
捷徑可協助使用者提供特定類型的內容 快速存取應用程式的某些部分
利用捷徑提供內容的方式取決於用途以及 捷徑的情境是由應用程式驅動或使用者驅動。雖然是 捷徑的情境不會改變,動態捷徑的情境也會持續變動 就能讓應用程式在這兩種情況下產生變化。如果使用者 選擇應用程式向使用者傳遞內容的方式,例如透過固定捷徑 則是由使用者定義以下情境說明部分用途 每種捷徑類型的案例:
- 靜態 快速鍵 最適合使用 與廣告互動 因為大部分的啟動器 只顯示 4 個 快速指令,靜態捷徑很適合用來執行日常安排 以一致的方式執行工作 例如讓使用者想查看自己的日曆 電子郵件 。
- 動態 快速指令適用於以下應用程式中的動作: 依情境區分內容專為特定情境而建立的捷徑 使用者在應用程式中執行的動作。舉例來說,假設您打造的遊戲 使用者在啟動時從目前等級開始,您需要更新 。使用動態捷徑即可更新捷徑 都能追蹤玩家的進度
- 已固定 快速指令適用於特定的由使用者驅動的動作。例如: 使用者可能會想將特定網站固定到啟動器中。這是 方法,因為可讓使用者執行自訂動作,例如 透過單一步驟前往網站,比使用預設瀏覽器更快 瀏覽器的執行個體
建立靜態捷徑
靜態捷徑會提供應用程式中一般動作的連結,以及這些 在最新版應用程式的生命週期中,動作都必須保持一致。 靜態捷徑 (包括查看寄件備份、設定 鬧鐘,以及顯示使用者當天的運動活動。
如要建立靜態捷徑,請執行下列步驟:
-
在應用程式的
AndroidManifest.xml檔案中,找出 意圖篩選器設為android.intent.action.MAIN動作和android.intent.category.LAUNCHER類別 -
新增
<meta-data>元素加入這個活動,以參照應用程式 快速鍵定義:<manifest xmlns:android="http://schemas.android.com/apk/res/android" package="com.example.myapplication"> <application ... > <activity android:name="Main"> <intent-filter> <action android:name="android.intent.action.MAIN" /> <category android:name="android.intent.category.LAUNCHER" /> </intent-filter> <meta-data android:name="android.app.shortcuts" android:resource="@xml/shortcuts" /> </activity> </application> </manifest>
-
建立名為
res/xml/shortcuts.xml的新資源檔案。 -
在新資源檔案中,新增
<shortcuts>根元素 其中包含<shortcut>元素清單。在<shortcut>元素,包括靜態圖像的相關資訊 快速指令,包括圖示、說明標籤及啟動的意圖 應用程式:<shortcuts xmlns:android="http://schemas.android.com/apk/res/android"> <shortcut android:shortcutId="compose" android:enabled="true" android:icon="@drawable/compose_icon" android:shortcutShortLabel="@string/compose_shortcut_short_label1" android:shortcutLongLabel="@string/compose_shortcut_long_label1" android:shortcutDisabledMessage="@string/compose_disabled_message1"> <intent android:action="android.intent.action.VIEW" android:targetPackage="com.example.myapplication" android:targetClass="com.example.myapplication.ComposeActivity" /> <!-- If your shortcut is associated with multiple intents, include them here. The last intent in the list determines what the user sees when they launch this shortcut. --> <categories android:name="android.shortcut.conversation" /> <capability-binding android:key="actions.intent.CREATE_MESSAGE" /> </shortcut> <!-- Specify more shortcuts here. --> </shortcuts>
自訂屬性值
以下清單列出了
靜態捷徑為 android:shortcutId 提供值,並
android:shortcutShortLabel。其他值皆為選填。
-
android:shortcutId -
字串常值,代表當
ShortcutManager物件執行作業 -
android:shortcutShortLabel -
說明捷徑用途的簡短詞語。可能的話 這段簡短說明的長度上限為 10 個字元。
若需更多資訊,請參閲
setShortLabel()。 -
android:shortcutLongLabel -
說明捷徑用途的擴充詞組。如果有足夠的儲存空間 啟動器時,啟動器會顯示這個值
android:shortcutShortLabel。請盡可能限制 說明在 25 個字元中若需更多資訊,請參閲
setLongLabel()。 -
android:shortcutDisabledMessage -
使用者嘗試執行作業時,支援的啟動器中顯示的訊息 啟動已停用的捷徑。訊息必須向使用者說明 快速鍵已停用。在下列情況下,此屬性值不會產生任何影響:
android:enabled為true。 -
android:enabled -
決定使用者是否能透過支援的捷徑與捷徑互動 啟動器。
android:enabled的預設值為true。如果設為false,請設定android:shortcutDisabledMessage,藉此說明 停用捷徑。如果您不需要提供這類訊息 完全移除 XML 檔案中的捷徑。 -
android:icon -
點陣圖或 自動調整 圖示,啟動器向使用者顯示捷徑時。這個 的值可以是圖片或包含 圖片。請盡可能使用自動調整圖示,以提升效能並 保持一致
設定內部元素
列出應用程式靜態捷徑的 XML 檔案支援下列內容:
每個 <shortcut> 元素中的元素。個人中心
每個元素都必須包含 intent 內部元素
您定義的靜態捷徑
-
intent -
使用者選取捷徑時,系統啟動的動作。 此意圖必須提供
android:action的值 屬性。可為單一捷徑提供多個意圖。詳情請見 管理 並定義多個意圖和活動 組合 意圖,以及
TaskStackBuilder類別參考資料。 -
categories -
為應用程式捷徑的動作類型提供分組資訊 例如建立新的聊天訊息
如需支援的捷徑類別清單,請參閱
ShortcutInfo類別參照。 -
capability-binding -
宣告功能 。
在上例中,捷徑已連結至宣告的功能 的
CREATE_MESSAGE、 這是應用程式動作 內建意圖這個功能繫結可讓使用者透過以下方式使用語音指令: Google 助理叫用捷徑。
建立動態捷徑
動態捷徑可提供連結,引導使用者前往特定且與內容相關的動作 在您使用應用程式時,這些動作可能會隨應用程式使用而變化 正在運作。動態捷徑的用途包括打電話給特定使用者、 導覽至特定位置,並從使用者上次儲存的位置載入遊戲 點。您也可以使用動態捷徑開啟會話群組。
ShortcutManagerCompat
Jetpack 程式庫是
ShortcutManager
API:讓您管理應用程式中的動態捷徑。使用
ShortcutManagerCompat 程式庫可減少樣板程式碼,並協助
確保捷徑在各種 Android 版本上都能正常運作。這個
推送動態捷徑時,也需要使用程式庫
也會出現在 Google 介面,例如 Google 助理
Google 捷徑整合資料庫。
ShortcutManagerCompat API 可讓應用程式執行下列操作
動態捷徑的作業:
-
推送與更新:使用
pushDynamicShortcut()發布及更新動態捷徑。如果已有動態參數 或固定相同 ID 的固定捷徑,每個可變動的捷徑都會更新。 -
移除:使用
removeDynamicShortcuts()。 使用以下方式移除所有動態捷徑:removeAllDynamicShortcuts()。
如需進一步瞭解有關快速執行捷徑的作業,請參見
管理捷徑
和
ShortcutManagerCompat
參照。
以下舉例說明如何建立動態捷徑,並將它與您的 應用程式:
Kotlin
val shortcut = ShortcutInfoCompat.Builder(context, "id1")
        .setShortLabel("Website")
        .setLongLabel("Open the website")
        .setIcon(IconCompat.createWithResource(context, R.drawable.icon_website))
        .setIntent(Intent(Intent.ACTION_VIEW,
                Uri.parse("https://www.mysite.example.com/")))
        .build()

ShortcutManagerCompat.pushDynamicShortcut(context, shortcut)
Java
ShortcutInfoCompat shortcut = new ShortcutInfoCompat.Builder(context, "id1")
    .setShortLabel("Website")
    .setLongLabel("Open the website")
    .setIcon(IconCompat.createWithResource(context, R.drawable.icon_website))
    .setIntent(new Intent(Intent.ACTION_VIEW,
                   Uri.parse("https://www.mysite.example.com/")))
    .build();

ShortcutManagerCompat.pushDynamicShortcut(context, shortcut);
新增 Google 捷徑整合資料庫
Google 捷徑整合資料庫是選用的 Jetpack 資料庫,這項服務 可讓您推送能在 Android 介面中顯示的動態捷徑,例如 和 Google 途徑,例如 Google 助理。使用這個程式庫 協助使用者找到捷徑,以便快速存取特定內容或重播 來處理您應用程式中的動作。
舉例來說,訊息應用程式可能會推送動態聯絡人的捷徑 名稱為「Alex」在使用者傳送訊息給對方後顯示動態捷徑 使用者向 Google 助理提出要求時,「Ok Google,傳送訊息給小艾, ExampleApp」,Google 助理可啟動範例應用程式並自動設定 傳送訊息給小艾。
透過這個程式庫推送的動態捷徑不受 捷徑限制 針對每部裝置強制執行這樣一來,您的應用程式每次 當使用者在您的應用程式中完成相關動作時。推送常用快速鍵 協助 Google 瞭解使用者的使用模式,並根據情境提供建議 相關的捷徑。
舉例來說,Google 助理可以從透過 使用者通常每天早上會主動跑的健身追蹤應用程式 建議「開始跑步」使用者隨手拿起手機的捷徑 早上
Google 捷徑整合資料庫未提供任何可定址資訊
功能本身將此程式庫加入應用程式後,Google 途徑
透過 ShortcutManagerCompat 推送。
如要在應用程式中使用這個程式庫,請按照下列步驟操作:
-
更新
gradle.properties檔案以支援 AndroidX 程式庫:android.useAndroidX=true # Automatically convert third-party libraries to use AndroidX android.enableJetifier=true
-
在
app/build.gradle中,新增 捷徑整合程式庫和ShortcutManagerCompat:dependencies { implementation "androidx.core:core:1.6.0" implementation 'androidx.core:core-google-shortcuts:1.0.0' ... }
在 Android 專案中加入程式庫依附元件後,應用程式就能使用
的 pushDynamicShortcut() 方法
ShortcutManagerCompat,推送符合資格的動態捷徑
顯示在啟動器和合作的 Google 介面上。
建立固定捷徑
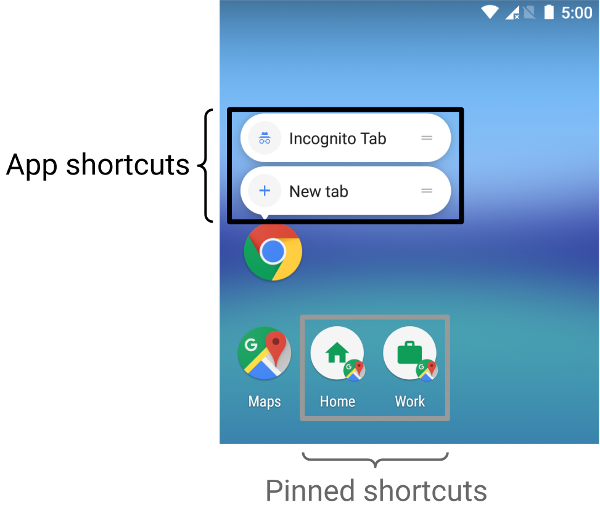
您可以在 Android 8.0 (API 級別 26) 以上版本中建立固定捷徑。 與靜態和動態的捷徑不同,支援的固定捷徑會顯示在支援的內容 將啟動器視為個別圖示。圖 1 說明瞭這兩項指標的差異 捷徑類型。
如要使用應用程式將捷徑固定在支援的啟動器,請前往 步驟如下:
-
使用
isRequestPinShortcutSupported(),驗證裝置的預設啟動器是否支援應用程式內固定功能 快速指令。 -
您可以根據以下其中一種方式建立
ShortcutInfo物件: 看看快速鍵是否存在:-
如果捷徑存在,請建立
ShortcutInfo物件,且該物件會 僅包含現有捷徑的 ID。系統會尋找並固定所有內容 其他與捷徑相關的資訊。 -
如要固定新的捷徑,請建立
ShortcutInfo,其中包含新事件的 ID、意圖和簡短標籤 快速鍵。
-
如果捷徑存在,請建立
-
呼叫方式,將捷徑固定至裝置啟動器
requestPinShortcut()。 在這個過程中,您可以傳入PendingIntent物件,這樣只有當捷徑固定時,應用程式才會通知應用程式固定捷徑後,應用程式可以使用
updateShortcuts()方法。如需更多資訊,請參閱 更新 捷徑。
下列程式碼片段說明如何建立固定捷徑。
Kotlin
val shortcutManager = getSystemService(ShortcutManager::class.java)

if (shortcutManager!!.isRequestPinShortcutSupported) {
    // Enable the existing shortcut with the ID "my-shortcut".
    val pinShortcutInfo = ShortcutInfo.Builder(context, "my-shortcut").build()

    // Create the PendingIntent object only if your app needs to be notified
    // that the user let the shortcut be pinned. If the pinning operation fails,
    // your app isn't notified. Assume here that the app implements a method
    // called createShortcutResultIntent() that returns a broadcast intent.
    val pinnedShortcutCallbackIntent = shortcutManager.createShortcutResultIntent(pinShortcutInfo)

    // Configure the intent so that your app's broadcast receiver gets the
    // callback successfully. For details, see PendingIntent.getBroadcast().
    val successCallback = PendingIntent.getBroadcast(context, /* request code */ 0,
            pinnedShortcutCallbackIntent, /* flags */ 0)

    shortcutManager.requestPinShortcut(pinShortcutInfo,
            successCallback.intentSender)
}
Java
ShortcutManager shortcutManager =
        context.getSystemService(ShortcutManager.class);

if (shortcutManager.isRequestPinShortcutSupported()) {
    // Enable the existing shortcut with the ID "my-shortcut".
    ShortcutInfo pinShortcutInfo =
            new ShortcutInfo.Builder(context, "my-shortcut").build();

    // Create the PendingIntent object only if your app needs to be notified
    // that the user let the shortcut be pinned. If the pinning operation fails,
    // your app isn't notified. Assume here that the app implements a method
    // called createShortcutResultIntent() that returns a broadcast intent.
    Intent pinnedShortcutCallbackIntent =
            shortcutManager.createShortcutResultIntent(pinShortcutInfo);

    // Configure the intent so that your app's broadcast receiver gets the
    // callback successfully. For details, see PendingIntent.getBroadcast().
    PendingIntent successCallback = PendingIntent.getBroadcast(context, /* request code */ 0,
            pinnedShortcutCallbackIntent, /* flags */ 0);

    shortcutManager.requestPinShortcut(pinShortcutInfo,
            successCallback.getIntentSender());
}
建立自訂捷徑活動
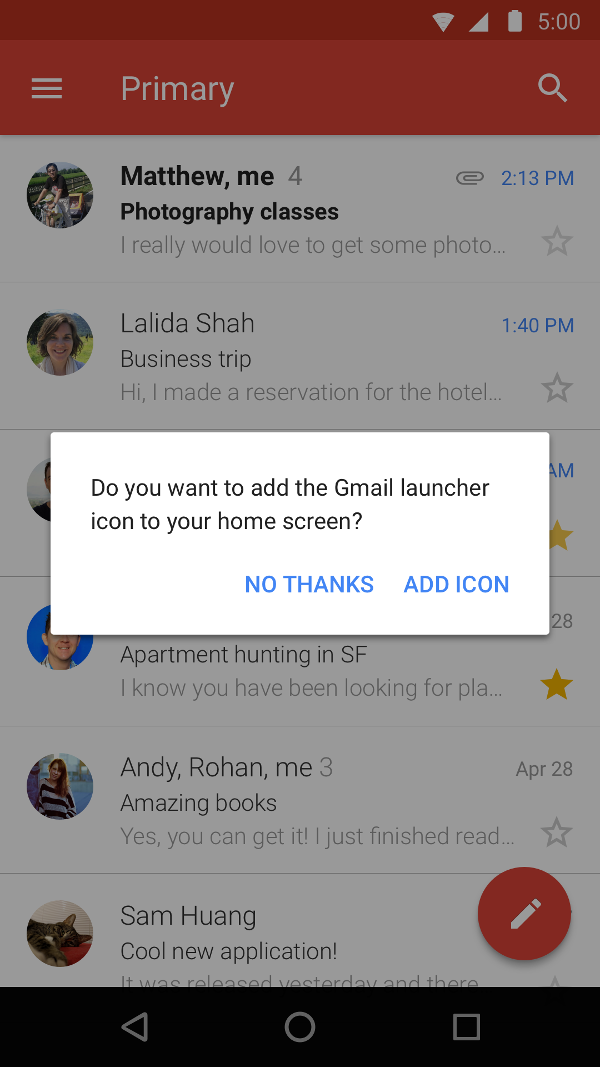
您也可以建立專門的活動,協助使用者建立捷徑、 自訂選項和確認按鈕。圖 2 顯示了 在 Gmail 應用程式中顯示這類活動的範例。
在應用程式的資訊清單檔案中新增
ACTION_CREATE_SHORTCUT
到活動的
<intent-filter>
元素。這項宣告設定當使用者嘗試
如何建立捷徑:
- 系統啟動應用程式的特殊活動。
- 使用者設定捷徑的選項。
- 使用者選取確認按鈕。
-
應用程式會使用
createShortcutResultIntent()方法。這個方法會傳回Intent, 應用程式會透過setResult()。 -
您的應用程式呼叫
finish()也就是用於建立自訂捷徑的活動。
同樣地,應用程式也可以提示使用者將固定捷徑新增至主畫面 或第一次啟動應用程式時的畫面。此方法 能有效幫助使用者在他們的網站上建立捷徑 執行模擬作業
測試快速鍵
如要測試應用程式捷徑,請在設有啟動器的裝置上安裝應用程式 。接著,您可以執行下列動作:
- 輕觸和顯示應用程式的啟動器圖示,以查看您定義的捷徑 。
- 拖曳捷徑,即可將捷徑固定至裝置的啟動器。