Android 12(API レベル 31)以降では、
RoundedCorner、
WindowInsets.getRoundedCorner(int
position)
:
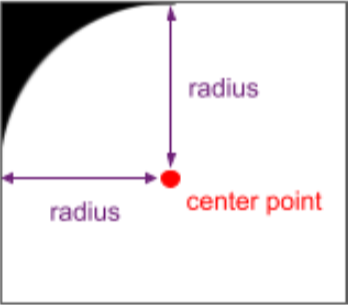
デバイス画面の角丸の半径と中心点。これらの API
丸みを帯びた画面でアプリの UI 要素が切り取られないようにする
可能です。このフレームワークでは
getPrivacyIndicatorBounds()
表示されるすべてのマイクやカメラの境界付き長方形を返す API が
インジケーターをご覧ください。
これらの API をアプリに実装しても、角の丸くない画面では効果がありません。
この機能を実装するには、次のコマンドを使用して RoundedCorner 情報を取得します。
WindowInsets.getRoundedCorner(int position)
説明します。アプリが画面全体を占有していない場合、API は
窓の角丸の中心点を基準にして角丸をつける
指定することもできます。
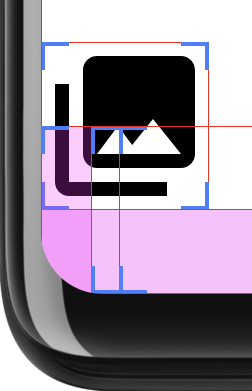
次のコード スニペットは、
RoundedCorner の情報に基づいてビューのマージンを設定します。この
右上の角が丸い部分です
Kotlin
// Get the top-right rounded corner from WindowInsets.
val insets = rootWindowInsets
val topRight = insets.getRoundedCorner(RoundedCorner.POSITION_TOP_RIGHT) ?: return

// Get the location of the close button in window coordinates.
val location = IntArray(2)
closeButton!!.getLocationInWindow(location)
val buttonRightInWindow = location[0] + closeButton.width
val buttonTopInWindow = location[1]

// Find the point on the quarter circle with a 45-degree angle.
val offset = (topRight.radius * Math.sin(Math.toRadians(45.0))).toInt()
val topBoundary = topRight.center.y - offset
val rightBoundary = topRight.center.x + offset

// Check whether the close button exceeds the boundary.
if (buttonRightInWindow < rightBoundary << buttonTopInWindow > topBoundary) {
   return
}

// Set the margin to avoid truncating.
val parentLocation = IntArray(2)
getLocationInWindow(parentLocation)
val lp = closeButton.layoutParams as FrameLayout.LayoutParams
lp.rightMargin = Math.max(buttonRightInWindow - rightBoundary, 0)
lp.topMargin = Math.max(topBoundary - buttonTopInWindow, 0)
closeButton.layoutParams = lp
Java
// Get the top-right rounded corner from WindowInsets.
final WindowInsets insets = getRootWindowInsets();
final RoundedCorner topRight = insets.getRoundedCorner(POSITION_TOP_RIGHT);
if (topRight == null) {
   return;
}

// Get the location of the close button in window coordinates.
int [] location = new int[2];
closeButton.getLocationInWindow(location);
final int buttonRightInWindow = location[0] + closeButton.getWidth();
final int buttonTopInWindow = location[1];

// Find the point on the quarter circle with a 45-degree angle.
final int offset = (int) (topRight.getRadius() * Math.sin(Math.toRadians(45)));
final int topBoundary = topRight.getCenter().y - offset;
final int rightBoundary = topRight.getCenter().x + offset;

// Check whether the close button exceeds the boundary.
if (buttonRightInWindow < rightBoundary << buttonTopInWindow > topBoundary) {
   return;
}

// Set the margin to avoid truncating.
int [] parentLocation = new int[2];
getLocationInWindow(parentLocation);
FrameLayout.LayoutParams lp = (FrameLayout.LayoutParams) closeButton.getLayoutParams();
lp.rightMargin = Math.max(buttonRightInWindow - rightBoundary, 0);
lp.topMargin = Math.max(topBoundary - buttonTopInWindow, 0);
closeButton.setLayoutParams(lp);
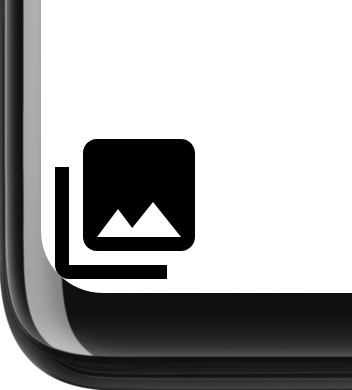
クリッピングに注意する
UI がディスプレイ全体に表示される場合、角が丸いとコンテンツに問題が生じる可能性があります。 あります。たとえば、図 2 は、ディスプレイの隅にあるアイコンで、 システムバーの背後に描画されるレイアウト:
これを回避するには、角の丸みを確認し、パディングを適用して アプリのコンテンツをデバイスの角から遠ざけてください。 例:
Kotlin
class InsetsLayout(context: Context, attrs: AttributeSet) : FrameLayout(context, attrs) {

    override fun onLayout(changed: Boolean, left: Int, top: Int, right: Int, bottom: Int) {
        val insets = rootWindowInsets

        if (Build.VERSION.SDK_INT >= Build.VERSION_CODES.S && insets != null) {
            applyRoundedCornerPadding(insets)
        }
        super.onLayout(changed, left, top, right, bottom)

    }

    @RequiresApi(Build.VERSION_CODES.S)
    private fun applyRoundedCornerPadding(insets: WindowInsets) {
        val topLeft = insets.getRoundedCorner(RoundedCorner.POSITION_TOP_LEFT)
        val topRight = insets.getRoundedCorner(RoundedCorner.POSITION_TOP_RIGHT)
        val bottomLeft = insets.getRoundedCorner(RoundedCorner.POSITION_BOTTOM_LEFT)
        val bottomRight = insets.getRoundedCorner(RoundedCorner.POSITION_BOTTOM_RIGHT)

        val leftRadius = max(topLeft?.radius ?: 0, bottomLeft?.radius ?: 0)
        val topRadius = max(topLeft?.radius ?: 0, topRight?.radius ?: 0)
        val rightRadius = max(topRight?.radius ?: 0, bottomRight?.radius ?: 0)
        val bottomRadius = max(bottomLeft?.radius ?: 0, bottomRight?.radius ?: 0)

        val windowManager = context.getSystemService(Context.WINDOW_SERVICE) as WindowManager
        val windowBounds = windowManager.currentWindowMetrics.bounds
        val safeArea = Rect(
            windowBounds.left + leftRadius,
            windowBounds.top + topRadius,
            windowBounds.right - rightRadius,
            windowBounds.bottom - bottomRadius
        )

        val location = intArrayOf(0, 0)
        getLocationInWindow(location)

        val leftMargin = location[0] - windowBounds.left
        val topMargin = location[1] - windowBounds.top
        val rightMargin = windowBounds.right - right - location[0]
        val bottomMargin = windowBounds.bottom - bottom - location[1]

        val layoutBounds = Rect(
            location[0] + paddingLeft,
            location[1] + paddingTop,
            location[0] + width - paddingRight,
            location[1] + height - paddingBottom
        )

        if (layoutBounds != safeArea && layoutBounds.contains(safeArea)) {
            setPadding(
                calculatePadding(leftRadius, leftMargin, paddingLeft),
                calculatePadding(topRadius, topMargin, paddingTop),
                calculatePadding(rightRadius, rightMargin, paddingRight),
                calculatePadding(bottomRadius, bottomMargin, paddingBottom)
            )
        }
    }

    private fun calculatePadding(radius1: Int?, radius2: Int?, margin: Int, padding: Int): Int =
        (max(radius1 ?: 0, radius2 ?: 0) - margin - padding).coerceAtLeast(0)
}
Java
public class InsetsLayout extends FrameLayout {
    public InsetsLayout(@NonNull Context context) {
        super(context);
    }

    public InsetsLayout(@NonNull Context context, @Nullable AttributeSet attrs) {
        super(context, attrs);
    }

    @Override
    protected void onLayout(boolean changed, int left, int top, int right, int bottom) {
        WindowInsets insets = getRootWindowInsets();
        if (Build.VERSION.SDK_INT >= Build.VERSION_CODES.S && insets != null) {
            applyRoundedCornerPadding(insets);
        }
        super.onLayout(changed, left, top, right, bottom);
    }

    @RequiresApi(Build.VERSION_CODES.S)
    private void applyRoundedCornerPadding(WindowInsets insets) {
        RoundedCorner topLeft = insets.getRoundedCorner(RoundedCorner.POSITION_TOP_LEFT);
        RoundedCorner topRight = insets.getRoundedCorner(RoundedCorner.POSITION_TOP_RIGHT);
        RoundedCorner bottomLeft = insets.getRoundedCorner(RoundedCorner.POSITION_BOTTOM_LEFT);
        RoundedCorner bottomRight = insets.getRoundedCorner(RoundedCorner.POSITION_BOTTOM_RIGHT);
        int radiusTopLeft = 0;
        int radiusTopRight = 0;
        int radiusBottomLeft = 0;
        int radiusBottomRight = 0;
        if (topLeft != null) radiusTopLeft = topLeft.getRadius();
        if (topRight != null) radiusTopRight = topRight.getRadius();
        if (bottomLeft != null) radiusBottomLeft = bottomLeft.getRadius();
        if (bottomRight != null) radiusBottomRight = bottomRight.getRadius();

        int leftRadius = Math.max(radiusTopLeft, radiusBottomLeft);
        int topRadius = Math.max(radiusTopLeft, radiusTopRight);
        int rightRadius = Math.max(radiusTopRight, radiusBottomRight);
        int bottomRadius = Math.max(radiusBottomLeft, radiusBottomRight);

        WindowManager windowManager =
                (WindowManager) getContext().getSystemService(Context.WINDOW_SERVICE);
        Rect windowBounds = windowManager.getCurrentWindowMetrics().getBounds();
        Rect safeArea = new Rect(
                windowBounds.left + leftRadius,
                windowBounds.top + topRadius,
                windowBounds.right - rightRadius,
                windowBounds.bottom - bottomRadius
        );
        int[] location = {0, 0};
        getLocationInWindow(location);

        int leftMargin = location[0] - windowBounds.left;
        int topMargin = location[1] - windowBounds.top;
        int rightMargin = windowBounds.right - getRight() - location[0];
        int bottomMargin = windowBounds.bottom - getBottom() - location[1];

        Rect layoutBounds = new Rect(
                location[0] + getPaddingLeft(),
                location[1] + getPaddingTop(),
                location[0] + getWidth() - getPaddingRight(),
                location[1] + getHeight() - getPaddingBottom()
        );

        if (!layoutBounds.equals(safeArea) && layoutBounds.contains(safeArea)) {
            setPadding(
                    calculatePadding(radiusTopLeft, radiusBottomLeft,
                                         leftMargin, getPaddingLeft()),
                    calculatePadding(radiusTopLeft, radiusTopRight,
                                         topMargin, getPaddingTop()),
                    calculatePadding(radiusTopRight, radiusBottomRight,
                                         rightMargin, getPaddingRight()),
                    calculatePadding(radiusBottomLeft, radiusBottomRight,
                                         bottomMargin, getPaddingBottom())
            );
        }
    }

    private int calculatePadding(int radius1, int radius2, int margin, int padding) {
        return Math.max(Math.max(radius1, radius2) - margin - padding, 0);
    }
}
このレイアウトでは、UI を角丸の領域まで拡張するかどうかを指定します。 その場所にパディングを追加します図 3 に「Show layout bounds」が表示されている開発者 オプションを有効にして、適用されているパディングをより明確に表示することもできます。
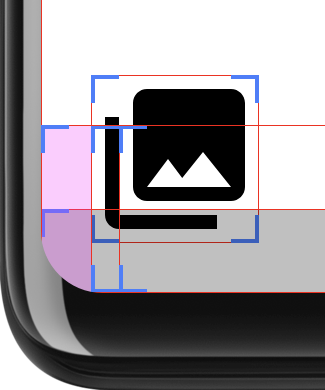
この判断を行うために、このレイアウトでは 2 つの長方形を計算します。safeArea
丸い角の半径内の面積、layoutBounds はサイズ、
パディングを差し引いた値になります。layoutArea に safeArea が完全に含まれている場合、次のようになります。
レイアウトの子はクリップされることがあります。その場合、パディングは
レイアウトが safeArea 内に収まるようにするために追加しました。
layoutBounds が safeArea を完全に囲んでいるかどうかを確認することで、
パディングを増やす方法について説明します。図 4
ナビゲーション バーの背後に描画されていないときにレイアウトを表示します。この例では
レイアウトが角丸に収まらないほど広くありません。これは、
ナビゲーション バーの表示領域内に収まるように調整します。パディングは不要です。