상대적 레이아웃
컬렉션을 사용해 정리하기
내 환경설정을 기준으로 콘텐츠를 저장하고 분류하세요.
Compose 방식 사용해 보기
Jetpack Compose는 Android에 권장되는 UI 도구 키트입니다. Compose에서 레이아웃을 사용하는 방법을 알아보세요.
<ph type="x-smartling-placeholder">
</ph>
Compose의 ConstraintLayout →
를 통해 개인정보처리방침을 정의할 수 있습니다.
RelativeLayout
은 상대 위치에 하위 뷰를 표시하는 뷰 그룹입니다. 각 뷰의 위치는 동위 요소(예: 다른 뷰의 왼쪽 또는 아래)에 상대적이거나 상위 RelativeLayout
영역(예: 맨 아래, 왼쪽 또는 중앙으로 정렬됨)에 상대적인 위치로 지정될 수 있습니다.
참고: 더 나은 성능과 도구 지원을 위해 ConstraintLayout을 사용하여 레이아웃을 빌드해야 합니다.
RelativeLayout
은 중첩된 뷰 그룹을 없애고 레이아웃 계층 구조를 평면으로 유지하여 성능을 개선하므로 사용자 인터페이스 설계에 매우 유용한 유틸리티입니다. 여러 개의 중첩된 LinearLayout
그룹을 사용한다면 단일 RelativeLayout
으로 대체할 수 있습니다.
뷰 위치 지정
RelativeLayout
을 사용하면 하위 뷰는 상위 뷰 또는 서로 다른 뷰(ID로 구분)에 상대적인 위치를 지정할 수 있습니다. 따라서 두 요소를 오른쪽 테두리로 정렬하거나 위아래로 나란히, 화면 중앙에, 왼쪽 가운데 등으로 정렬할 수 있습니다. 기본적으로 모든 하위 뷰는 레이아웃의 왼쪽 상단에 그려지므로 RelativeLayout.LayoutParams
에서 사용할 수 있는 다양한 레이아웃 속성을 사용하여 각 뷰의 위치를 정의해야 합니다.
RelativeLayout
의 뷰에 사용할 수 있는 많은 레이아웃 속성 중 몇 가지는 다음과 같습니다.
android:layout_alignParentTop
"true"
면 이 뷰의 상단 가장자리를 상위 뷰의 상단 가장자리와 일치시킵니다.android:layout_centerVertical
"true"
면 이 하위 요소를 상위 요소 내에 세로로 중앙에 배치합니다.android:layout_below
- 이 뷰의 상단 가장자리를 리소스 ID로 지정한 뷰 아래에 배치합니다.
android:layout_toRightOf
- 이 뷰의 왼쪽 가장자리를 리소스 ID로 지정된 뷰의 오른쪽에 배치합니다.
다음은 몇 가지 예입니다. 모든 레이아웃 속성은 RelativeLayout.LayoutParams
에 기술되어 있습니다.
각 레이아웃 속성의 값은 상위 RelativeLayout
에 상대적인 레이아웃 위치를 사용 설정하는 부울 또는 뷰가 배치되어야 하는 레이아웃의 다른 뷰를 참조하는 ID입니다.
XML 레이아웃에서 레이아웃의 다른 뷰에 관한 종속 항목은 순서와 관계없이 선언할 수 있습니다.
예를 들어, 'view2'가 계층 구조에서 선언된 마지막 뷰라고 해도 'view1'을 'view2' 아래에 배치하도록 선언할 수 있습니다. 아래 예는 이러한 시나리오를 보여줍니다.
예
각 뷰의 상대 위치를 제어하는 각 속성이 강조되어 있습니다.
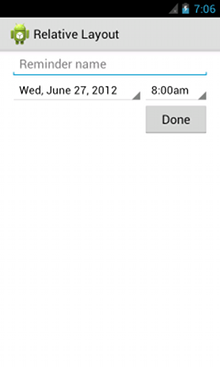
<?xml version="1.0" encoding="utf-8"?>
<RelativeLayout xmlns:android="http://schemas.android.com/apk/res/android"
android:layout_width="match_parent"
android:layout_height="match_parent"
android:paddingLeft="16dp"
android:paddingRight="16dp" >
<EditText
android:id="@+id/name"
android:layout_width="match_parent"
android:layout_height="wrap_content"
android:hint="@string/reminder" />
<Spinner
android:id="@+id/dates"
android:layout_width="0dp"
android:layout_height="wrap_content"
android:layout_below="@id/name"
android:layout_alignParentLeft="true"
android:layout_toLeftOf="@+id/times" />
<Spinner
android:id="@id/times"
android:layout_width="96dp"
android:layout_height="wrap_content"
android:layout_below="@id/name"
android:layout_alignParentRight="true" />
<Button
android:layout_width="96dp"
android:layout_height="wrap_content"
android:layout_below="@id/times"
android:layout_alignParentRight="true"
android:text="@string/done" />
</RelativeLayout>
RelativeLayout
의 각 하위 뷰에서 사용 가능한 모든 레이아웃 속성에 관한 자세한 내용은 RelativeLayout.LayoutParams
를 참고하세요.
이 페이지에 나와 있는 콘텐츠와 코드 샘플에는 콘텐츠 라이선스에서 설명하는 라이선스가 적용됩니다. 자바 및 OpenJDK는 Oracle 및 Oracle 계열사의 상표 또는 등록 상표입니다.
최종 업데이트: 2025-07-27(UTC)
[[["이해하기 쉬움","easyToUnderstand","thumb-up"],["문제가 해결됨","solvedMyProblem","thumb-up"],["기타","otherUp","thumb-up"]],[["필요한 정보가 없음","missingTheInformationINeed","thumb-down"],["너무 복잡함/단계 수가 너무 많음","tooComplicatedTooManySteps","thumb-down"],["오래됨","outOfDate","thumb-down"],["번역 문제","translationIssue","thumb-down"],["샘플/코드 문제","samplesCodeIssue","thumb-down"],["기타","otherDown","thumb-down"]],["최종 업데이트: 2025-07-27(UTC)"],[],[],null,["# Relative Layout\n\nTry the Compose way \nJetpack Compose is the recommended UI toolkit for Android. Learn how to work with layouts in Compose. \n[ConstraintLayout in Compose →](/jetpack/compose/layouts/constraintlayout) \n\n[RelativeLayout](/reference/android/widget/RelativeLayout) is a view group that displays child views in relative\npositions. The position of each view can be specified as relative to sibling elements (such as to\nthe left-of or below another view) or in positions relative to the parent [RelativeLayout](/reference/android/widget/RelativeLayout) area (such as aligned to the bottom, left or center).\n\n**Note:**\nFor better performance and tooling support, you should instead [build your layout with ConstraintLayout](/training/constraint-layout).\n\nA [RelativeLayout](/reference/android/widget/RelativeLayout) is a very powerful utility for designing a user interface\nbecause it can eliminate nested view groups and keep your layout hierarchy flat, which improves\nperformance. If you find yourself using several nested [LinearLayout](/reference/android/widget/LinearLayout) groups,\nyou may be able to replace them with a single [RelativeLayout](/reference/android/widget/RelativeLayout).\n\nPositioning Views\n-----------------\n\n[RelativeLayout](/reference/android/widget/RelativeLayout) lets child views specify their position relative to the\nparent view or to each other (specified by ID). So you can align two elements by right border, or\nmake one below another, centered in the screen, centered left, and so on. By default, all child\nviews are drawn at the top-left of the layout, so you must define the position of each view\nusing the various layout properties available from [RelativeLayout.LayoutParams](/reference/android/widget/RelativeLayout.LayoutParams).\n\nSome of the many layout properties available to views in a [RelativeLayout](/reference/android/widget/RelativeLayout)\ninclude:\n\n[`android:layout_alignParentTop`](/reference/android/widget/RelativeLayout.LayoutParams#attr_android:layout_alignParentTop)\n: If `\"true\"`, makes the top edge of this view match the top edge of the parent.\n\n[`android:layout_centerVertical`](/reference/android/widget/RelativeLayout.LayoutParams#attr_android:layout_centerVertical)\n: If `\"true\"`, centers this child vertically within its parent.\n\n[`android:layout_below`](/reference/android/widget/RelativeLayout.LayoutParams#attr_android:layout_below)\n: Positions the top edge of this view below the view specified with a resource ID.\n\n[`android:layout_toRightOf`](/reference/android/widget/RelativeLayout.LayoutParams#attr_android:layout_toRightOf)\n: Positions the left edge of this view to the right of the view specified with a resource ID.\n\nThese are just a few examples. All layout attributes are documented at [RelativeLayout.LayoutParams](/reference/android/widget/RelativeLayout.LayoutParams).\n\nThe value for each layout property is either a boolean to\nenable a layout position relative to the parent [RelativeLayout](/reference/android/widget/RelativeLayout) or an ID that\nreferences another view in the layout against which the view should be positioned.\n\nIn your XML layout, dependencies against other views in the layout can be declared in any order.\nFor example, you can declare that \"view1\" be positioned below \"view2\" even if \"view2\" is the last\nview declared in the hierarchy. The example below demonstrates such a scenario.\n\nExample\n-------\n\nEach of the attributes that control the relative position of each view are emphasized. \n\n```xml\n\u003c?xml version=\"1.0\" encoding=\"utf-8\"?\u003e\n\u003cRelativeLayout xmlns:android=\"http://schemas.android.com/apk/res/android\"\n android:layout_width=\"match_parent\"\n android:layout_height=\"match_parent\"\n android:paddingLeft=\"16dp\"\n android:paddingRight=\"16dp\" \u003e\n \u003cEditText\n android:id=\"@+id/name\"\n android:layout_width=\"match_parent\"\n android:layout_height=\"wrap_content\"\n android:hint=\"@string/reminder\" /\u003e\n \u003cSpinner\n android:id=\"@+id/dates\"\n android:layout_width=\"0dp\"\n android:layout_height=\"wrap_content\"\n android:layout_below=\"@id/name\"\n android:layout_alignParentLeft=\"true\"\n android:layout_toLeftOf=\"@+id/times\" /\u003e\n \u003cSpinner\n android:id=\"@id/times\"\n android:layout_width=\"96dp\"\n android:layout_height=\"wrap_content\"\n android:layout_below=\"@id/name\"\n android:layout_alignParentRight=\"true\" /\u003e\n \u003cButton\n android:layout_width=\"96dp\"\n android:layout_height=\"wrap_content\"\n android:layout_below=\"@id/times\"\n android:layout_alignParentRight=\"true\"\n android:text=\"@string/done\" /\u003e\n\u003c/RelativeLayout\u003e\n```\n\nFor details about all the layout attributes available to each child view of a [RelativeLayout](/reference/android/widget/RelativeLayout), see [RelativeLayout.LayoutParams](/reference/android/widget/RelativeLayout.LayoutParams)."]]