چیدمان نسبی
با مجموعهها، منظم بمانید
ذخیره و طبقهبندی محتوا براساس اولویتهای شما.
روش Compose را امتحان کنید
Jetpack Compose جعبه ابزار UI توصیه شده برای اندروید است. نحوه کار با طرحبندیها در Compose را بیاموزید.
RelativeLayout
یک گروه نمایش است که نماهای فرزند را در موقعیت های نسبی نمایش می دهد. موقعیت هر نما را می توان نسبت به عناصر خواهر و برادر (مانند سمت چپ یا پایین نمای دیگر) یا در موقعیت های مربوط به ناحیه RelativeLayout
والد (مانند تراز در پایین، چپ یا مرکز) مشخص کرد.
توجه: برای عملکرد بهتر و پشتیبانی ابزار، در عوض باید طرح خود را با ConstraintLayout بسازید .

RelativeLayout
یک ابزار بسیار قدرتمند برای طراحی یک رابط کاربری است زیرا می تواند گروه های نمایش تودرتو را حذف کند و سلسله مراتب طرح بندی شما را صاف نگه دارد، که عملکرد را بهبود می بخشد. اگر متوجه شدید که از چندین گروه LinearLayout
تو در تو استفاده می کنید، ممکن است بتوانید آنها را با یک RelativeLayout
جایگزین کنید.
نماهای موقعیت یابی
RelativeLayout
به نماهای فرزند اجازه می دهد موقعیت خود را نسبت به نمای والد یا یکدیگر (مشخص شده توسط ID) مشخص کنند. بنابراین می توانید دو عنصر را با حاشیه سمت راست تراز کنید، یا یکی در زیر دیگری، در مرکز صفحه، در مرکز سمت چپ، و غیره ایجاد کنید. بهطور پیشفرض، همه نماهای فرزند در بالا سمت چپ طرحبندی ترسیم میشوند، بنابراین باید موقعیت هر نما را با استفاده از ویژگیهای طرحبندی مختلف موجود در RelativeLayout.LayoutParams
تعیین کنید.
برخی از بسیاری از ویژگیهای طرحبندی موجود برای نماها در یک RelativeLayout
عبارتند از:
android:layout_alignParentTop
- اگر
"true"
، لبه بالایی این نمای را با لبه بالای والد مطابقت می دهد. android:layout_centerVertical
- اگر
"true"
، این کودک را به صورت عمودی در والد خود متمرکز می کند. -
android:layout_below
- لبه بالایی این نما را در زیر نمای مشخص شده با شناسه منبع قرار می دهد.
-
android:layout_toRightOf
- لبه سمت چپ این نما را در سمت راست نمای مشخص شده با شناسه منبع قرار می دهد.
اینها فقط چند نمونه هستند. تمام ویژگیهای طرحبندی در RelativeLayout.LayoutParams
مستند شدهاند.
مقدار هر ویژگی layout یا یک بولی برای فعال کردن یک موقعیت طرح نسبت به RelativeLayout
والد یا یک شناسه است که به نمای دیگری در طرح ارجاع می دهد که نمای باید در مقابل آن قرار گیرد.
در چیدمان XML شما، وابستگی ها در برابر سایر نماهای موجود در چیدمان را می توان به هر ترتیبی اعلام کرد. به عنوان مثال، می توانید اعلام کنید که "view1" در زیر "view2" قرار می گیرد حتی اگر "view2" آخرین نمای اعلام شده در سلسله مراتب باشد. مثال زیر چنین سناریویی را نشان می دهد.
مثال
بر هر یک از ویژگی هایی که موقعیت نسبی هر دیدگاه را کنترل می کنند، تأکید می شود.

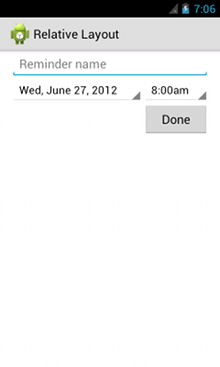
<?xml version="1.0" encoding="utf-8"?>
<RelativeLayout xmlns:android="http://schemas.android.com/apk/res/android"
android:layout_width="match_parent"
android:layout_height="match_parent"
android:paddingLeft="16dp"
android:paddingRight="16dp" >
<EditText
android:id="@+id/name"
android:layout_width="match_parent"
android:layout_height="wrap_content"
android:hint="@string/reminder" />
<Spinner
android:id="@+id/dates"
android:layout_width="0dp"
android:layout_height="wrap_content"
android:layout_below="@id/name"
android:layout_alignParentLeft="true"
android:layout_toLeftOf="@+id/times" />
<Spinner
android:id="@id/times"
android:layout_width="96dp"
android:layout_height="wrap_content"
android:layout_below="@id/name"
android:layout_alignParentRight="true" />
<Button
android:layout_width="96dp"
android:layout_height="wrap_content"
android:layout_below="@id/times"
android:layout_alignParentRight="true"
android:text="@string/done" />
</RelativeLayout>
برای جزئیات در مورد تمام ویژگی های طرح بندی موجود برای هر نمای فرزند از یک RelativeLayout
، RelativeLayout.LayoutParams
را ببینید.
محتوا و نمونه کدها در این صفحه مشمول پروانههای توصیفشده در پروانه محتوا هستند. جاوا و OpenJDK علامتهای تجاری یا علامتهای تجاری ثبتشده Oracle و/یا وابستههای آن هستند.
تاریخ آخرین بهروزرسانی 2025-07-29 بهوقت ساعت هماهنگ جهانی.
[[["درک آسان","easyToUnderstand","thumb-up"],["مشکلم را برطرف کرد","solvedMyProblem","thumb-up"],["غیره","otherUp","thumb-up"]],[["اطلاعاتی که نیاز دارم وجود ندارد","missingTheInformationINeed","thumb-down"],["بیشازحد پیچیده/ مراحل بسیار زیاد","tooComplicatedTooManySteps","thumb-down"],["قدیمی","outOfDate","thumb-down"],["مشکل ترجمه","translationIssue","thumb-down"],["مشکل کد / نمونهها","samplesCodeIssue","thumb-down"],["غیره","otherDown","thumb-down"]],["تاریخ آخرین بهروزرسانی 2025-07-29 بهوقت ساعت هماهنگ جهانی."],[],[],null,["# Relative Layout\n\nTry the Compose way \nJetpack Compose is the recommended UI toolkit for Android. Learn how to work with layouts in Compose. \n[ConstraintLayout in Compose →](/jetpack/compose/layouts/constraintlayout) \n\n[RelativeLayout](/reference/android/widget/RelativeLayout) is a view group that displays child views in relative\npositions. The position of each view can be specified as relative to sibling elements (such as to\nthe left-of or below another view) or in positions relative to the parent [RelativeLayout](/reference/android/widget/RelativeLayout) area (such as aligned to the bottom, left or center).\n\n**Note:**\nFor better performance and tooling support, you should instead [build your layout with ConstraintLayout](/training/constraint-layout).\n\nA [RelativeLayout](/reference/android/widget/RelativeLayout) is a very powerful utility for designing a user interface\nbecause it can eliminate nested view groups and keep your layout hierarchy flat, which improves\nperformance. If you find yourself using several nested [LinearLayout](/reference/android/widget/LinearLayout) groups,\nyou may be able to replace them with a single [RelativeLayout](/reference/android/widget/RelativeLayout).\n\nPositioning Views\n-----------------\n\n[RelativeLayout](/reference/android/widget/RelativeLayout) lets child views specify their position relative to the\nparent view or to each other (specified by ID). So you can align two elements by right border, or\nmake one below another, centered in the screen, centered left, and so on. By default, all child\nviews are drawn at the top-left of the layout, so you must define the position of each view\nusing the various layout properties available from [RelativeLayout.LayoutParams](/reference/android/widget/RelativeLayout.LayoutParams).\n\nSome of the many layout properties available to views in a [RelativeLayout](/reference/android/widget/RelativeLayout)\ninclude:\n\n[`android:layout_alignParentTop`](/reference/android/widget/RelativeLayout.LayoutParams#attr_android:layout_alignParentTop)\n: If `\"true\"`, makes the top edge of this view match the top edge of the parent.\n\n[`android:layout_centerVertical`](/reference/android/widget/RelativeLayout.LayoutParams#attr_android:layout_centerVertical)\n: If `\"true\"`, centers this child vertically within its parent.\n\n[`android:layout_below`](/reference/android/widget/RelativeLayout.LayoutParams#attr_android:layout_below)\n: Positions the top edge of this view below the view specified with a resource ID.\n\n[`android:layout_toRightOf`](/reference/android/widget/RelativeLayout.LayoutParams#attr_android:layout_toRightOf)\n: Positions the left edge of this view to the right of the view specified with a resource ID.\n\nThese are just a few examples. All layout attributes are documented at [RelativeLayout.LayoutParams](/reference/android/widget/RelativeLayout.LayoutParams).\n\nThe value for each layout property is either a boolean to\nenable a layout position relative to the parent [RelativeLayout](/reference/android/widget/RelativeLayout) or an ID that\nreferences another view in the layout against which the view should be positioned.\n\nIn your XML layout, dependencies against other views in the layout can be declared in any order.\nFor example, you can declare that \"view1\" be positioned below \"view2\" even if \"view2\" is the last\nview declared in the hierarchy. The example below demonstrates such a scenario.\n\nExample\n-------\n\nEach of the attributes that control the relative position of each view are emphasized. \n\n```xml\n\u003c?xml version=\"1.0\" encoding=\"utf-8\"?\u003e\n\u003cRelativeLayout xmlns:android=\"http://schemas.android.com/apk/res/android\"\n android:layout_width=\"match_parent\"\n android:layout_height=\"match_parent\"\n android:paddingLeft=\"16dp\"\n android:paddingRight=\"16dp\" \u003e\n \u003cEditText\n android:id=\"@+id/name\"\n android:layout_width=\"match_parent\"\n android:layout_height=\"wrap_content\"\n android:hint=\"@string/reminder\" /\u003e\n \u003cSpinner\n android:id=\"@+id/dates\"\n android:layout_width=\"0dp\"\n android:layout_height=\"wrap_content\"\n android:layout_below=\"@id/name\"\n android:layout_alignParentLeft=\"true\"\n android:layout_toLeftOf=\"@+id/times\" /\u003e\n \u003cSpinner\n android:id=\"@id/times\"\n android:layout_width=\"96dp\"\n android:layout_height=\"wrap_content\"\n android:layout_below=\"@id/name\"\n android:layout_alignParentRight=\"true\" /\u003e\n \u003cButton\n android:layout_width=\"96dp\"\n android:layout_height=\"wrap_content\"\n android:layout_below=\"@id/times\"\n android:layout_alignParentRight=\"true\"\n android:text=\"@string/done\" /\u003e\n\u003c/RelativeLayout\u003e\n```\n\nFor details about all the layout attributes available to each child view of a [RelativeLayout](/reference/android/widget/RelativeLayout), see [RelativeLayout.LayoutParams](/reference/android/widget/RelativeLayout.LayoutParams)."]]