
ダイアログは、ユーザーによる意思決定や追加情報の入力を求める小さなウィンドウです。ダイアログが全画面表示されることはなく、通常は、次に進む前にユーザーに行動を求めるモーダル イベントに使用されます。

Dialog クラスはダイアログの基本クラスですが、Dialog を直接インスタンス化しないでください。代わりに、次のいずれかのサブクラスを使用します。
AlertDialog- タイトル、最大 3 つのボタン、選択可能なアイテムのリスト、またはカスタム レイアウトを表示できるダイアログ。
DatePickerDialogまたはTimePickerDialog- ユーザーが日付または時刻を選択できる事前定義 UI を含むダイアログ。
これらのクラスは、ダイアログのスタイルと構造を定義します。ダイアログのコンテナとして DialogFragment も必要です。DialogFragment クラスは、Dialog オブジェクトでメソッドを呼び出す代わりに、ダイアログの作成と外観の管理に必要なすべてのコントロールを提供します。
DialogFragment を使用してダイアログを管理すると、ユーザーが「戻る」ボタンをタップしたときや画面を回転させたときなど、ライフサイクル イベントを正しく処理できます。また、DialogFragment クラスの使用により、従来の Fragment のように、より大きな UI での埋め込み可能なコンポーネントとしてダイアログの UI を再利用できます(画面の大小に応じてダイアログ UI の表示を変える場合など)。
このドキュメントの以降のセクションでは、AlertDialog オブジェクトと組み合わせて DialogFragment を使用する方法について説明します。日付または時刻の選択ツールを作成する場合は、アプリに選択ツールを追加するをご覧ください。
ダイアログ フラグメントを作成する
DialogFragment を拡張し、onCreateDialog() コールバック メソッドで AlertDialog を作成することで、さまざまなダイアログ デザイン(カスタム レイアウトや、マテリアル デザインのダイアログに記載されているデザインなど)を作成できます。
以下の例は、DialogFragment 内で管理される基本的な AlertDialog を示しています。
Kotlin
class StartGameDialogFragment : DialogFragment() {
    override fun onCreateDialog(savedInstanceState: Bundle?): Dialog {
        return activity?.let {
            // Use the Builder class for convenient dialog construction.
            val builder = AlertDialog.Builder(it)
            builder.setMessage("Start game")
                .setPositiveButton("Start") { dialog, id ->
                    // START THE GAME!
                }
                .setNegativeButton("Cancel") { dialog, id ->
                    // User cancelled the dialog.
                }
            // Create the AlertDialog object and return it.
            builder.create()
        } ?: throw IllegalStateException("Activity cannot be null")
    }
}

class OldXmlActivity : AppCompatActivity() {
    override fun onCreate(savedInstanceState: Bundle?) {
        super.onCreate(savedInstanceState)
        setContentView(R.layout.activity_old_xml)

        StartGameDialogFragment().show(supportFragmentManager, "GAME_DIALOG")
    }
}
Java
public class StartGameDialogFragment extends DialogFragment {
    @Override
    public Dialog onCreateDialog(Bundle savedInstanceState) {
        // Use the Builder class for convenient dialog construction.
        AlertDialog.Builder builder = new AlertDialog.Builder(getActivity());
        builder.setMessage(R.string.dialog_start_game)
               .setPositiveButton(R.string.start, new DialogInterface.OnClickListener() {
                   public void onClick(DialogInterface dialog, int id) {
                       // START THE GAME!
                   }
               })
               .setNegativeButton(R.string.cancel, new DialogInterface.OnClickListener() {
                   public void onClick(DialogInterface dialog, int id) {
                       // User cancels the dialog.
                   }
               });
        // Create the AlertDialog object and return it.
        return builder.create();
    }
}
// ...

StartGameDialogFragment().show(supportFragmentManager, "GAME_DIALOG");
このクラスのインスタンスを作成し、そのオブジェクトで show() を呼び出すと、次の図のようなダイアログが表示されます。

次のセクションでは、AlertDialog.Builder API を使用したダイアログの作成について詳しく説明します。
ダイアログの複雑さに応じて、DialogFragment では、すべての基本的なフラグメント ライフサイクル メソッドを含め、他のさまざまなコールバック メソッドを実装できます。
アラート ダイアログを作成する
AlertDialog クラスを使用すると、さまざまなダイアログ デザインを作成できます。多くの場合、必要なダイアログ クラスはこれだけです。次の図に示すように、アラート ダイアログには 3 つの領域があります。
- タイトル: 省略可能です。コンテンツ エリアが詳細メッセージ、リスト、カスタム レイアウトで占められている場合にのみ使用されます。単純なメッセージや質問を記述する場合は、タイトルは必要ありません。
- コンテンツ エリア: メッセージ、リスト、その他のカスタム レイアウトを表示できます。
- アクション ボタン: ダイアログに含めるアクション ボタンは 3 つ以内にする必要があります。
AlertDialog.Builder クラスには、カスタム レイアウトを含め、このようなコンテンツを含む AlertDialog を作成できる API が用意されています。
AlertDialog をビルドする手順は次のとおりです。
Kotlin
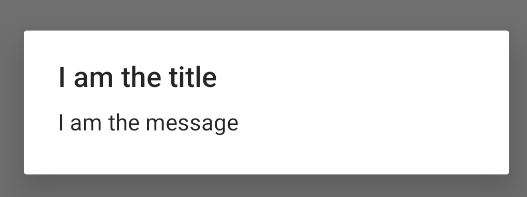
val builder: AlertDialog.Builder = AlertDialog.Builder(context)
builder
    .setMessage("I am the message")
    .setTitle("I am the title")

val dialog: AlertDialog = builder.create()
dialog.show()
Java
// 1. Instantiate an AlertDialog.Builder with its constructor.
AlertDialog.Builder builder = new AlertDialog.Builder(getActivity());

// 2. Chain together various setter methods to set the dialog characteristics.
builder.setMessage(R.string.dialog_message)
       .setTitle(R.string.dialog_title);

// 3. Get the AlertDialog.
AlertDialog dialog = builder.create();
上記のコード スニペットでは、次のダイアログが生成されます。
ボタンを追加する
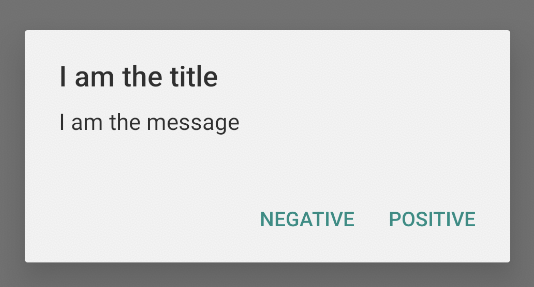
図 2 のようなアクション ボタンを追加するには、setPositiveButton() メソッドと setNegativeButton() メソッドを呼び出します。
Kotlin
val builder: AlertDialog.Builder = AlertDialog.Builder(context)
builder
    .setMessage("I am the message")
    .setTitle("I am the title")
    .setPositiveButton("Positive") { dialog, which ->
        // Do something.
    }
    .setNegativeButton("Negative") { dialog, which ->
        // Do something else.
    }

val dialog: AlertDialog = builder.create()
dialog.show()
Java
AlertDialog.Builder builder = new AlertDialog.Builder(getActivity());
// Add the buttons.
builder.setPositiveButton(R.string.ok, new DialogInterface.OnClickListener() {
           public void onClick(DialogInterface dialog, int id) {
               // User taps OK button.
           }
       });
builder.setNegativeButton(R.string.cancel, new DialogInterface.OnClickListener() {
           public void onClick(DialogInterface dialog, int id) {
               // User cancels the dialog.
           }
       });
// Set other dialog properties.
...

// Create the AlertDialog.
AlertDialog dialog = builder.create();
set...Button() メソッドには、ボタンのタイトル(文字列リソースで指定)と、ユーザーがボタンをタップしたときのアクションを定義する DialogInterface.OnClickListener が必要です。
追加できるアクション ボタンは次の 3 つです。
- Positive: アクションを受け入れて続行する場合に使用します(「OK」アクション)。
- Negative: アクションをキャンセルする場合に使用します。
- ニュートラル: ユーザーがアクションを続けないが、キャンセルするとは限らない場合に使用します。Positive ボタンと Negative ボタンの間に表示されます。たとえば、「後で通知する」のようなアクションです。
AlertDialog に追加できるボタンは各タイプごとに 1 つだけです。たとえば、「Positive」ボタンを複数使用することはできません。
上記のコード スニペットでは、次のようなアラート ダイアログが表示されます。
Add a list
AlertDialog API で使用できるリストは、次の 3 種類です。
- 従来の択一リスト。
- 固定の択一リスト(ラジオボタン)。
- 固定の多肢選択リスト(チェックボックス)。
図 5 のような択一リストを作成するには、setItems() メソッドを使用します。
Kotlin
val builder: AlertDialog.Builder = AlertDialog.Builder(context)
builder
    .setTitle("I am the title")
    .setPositiveButton("Positive") { dialog, which ->
        // Do something.
    }
    .setNegativeButton("Negative") { dialog, which ->
        // Do something else.
    }
    .setItems(arrayOf("Item One", "Item Two", "Item Three")) { dialog, which ->
        // Do something on item tapped.
    }

val dialog: AlertDialog = builder.create()
dialog.show()
Java
@Override
public Dialog onCreateDialog(Bundle savedInstanceState) {
    AlertDialog.Builder builder = new AlertDialog.Builder(getActivity());
    builder.setTitle(R.string.pick_color)
           .setItems(R.array.colors_array, new DialogInterface.OnClickListener() {
               public void onClick(DialogInterface dialog, int which) {
               // The 'which' argument contains the index position of the selected item.
           }
    });
    return builder.create();
}
このコード スニペットは、次のようなダイアログを生成します。
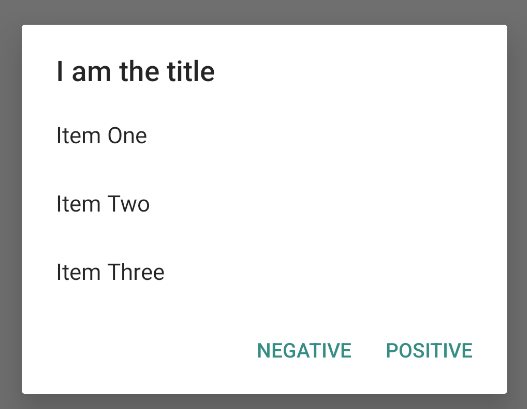
リストはダイアログのコンテンツ エリアに表示されるため、ダイアログにメッセージとリストの両方は表示できません。setTitle() を使用してダイアログのタイトルを設定します。リストのアイテムを指定するには、setItems() を呼び出して配列を渡します。setAdapter() を使用してリストを指定することもできます。これにより、ListAdapter を使用して、データベースからなど、動的データを含むリストを返すことができます。
ListAdapter を使用してリストを返す場合は、必ず Loader を使用して、コンテンツが非同期で読み込まれるようにします。詳しくは、アダプターを使用したレイアウトの作成とローダをご覧ください。
固定の多肢選択リストまたは択一リストを追加する
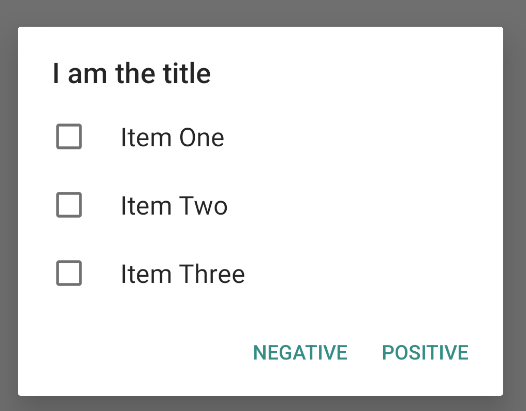
多肢選択式(チェックボックス)または択一式(ラジオボタン)のリストを追加するには、それぞれ setMultiChoiceItems() メソッド、setSingleChoiceItems() メソッドを使用します。
たとえば、ArrayList で選択したアイテムを保存する、図 6 に示すような多肢選択リストを作成する方法は次のとおりです。
Kotlin
val builder: AlertDialog.Builder = AlertDialog.Builder(context)
builder
    .setTitle("I am the title")
    .setPositiveButton("Positive") { dialog, which ->
        // Do something.
    }
    .setNegativeButton("Negative") { dialog, which ->
        // Do something else.
    }
    .setMultiChoiceItems(
        arrayOf("Item One", "Item Two", "Item Three"), null) { dialog, which, isChecked ->
        // Do something.
    }

val dialog: AlertDialog = builder.create()
dialog.show()
Java
@Override
public Dialog onCreateDialog(Bundle savedInstanceState) {
    selectedItems = new ArrayList();  // Where we track the selected items
    AlertDialog.Builder builder = new AlertDialog.Builder(getActivity());
    // Set the dialog title.
    builder.setTitle(R.string.pick_toppings)
    // Specify the list array, the items to be selected by default (null for
    // none), and the listener through which to receive callbacks when items
    // are selected.
           .setMultiChoiceItems(R.array.toppings, null,
                      new DialogInterface.OnMultiChoiceClickListener() {
               @Override
               public void onClick(DialogInterface dialog, int which,
                       boolean isChecked) {
                   if (isChecked) {
                       // If the user checks the item, add it to the selected
                       // items.
                       selectedItems.add(which);
                   } else if (selectedItems.contains(which)) {
                       // If the item is already in the array, remove it.
                       selectedItems.remove(which);
                   }
               }
           })
    // Set the action buttons
           .setPositiveButton(R.string.ok, new DialogInterface.OnClickListener() {
               @Override
               public void onClick(DialogInterface dialog, int id) {
                   // User taps OK, so save the selectedItems results
                   // somewhere or return them to the component that opens the
                   // dialog.
                   ...
               }
           })
           .setNegativeButton(R.string.cancel, new DialogInterface.OnClickListener() {
               @Override
               public void onClick(DialogInterface dialog, int id) {
                   ...
               }
           });

    return builder.create();
}
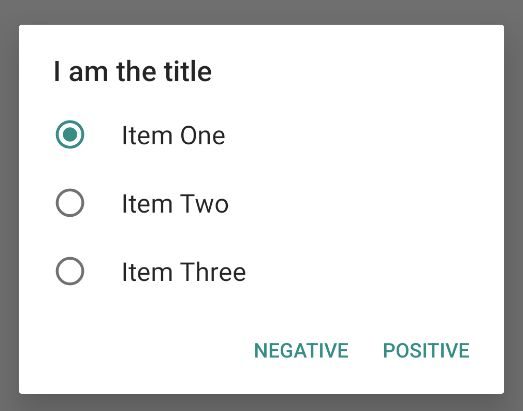
単一選択アラート ダイアログは次のようにして取得できます。
Kotlin
val builder: AlertDialog.Builder = AlertDialog.Builder(context)
builder
    .setTitle("I am the title")
    .setPositiveButton("Positive") { dialog, which ->
        // Do something.
    }
    .setNegativeButton("Negative") { dialog, which ->
        // Do something else.
    }
    .setSingleChoiceItems(
        arrayOf("Item One", "Item Two", "Item Three"), 0
    ) { dialog, which ->
        // Do something.
    }

val dialog: AlertDialog = builder.create()
dialog.show()
Java
        String[] choices = {"Item One", "Item Two", "Item Three"};

        AlertDialog.Builder builder = AlertDialog.Builder(context);
        builder
                .setTitle("I am the title")
                .setPositiveButton("Positive", (dialog, which) -> {

                })
                .setNegativeButton("Negative", (dialog, which) -> {

                })
                .setSingleChoiceItems(choices, 0, (dialog, which) -> {

                });

        AlertDialog dialog = builder.create();
        dialog.show();
結果は次のようになります。
カスタム レイアウトを作成する
ダイアログのレイアウトをカスタマイズしたい場合は、レイアウトを作成し、AlertDialog.Builder オブジェクトで setView() を呼び出して AlertDialog に追加します。
デフォルトでは、カスタム レイアウトはダイアログ ウィンドウに適用されますが、AlertDialog.Builder メソッドを使用してボタンとタイトルを追加することもできます。
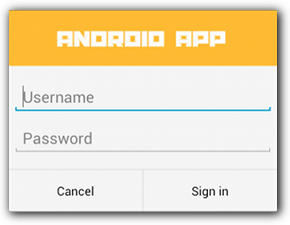
たとえば、上記のカスタム ダイアログ レイアウトのレイアウト ファイルは次のようになります。
res/layout/dialog_signin.xml
<LinearLayout xmlns:android="http://schemas.android.com/apk/res/android"
    android:orientation="vertical"
    android:layout_width="wrap_content"
    android:layout_height="wrap_content">
    <ImageView
        android:src="@drawable/header_logo"
        android:layout_width="match_parent"
        android:layout_height="64dp"
        android:scaleType="center"
        android:background="#FFFFBB33"
        android:contentDescription="@string/app_name" />
    <EditText
        android:id="@+id/username"
        android:inputType="textEmailAddress"
        android:layout_width="match_parent"
        android:layout_height="wrap_content"
        android:layout_marginTop="16dp"
        android:layout_marginLeft="4dp"
        android:layout_marginRight="4dp"
        android:layout_marginBottom="4dp"
        android:hint="@string/username" />
    <EditText
        android:id="@+id/password"
        android:inputType="textPassword"
        android:layout_width="match_parent"
        android:layout_height="wrap_content"
        android:layout_marginTop="4dp"
        android:layout_marginLeft="4dp"
        android:layout_marginRight="4dp"
        android:layout_marginBottom="16dp"
        android:fontFamily="sans-serif"
        android:hint="@string/password"/>
</LinearLayout>
DialogFragment でレイアウトをインフレートするには、getLayoutInflater() を使用して LayoutInflater を取得し、inflate() を呼び出します。最初のパラメータはレイアウト リソース ID であり、2 番目のパラメータはレイアウトの親ビューです。その後、setView() を呼び出してダイアログにレイアウトを配置できます。次の例はこのメソッドを示しています。
Kotlin
override fun onCreateDialog(savedInstanceState: Bundle?): Dialog {
    return activity?.let {
        val builder = AlertDialog.Builder(it)
        // Get the layout inflater.
        val inflater = requireActivity().layoutInflater;

        // Inflate and set the layout for the dialog.
        // Pass null as the parent view because it's going in the dialog
        // layout.
        builder.setView(inflater.inflate(R.layout.dialog_signin, null))
                // Add action buttons.
                .setPositiveButton(R.string.signin,
                        DialogInterface.OnClickListener { dialog, id ->
                            // Sign in the user.
                        })
                .setNegativeButton(R.string.cancel,
                        DialogInterface.OnClickListener { dialog, id ->
                            getDialog().cancel()
                        })
        builder.create()
    } ?: throw IllegalStateException("Activity cannot be null")
}
Java
@Override
public Dialog onCreateDialog(Bundle savedInstanceState) {
    AlertDialog.Builder builder = new AlertDialog.Builder(getActivity());
    // Get the layout inflater.
    LayoutInflater inflater = requireActivity().getLayoutInflater();

    // Inflate and set the layout for the dialog.
    // Pass null as the parent view because it's going in the dialog layout.
    builder.setView(inflater.inflate(R.layout.dialog_signin, null))
    // Add action buttons
           .setPositiveButton(R.string.signin, new DialogInterface.OnClickListener() {
               @Override
               public void onClick(DialogInterface dialog, int id) {
                   // Sign in the user.
               }
           })
           .setNegativeButton(R.string.cancel, new DialogInterface.OnClickListener() {
               public void onClick(DialogInterface dialog, int id) {
                   LoginDialogFragment.this.getDialog().cancel();
               }
           });
    return builder.create();
}
カスタム ダイアログにしたい場合は、Dialog API を使用する代わりに、Activity をダイアログとして表示できます。アクティビティを作成し、<activity> マニフェスト要素でテーマを Theme.Holo.Dialog に設定します。
<activity android:theme="@android:style/Theme.Holo.Dialog" >
アクティビティが全画面ではなく、ダイアログ ウィンドウに表示されます。
ダイアログのホストにイベントを渡す
ユーザーがダイアログのアクション ボタンのいずれかをタップするか、リストからアイテムを選択すると、DialogFragment によって必要なアクションが行われることもありますが、多くの場合、ダイアログを開いたアクティビティまたはフラグメントにイベントを渡す必要があります。これを行うには、クリック イベントのタイプごとにメソッドでインターフェースを定義します。次に、ダイアログからアクション イベントを受け取るホスト コンポーネントにインターフェースを実装します。
例として、イベントをホスト アクティビティに返すインターフェースを定義する DialogFragment を次に示します。
Kotlin
class NoticeDialogFragment : DialogFragment() {
    // Use this instance of the interface to deliver action events.
    internal lateinit var listener: NoticeDialogListener

    // The activity that creates an instance of this dialog fragment must
    // implement this interface to receive event callbacks. Each method passes
    // the DialogFragment in case the host needs to query it.
    interface NoticeDialogListener {
        fun onDialogPositiveClick(dialog: DialogFragment)
        fun onDialogNegativeClick(dialog: DialogFragment)
    }

    // Override the Fragment.onAttach() method to instantiate the
    // NoticeDialogListener.
    override fun onAttach(context: Context) {
        super.onAttach(context)
        // Verify that the host activity implements the callback interface.
        try {
            // Instantiate the NoticeDialogListener so you can send events to
            // the host.
            listener = context as NoticeDialogListener
        } catch (e: ClassCastException) {
            // The activity doesn't implement the interface. Throw exception.
            throw ClassCastException((context.toString() +
                    " must implement NoticeDialogListener"))
        }
    }
}
Java
public class NoticeDialogFragment extends DialogFragment {

    // The activity that creates an instance of this dialog fragment must
    // implement this interface to receive event callbacks. Each method passes
    // the DialogFragment in case the host needs to query it.
    public interface NoticeDialogListener {
        public void onDialogPositiveClick(DialogFragment dialog);
        public void onDialogNegativeClick(DialogFragment dialog);
    }

    // Use this instance of the interface to deliver action events.
    NoticeDialogListener listener;

    // Override the Fragment.onAttach() method to instantiate the
    // NoticeDialogListener.
    @Override
    public void onAttach(Context context) {
        super.onAttach(context);
        // Verify that the host activity implements the callback interface.
        try {
            // Instantiate the NoticeDialogListener so you can send events to
            // the host.
            listener = (NoticeDialogListener) context;
        } catch (ClassCastException e) {
            // The activity doesn't implement the interface. Throw exception.
            throw new ClassCastException(activity.toString()
                    + " must implement NoticeDialogListener");
        }
    }
    ...
}
ダイアログをホストするアクティビティは、ダイアログ フラグメントのコンストラクタでダイアログのインスタンスを作成し、NoticeDialogListener インターフェースの実装によってダイアログのイベントを受け取ります。
Kotlin
class MainActivity : FragmentActivity(),
        NoticeDialogFragment.NoticeDialogListener {

    fun showNoticeDialog() {
        // Create an instance of the dialog fragment and show it.
        val dialog = NoticeDialogFragment()
        dialog.show(supportFragmentManager, "NoticeDialogFragment")
    }

    // The dialog fragment receives a reference to this Activity through the
    // Fragment.onAttach() callback, which it uses to call the following
    // methods defined by the NoticeDialogFragment.NoticeDialogListener
    // interface.
    override fun onDialogPositiveClick(dialog: DialogFragment) {
        // User taps the dialog's positive button.
    }

    override fun onDialogNegativeClick(dialog: DialogFragment) {
        // User taps the dialog's negative button.
    }
}
Java
public class MainActivity extends FragmentActivity
                          implements NoticeDialogFragment.NoticeDialogListener{
    ...
    public void showNoticeDialog() {
        // Create an instance of the dialog fragment and show it.
        DialogFragment dialog = new NoticeDialogFragment();
        dialog.show(getSupportFragmentManager(), "NoticeDialogFragment");
    }

    // The dialog fragment receives a reference to this Activity through the
    // Fragment.onAttach() callback, which it uses to call the following
    // methods defined by the NoticeDialogFragment.NoticeDialogListener
    // interface.
    @Override
    public void onDialogPositiveClick(DialogFragment dialog) {
        // User taps the dialog's positive button.
        ...
    }

    @Override
    public void onDialogNegativeClick(DialogFragment dialog) {
        // User taps the dialog's negative button.
        ...
    }
}
ホスト アクティビティは NoticeDialogListener を実装するため(前の例の onAttach() コールバック メソッドによって適用されます)、ダイアログ フラグメントはインターフェース コールバック メソッドを使用してクリック イベントをアクティビティに配信します。
Kotlin
    override fun onCreateDialog(savedInstanceState: Bundle): Dialog {
        return activity?.let {
            // Build the dialog and set up the button click handlers.
            val builder = AlertDialog.Builder(it)

            builder.setMessage(R.string.dialog_start_game)
                    .setPositiveButton(R.string.start,
                            DialogInterface.OnClickListener { dialog, id ->
                                // Send the positive button event back to the
                                // host activity.
                                listener.onDialogPositiveClick(this)
                            })
                    .setNegativeButton(R.string.cancel,
                            DialogInterface.OnClickListener { dialog, id ->
                                // Send the negative button event back to the
                                // host activity.
                                listener.onDialogNegativeClick(this)
                            })

            builder.create()
        } ?: throw IllegalStateException("Activity cannot be null")
    }
Java
public class NoticeDialogFragment extends DialogFragment {
    ...
    @Override
    public Dialog onCreateDialog(Bundle savedInstanceState) {
        // Build the dialog and set up the button click handlers.
        AlertDialog.Builder builder = new AlertDialog.Builder(getActivity());
        builder.setMessage(R.string.dialog_start_game)
               .setPositiveButton(R.string.start, new DialogInterface.OnClickListener() {
                   public void onClick(DialogInterface dialog, int id) {
                       // Send the positive button event back to the host activity.
                       listener.onDialogPositiveClick(NoticeDialogFragment.this);
                   }
               })
               .setNegativeButton(R.string.cancel, new DialogInterface.OnClickListener() {
                   public void onClick(DialogInterface dialog, int id) {
                       // Send the negative button event back to the host activity.
                       listener.onDialogNegativeClick(NoticeDialogFragment.this);
                   }
               });
        return builder.create();
    }
}
ダイアログを表示する
ダイアログを表示する場合は、DialogFragment のインスタンスを作成し、show() を呼び出して、FragmentManager とダイアログ フラグメントのタグ名を渡します。
FragmentManager を取得するには、FragmentActivity から getSupportFragmentManager() を呼び出すか、Fragment から getParentFragmentManager() を呼び出します。次の例をご覧ください。
Kotlin
fun confirmStartGame() {
    val newFragment = StartGameDialogFragment()
    newFragment.show(supportFragmentManager, "game")
}
Java
public void confirmStartGame() {
    DialogFragment newFragment = new StartGameDialogFragment();
    newFragment.show(getSupportFragmentManager(), "game");
}
2 番目の引数 "game" は一意のタグ名です。必要に応じて、フラグメントの状態を保存、復元するために使用されます。また、このタグを使用すると、findFragmentByTag() を呼び出すことでフラグメントのハンドルを取得できます。
全画面で、または埋め込みフラグメントとしてダイアログを表示する
UI デザインの一部を、ある状況ではダイアログとして表示し、他の状況では全画面または埋め込みフラグメントとして表示したい場合があります。デバイスの画面サイズに応じて異なる表示にすることもできます。DialogFragment クラスは、埋め込み可能な Fragment としての動作が可能であるため、このような柔軟性が得られます。
ただし、この場合、AlertDialog.Builder または他の Dialog オブジェクトを使用してダイアログを作成することはできません。DialogFragment を埋め込み可能にする場合、レイアウトでダイアログの UI を定義し、onCreateView() コールバックでレイアウトを読み込みます。
ダイアログまたは埋め込み可能フラグメントとして表示できる DialogFragment の例を次に示します(purchase_items.xml という名前のレイアウトを使用)。
Kotlin
class CustomDialogFragment : DialogFragment() {

    // The system calls this to get the DialogFragment's layout, regardless of
    // whether it's being displayed as a dialog or an embedded fragment.
    override fun onCreateView(
            inflater: LayoutInflater,
            container: ViewGroup?,
            savedInstanceState: Bundle?
    ): View {
        // Inflate the layout to use as a dialog or embedded fragment.
        return inflater.inflate(R.layout.purchase_items, container, false)
    }

    // The system calls this only when creating the layout in a dialog.
    override fun onCreateDialog(savedInstanceState: Bundle): Dialog {
        // The only reason you might override this method when using
        // onCreateView() is to modify the dialog characteristics. For example,
        // the dialog includes a title by default, but your custom layout might
        // not need it. Here, you can remove the dialog title, but you must
        // call the superclass to get the Dialog.
        val dialog = super.onCreateDialog(savedInstanceState)
        dialog.requestWindowFeature(Window.FEATURE_NO_TITLE)
        return dialog
    }
}
Java
public class CustomDialogFragment extends DialogFragment {
    // The system calls this to get the DialogFragment's layout, regardless of
    // whether it's being displayed as a dialog or an embedded fragment.
    @Override
    public View onCreateView(LayoutInflater inflater, ViewGroup container,
            Bundle savedInstanceState) {
        // Inflate the layout to use as a dialog or embedded fragment.
        return inflater.inflate(R.layout.purchase_items, container, false);
    }

    // The system calls this only when creating the layout in a dialog.
    @Override
    public Dialog onCreateDialog(Bundle savedInstanceState) {
        // The only reason you might override this method when using
        // onCreateView() is to modify the dialog characteristics. For example,
        // the dialog includes a title by default, but your custom layout might
        // not need it. Here, you can remove the dialog title, but you must
        // call the superclass to get the Dialog.
        Dialog dialog = super.onCreateDialog(savedInstanceState);
        dialog.requestWindowFeature(Window.FEATURE_NO_TITLE);
        return dialog;
    }
}
次の例では、画面サイズに基づいて、フラグメントをダイアログとして表示するか、全画面 UI として表示するかを決定します。
Kotlin
fun showDialog() {
    val fragmentManager = supportFragmentManager
    val newFragment = CustomDialogFragment()
    if (isLargeLayout) {
        // The device is using a large layout, so show the fragment as a
        // dialog.
        newFragment.show(fragmentManager, "dialog")
    } else {
        // The device is smaller, so show the fragment fullscreen.
        val transaction = fragmentManager.beginTransaction()
        // For a polished look, specify a transition animation.
        transaction.setTransition(FragmentTransaction.TRANSIT_FRAGMENT_OPEN)
        // To make it fullscreen, use the 'content' root view as the container
        // for the fragment, which is always the root view for the activity.
        transaction
                .add(android.R.id.content, newFragment)
                .addToBackStack(null)
                .commit()
    }
}
Java
public void showDialog() {
    FragmentManager fragmentManager = getSupportFragmentManager();
    CustomDialogFragment newFragment = new CustomDialogFragment();

    if (isLargeLayout) {
        // The device is using a large layout, so show the fragment as a
        // dialog.
        newFragment.show(fragmentManager, "dialog");
    } else {
        // The device is smaller, so show the fragment fullscreen.
        FragmentTransaction transaction = fragmentManager.beginTransaction();
        // For a polished look, specify a transition animation.
        transaction.setTransition(FragmentTransaction.TRANSIT_FRAGMENT_OPEN);
        // To make it fullscreen, use the 'content' root view as the container
        // for the fragment, which is always the root view for the activity.
        transaction.add(android.R.id.content, newFragment)
                   .addToBackStack(null).commit();
    }
}
フラグメント トランザクションの実行について詳しくは、フラグメントをご覧ください。
この例では、現在のデバイスでアプリの大きなレイアウト デザインを使用するか(つまり、このフラグメントを全画面ではなくダイアログとして表示するか)を mIsLargeLayout ブール値で指定します。この種のブール値を設定する最良の方法は、さまざまな画面サイズについて代替リソース値でブールリソース値を宣言することです。例として、異なる画面サイズのブールリソースを 2 種類示します。
res/values/bools.xml
<!-- Default boolean values -->
<resources>
    <bool name="large_layout">false</bool>
</resources>
res/values-large/bools.xml
<!-- Large screen boolean values -->
<resources>
    <bool name="large_layout">true</bool>
</resources>
その後、次の例に示すように、アクティビティの onCreate() メソッドにおいて mIsLargeLayout 値を初期化できます。
Kotlin
override fun onCreate(savedInstanceState: Bundle?) {
    super.onCreate(savedInstanceState)
    setContentView(R.layout.activity_main)

    isLargeLayout = resources.getBoolean(R.bool.large_layout)
}
Java
boolean isLargeLayout;

@Override
public void onCreate(Bundle savedInstanceState) {
    super.onCreate(savedInstanceState);
    setContentView(R.layout.activity_main);

    isLargeLayout = getResources().getBoolean(R.bool.large_layout);
}
大画面でアクティビティをダイアログとして表示する
小画面のときにダイアログを全画面 UI として表示する一方、大画面のときは Activity をダイアログとして表示することで、同じ結果を得ることができます。どちらの方法を選択するかはアプリの設計によって異なりますが、アプリが小画面向けに設計されている場合、タブレットでは存続期間が短いアクティビティをダイアログとして表示すると、多くの場合エクスペリエンスを改善できます。
大画面でのみアクティビティをダイアログとして表示するには、Theme.Holo.DialogWhenLarge テーマを <activity> マニフェスト要素に適用します。
<activity android:theme="@android:style/Theme.Holo.DialogWhenLarge" >
テーマを使用したアクティビティのスタイル設定について詳しくは、スタイルとテーマをご覧ください。
ダイアログを閉じる
AlertDialog.Builder を使用して作成した操作ボタンをユーザーがタップすると、システムによってダイアログが閉じられます。
また、リストでラジオボタンまたはチェックボックスが使われている場合を除き、ユーザーがダイアログ リスト内のアイテムをタップすると、ダイアログが閉じます。それ以外の場合は、DialogFragment で dismiss() を呼び出して、ダイアログを手動で閉じることができます。
ダイアログが閉じるときに特定のアクションを実行する必要がある場合は、DialogFragment で onDismiss() メソッドを実装できます。
ダイアログをキャンセルすることもできます。これは、ユーザーがタスクを完了せずにダイアログを離れることを示す特別なイベントです。ユーザーが戻るボタンをタップした場合、ダイアログ エリア以外の画面をタップした場合、または Dialog で明示的に cancel() を呼び出した場合(たとえばダイアログの「キャンセル」ボタンに応じてなど)に発生します。
上記の例に示すように、DialogFragment クラスで onCancel() を実装することでキャンセル イベントに対応できます。