
Ресурсы — это дополнительные файлы и статическое содержимое, которые использует ваш код, такие как растровые изображения, строки пользовательского интерфейса, инструкции по анимации и многое другое.
Всегда выносите ресурсы приложения, такие как изображения и строки, за пределы кода, чтобы вы могли управлять ими независимо. Также предоставляйте альтернативные ресурсы для конкретных конфигураций устройств, группируя их в специально названные каталоги ресурсов. Во время выполнения Android использует соответствующий ресурс в зависимости от текущей конфигурации. Например, вы можете захотеть предоставить разные строки в зависимости от языковых настроек.
После того как вы вынесете ресурсы своего приложения во внешний каталог, вы сможете получить к ним доступ, используя идентификаторы ресурсов, сгенерированные в R классе вашего проекта. В этом документе показано, как сгруппировать ресурсы в вашем проекте Android. Также показано, как предоставить альтернативные ресурсы для конкретных конфигураций устройства и затем получить к ним доступ из кода вашего приложения или других XML-файлов.
Типы групповых ресурсов
Размещайте каждый тип ресурсов в отдельной подпапке каталога res/ вашего проекта. Например, вот иерархия файлов для простого проекта:
MyProject/
    src/
        MyActivity.kt
    res/
        drawable/
            graphic.png
        mipmap/
            icon.png
        values/
            strings.xml
В каталоге res/ находятся все ресурсы из его подкаталогов: ресурс изображения, каталог mipmap/ для значков запуска и файл строковых ресурсов. Названия каталогов ресурсов важны и описаны в таблице 1.
Примечание: Дополнительную информацию об использовании папок mipmap см. в разделе «Размещение значков приложений в каталогах mipmap» .
Таблица 1. Поддерживаемые каталоги ресурсов внутри каталога res/ проекта.
| Каталог | Тип ресурса |
|---|---|
drawable/ | Растровые файлы (PNG,
Для получения более подробной информации см. ресурсы Drawable . |
mipmap/ | Файлы Drawable для различной плотности значков запуска. Для получения дополнительной информации об управлении значками запуска с помощью папок mipmap/ см. раздел «Размещение значков приложений в каталогах mipmap» . |
raw/ | Произвольные файлы для сохранения в исходном виде. Чтобы открыть эти ресурсы с помощью необработанного Однако, если вам необходим доступ к исходным именам файлов и иерархии файлов, рассмотрите возможность сохранения ресурсов в каталоге |
values/ | XML-файлы, содержащие простые значения, такие как строки, целые числа и цвета. В то время как XML-файлы ресурсов в других подкаталогах Поскольку каждый ресурс определяется собственным XML-элементом, вы можете назвать файл как угодно и разместить в одном файле ресурсы разных типов. Однако для большей ясности может потребоваться размещать уникальные типы ресурсов в разных файлах. Например, вот несколько вариантов именования файлов ресурсов, которые вы можете создать в этом каталоге:
Для получения дополнительной информации см. разделы «Строковые ресурсы» , «Ресурсы стиля» и «Дополнительные типы ресурсов» . |
xml/ | Произвольные XML-файлы, которые можно прочитать во время выполнения, вызвав метод Resources.getXML . Здесь необходимо сохранить различные XML-файлы конфигурации. |
font/ | Файлы шрифтов с расширениями, такими как TTF, OTF или TTC, или XML-файлы, содержащие элемент <font-family> . Для получения дополнительной информации о шрифтах как ресурсах см. раздел «Добавление шрифта в качестве XML-ресурса» . |
Внимание: Никогда не сохраняйте файлы ресурсов непосредственно в каталог res/ . Это приведет к ошибке компиляции.
Ресурсы, которые вы сохраняете в подкаталогах, определенных в Таблице 1, являются вашими ресурсами по умолчанию. То есть, эти ресурсы определяют дизайн и содержимое вашего приложения по умолчанию. Однако для разных типов устройств на базе Android могут потребоваться ресурсы разных типов.
Например, вы можете предоставить различные строковые ресурсы, которые будут переводить текст в пользовательском интерфейсе в зависимости от языковых настроек устройства.
Примечание: В Compose элементы пользовательского интерфейса, анимации и цвета, управляемые состоянием, объявляются на Kotlin, поэтому каталоги layout/ , menu/ , anim/ , animator/ и color/ устарели для современных приложений. Для получения дополнительной информации см. разделы «Анимации в Compose» и «Анатомия темы в Compose» .
Предоставьте альтернативные ресурсы
Большинство приложений предоставляют альтернативные ресурсы для поддержки конкретных конфигураций устройств. Например, включают альтернативные ресурсы изображений для разных плотностей экрана и альтернативные строковые ресурсы для разных языков. Во время выполнения Android определяет текущую конфигурацию устройства и загружает соответствующие ресурсы для вашего приложения.
Чтобы указать специфичные для конфигурации альтернативы для набора ресурсов, выполните следующие действия:
- Создайте новую директорию в каталоге
res/с именем в формате<resources_name> - <qualifier>.-
<resources_name>— это имя каталога соответствующих ресурсов по умолчанию (определенных в таблице 1). -
<qualifier>— это имя, указывающее на конкретную конфигурацию, для которой должны использоваться эти ресурсы (определено в Таблице 2).
Вы можете добавить более одного
<qualifier>. Разделяйте каждый из них дефисом.Внимание: При добавлении нескольких квалификаторов необходимо располагать их в том же порядке, в котором они указаны в Таблице 2. Если порядок квалификаторов будет неправильным, ресурсы будут проигнорированы.
-
- Сохраните соответствующие альтернативные ресурсы в этой новой директории. Файлы ресурсов должны быть названы точно так же, как и файлы ресурсов по умолчанию.
Например, вот некоторые ресурсы по умолчанию и альтернативные варианты:
res/
    drawable/
        icon.png
        background.png
    drawable-hdpi/
        icon.png
        background.png
Квалификатор hdpi указывает, что ресурсы в этом каталоге предназначены для устройств с экраном высокой плотности. Изображения в этих каталогах drawable имеют размеры, соответствующие определенной плотности экрана, но имена файлов остаются неизменными. Таким образом, идентификатор ресурса, используемый для ссылки на изображение icon.png или background.png , всегда один и тот же. Android выбирает версию каждого ресурса, которая наилучшим образом соответствует текущему устройству, сравнивая информацию о конфигурации устройства с квалификаторами в имени каталога ресурсов.
Внимание: При определении альтернативного ресурса убедитесь, что вы также определяете этот ресурс в конфигурации по умолчанию. В противном случае ваше приложение может столкнуться с исключениями во время выполнения при изменении конфигурации устройства. Например, если вы добавите строку только к values-en , а не values , ваше приложение может столкнуться с исключением Resource Not Found когда пользователь изменит системный язык по умолчанию.
В таблице 2 перечислены квалификаторы конфигурации в порядке приоритета. Вы можете добавить несколько квалификаторов к одному имени каталога, разделяя каждый квалификатор дефисом. Если вы используете несколько квалификаторов для каталога ресурсов, вы должны добавить их к имени каталога в том порядке, в котором они перечислены в таблице.
Таблица 2. Названия квалификаторов конфигурации.
| Конфигурация | Значения квалификатора | Описание |
|---|---|---|
| MCC и MNC | Примеры:mcc310mcc208-mnc00 | Код страны мобильной связи (MCC), за которым, при желании, следует код мобильной сети (MNC) с SIM-карты в устройстве. Например, Если устройство использует радиосвязь (то есть, это GSM-телефон), значения MCC и MNC берутся с SIM-карты. Вы также можете использовать только MCC, например, для включения в приложение юридических ресурсов, специфичных для конкретной страны. Если вам необходимо указать только язык, используйте вместо этого квалификаторы language, script (необязательно) и region (необязательно) . Если вы используете квалификаторы MCC и MNC, делайте это с осторожностью и проверьте, работает ли все должным образом. Также обратите внимание на поля конфигурации |
| Язык, письменность (необязательно) и регион (необязательно) | Примеры:enfren-rUSfr-rFRfr-rCAb+enb+en+USb+es+419b+zh+Hantb+sr+Latn+RS | Язык определяется двухбуквенным кодом языка ISO 639-1 , за которым, при необходимости, следует двухбуквенный код региона ISO 3166-1-alpha-2 (перед которым стоит строчная буква Коды не чувствительны к регистру. Префикс В Android 7.0 (уровень API 24) появилась поддержка языковых тегов BCP 47 , которые можно использовать для определения языковых и региональных ресурсов. Языковой тег состоит из последовательности одного или нескольких подтегов, каждый из которых уточняет или сужает диапазон языков, определяемых общим тегом. Дополнительную информацию о языковых тегах см. в разделе «Теги для определения языков» . Для использования языкового тега BCP 47 объедините Языковой тег может изменяться в процессе работы вашего приложения, если пользователи меняют язык в системных настройках. Информацию о том, как это может повлиять на работу приложения во время выполнения, см. в разделе «Обработка изменений конфигурации» . Полное руководство по локализации вашего приложения на другие языки см. в разделе «Локализация вашего приложения» . См. также метод |
| Грамматический род | masculinefeminineneuter | Грамматический род пользователя. Используется для языков, в которых есть грамматический род. Например, если вам необходимо предоставить разные ресурсы для франкоговорящих пользователей, вы можете использовать каталоги следующего вида: См. раздел «Персонализация пользовательского интерфейса приложения с помощью грамматического рода» . Также обратите внимание на метод конфигурации Добавлено в API уровня 34. |
| Широкий цветовой охват | widecgnowidecg |
Добавлено в API уровня 26. Также обратите внимание на метод конфигурации |
| Расширенный динамический диапазон (HDR) | highdrlowdr |
Добавлено в API уровня 26. Также обратите внимание на метод конфигурации |
| режим пользовательского интерфейса | cardesktelevisionappliancewatchvrheadset |
Добавлено в API уровня 8; телевизоры добавлены в API 13; бытовая техника добавлена в API 16; часы добавлены в API 20; VR-гарнитура добавлена в API 26. Для получения информации о том, как ваше приложение должно реагировать на подключение или отключение устройства от док-станции, ознакомьтесь с разделом «Определение и мониторинг состояния и типа док-станции» . Это может измениться в процессе работы вашего приложения, если пользователь поместит устройство в док-станцию. Вы можете включить или отключить некоторые из этих режимов с помощью |
| Ночной режим | nightnotnight |
Добавлено в API уровня 8. Это может измениться в процессе работы вашего приложения, если ночной режим оставлен в автоматическом режиме (по умолчанию), в этом случае режим изменяется в зависимости от времени суток. Вы можете включить или отключить этот режим с помощью |
| Плотность пикселей экрана (dpi) | ldpimdpihdpixhdpixxhdpixxxhdpinodpitvdpianydpinnn dpi |
Между шестью основными плотностями существует соотношение масштабирования 3:4:6:8:12:16 (без учета плотности tvdpi). Таким образом, растровое изображение 9x9 в ldpi соответствует 12x12 в mdpi, 18x18 в hdpi, 24x24 в xhdpi и так далее. Примечание: Использование квалификатора плотности не означает, что ресурсы предназначены только для экранов с такой плотностью. Если вы не предоставите альтернативные ресурсы с квалификаторами, которые лучше соответствуют текущей конфигурации устройства, система будет использовать те ресурсы, которые лучше всего подходят . Для получения дополнительной информации о том, как обрабатывать различные плотности экрана и как Android может масштабировать ваши растровые изображения в соответствии с текущей плотностью, см. Обзор совместимости экранов . |
| Тип сенсорного экрана | notouchfinger |
Также обратите внимание на поле «Конфигурация |
| Наличие клавиатуры | keysexposedkeyshiddenkeyssoft |
Если вы предоставляете ресурсы Это может измениться в процессе работы вашего приложения, если пользователь откроет аппаратную клавиатуру. Информацию о том, как это влияет на ваше приложение во время выполнения, см. в разделе «Обработка изменений конфигурации» . Также обратите внимание на поля конфигурации |
| Основной метод ввода текста | nokeysqwerty12key |
Также обратите внимание на поле «Настройка |
| Доступность навигационных клавиш | navexposednavhidden |
Это может измениться в процессе работы вашего приложения, если пользователь откроет клавиши навигации. Информацию о том, как это влияет на ваше приложение во время выполнения, см. в разделе «Обработка изменений конфигурации» . Также обратите внимание на поле конфигурации |
| Основной метод навигации без использования сенсорного экрана. | nonavdpadtrackballwheel |
Также обратите внимание на поле «Конфигурация |
| Версия платформы (уровень API) | Примеры:v3v4v7и т. д. | Уровень API, поддерживаемый устройством. Например, |
Примечание: Не все версии Android поддерживают все квалификаторы. Использование нового квалификатора неявно добавляет квалификатор версии платформы, чтобы старые устройства могли его игнорировать. Во избежание проблем всегда включайте набор ресурсов по умолчанию (набор ресурсов без квалификаторов ). Для получения дополнительной информации см. раздел о предоставлении наилучшей совместимости устройств с ресурсами .
В приложениях Compose квалификаторы конфигурации, связанные с макетом и размерами, не требуются. Хотя они по-прежнему существуют, они исключены из Таблицы 2. К этим квалификаторам относятся: направление макета, минимальная ширина, доступная ширина, доступная высота, размер экрана, соотношение сторон экрана, круглый экран и ориентация экрана. Полную таблицу квалификаторов конфигурации в порядке приоритета см. в разделе «Обзор ресурсов приложения (Представления)» .
правила присвоения имен квалификаторам
Вот несколько правил использования имен квалификаторов конфигурации:
- Для одного набора ресурсов можно указать несколько квалификаторов, разделённых дефисами. Например,
drawable-en-rUS-nightприменяется к устройствам с американским английским языком в ночном режиме. - Квалификационные критерии должны быть указаны в порядке, приведенном в Таблице 2 .
- Неверно:
drawable-hdpi-night/ - Правильно:
drawable-night-hdpi/
- Неверно:
- Альтернативные каталоги ресурсов не могут быть вложенными. Например, нельзя использовать
res/drawable/drawable-en/. - Значения нечувствительны к регистру. Компилятор ресурсов преобразует имена каталогов в нижний регистр перед обработкой, чтобы избежать проблем в файловых системах, нечувствительных к регистру. Любое использование регистра в именах предназначено только для улучшения читаемости.
- Поддерживается только одно значение для каждого типа квалификатора. Например, если вы хотите использовать одни и те же файлы drawable для Испании и Франции, вы не можете создать каталог с именем
drawable-es-fr/. Вместо этого вам понадобятся два каталога ресурсов, напримерdrawable-es/иdrawable-fr/, которые будут содержать соответствующие файлы.
После сохранения альтернативных ресурсов в каталоги, названные с указанными квалификаторами, Android автоматически применяет эти ресурсы в вашем приложении в соответствии с текущей конфигурацией устройства. Каждый раз, когда запрашивается ресурс, Android проверяет наличие альтернативных каталогов ресурсов, содержащих запрошенный файл ресурса, а затем находит наиболее подходящий ресурс .
Если нет альтернативных ресурсов, соответствующих конкретной конфигурации устройства, Android использует соответствующие ресурсы по умолчанию — набор ресурсов определенного типа, не содержащий квалификатора конфигурации.
Создание псевдонимов ресурсов
Если у вас есть ресурс, который вы хотите использовать для настройки нескольких устройств, но не хотите предоставлять его в качестве ресурса по умолчанию, вам не нужно размещать один и тот же ресурс в нескольких альтернативных каталогах ресурсов. Вместо этого вы можете создать альтернативный ресурс, который будет действовать как псевдоним для ресурса, сохраненного в вашем каталоге ресурсов по умолчанию.
Drawables
Например, представьте, что у вас есть иконка приложения, icon.png , и вам нужна уникальная версия для разных языковых версий. Однако две языковые версии, англо-канадская и франко-канадская, должны использовать одну и ту же версию. Вам не нужно копировать одно и то же изображение в каталог ресурсов для обеих языковых версий. Вместо этого вы можете сохранить изображение, используемое для обеих версий, под любым именем, кроме icon.png , например, icon_ca.png , и поместить его в каталог res/drawable/ по умолчанию. Затем создайте файл icon.xml в res/drawable-en-rCA/ и res/drawable-fr-rCA/ который будет ссылаться на ресурс icon_ca.png с помощью элемента <bitmap> .
<?xml version="1.0" encoding="utf-8"?>
<bitmap xmlns:android="http://schemas.android.com/apk/res/android" android:src="@drawable/icon_ca" />
Это позволяет хранить только одну версию файла PNG и два небольших XML-файла, указывающих на него. Затем вы можете использовать painterResource(R.drawable.icon) , и система выберет соответствующий файл, как только определит локаль.
Строки и другие простые значения
Чтобы создать псевдоним для существующей строки, используйте идентификатор ресурса нужной строки в качестве значения для новой строки:
<?xml version="1.0" encoding="utf-8"?>
<resources>
    <string name="hello">Hello</string>
    <string name="hi">@string/hello</string>
</resources>
Ресурс R.string.hi теперь является псевдонимом для ресурса R.string.hello .
Аналогичным образом работают и другие простые значения , например, цвета:
<?xml version="1.0" encoding="utf-8"?>
<resources>
    <color name="red">#f00</color>
    <color name="highlight">@color/red</color>
</resources>
Получите доступ к ресурсам вашего приложения.
После того как вы укажете ресурс в своем приложении, вы сможете применить его, сославшись на его идентификатор ресурса. Все идентификаторы ресурсов определены в классе R вашего проекта, который инструмент aapt генерирует автоматически.
При компиляции вашего приложения aapt генерирует класс R , содержащий идентификаторы ресурсов для всех ресурсов в вашем каталоге res/ . Для каждого типа ресурса существует подкласс R , например, R.drawable для всех ресурсов drawable. И для каждого ресурса этого типа существует статическое целое число, например, R.drawable.icon . Это целое число является идентификатором ресурса, который вы можете использовать для получения вашего ресурса.
Хотя идентификаторы ресурсов указываются в классе R , вам не нужно искать их там. Идентификатор ресурса всегда состоит из следующих элементов:
- Тип ресурса : каждый ресурс группируется в определенный «тип», например,
stringилиdrawable. - Имя ресурса , которое представляет собой имя файла без расширения.
Доступ к ресурсам в Compose
Jetpack Compose предоставляет встроенные функции, поддерживающие компонуемость, для безопасного доступа к ресурсам.
- Строки:
stringResource(id = R.string.hello)
- Рисунки:
painterResource(id = R.drawable.my_icon)
Доступ к ресурсам в коде, не относящемся к пользовательскому интерфейсу.
Если вам необходимо получить доступ к ресурсам за пределами иерархии пользовательского интерфейса — например, в ViewModel , Repository или системной Service — вы можете разрешить их с помощью Context .
// Retrieve a localized string resource
val greeting = context.getString(R.string.hello_world)
Вы также можете получать доступ к отдельным ресурсам, используя методы из Resources , экземпляр которого можно получить с помощью getResources .
Синтаксис
Вот синтаксис для ссылки на ресурс в коде:
[<package_name>.]R.<resource_type>.<resource_name>
-
<package_name>— это имя пакета, в котором находится ресурс (не требуется при ссылке на ресурсы из собственного пакета). -
<resource_type>— это подклассRдля типа ресурса. -
<resource_name>— это либо имя файла ресурса без расширения, либо значение атрибутаandroid:nameв XML-элементе (для простых значений).
Для получения более подробной информации о каждом типе ресурсов и способах их ссылки см. раздел «Ресурсы» в Compose .
Получите доступ к оригинальным файлам
Хотя это и нечасто случается, вам может потребоваться доступ к исходным файлам и каталогам. В этом случае сохранение файлов в res/ вам не подойдёт, поскольку единственный способ прочитать ресурс из res/ — это использовать его идентификатор. Вместо этого вы можете сохранять ресурсы в каталоге assets/ .
Файлы, сохраненные в каталоге assets/ не имеют идентификатора ресурса, поэтому вы не можете ссылаться на них через класс R или из XML-ресурсов. Вместо этого вы можете запрашивать файлы в каталоге assets/ как обычную файловую систему и считывать необработанные данные с помощью AssetManager .
Однако, если вам требуется только возможность чтения необработанных данных (например, видео- или аудиофайла), сохраните файл в каталоге res/raw/ и считывайте поток байтов с помощью openRawResource .
Получите доступ к ресурсам платформы
Android содержит ряд стандартных ресурсов, таких как системные стили и темы. Для доступа к ним укажите в ссылке на ресурс класс пакета android . Например: painterResource(android.R.drawable.ic_menu_info_details) .
Обеспечьте наилучшую совместимость устройства с имеющимися ресурсами.
Для того чтобы ваше приложение поддерживало различные конфигурации устройств, очень важно всегда указывать ресурсы по умолчанию для каждого типа ресурсов, используемых вашим приложением.
Например, если ваше приложение поддерживает несколько языков, всегда указывайте каталог values/ (в котором сохраняются ваши строки) без указания языка и региона . Если же вы поместите все ваши строковые файлы в каталоги с указанием языка и региона, ваше приложение будет аварийно завершать работу при запуске на устройстве, настроенном на язык, который ваши строки не поддерживают.
Если вы укажете values/ ресурсы по умолчанию, ваше приложение будет работать корректно, даже если пользователь не понимает язык, на котором оно отображается. Это лучше, чем сбой.
Предоставление ресурсов по умолчанию важно не только потому, что ваше приложение может работать с конфигурацией, которую вы не предусмотрели, но и потому, что новые версии Android иногда добавляют квалификаторы конфигурации, которые не поддерживаются более старыми версиями. Если вы используете квалификатор ресурсов new, но сохраняете совместимость кода с более старыми версиями Android, то при запуске вашего приложения в более старой версии Android оно будет аварийно завершаться, если вы не предоставите ресурсы по умолчанию, поскольку оно не сможет использовать ресурсы, указанные с квалификатором new.
Например, если ваш minSdkVersion установлен на 4, и вы указываете для всех своих ресурсов drawable режим «ночь» ( night или notnight , которые были добавлены в API уровня 8), то устройство с API уровня 4 не сможет получить доступ к вашим ресурсам drawable и произойдет сбой. В этом случае вам, вероятно, следует установить notnight в качестве ресурсов по умолчанию, поэтому исключите этот параметр и поместите ваши ресурсы drawable либо в drawable/ либо drawable-night/ .
Вкратце, для обеспечения наилучшей совместимости с устройствами всегда указывайте ресурсы по умолчанию, необходимые вашему приложению для корректной работы. Затем создавайте альтернативные ресурсы для конкретных конфигураций устройств, используя квалификаторы конфигурации.
Из этого правила есть одно исключение: если minSdkVersion вашего приложения равно 4 или больше, вам не нужны ресурсы drawable по умолчанию, если вы предоставляете альтернативные ресурсы drawable с помощью квалификатора плотности экрана . Даже без ресурсов drawable по умолчанию Android может найти наилучшее соответствие среди альтернативных плотностей экрана и масштабировать растровые изображения по мере необходимости. Однако для наилучшего взаимодействия со всеми типами устройств предоставляйте альтернативные ресурсы drawable для всех трех типов плотности.
Как Android находит наиболее подходящий ресурс
Когда вы запрашиваете ресурс, для которого предоставляете альтернативы, Android выбирает, какой альтернативный ресурс использовать во время выполнения, в зависимости от текущей конфигурации устройства. Чтобы продемонстрировать, как Android выбирает альтернативный ресурс, предположим, что следующие каталоги drawable содержат разные версии одних и тех же изображений:
drawable/
drawable-en/
drawable-fr-rCA/
drawable-en-night/
drawable-en-notouch-12key/
drawable-night-ldpi/
drawable-night-notouch-12key/
Предположим, что конфигурация устройства следующая:
Локаль = en-GB
Ночной режим = night
Плотность пикселей экрана = hdpi
Тип сенсорного экрана = notouch
Основной метод ввода текста = 12key
Сравнивая конфигурацию устройства с доступными альтернативными ресурсами, Android выбирает изображения из набора drawable-en-night .
Система принимает решение о том, какие ресурсы использовать, руководствуясь следующей логикой:
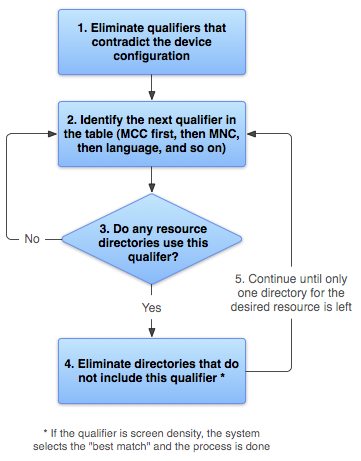
Рисунок 2. Блок-схема того, как Android находит наиболее подходящий ресурс.
- Удалите файлы ресурсов, противоречащие конфигурации устройства.
Каталог
drawable-fr-rCA/удален, поскольку он противоречит локалиen-GB.drawable/ drawable-en/
drawable-fr-rCA/drawable-en-night/ drawable-en-notouch-12key/ drawable-night-ldpi/ drawable-night-notouch-12key/Исключение: Плотность пикселей экрана — единственный параметр, который не исключается из-за противоречия. Даже если плотность экрана устройства указана как hdpi, параметр
drawable-night-ldpi/не исключается, поскольку на данном этапе любая плотность экрана считается соответствующей. Для получения дополнительной информации см. Обзор совместимости экранов . - Найдите следующий по приоритету квалификатор в списке ( таблица 2 ). (Начните с MCC.)
- Содержатся ли в каких-либо справочниках ресурсов это уточнение?
- Если нет, вернитесь ко второму шагу и посмотрите на следующее уточнение. В этом примере ответ «нет» до тех пор, пока не будет достигнуто языковое уточнение.
- Если да, переходите к четвертому шагу.
- Удалите каталоги ресурсов, которые не содержат этого квалификатора. В этом примере система затем удаляет все каталоги, которые не содержат языкового квалификатора:
drawable/drawable-en/ drawable-en-night/ drawable-en-notouch-12key/drawable-night-ldpi/drawable-night-notouch-12key/Исключение: если рассматриваемый параметр — плотность пикселей экрана, Android выбирает вариант, наиболее точно соответствующий плотности экрана устройства. В целом, Android предпочитает уменьшать большее исходное изображение, чем увеличивать меньшее. Для получения дополнительной информации см. Обзор совместимости экранов .
- Повторяйте шаги два, три и четыре, пока не останется только одна директория. В этом примере следующим квалификатором, для которого есть совпадения, является ночной режим. Таким образом, ресурсы, не указывающие на ночной режим, исключаются:
drawable-en/drawable-en-night/drawable-en-notouch-12key/Оставшаяся директория называется
drawable-en-night.
Хотя эта процедура выполняется для каждого запрашиваемого ресурса, система оптимизирует некоторые её аспекты. Одна из таких оптимизаций заключается в том, что после того, как конфигурация устройства известна, она может исключить альтернативные ресурсы, которые никогда не смогут соответствовать требованиям. Например, если язык конфигурации — английский, то любой каталог ресурсов, у которого языковой квалификатор установлен на значение, отличное от английского, никогда не будет включен в пул проверяемых ресурсов (хотя каталог ресурсов без языкового квалификатора всё равно будет включен).
При выборе ресурсов на основе параметров размера экрана система использует ресурсы, предназначенные для экрана меньшего размера, чем текущий, если нет ресурсов, которые лучше соответствуют этим параметрам. Например, для экрана большого размера при необходимости используются ресурсы для экрана стандартного размера.
Однако, если единственные доступные ресурсы превышают размер текущего экрана, система их не использует, и ваше приложение аварийно завершает работу, если никакие другие ресурсы не соответствуют конфигурации устройства. Это происходит, например, если все ресурсы макета помечены квалификатором xlarge , а устройство имеет экран обычного размера.
Примечание: Приоритет квалификатора (в таблице 2 ) важнее, чем количество квалификаторов, точно соответствующих устройству. В приведенном выше примере на четвертом шаге последний вариант в списке включает три квалификатора, точно соответствующих устройству (ночной режим, тип сенсорного экрана и метод ввода), в то время как drawable-en имеет только один параметр, соответствующий устройству (язык). Однако язык имеет более высокий приоритет, чем эти другие квалификаторы, поэтому drawable-night-notouch-12key исключается.
Дополнительные ресурсы
Чтобы узнать больше о ресурсах приложения, ознакомьтесь со следующими дополнительными материалами: