
ข้อมูลสำคัญ
- Vector Drawable คือภาพกราฟิกเวกเตอร์ที่กำหนดไว้ในไฟล์ XML เป็นชุดจุด เส้น และเส้นโค้ง พร้อมกับข้อมูลสีที่เกี่ยวข้อง
- Vector Drawable ปรับขนาดได้ ซึ่งหมายความว่าสามารถปรับขนาดได้โดยไม่สูญเสียคุณภาพการแสดงผล จึงเหมาะอย่างยิ่งสำหรับการใช้ในแอป Android เนื่องจากช่วยลดขนาดไฟล์ APK และปรับปรุงประสิทธิภาพได้
- คุณสร้าง Vector Drawable ใน Android Studio ได้โดยคลิกขวาที่โฟลเดอร์ Drawable ในโปรเจ็กต์ แล้วเลือก New > Vector Asset นอกจากนี้ คุณยังนำเข้าไฟล์ SVG ไปยัง Android Studio เป็น Vector Drawable ได้ด้วย
บทนำ
VectorDrawable คือภาพกราฟิกเวกเตอร์ที่กำหนดไว้
ในไฟล์ XML เป็นชุดจุด เส้น และเส้นโค้ง พร้อมกับข้อมูลสีที่เกี่ยวข้อง ข้อดีที่สำคัญของการใช้ Vector Drawable คือความสามารถในการปรับขนาดรูปภาพ
โดยสามารถปรับขนาดได้โดยไม่สูญเสียคุณภาพการแสดงผล ซึ่งหมายความว่าระบบจะปรับขนาดไฟล์เดียวกันให้มีความหนาแน่นของหน้าจอที่แตกต่างกันโดยไม่สูญเสียคุณภาพของรูปภาพ
จึงทำให้ไฟล์ APK มีขนาดเล็กลงและนักพัฒนาแอปดูแลรักษาน้อยลง นอกจากนี้ คุณยังใช้รูปภาพเวกเตอร์สำหรับภาพเคลื่อนไหวได้โดยใช้ไฟล์ XML หลายไฟล์แทนรูปภาพหลายรูปสำหรับความละเอียดการแสดงผลแต่ละรายการ
หน้านี้และวิดีโอด้านล่างจะให้ภาพรวมเกี่ยวกับวิธีสร้าง Vector Drawable ใน XML นอกจากนี้ Android Studio ยังแปลงไฟล์ SVG เป็นรูปแบบ Vector Drawable ได้ด้วยตามที่อธิบายไว้ใน การใช้ กราฟิกเวกเตอร์หลายความหนาแน่น
Android 5.0 (API ระดับ 21) เป็นเวอร์ชันแรกที่รองรับ Vector Drawable อย่างเป็นทางการด้วย
VectorDrawable
และ AnimatedVectorDrawable แต่
คุณสามารถรองรับเวอร์ชันเก่าได้ด้วยไลบรารีการสนับสนุน Android ซึ่งมีคลาส
VectorDrawableCompat และ
AnimatedVectorDrawableCompat
เกี่ยวกับคลาส VectorDrawable
VectorDrawable กำหนดออบเจ็กต์ Drawable แบบคงที่
เช่นเดียวกับรูปแบบ SVG ภาพกราฟิกเวกเตอร์แต่ละรายการจะกำหนดเป็นลำดับชั้นแบบต้นไม้ ซึ่งประกอบด้วยออบเจ็กต์ path และ group
path แต่ละรายการจะมีรูปทรงเรขาคณิตของเส้นขอบของออบเจ็กต์ และ
group จะมีรายละเอียดสำหรับการแปลง ระบบจะวาดเส้นทางทั้งหมด
ตามลำดับที่ปรากฏในไฟล์ XML
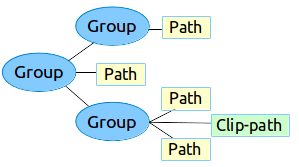
รูปที่ 1 ตัวอย่างลำดับชั้นของชิ้นงาน Vector Drawable
เครื่องมือ Vector asset studio มีวิธีง่ายๆ ในการเพิ่มภาพกราฟิกเวกเตอร์ลงในโปรเจ็กต์ เป็นไฟล์ XML
ตัวอย่าง XML
นี่คือตัวอย่างไฟล์ XML ของ VectorDrawable ที่แสดงรูปภาพ
แบตเตอรี่ในโหมดชาร์จ
<!-- res/drawable/battery_charging.xml -->
<vector xmlns:android="http://schemas.android.com/apk/res/android"
    android:height="24dp"
    android:width="24dp"
    android:viewportWidth="24.0"
    android:viewportHeight="24.0">
   <group
         android:name="rotationGroup"
         android:pivotX="10.0"
         android:pivotY="10.0"
         android:rotation="15.0" >
      <path
        android:name="vect"
        android:fillColor="#FF000000"
        android:pathData="M15.67,4H14V2h-4v2H8.33C7.6,4 7,4.6 7,5.33V9h4.93L13,7v2h4V5.33C17,4.6 16.4,4 15.67,4z"
        android:fillAlpha=".3"/>
      <path
        android:name="draw"
        android:fillColor="#FF000000"
        android:pathData="M13,12.5h2L11,20v-5.5H9L11.93,9H7v11.67C7,21.4 7.6,22 8.33,22h7.33c0.74,0 1.34,-0.6 1.34,-1.33V9h-4v3.5z"/>
   </group>
</vector>
XML นี้จะแสดงรูปภาพต่อไปนี้

เกี่ยวกับคลาส AnimatedVectorDrawable
AnimatedVectorDrawable จะเพิ่มภาพเคลื่อนไหวลงในพร็อพเพอร์ตี้ของกราฟิกเวกเตอร์
คุณสามารถกำหนดภาพกราฟิกเวกเตอร์เคลื่อนไหวเป็นไฟล์ทรัพยากร 3 ไฟล์แยกกัน หรือเป็นไฟล์ XML ไฟล์เดียวที่กำหนด Drawable ทั้งหมด มาดูแนวทางทั้ง 2 แบบเพื่อให้เข้าใจได้ดียิ่งขึ้น ได้แก่ ไฟล์ XML หลายไฟล์ และ ไฟล์ XML ไฟล์เดียว
ไฟล์ XML หลายไฟล์
การใช้แนวทางนี้จะช่วยให้คุณกำหนดไฟล์ XML 3 ไฟล์แยกกันได้ ดังนี้
- ไฟล์ XML ของ
VectorDrawable -
ไฟล์ XML ที่กำหนดเป้าหมาย, เส้นทางและกลุ่มเป้าหมายที่จะเคลื่อนไหว, พร็อพเพอร์ตี้ และภาพเคลื่อนไหวที่กำหนดเป็นออบเจ็กต์ หรือออบเจ็กต์
AnimatedVectorDrawableVectorDrawableObjectAnimatorAnimatorSet - ไฟล์ XML ของ Animator
ตัวอย่างไฟล์ XML หลายไฟล์
ไฟล์ XML ต่อไปนี้แสดงภาพเคลื่อนไหวของภาพกราฟิกเวกเตอร์
- ไฟล์ XML ของ VectorDrawable:
vd.xml -
<vector xmlns:android="http://schemas.android.com/apk/res/android"
   android:height="64dp"
   android:width="64dp"
   android:viewportHeight="600"
   android:viewportWidth="600" >
   <group
      android:name="rotationGroup"
      android:pivotX="300.0"
      android:pivotY="300.0"
      android:rotation="45.0" >
      <path
         android:name="vectorPath"
         android:fillColor="#000000"
         android:pathData="M300,70 l 0,-70 70,70 0,0 -70,70z" />
   </group>
</vector>
- ไฟล์ XML ของ AnimatedVectorDrawable:
avd.xml -
<animated-vector xmlns:android="http://schemas.android.com/apk/res/android"
   android:drawable="@drawable/vd" >
     <target
         android:name="rotationGroup"
         android:animation="@anim/rotation" />
     <target
         android:name="vectorPath"
         android:animation="@anim/path_morph" />
</animated-vector>
- ไฟล์ XML ของ Animator ที่ใช้ในไฟล์ XML ของ AnimatedVectorDrawable
ไฟล์:
rotation.xmlและpath_morph.xml -
<objectAnimator
   android:duration="6000"
   android:propertyName="rotation"
   android:valueFrom="0"
   android:valueTo="360" />
<set xmlns:android="http://schemas.android.com/apk/res/android">
   <objectAnimator
      android:duration="3000"
      android:propertyName="pathData"
      android:valueFrom="M300,70 l 0,-70 70,70 0,0   -70,70z"
      android:valueTo="M300,70 l 0,-70 70,0  0,140 -70,0 z"
      android:valueType="pathType"/>
</set>
ไฟล์ XML ไฟล์เดียว
การใช้แนวทางนี้จะช่วยให้คุณผสานไฟล์ XML ที่เกี่ยวข้องเป็นไฟล์ XML ไฟล์เดียว
ผ่านรูปแบบชุด XML ได้ เมื่อสร้างแอป แท็ก
aapt จะสร้างทรัพยากรแยกต่างหากและอ้างอิงทรัพยากรเหล่านั้นใน
เวกเตอร์เคลื่อนไหว แนวทางนี้ต้องใช้ Build Tools 24 ขึ้นไป และเอาต์พุตจะเข้ากันได้กับรุ่นก่อนหน้า
ตัวอย่างไฟล์ XML ไฟล์เดียว
<animated-vector
    xmlns:android="http://schemas.android.com/apk/res/android"
    xmlns:aapt="http://schemas.android.com/aapt">
    <aapt:attr name="android:drawable">
        <vector
            android:width="24dp"
            android:height="24dp"
            android:viewportWidth="24"
            android:viewportHeight="24">
            <path
                android:name="root"
                android:strokeWidth="2"
                android:strokeLineCap="square"
                android:strokeColor="?android:colorControlNormal"
                android:pathData="M4.8,13.4 L9,17.6 M10.4,16.2 L19.6,7" />
        </vector>
    </aapt:attr>
    <target android:name="root">
        <aapt:attr name="android:animation">
            <objectAnimator
                android:propertyName="pathData"
                android:valueFrom="M4.8,13.4 L9,17.6 M10.4,16.2 L19.6,7"
                android:valueTo="M6.4,6.4 L17.6,17.6 M6.4,17.6 L17.6,6.4"
                android:duration="300"
                android:interpolator="@android:interpolator/fast_out_slow_in"
                android:valueType="pathType" />
        </aapt:attr>
    </target>
</animated-vector>
โซลูชันความเข้ากันได้แบบย้อนหลังของ Vector Drawable
หากต้องการรองรับ Vector Drawable และ Animated Vector Drawable ในอุปกรณ์ที่ใช้แพลตฟอร์มเวอร์ชันต่ำกว่า Android 5.0 (ระดับ API 21) หรือใช้ fillColor, fillType และ strokeColor ใน Android เวอร์ชันต่ำกว่า Android 7.0 (ระดับ API 24) คุณจะใช้ VectorDrawableCompat และ AnimatedVectorDrawableCompat ได้ผ่านไลบรารีการสนับสนุน 2 รายการ ได้แก่ support-vector-drawable และ animated-vector-drawable ตามลำดับ
Android Studio 1.4 ได้เปิดตัวการรองรับความเข้ากันได้แบบจำกัดสำหรับ Vector Drawable โดยการสร้างไฟล์ PNG ในเวลาบิลด์ อย่างไรก็ตาม ไลบรารีการสนับสนุน Vector Drawable และ Animated Vector Drawable มีความยืดหยุ่นและความเข้ากันได้ที่หลากหลาย ซึ่งเป็นไลบรารีการสนับสนุน ดังนั้นคุณจึงใช้กับแพลตฟอร์ม Android ทุกเวอร์ชันได้ตั้งแต่ Android 2.1 (ระดับ API 7 ขึ้นไป) หากต้องการกำหนดค่าแอปให้ใช้ไลบรารีการสนับสนุนเวกเตอร์ ให้เพิ่มองค์ประกอบ vectorDrawables ลงในไฟล์ build.gradle ในโมดูลแอป
ใช้ข้อมูลโค้ดต่อไปนี้เพื่อกำหนดค่าองค์ประกอบ vectorDrawables
ดึงดูด
// For Gradle Plugin 2.0+
android {
    defaultConfig {
        vectorDrawables.useSupportLibrary = true
    }
}
Kotlin
// For Gradle Plugin 2.0+
android {
    defaultConfig {
        vectorDrawables.useSupportLibrary = true
    }
}
ดึงดูด
// For Gradle Plugin 1.5 or below
android {
    defaultConfig {
        // Stops the Gradle plugin’s automatic rasterization of vectors
        generatedDensities = []
    }
    // Flag notifies aapt to keep the attribute IDs around
    aaptOptions {
        additionalParameters "--no-version-vectors"
    }
}
Kotlin
// For Gradle Plugin 1.5 or below
android {
    defaultConfig {
        // Stops the Gradle plugin’s automatic rasterization of vectors
        generatedDensities()
    }
    // Flag notifies aapt to keep the attribute IDs around
    aaptOptions {
        additionalParameters("--no-version-vectors")
    }
}
คุณสามารถใช้ VectorDrawableCompat
และ
AnimatedVectorDrawableCompat ในอุปกรณ์ทั้งหมด
ที่ใช้ Android 4.0 (ระดับ API 14) ขึ้นไป เนื่องจากวิธีที่ Android
โหลด Drawable ไม่ใช่ทุกที่ที่ยอมรับรหัส Drawable เช่น ในไฟล์ XML
จะรองรับการโหลด Vector Drawable แพ็กเกจ
android.support.v7.appcompat ได้เพิ่มฟีเจอร์ต่างๆ
เพื่อให้ใช้ Vector Drawable ได้ง่าย ประการแรก เมื่อคุณใช้
android.support.v7.appcompat แพ็กเกจกับ
ImageView หรือคลาสย่อย เช่น
ImageButton และ
FloatingActionButton คุณจะใช้
แอตทริบิวต์ app:srcCompat ใหม่เพื่ออ้างอิง Vector Drawable
รวมถึง Drawable อื่นๆ ที่ใช้ได้กับ android:src ได้
<ImageView
  android:layout_width="wrap_content"
  android:layout_height="wrap_content"
  app:srcCompat="@drawable/ic_add" />
หากต้องการเปลี่ยน Drawable ในรันไทม์ คุณสามารถใช้วิธี
setImageResource()
ได้เช่นเดิม การใช้ AppCompat
และ app:srcCompat เป็นวิธีที่ปลอดภัยที่สุดในการผสานรวม
Vector Drawable เข้ากับแอป
ไลบรารีการสนับสนุนเวอร์ชัน 25.4.0 ขึ้นไปรองรับฟีเจอร์ต่อไปนี้
- การแปลงเส้นทาง (ตัวประเมิน PathType) ใช้เพื่อแปลง เส้นทางหนึ่งเป็นอีกเส้นทางหนึ่ง
- การประมาณเส้นทาง ใช้เพื่อกำหนดตัวประมาณแบบยืดหยุ่น (แสดงเป็นเส้นทาง) แทนตัวประมาณที่ระบบกำหนด เช่น LinearInterpolator
ไลบรารีการสนับสนุนเวอร์ชัน 26.0.0-beta1 ขึ้นไปรองรับฟีเจอร์ต่อไปนี้
- การเคลื่อนที่ไปตามเส้นทาง ออบเจ็กต์รูปทรงเรขาคณิตสามารถเคลื่อนที่ไปรอบๆ ตามเส้นทางที่กำหนดเป็นส่วนหนึ่งของภาพเคลื่อนไหว
ตัวอย่างไฟล์ XML หลายไฟล์ที่ใช้ไลบรารีการสนับสนุน
ไฟล์ XML ต่อไปนี้แสดงแนวทางในการใช้ไฟล์ XML หลายไฟล์ เพื่อสร้างภาพเคลื่อนไหวของภาพกราฟิกเวกเตอร์
- ไฟล์ XML ของ VectorDrawable:
vd.xml -
<vector xmlns:android="http://schemas.android.com/apk/res/android"
   android:height="64dp"
   android:width="64dp"
   android:viewportHeight="600"
   android:viewportWidth="600" >
   <group
      android:name="rotationGroup"
      android:pivotX="300.0"
      android:pivotY="300.0"
      android:rotation="45.0" >
      <path
         android:name="vectorPath"
         android:fillColor="#000000"
         android:pathData="M300,70 l 0,-70 70,70 0,0 -70,70z" />
   </group>
</vector>
- ไฟล์ XML ของ AnimatedVectorDrawable:
avd.xml -
<animated-vector xmlns:android="http://schemas.android.com/apk/res/android"
   android:drawable="@drawable/vd" >
     <target
         android:name="rotationGroup"
         android:animation="@anim/rotation" />
</animated-vector>
- ไฟล์ XML ของ Animator ที่ใช้ในไฟล์ XML ของ AnimatedVectorDrawable
ไฟล์:
rotation.xml -
<objectAnimator
   android:duration="6000"
   android:propertyName="rotation"
   android:valueFrom="0"
   android:valueTo="360" />
ไฟล์ XML ไฟล์เดียว
ไฟล์ XML ต่อไปนี้แสดงแนวทางในการใช้ไฟล์ XML ไฟล์เดียว เพื่อสร้างภาพเคลื่อนไหวของภาพกราฟิกเวกเตอร์ เมื่อสร้างแอป แท็ก
aapt จะสร้างทรัพยากรแยกต่างหากและอ้างอิงทรัพยากรเหล่านั้นใน
เวกเตอร์เคลื่อนไหว แนวทางนี้ต้องใช้ Build Tools 24 ขึ้นไป และเอาต์พุตจะเข้ากันได้กับรุ่นก่อนหน้า
ตัวอย่างไฟล์ XML ไฟล์เดียวที่ใช้ไลบรารีการสนับสนุน
<animated-vector
    xmlns:android="http://schemas.android.com/apk/res/android"
    xmlns:aapt="http://schemas.android.com/aapt">
    <aapt:attr name="android:drawable">
        <vector xmlns:android="http://schemas.android.com/apk/res/android"
            android:width="64dp"
            android:height="64dp"
            android:viewportWidth="600"
            android:viewportHeight="600">
            <group
                android:name="rotationGroup"
                android:pivotX="300"
                android:pivotY="300"
                android:rotation="45.0" >
                <path
                    android:name="vectorPath"
                    android:fillColor="#000000"
                    android:pathData="M300,70 l 0,-70 70,70 0,0 -70,70z" />
            </group>
        </vector>
    </aapt:attr>
    <target android:name="rotationGroup">
        <aapt:attr name="android:animation">
            <objectAnimator
                android:propertyName="rotation"
                android:valueFrom="0"
                android:valueTo="360"
                android:duration="6000"
                android:interpolator="@android:interpolator/fast_out_slow_in" />
        </aapt:attr>
    </target>
</animated-vector>