প্রতিক্রিয়াশীল UI এবং নেভিগেশন
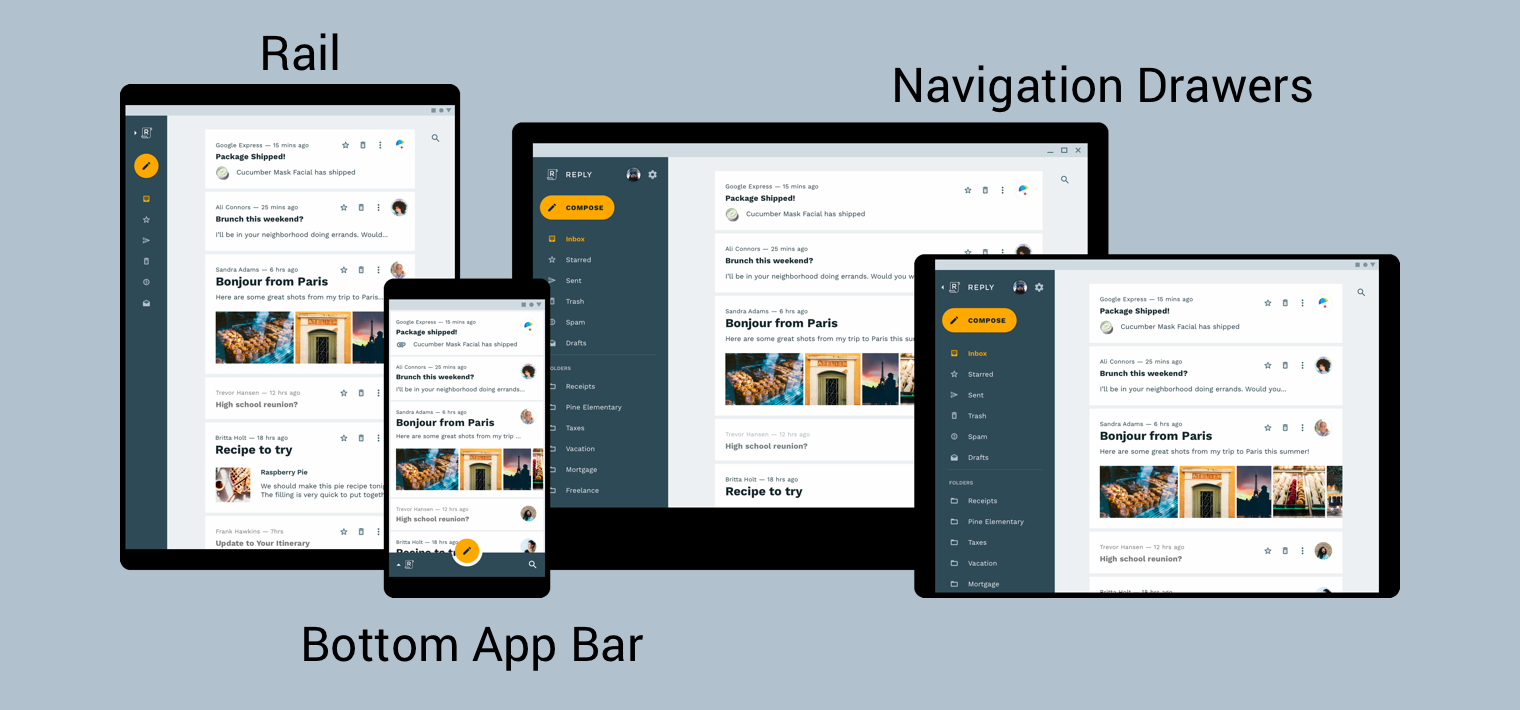
আপনার ব্যবহারকারীদের সর্বোত্তম সম্ভাব্য নেভিগেশন অভিজ্ঞতা প্রদান করার জন্য, আপনাকে একটি নেভিগেশন UI প্রদান করা উচিত যা ব্যবহারকারীর ডিভাইসের প্রস্থ, উচ্চতা এবং ক্ষুদ্রতম-প্রস্থের সাথে মানানসই। আপনি একটি নীচের অ্যাপ বার , একটি সর্বদা-উপস্থিত বা সংকোচনযোগ্য নেভিগেশন ড্রয়ার , একটি রেল , অথবা উপলব্ধ স্ক্রীন স্থান এবং আপনার অ্যাপের অনন্য শৈলীর উপর ভিত্তি করে সম্পূর্ণ নতুন কিছু ব্যবহার করতে চাইতে পারেন৷

পণ্য স্থাপত্যের উপাদান নকশা নির্দেশিকা একটি প্রতিক্রিয়াশীল UI তৈরির জন্য অতিরিক্ত প্রসঙ্গ এবং বিবেচনা প্রদান করে—অর্থাৎ, একটি UI যা গতিশীলভাবে পরিবেশগত পরিবর্তনের সাথে খাপ খায়। পরিবেশগত পরিবর্তনের কয়েকটি উদাহরণের মধ্যে রয়েছে প্রস্থ, উচ্চতা, অভিযোজন এবং ব্যবহারকারীর ভাষার পছন্দের সমন্বয়। এই পরিবেশগত বৈশিষ্ট্যগুলিকে সম্মিলিতভাবে ডিভাইসের কনফিগারেশন হিসাবে উল্লেখ করা হয়।
রানটাইমে যখন এই বৈশিষ্ট্যগুলির মধ্যে এক বা একাধিক পরিবর্তন হয়, তখন Android OS আপনার অ্যাপের কার্যকলাপ এবং টুকরোগুলি ধ্বংস করে এবং তারপরে পুনরায় তৈরি করে প্রতিক্রিয়া জানায়৷ অতএব, অ্যান্ড্রয়েডে একটি প্রতিক্রিয়াশীল UI সমর্থন করার জন্য আপনি যা করতে পারেন তা হল যে আপনি উপযুক্ত যেখানে রিসোর্স কনফিগারেশন কোয়ালিফায়ার ব্যবহার করছেন এবং হার্ড-কোডেড লেআউট আকারের ব্যবহার এড়িয়ে যাচ্ছেন তা নিশ্চিত করা।
একটি প্রতিক্রিয়াশীল UI এ বিশ্বব্যাপী নেভিগেশন বাস্তবায়ন করা
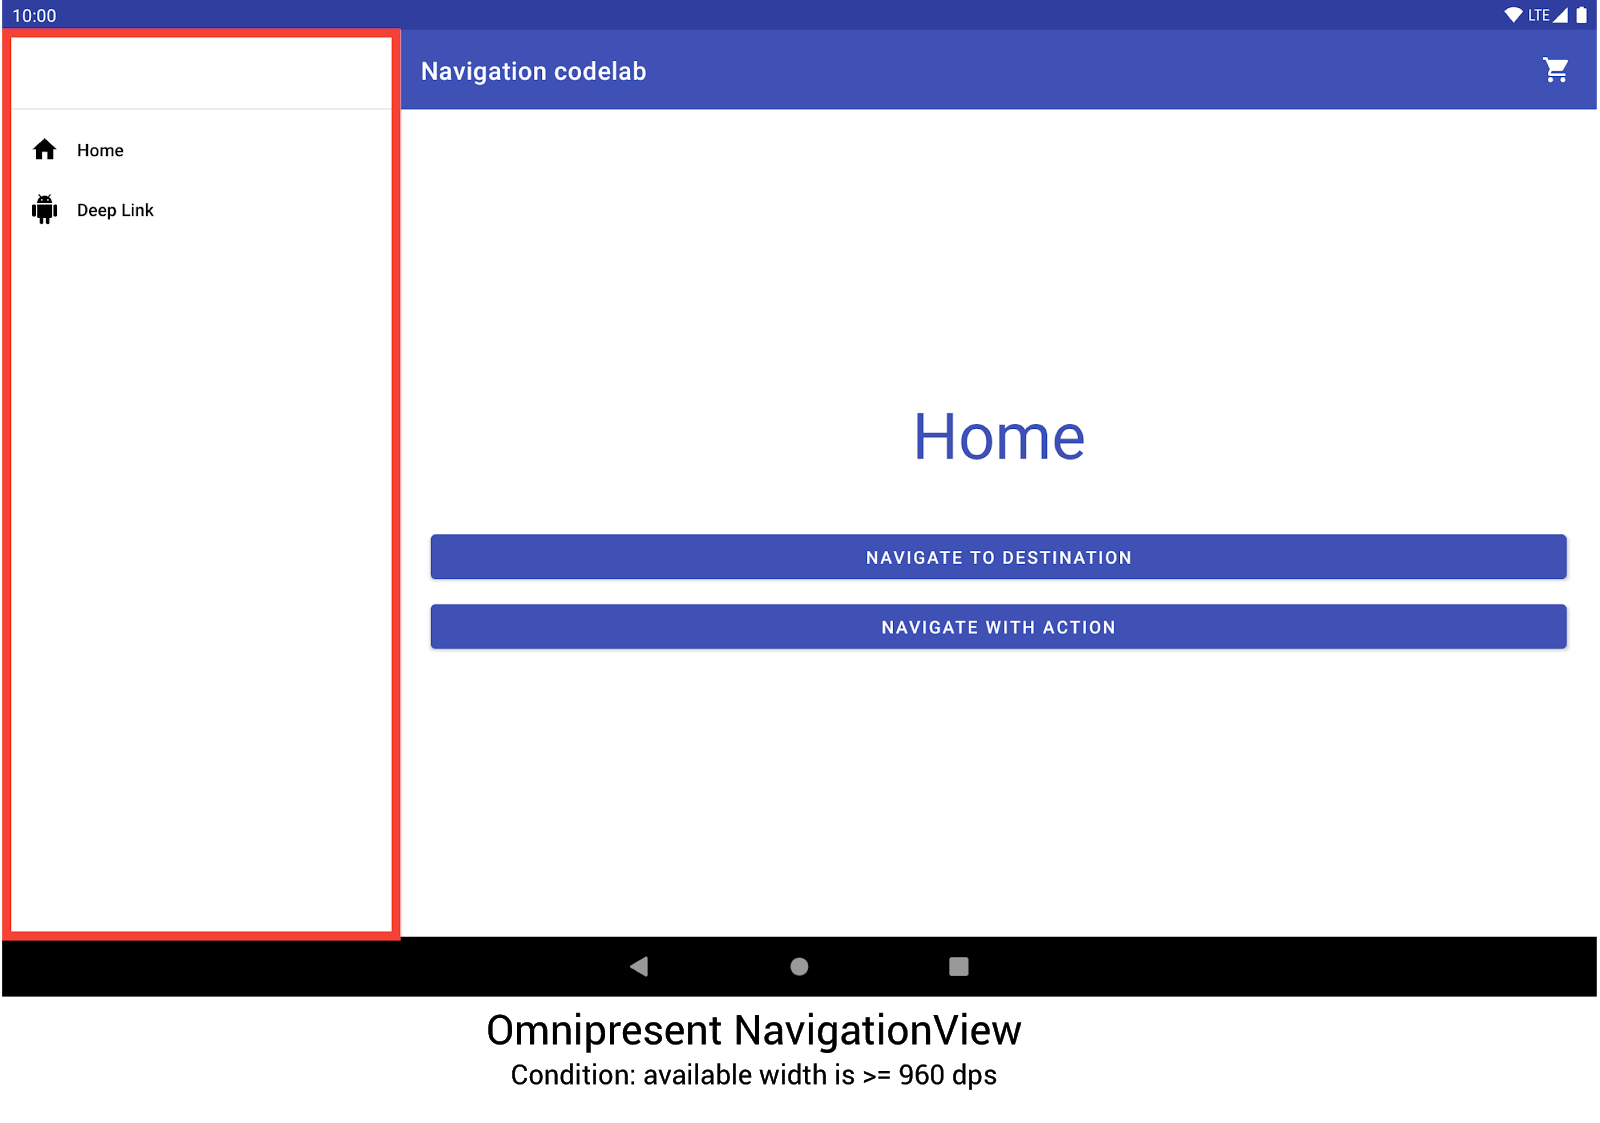
একটি প্রতিক্রিয়াশীল UI এর অংশ হিসাবে বিশ্বব্যাপী নেভিগেশন প্রয়োগ করা আপনার নেভিগেশন গ্রাফ হোস্ট করা কার্যকলাপের সাথে শুরু হয়। একটি হ্যান্ডস-অন উদাহরণের জন্য, নেভিগেশন কোডল্যাবটি দেখুন। কোডল্যাব নেভিগেশন মেনু প্রদর্শনের জন্য একটি NavigationView ব্যবহার করে, যেমন চিত্র 2-এ দেখানো হয়েছে। কমপক্ষে 960dp প্রস্থে রেন্ডার করা ডিভাইসে চলার সময়, এই NavigationView সর্বদা অন-স্ক্রীনে থাকে।

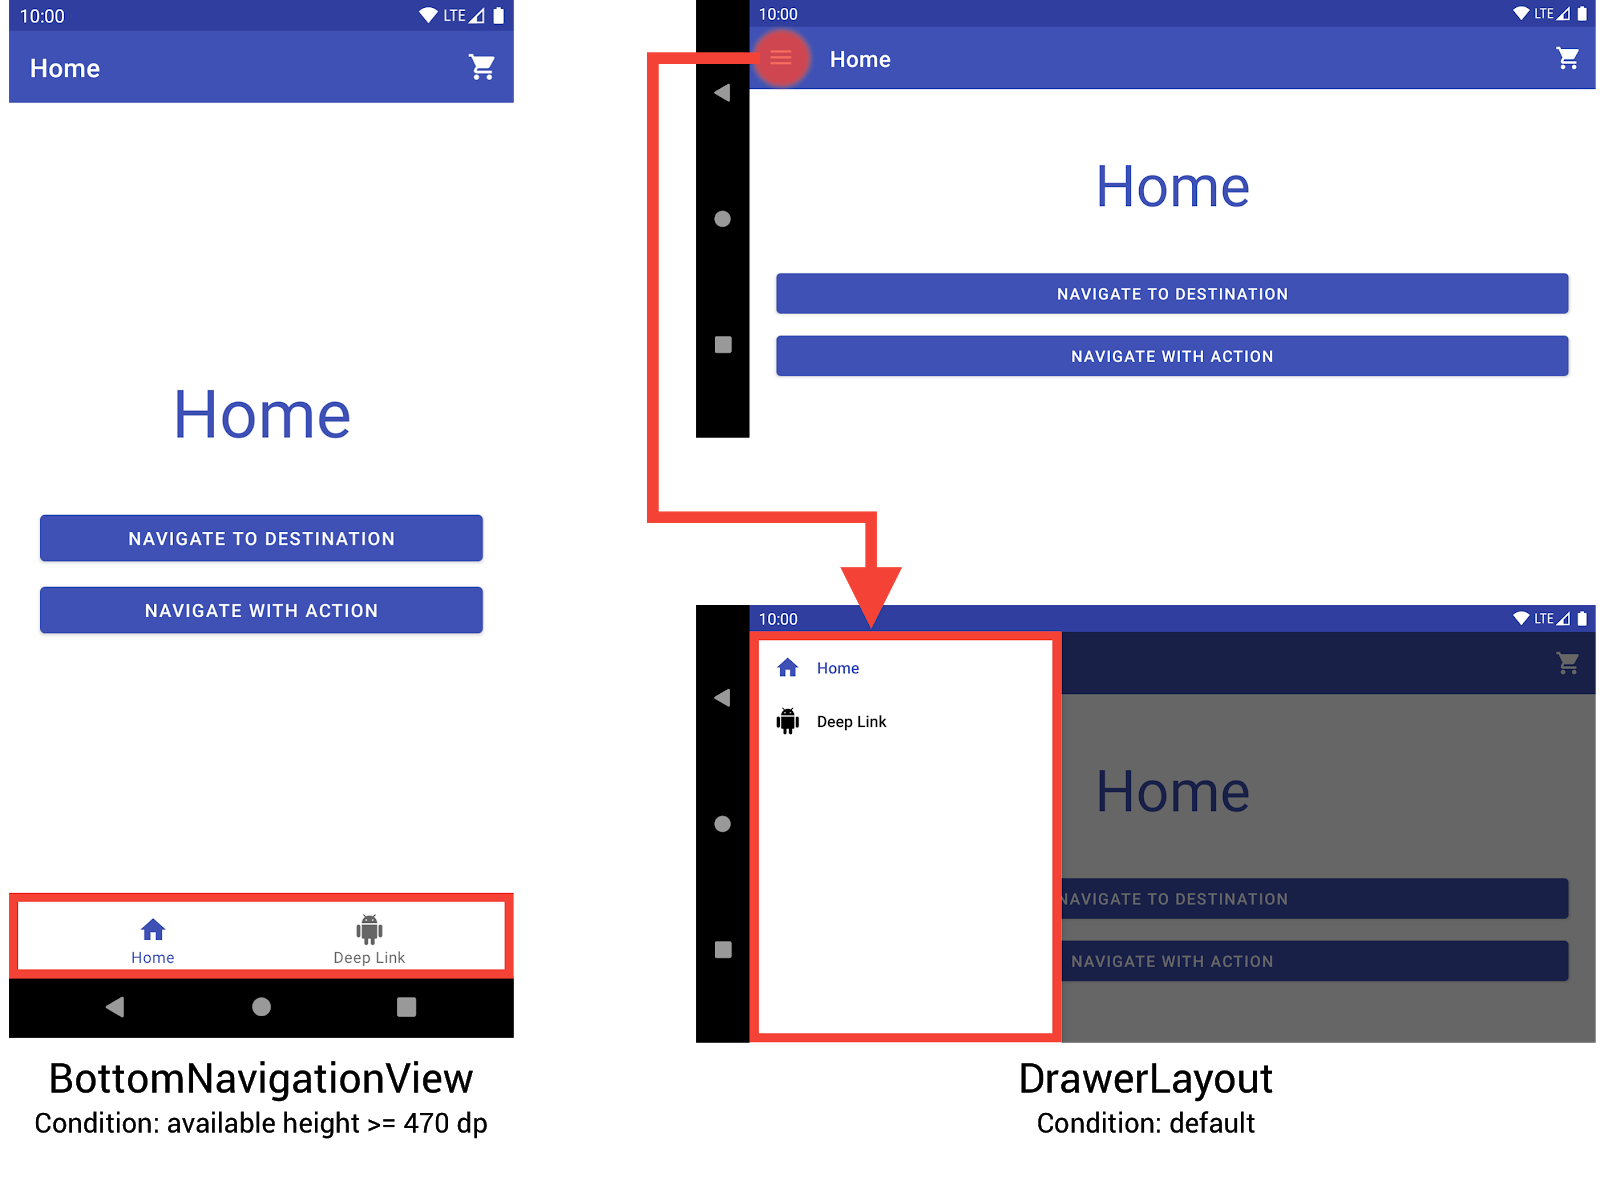
NavigationView ব্যবহার করে। অন্যান্য ডিভাইসের আকার এবং অভিযোজনগুলি প্রয়োজন অনুসারে DrawerLayout বা BottomNavigationView মধ্যে গতিশীলভাবে স্যুইচ করে।

BottomNavigationView এবং DrawerLayout ব্যবহার করে।আপনি তিনটি ভিন্ন লেআউট তৈরি করে এই আচরণটি বাস্তবায়ন করতে পারেন, যেখানে প্রতিটি লেআউট কাঙ্খিত নেভিগেশন উপাদানগুলিকে সংজ্ঞায়িত করে এবং বর্তমান ডিভাইস কনফিগারেশনের উপর ভিত্তি করে শ্রেণিবিন্যাস দেখে।
যে কনফিগারেশনে প্রতিটি লেআউট প্রযোজ্য তা নির্দেশিত কাঠামোর দ্বারা নির্ধারিত হয় যেখানে লেআউট ফাইলটি স্থাপন করা হয়েছে। উদাহরণস্বরূপ, NavigationView লেআউট ফাইলটি res/layout-w960dp ডিরেক্টরিতে পাওয়া যায়।
<!-- res/layout-w960dp/navigation_activity.xml -->
<RelativeLayout
   xmlns:android="http://schemas.android.com/apk/res/android"
   xmlns:app="http://schemas.android.com/apk/res-auto"
   xmlns:tools="http://schemas.android.com/tools"
   android:layout_width="match_parent"
   android:layout_height="match_parent"
   tools:context="com.example.android.codelabs.navigation.MainActivity">

   <com.google.android.material.navigation.NavigationView
       android:id="@+id/nav_view"
       android:layout_width="wrap_content"
       android:layout_height="match_parent"
       android:layout_alignParentStart="true"
       app:elevation="0dp"
       app:headerLayout="@layout/nav_view_header"
       app:menu="@menu/nav_drawer_menu" />

   <View
       android:layout_width="1dp"
       android:layout_height="match_parent"
       android:layout_toEndOf="@id/nav_view"
       android:background="?android:attr/listDivider" />

   <androidx.appcompat.widget.Toolbar
       android:id="@+id/toolbar"
       android:layout_width="match_parent"
       android:layout_height="wrap_content"
       android:layout_alignParentTop="true"
       android:layout_toEndOf="@id/nav_view"
       android:background="@color/colorPrimary"
       android:theme="@style/ThemeOverlay.MaterialComponents.Dark.ActionBar" />

   <androidx.fragment.app.FragmentContainerView
       android:id="@+id/my_nav_host_fragment"
       android:name="androidx.navigation.fragment.NavHostFragment"
       android:layout_width="match_parent"
       android:layout_height="match_parent"
       android:layout_below="@id/toolbar"
       android:layout_toEndOf="@id/nav_view"
       app:defaultNavHost="true"
       app:navGraph="@navigation/mobile_navigation" />
</RelativeLayout>
নীচের নেভিগেশন ভিউ res/layout-h470dp ডিরেক্টরিতে পাওয়া যায়:
<!-- res/layout-h470dp/navigation_activity.xml -->
<LinearLayout
   xmlns:android="http://schemas.android.com/apk/res/android"
   xmlns:app="http://schemas.android.com/apk/res-auto"
   xmlns:tools="http://schemas.android.com/tools"
   android:layout_width="match_parent"
   android:layout_height="match_parent"
   android:orientation="vertical"
   tools:context="com.example.android.codelabs.navigation.MainActivity">

   <androidx.appcompat.widget.Toolbar
       android:id="@+id/toolbar"
       android:layout_width="match_parent"
       android:layout_height="wrap_content"
       android:background="@color/colorPrimary"
       android:theme="@style/ThemeOverlay.MaterialComponents.Dark.ActionBar" />

   <androidx.fragment.app.FragmentContainerView
       android:id="@+id/my_nav_host_fragment"
       android:name="androidx.navigation.fragment.NavHostFragment"
       android:layout_width="match_parent"
       android:layout_height="0dp"
       android:layout_weight="1"
       app:defaultNavHost="true"
       app:navGraph="@navigation/mobile_navigation" />

   <com.google.android.material.bottomnavigation.BottomNavigationView
       android:id="@+id/bottom_nav_view"
       android:layout_width="match_parent"
       android:layout_height="wrap_content"
       app:menu="@menu/bottom_nav_menu" />
</LinearLayout>
ড্রয়ারের লেআউটটি res/layout ডিরেক্টরিতে পাওয়া যায়। কোনো কনফিগারেশন-নির্দিষ্ট কোয়ালিফায়ার ছাড়াই ডিফল্ট লেআউটের জন্য এই ডিরেক্টরিটি ব্যবহার করুন:
<!-- res/layout/navigation_activity.xml -->
<androidx.drawerlayout.widget.DrawerLayout
   xmlns:android="http://schemas.android.com/apk/res/android"
   xmlns:app="http://schemas.android.com/apk/res-auto"
   xmlns:tools="http://schemas.android.com/tools"
   android:id="@+id/drawer_layout"
   android:layout_width="match_parent"
   android:layout_height="match_parent"
   tools:context="com.example.android.codelabs.navigation.MainActivity">

   <LinearLayout
       android:layout_width="match_parent"
       android:layout_height="match_parent"
       android:orientation="vertical">

       <androidx.appcompat.widget.Toolbar
           android:id="@+id/toolbar"
           android:layout_width="match_parent"
           android:layout_height="wrap_content"
           android:background="@color/colorPrimary"
           android:theme="@style/ThemeOverlay.MaterialComponents.Dark.ActionBar" />

       <androidx.fragment.app.FragmentContainerView
           android:id="@+id/my_nav_host_fragment"
           android:name="androidx.navigation.fragment.NavHostFragment"
           android:layout_width="match_parent"
           android:layout_height="match_parent"
           app:defaultNavHost="true"
           app:navGraph="@navigation/mobile_navigation" />
   </LinearLayout>

   <com.google.android.material.navigation.NavigationView
       android:id="@+id/nav_view"
       android:layout_width="wrap_content"
       android:layout_height="match_parent"
       android:layout_gravity="start"
       app:menu="@menu/nav_drawer_menu" />
</androidx.drawerlayout.widget.DrawerLayout>
কোন সংস্থানগুলি প্রয়োগ করতে হবে তা নির্ধারণ করার সময় Android অগ্রাধিকারের একটি ক্রম অনুসরণ করে৷ এই উদাহরণের জন্য নির্দিষ্ট, -w960dp (বা উপলব্ধ প্রস্থ >= 960dp) -h470dp (বা উপলব্ধ উচ্চতা >= 470) এর চেয়ে অগ্রাধিকার নেয়। যদি ডিভাইস কনফিগারেশন এই শর্তগুলির মধ্যে একটির সাথে মেলে না, তাহলে ডিফল্ট লেআউট রিসোর্স ( res/layout/navigation_activity.xml ) ব্যবহার করা হয়।
নেভিগেশন ইভেন্টগুলি পরিচালনা করতে, আপনাকে শুধুমাত্র সেই ইভেন্টগুলিকে ওয়্যার আপ করতে হবে যা বর্তমানে উপস্থিত উইজেটগুলির সাথে সামঞ্জস্যপূর্ণ, নিম্নলিখিত উদাহরণে দেখানো হয়েছে৷
কোটলিন
class MainActivity : AppCompatActivity() {

   private lateinit var appBarConfiguration : AppBarConfiguration

   override fun onCreate(savedInstanceState: Bundle?) {
      super.onCreate(savedInstanceState)
      setContentView(R.layout.navigation_activity)
      val drawerLayout : DrawerLayout? = findViewById(R.id.drawer_layout)
      appBarConfiguration = AppBarConfiguration(
                  setOf(R.id.home_dest, R.id.deeplink_dest),
                  drawerLayout)

      ...

      // Initialize the app bar with the navigation drawer if present.
      // If the drawerLayout is not null here, a Navigation button will be added
      // to the app bar whenever the user is on a top-level destination.
      setupActionBarWithNavController(navController, appBarConfig)

      // Initialize the NavigationView if it is present,
      // so that clicking an item takes
      // the user to the appropriate destination.
      val sideNavView = findViewById<NavigationView>(R.id.nav_view)
      sideNavView?.setupWithNavController(navController)

      // Initialize the BottomNavigationView if it is present,
      // so that clicking an item takes
      // the user to the appropriate destination.
      val bottomNav = findViewById<BottomNavigationView>(R.id.bottom_nav_view)
      bottomNav?.setupWithNavController(navController)

      ...
    }

    ...
}
জাভা
public class MainActivity extends AppCompatActivity {

   private AppBarConfiguration appBarConfiguration;

   @Override
   protected void onCreate(@Nullable Bundle savedInstanceState) {
       super.onCreate(savedInstanceState);
       setContentView(R.layout.navigation_activity);
       NavHostFragment host = (NavHostFragment) getSupportFragmentManager()
               .findFragmentById(R.id.my_nav_host_fragment);
       NavController navController = host.getNavController();

       DrawerLayout drawerLayout = findViewById(R.id.drawer_layout);
       appBarConfiguration = new AppBarConfiguration.Builder(
               R.id.home_dest, R.id.deeplink_dest)
               .setDrawerLayout(drawerLayout)
               .build();

       // Initialize the app bar with the navigation drawer if present.
       // If the drawerLayout is not null here, a Navigation button will be added to
       // the app bar whenever the user is on a top-level destination.
       NavigationUI.setupActionBarWithNavController(
               this, navController, appBarConfiguration);


       // Initialize the NavigationView if it is present,
       // so that clicking an item takes
       // the user to the appropriate destination.
       NavigationView sideNavView = findViewById(R.id.nav_view);
       if(sideNavView != null) {
           NavigationUI.setupWithNavController(sideNavView, navController);
       }

       // Initialize the BottomNavigationView if it is present,
       // so that clicking an item takes
       // the user to the appropriate destination.
       BottomNavigationView bottomNav = findViewById(R.id.bottom_nav_view);
       if(bottomNav != null) {
           NavigationUI.setupWithNavController(bottomNav, navController);
       }

   }
}
যদি ডিভাইস কনফিগারেশন পরিবর্তিত হয়, যদি না স্পষ্টভাবে অন্যথায় কনফিগার করা হয় , Android পূর্ববর্তী কনফিগারেশনের কার্যকলাপকে এর সাথে সম্পর্কিত দৃষ্টিভঙ্গি সহ ধ্বংস করে। এটি তারপর নতুন কনফিগারেশনের জন্য ডিজাইন করা সংস্থানগুলির সাথে কার্যকলাপটি পুনরায় তৈরি করে। ক্রিয়াকলাপ, ধ্বংস এবং পুনরায় তৈরি করা হচ্ছে, তারপর স্বয়ংক্রিয়ভাবে onCreate() এ যথাযথ বিশ্বব্যাপী নেভিগেশন উপাদানগুলিকে সংযুক্ত করে।
স্প্লিট-ভিউ লেআউটের বিকল্প বিবেচনা করুন
স্প্লিট-ভিউ লেআউট, বা মাস্টার/ডিটেইল লেআউট , একসময় ট্যাবলেট এবং অন্যান্য বড় স্ক্রীন ডিভাইসের জন্য ডিজাইন করার জন্য খুব জনপ্রিয় এবং প্রস্তাবিত উপায় ছিল।
অ্যান্ড্রয়েড ট্যাবলেট প্রবর্তনের পর থেকে, ডিভাইসগুলির ইকোসিস্টেম দ্রুত বৃদ্ধি পেয়েছে। একটি ফ্যাক্টর যা বড় পর্দার ডিভাইসগুলির জন্য ডিজাইনের স্থানকে যথেষ্টভাবে প্রভাবিত করেছে তা হল মাল্টি-উইন্ডো মোডের প্রবর্তন, বিশেষ করে মুক্ত-ফর্মের উইন্ডোগুলি যেগুলি সম্পূর্ণরূপে পুনরায় আকার দেওয়া যায়, যেমন ChromeOS ডিভাইসগুলিতে। এটি স্ক্রীনের আকারের উপর ভিত্তি করে আপনার নেভিগেশন কাঠামো পরিবর্তন করার পরিবর্তে আপনার অ্যাপের প্রতিটি স্ক্রীন প্রতিক্রিয়াশীল হওয়ার উপর উল্লেখযোগ্যভাবে বেশি জোর দেয়।
যদিও নেভিগেশন লাইব্রেরি ব্যবহার করে একটি স্প্লিট-ভিউ লেআউট ইন্টারফেস বাস্তবায়ন করা সম্ভব, আপনার অন্যান্য বিকল্প বিবেচনা করা উচিত।
গন্তব্যের নাম
আপনি যদি android:label অ্যাট্রিবিউট ব্যবহার করে আপনার গ্রাফে গন্তব্যের নাম প্রদান করেন, তাহলে সর্বদা সম্পদের মান ব্যবহার করতে ভুলবেন না যাতে আপনার সামগ্রী এখনও স্থানীয়করণ করা যায়।
<navigation ...>
    <fragment
        android:id="@+id/my_dest"
        android:name="com.example.MyFragment"
        android:label="@string/my_dest_label"
        tools:layout="@layout/my_fragment" />
    ...
সম্পদের মান সহ, যখনই আপনার কনফিগারেশন পরিবর্তিত হয় তখন আপনার গন্তব্যে স্বয়ংক্রিয়ভাবে সবচেয়ে উপযুক্ত সংস্থানগুলি প্রয়োগ করা হয়।

