
Responsive UI and navigation
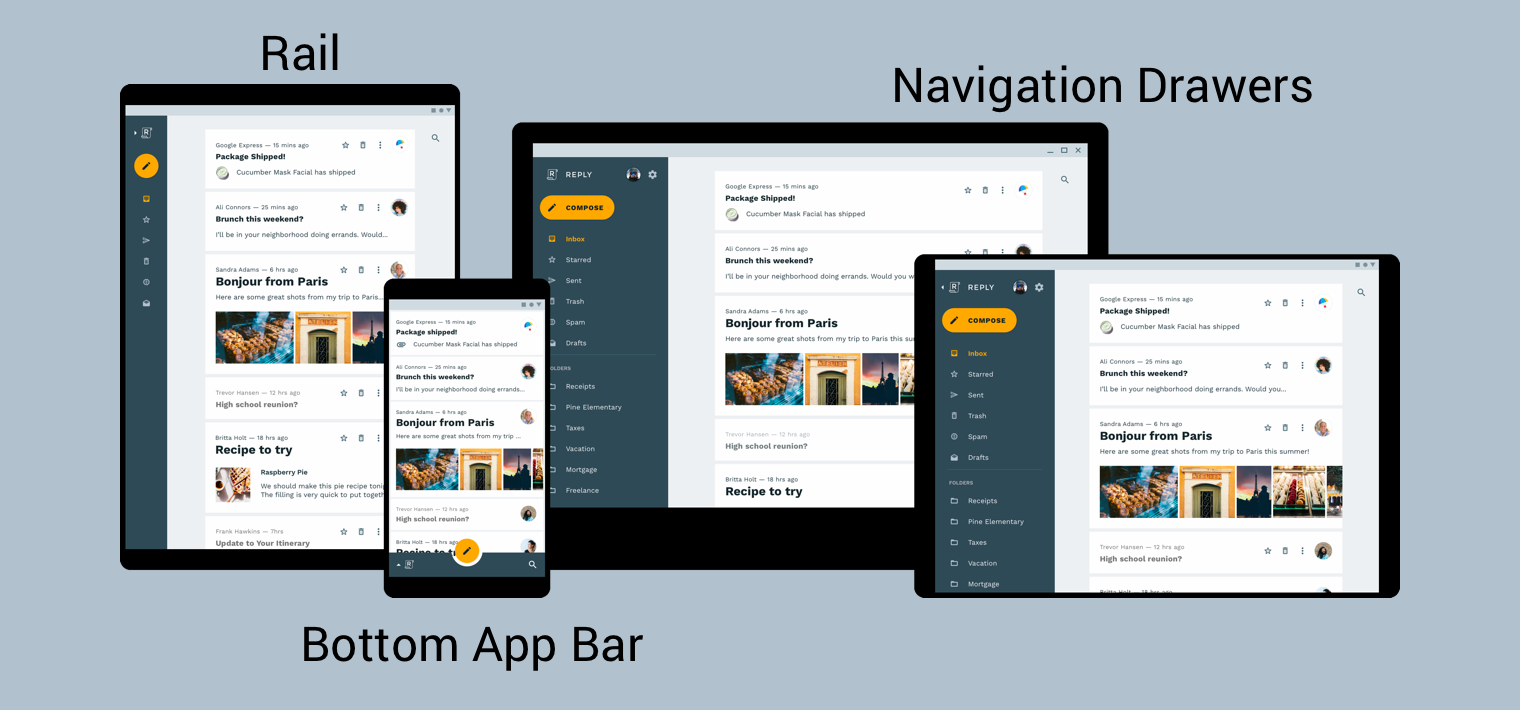
To provide the best possible navigation experience to your users, you should provide a navigation UI that is tailored to the width, height, and smallest-width of the user’s device. You may wish to use a bottom app bar, an always-present or collapsible navigation drawer, a rail, or perhaps something completely new based on the available screen space and your app's unique style.
The material design guide to product architecture provides additional context and considerations for building a responsive UI—that is, a UI that dynamically adapts to environmental changes. A few examples of environmental changes include adjustments to width, height, orientation, and user language preference. These environmental properties are collectively referred to as the device’s configuration.
When one or more of these properties change at runtime, the Android OS responds by destroying and then recreating your app’s activities and fragments. Therefore, the best thing you can do to support a responsive UI on Android is to ensure that you’re using resource configuration qualifiers where appropriate and avoiding the use of hard-coded layout sizes.
Implementing global navigation in a responsive UI
Implementing global navigation as part of a responsive UI starts with the
activity that is hosting your navigation graph. For a hands-on example, check
out the
Navigation codelab.
The codelab uses a NavigationView
to display the navigation menu, as shown in figure 2. When running on a device
that renders at a width of at least 960dp, this NavigationView is always
on-screen.
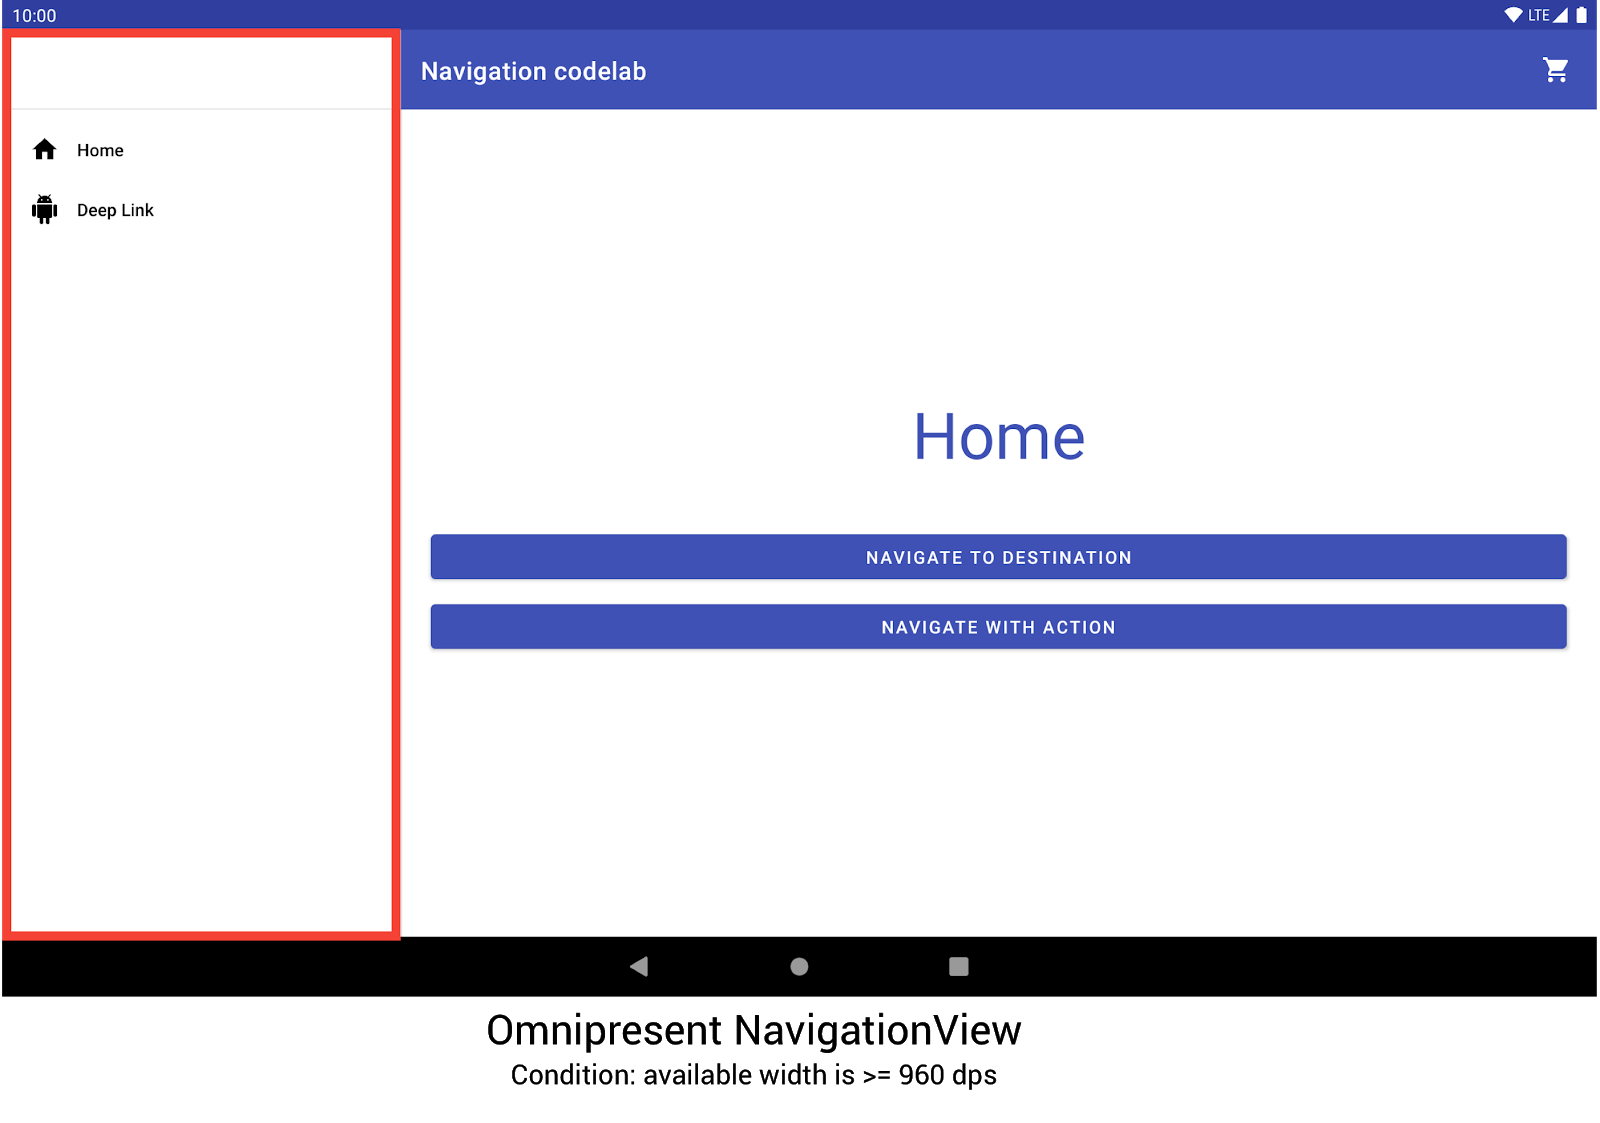
NavigationView to display the navigation menu.Other device sizes and orientations dynamically switch between
DrawerLayout or
BottomNavigationView
as needed.
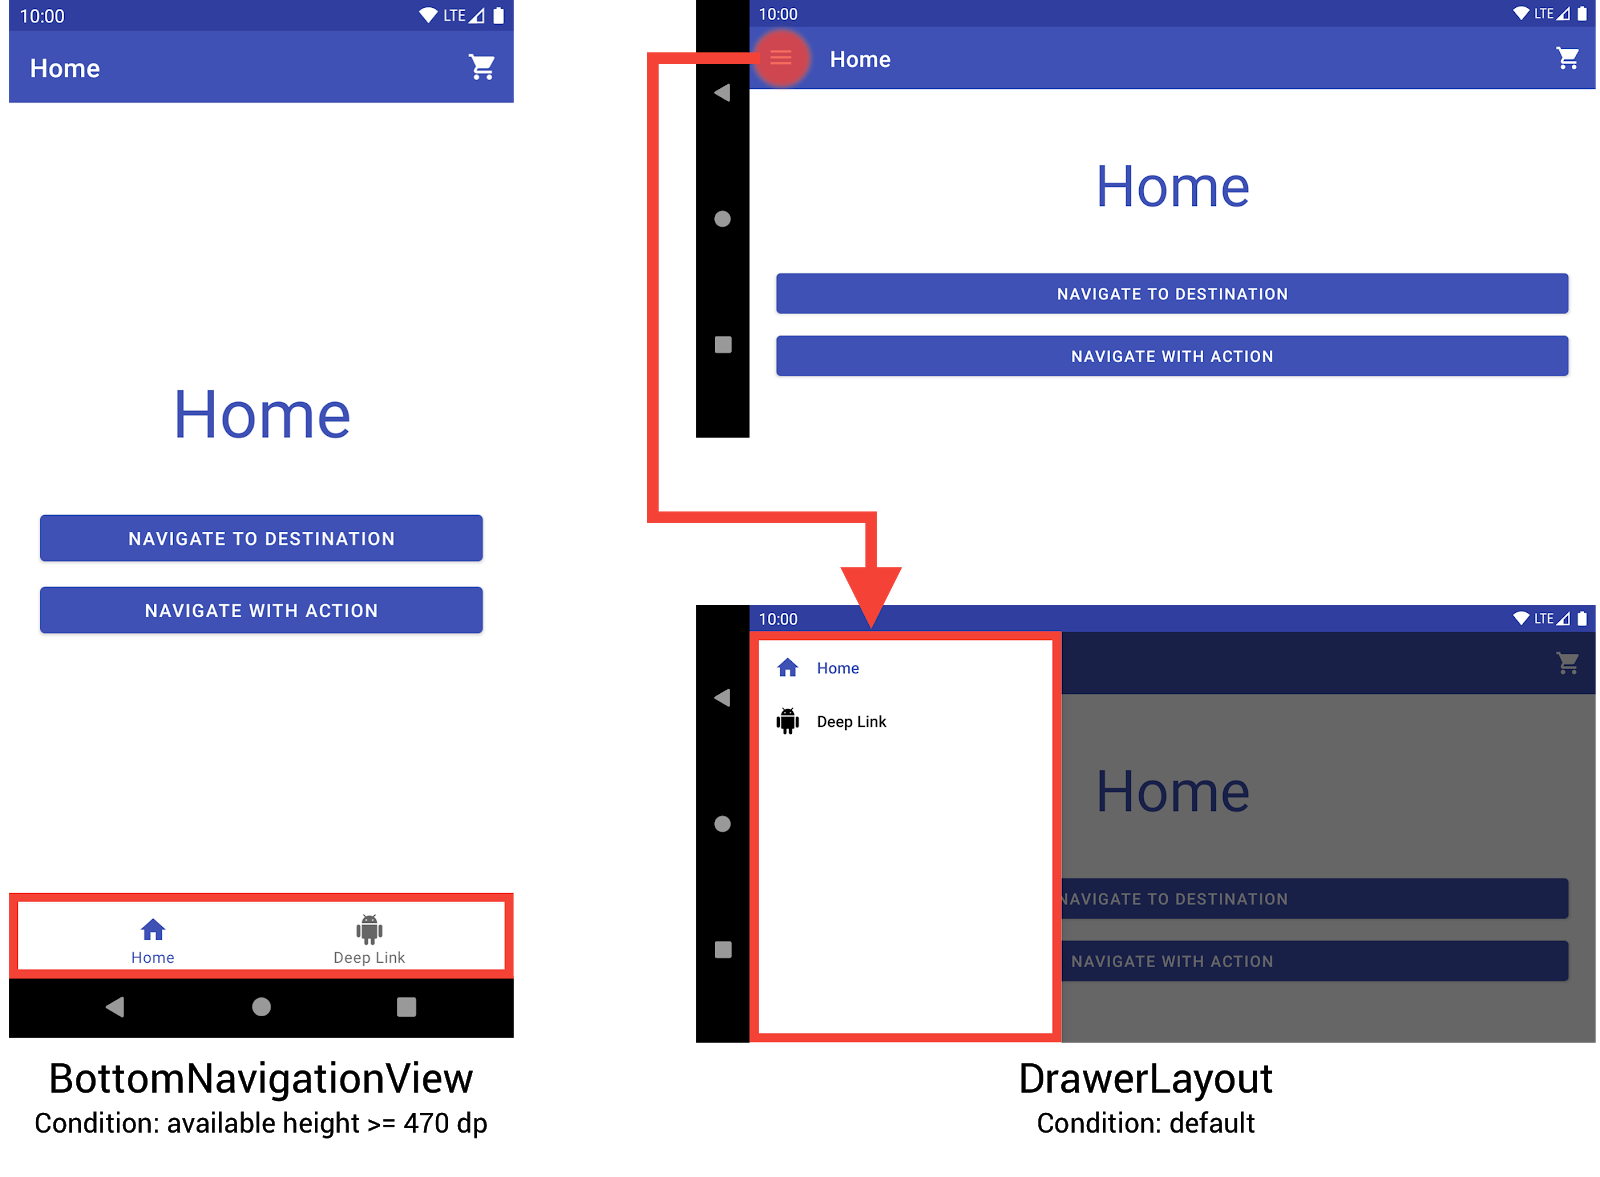
BottomNavigationView and DrawerLayoutto display
the navigation menu on smaller devices.You can implement this behavior by creating three different layouts, where each layout defines the desired navigation elements and view hierarchy based on the current device configuration.
The configuration to which each layout applies is determined by the directory
structure in which the layout file is placed. For example, the NavigationView
layout file is found in the res/layout-w960dp directory.
<!-- res/layout-w960dp/navigation_activity.xml -->
<RelativeLayout
   xmlns:android="http://schemas.android.com/apk/res/android"
   xmlns:app="http://schemas.android.com/apk/res-auto"
   xmlns:tools="http://schemas.android.com/tools"
   android:layout_width="match_parent"
   android:layout_height="match_parent"
   tools:context="com.example.android.codelabs.navigation.MainActivity">

   <com.google.android.material.navigation.NavigationView
       android:id="@+id/nav_view"
       android:layout_width="wrap_content"
       android:layout_height="match_parent"
       android:layout_alignParentStart="true"
       app:elevation="0dp"
       app:headerLayout="@layout/nav_view_header"
       app:menu="@menu/nav_drawer_menu" />

   <View
       android:layout_width="1dp"
       android:layout_height="match_parent"
       android:layout_toEndOf="@id/nav_view"
       android:background="?android:attr/listDivider" />

   <androidx.appcompat.widget.Toolbar
       android:id="@+id/toolbar"
       android:layout_width="match_parent"
       android:layout_height="wrap_content"
       android:layout_alignParentTop="true"
       android:layout_toEndOf="@id/nav_view"
       android:background="@color/colorPrimary"
       android:theme="@style/ThemeOverlay.MaterialComponents.Dark.ActionBar" />

   <androidx.fragment.app.FragmentContainerView
       android:id="@+id/my_nav_host_fragment"
       android:name="androidx.navigation.fragment.NavHostFragment"
       android:layout_width="match_parent"
       android:layout_height="match_parent"
       android:layout_below="@id/toolbar"
       android:layout_toEndOf="@id/nav_view"
       app:defaultNavHost="true"
       app:navGraph="@navigation/mobile_navigation" />
</RelativeLayout>
The bottom navigation view is found in the res/layout-h470dp directory:
<!-- res/layout-h470dp/navigation_activity.xml -->
<LinearLayout
   xmlns:android="http://schemas.android.com/apk/res/android"
   xmlns:app="http://schemas.android.com/apk/res-auto"
   xmlns:tools="http://schemas.android.com/tools"
   android:layout_width="match_parent"
   android:layout_height="match_parent"
   android:orientation="vertical"
   tools:context="com.example.android.codelabs.navigation.MainActivity">

   <androidx.appcompat.widget.Toolbar
       android:id="@+id/toolbar"
       android:layout_width="match_parent"
       android:layout_height="wrap_content"
       android:background="@color/colorPrimary"
       android:theme="@style/ThemeOverlay.MaterialComponents.Dark.ActionBar" />

   <androidx.fragment.app.FragmentContainerView
       android:id="@+id/my_nav_host_fragment"
       android:name="androidx.navigation.fragment.NavHostFragment"
       android:layout_width="match_parent"
       android:layout_height="0dp"
       android:layout_weight="1"
       app:defaultNavHost="true"
       app:navGraph="@navigation/mobile_navigation" />

   <com.google.android.material.bottomnavigation.BottomNavigationView
       android:id="@+id/bottom_nav_view"
       android:layout_width="match_parent"
       android:layout_height="wrap_content"
       app:menu="@menu/bottom_nav_menu" />
</LinearLayout>
The drawer layout is found in the res/layout directory. Use this directory for
default layouts with no configuration-specific qualifiers:
<!-- res/layout/navigation_activity.xml -->
<androidx.drawerlayout.widget.DrawerLayout
   xmlns:android="http://schemas.android.com/apk/res/android"
   xmlns:app="http://schemas.android.com/apk/res-auto"
   xmlns:tools="http://schemas.android.com/tools"
   android:id="@+id/drawer_layout"
   android:layout_width="match_parent"
   android:layout_height="match_parent"
   tools:context="com.example.android.codelabs.navigation.MainActivity">

   <LinearLayout
       android:layout_width="match_parent"
       android:layout_height="match_parent"
       android:orientation="vertical">

       <androidx.appcompat.widget.Toolbar
           android:id="@+id/toolbar"
           android:layout_width="match_parent"
           android:layout_height="wrap_content"
           android:background="@color/colorPrimary"
           android:theme="@style/ThemeOverlay.MaterialComponents.Dark.ActionBar" />

       <androidx.fragment.app.FragmentContainerView
           android:id="@+id/my_nav_host_fragment"
           android:name="androidx.navigation.fragment.NavHostFragment"
           android:layout_width="match_parent"
           android:layout_height="match_parent"
           app:defaultNavHost="true"
           app:navGraph="@navigation/mobile_navigation" />
   </LinearLayout>

   <com.google.android.material.navigation.NavigationView
       android:id="@+id/nav_view"
       android:layout_width="wrap_content"
       android:layout_height="match_parent"
       android:layout_gravity="start"
       app:menu="@menu/nav_drawer_menu" />
</androidx.drawerlayout.widget.DrawerLayout>
Android follows an
order of precedence
when determining which resources to apply. Specific to this example, -w960dp
(or available width >= 960dp) takes precedence over -h470dp (or available
height >= 470). If the device configuration doesn't match either of those
conditions, then the default layout resource
(res/layout/navigation_activity.xml) is used.
In handling navigation events, you need to wire up only the events that correspond to the widgets that are currently present, as shown in the following example.
Kotlin
class MainActivity : AppCompatActivity() {

   private lateinit var appBarConfiguration : AppBarConfiguration

   override fun onCreate(savedInstanceState: Bundle?) {
      super.onCreate(savedInstanceState)
      setContentView(R.layout.navigation_activity)
      val drawerLayout : DrawerLayout? = findViewById(R.id.drawer_layout)
      appBarConfiguration = AppBarConfiguration(
                  setOf(R.id.home_dest, R.id.deeplink_dest),
                  drawerLayout)

      ...

      // Initialize the app bar with the navigation drawer if present.
      // If the drawerLayout is not null here, a Navigation button will be added
      // to the app bar whenever the user is on a top-level destination.
      setupActionBarWithNavController(navController, appBarConfig)

      // Initialize the NavigationView if it is present,
      // so that clicking an item takes
      // the user to the appropriate destination.
      val sideNavView = findViewById<NavigationView>(R.id.nav_view)
      sideNavView?.setupWithNavController(navController)

      // Initialize the BottomNavigationView if it is present,
      // so that clicking an item takes
      // the user to the appropriate destination.
      val bottomNav = findViewById<BottomNavigationView>(R.id.bottom_nav_view)
      bottomNav?.setupWithNavController(navController)

      ...
    }

    ...
}
Java
public class MainActivity extends AppCompatActivity {

   private AppBarConfiguration appBarConfiguration;

   @Override
   protected void onCreate(@Nullable Bundle savedInstanceState) {
       super.onCreate(savedInstanceState);
       setContentView(R.layout.navigation_activity);
       NavHostFragment host = (NavHostFragment) getSupportFragmentManager()
               .findFragmentById(R.id.my_nav_host_fragment);
       NavController navController = host.getNavController();

       DrawerLayout drawerLayout = findViewById(R.id.drawer_layout);
       appBarConfiguration = new AppBarConfiguration.Builder(
               R.id.home_dest, R.id.deeplink_dest)
               .setDrawerLayout(drawerLayout)
               .build();

       // Initialize the app bar with the navigation drawer if present.
       // If the drawerLayout is not null here, a Navigation button will be added to
       // the app bar whenever the user is on a top-level destination.
       NavigationUI.setupActionBarWithNavController(
               this, navController, appBarConfiguration);


       // Initialize the NavigationView if it is present,
       // so that clicking an item takes
       // the user to the appropriate destination.
       NavigationView sideNavView = findViewById(R.id.nav_view);
       if(sideNavView != null) {
           NavigationUI.setupWithNavController(sideNavView, navController);
       }

       // Initialize the BottomNavigationView if it is present,
       // so that clicking an item takes
       // the user to the appropriate destination.
       BottomNavigationView bottomNav = findViewById(R.id.bottom_nav_view);
       if(bottomNav != null) {
           NavigationUI.setupWithNavController(bottomNav, navController);
       }

   }
}
If the device configuration changes, unless explicitly
configured otherwise,
Android destroys the activity from the previous configuration along with its
associated views. It then recreates the activity with resources designed for the
new configuration. The activity, being destroyed and recreated, then
automatically wires up the proper global navigation elements in onCreate().
Consider alternatives to split-view layouts
Split-view layouts, or master/detail layouts, were once a very popular and recommended way to design for tablets and other large screen devices.
Since the introduction of Android tablets, the ecosystem of devices has grown rapidly. One factor that has considerably influenced the design space for large screen devices has been the introduction of multi-window modes, particularly free-form windows that are fully resizable, such as those on ChromeOS devices. This puts a significantly higher emphasis on every screen of your app being responsive, rather than changing your navigation structure based on the screen size.
While it's possible to implement a split-view layout interface using the Navigation library, you should consider other alternatives.
Destination names
If you provide destination names in your graph using the android:label
attribute, be sure to always use resource values so that your content can still
be localized.
<navigation ...>
    <fragment
        android:id="@+id/my_dest"
        android:name="com.example.MyFragment"
        android:label="@string/my_dest_label"
        tools:layout="@layout/my_fragment" />
    ...
With resource values, your destinations automatically have the most appropriate resources applied whenever your configuration changes.