
Les notifications fournissent des informations courtes et opportunes sur les événements de votre application lorsqu'elle n'est pas utilisée. Ce document vous explique comment créer une notification avec différentes fonctionnalités. Pour découvrir comment les notifications s'affichent sur Android, consultez la présentation des notifications. Pour obtenir un exemple de code utilisant les notifications, consultez l'exemple SociaLite sur GitHub.
Le code de cette page utilise les API NotificationCompat de la bibliothèque AndroidX. Ces API vous permettent d'ajouter des fonctionnalités disponibles uniquement sur les versions plus récentes d'Android, tout en assurant la compatibilité avec Android 9 (niveau d'API 28).
Toutefois, certaines fonctionnalités, comme l'action de réponse intégrée, n'ont aucun effet sur les versions antérieures.
Créer une notification de base
Dans sa forme la plus basique et la plus compacte, également appelée forme réduite, une notification affiche une icône, un titre et une petite quantité de contenu textuel. Cette section explique comment créer une notification sur laquelle l'utilisateur peut appuyer pour lancer une activité dans votre application.

Figure 1. Notification avec une icône, un titre et du texte.
Pour en savoir plus sur chaque partie d'une notification, consultez Anatomie d'une notification.
Déclarer l'autorisation d'exécution
Android 13 (niveau d'API 33) et versions ultérieures acceptent une autorisation d'exécution pour la publication de notifications non exemptées (y compris les services de premier plan) à partir d'une application.
L'autorisation que vous devez déclarer dans le fichier manifeste de votre application apparaît dans l'extrait de code suivant :
<manifest ...>
    <uses-permission android:name="android.permission.POST_NOTIFICATIONS"/>
    <application ...>
        ...
    </application>
</manifest>
Pour en savoir plus sur les autorisations d'exécution, consultez Autorisation d'exécution des notifications.
Définir le contenu de la notification
Pour commencer, définissez le contenu et le canal de la notification à l'aide d'un objet NotificationCompat.Builder. L'exemple suivant montre comment créer une notification avec les éléments suivants :
Petite icône, définie par
setSmallIcon(). Il s'agit du seul contenu visible par l'utilisateur qui est obligatoire.Titre défini par
setContentTitle().Corps du texte, défini par
setContentText().Priorité de la notification, définie par
setPriority(). La priorité détermine le degré d'intrusion de la notification sur Android 7.1 et versions antérieures. Pour Android 8.0 et versions ultérieures, définissez plutôt l'importance du canal comme indiqué dans la section suivante.
val textTitle = "Title" val textContent = "Content" val builder = NotificationCompat.Builder(context, CHANNEL_ID) .setSmallIcon(R.drawable.ic_logo) .setContentTitle(textTitle) .setContentText(textContent) .setPriority(NotificationCompat.PRIORITY_DEFAULT)
Le constructeur NotificationCompat.Builder nécessite que vous fournissiez un ID de canal. Cette valeur est requise pour la compatibilité avec Android 8.0 (niveau d'API 26) et les versions ultérieures, mais elle est ignorée par les versions antérieures.
Par défaut, le contenu textuel de la notification est tronqué pour tenir sur une seule ligne. Vous pouvez afficher des informations supplémentaires en créant une notification extensible.
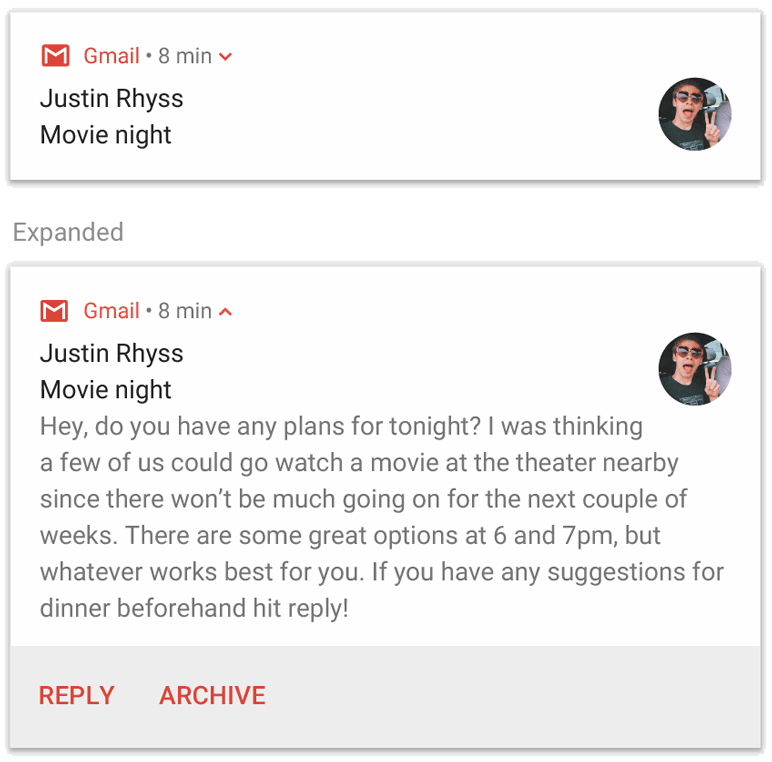
Figure 2. Notification à développer sous forme réduite et développée.
Si vous souhaitez que votre notification soit plus longue, vous pouvez activer une notification extensible en ajoutant un modèle de style avec setStyle(). Par exemple, le code suivant crée une zone de texte plus grande :
val builder = NotificationCompat.Builder(context, CHANNEL_ID) .setSmallIcon(R.drawable.ic_logo) .setContentTitle("My notification") .setContentText("Much longer text that cannot fit one line...") .setStyle(NotificationCompat.BigTextStyle() .bigText("Much longer text that cannot fit one line...")) .setPriority(NotificationCompat.PRIORITY_DEFAULT)
Pour en savoir plus sur les autres styles de grandes notifications, y compris sur l'ajout d'une image et de commandes de lecture multimédia, consultez Créer une notification à développer.
Créer un canal et définir l'importance
Avant de pouvoir envoyer la notification sur Android 8.0 ou version ultérieure, enregistrez le canal de notification de votre application auprès du système en transmettant une instance de NotificationChannel à createNotificationChannel(). Le code suivant est bloqué par une condition sur la version SDK_INT :
fun createNotificationChannel(context: Context) { // Create the NotificationChannel, but only on API 26+ because // the NotificationChannel class is not in the Support Library. if (Build.VERSION.SDK_INT >= Build.VERSION_CODES.O) { val name = context.getString(R.string.channel_name) val descriptionText = context.getString(R.string.channel_description) val importance = NotificationManager.IMPORTANCE_DEFAULT val channel = NotificationChannel(CHANNEL_ID, name, importance).apply { description = descriptionText } // Register the channel with the system. val notificationManager: NotificationManager = context.getSystemService(NotificationManager::class.java) as NotificationManager notificationManager.createNotificationChannel(channel) } }
Étant donné que vous devez créer le canal de notification avant de publier des notifications sur Android 8.0 et versions ultérieures, exécutez ce code dès le démarrage de votre application. Vous pouvez appeler cette méthode à plusieurs reprises, car la création d'un canal de notification existant n'effectue aucune opération.
Le constructeur NotificationChannel nécessite un importance, en utilisant l'une des constantes de la classe NotificationManager. Ce paramètre détermine comment interrompre l'utilisateur pour toute notification appartenant à ce canal. Définissez la priorité avec setPriority() pour prendre en charge Android 7.1 et les versions antérieures, comme indiqué dans l'exemple précédent.
Bien que vous deviez définir l'importance ou la priorité de la notification comme indiqué dans l'exemple suivant, le système ne garantit pas le comportement d'alerte que vous obtenez. Dans certains cas, le système peut modifier le niveau d'importance en fonction d'autres facteurs, et l'utilisateur peut toujours redéfinir le niveau d'importance d'un canal donné.
Pour en savoir plus sur la signification des différents niveaux, consultez Niveaux d'importance des notifications.
Définir l'action à effectuer lorsque l'utilisateur appuie sur la notification
Chaque notification doit répondre à un appui, généralement pour ouvrir une activité dans votre application qui correspond à la notification. Pour ce faire, spécifiez un intent de contenu défini avec un objet PendingIntent et transmettez-le à setContentIntent().
L'extrait suivant montre comment créer un intent de base pour ouvrir une activité lorsque l'utilisateur appuie sur la notification :
// Create an explicit intent for an Activity in your app. val intent = Intent(context, AlertDetails::class.java).apply { flags = Intent.FLAG_ACTIVITY_NEW_TASK or Intent.FLAG_ACTIVITY_CLEAR_TASK } val pendingIntent: PendingIntent = PendingIntent.getActivity(context, 0, intent, PendingIntent.FLAG_IMMUTABLE) val builder = NotificationCompat.Builder(context, CHANNEL_ID) .setSmallIcon(R.drawable.ic_logo) .setContentTitle("My notification") .setContentText("Hello World!") .setPriority(NotificationCompat.PRIORITY_DEFAULT) // Set the intent that fires when the user taps the notification. .setContentIntent(pendingIntent) .setAutoCancel(true)
Ce code appelle setAutoCancel(), qui supprime automatiquement la notification lorsque l'utilisateur appuie dessus.
Les indicateurs d'intention de l'exemple précédent préservent l'expérience de navigation attendue par l'utilisateur après qu'il a ouvert votre application à l'aide de la notification. Vous pouvez l'utiliser en fonction du type d'activité que vous démarrez, qui peut être l'un des suivants :
Activité qui existe exclusivement pour les réponses à la notification. Il n'y a aucune raison pour que l'utilisateur accède à cette activité lors de l'utilisation normale de l'application. L'activité démarre donc une nouvelle tâche au lieu d'être ajoutée à la pile "Retour" et à la tâche existantes de votre application. Il s'agit du type d'intent créé dans l'exemple précédent.
Une activité qui existe dans le flux d'application habituel de votre application. Dans ce cas, le démarrage de l'activité crée une pile "Retour" afin de préserver les attentes de l'utilisateur concernant les boutons "Retour" et "Haut".
Afficher la notification
Pour que la notification s'affiche, appelez NotificationManagerCompat.notify() en lui transmettant un ID unique pour la notification et le résultat de NotificationCompat.Builder.build(). Ce processus est illustré dans l'exemple suivant :
with(NotificationManagerCompat.from(context)) { if (ActivityCompat.checkSelfPermission( context, Manifest.permission.POST_NOTIFICATIONS ) != PackageManager.PERMISSION_GRANTED ) { // TODO: Consider calling ActivityCompat#requestPermissions here // to request the missing permissions, and then overriding // public fun onRequestPermissionsResult(requestCode: Int, permissions: Array<out String>, // grantResults: IntArray) // to handle the case where the user grants the permission. See the documentation // for ActivityCompat#requestPermissions for more details. return@with } // notificationId is a unique int for each notification that you must define. notify(notificationId, builder.build())
Enregistrez l'ID de notification que vous transmettez à NotificationManagerCompat.notify(), car vous en aurez besoin lorsque vous voudrez mettre à jour ou supprimer la notification.
De plus, pour tester les notifications de base sur les appareils équipés d'Android 13 ou version ultérieure, activez les notifications manuellement ou créez une boîte de dialogue pour demander les notifications.
Ajouter des boutons d'action
Une notification peut proposer jusqu'à trois boutons d'action qui permettent à l'utilisateur de répondre rapidement, par exemple pour mettre en veille un rappel ou répondre à un message. Toutefois, ces boutons d'action ne doivent pas dupliquer l'action effectuée lorsque l'utilisateur appuie sur la notification.
Figure 3. Notification avec un bouton d'action.
Pour ajouter un bouton d'action, transmettez un PendingIntent à la méthode addAction(). Cela revient à configurer l'action par défaut de la notification lorsque l'utilisateur appuie dessus, sauf qu'au lieu de lancer une activité, vous pouvez effectuer d'autres actions, comme démarrer un BroadcastReceiver qui effectue une tâche en arrière-plan afin que l'action n'interrompe pas l'application déjà ouverte.
Par exemple, le code suivant montre comment envoyer une diffusion à un récepteur spécifique :
val ACTION_SNOOZE = "snooze" val snoozeIntent = Intent(context, MyBroadcastReceiver::class.java).apply { action = ACTION_SNOOZE putExtra(EXTRA_NOTIFICATION_ID, 0) } val snoozePendingIntent: PendingIntent = PendingIntent.getBroadcast(context, 0, snoozeIntent, PendingIntent.FLAG_IMMUTABLE) val builder = NotificationCompat.Builder(context, CHANNEL_ID) .setSmallIcon(R.drawable.ic_logo) .setContentTitle("My notification") .setContentText("Hello World!") .setPriority(NotificationCompat.PRIORITY_DEFAULT) .setContentIntent(pendingIntent) .addAction(R.drawable.snooze, context.getString(R.string.snooze), snoozePendingIntent)
Pour en savoir plus sur la création d'un BroadcastReceiver permettant d'exécuter des tâches en arrière-plan, consultez la présentation des diffusions.
Si vous essayez plutôt de créer une notification avec des boutons de lecture multimédia, par exemple pour mettre en pause et passer des pistes, découvrez comment créer une notification avec des commandes multimédias.
Ajouter une action de réponse directe
L'action de réponse directe, introduite dans Android 7.0 (niveau d'API 24), permet aux utilisateurs de saisir du texte directement dans la notification. Le texte est ensuite transmis à votre application sans ouvrir d'activité. Par exemple, vous pouvez utiliser une action de réponse directe pour permettre aux utilisateurs de répondre à des messages ou de mettre à jour des listes de tâches depuis la notification.

Figure 4. Appuyer sur le bouton "Répondre" ouvre la saisie de texte.
L'action de réponse directe s'affiche sous forme de bouton supplémentaire dans la notification qui ouvre un champ de saisie de texte. Lorsque l'utilisateur a fini de saisir du texte, le système joint la réponse textuelle à l'intent que vous spécifiez pour l'action de notification et envoie l'intent à votre application.
Ajouter le bouton de réponse
Pour créer une action de notification compatible avec la réponse directe, procédez comme suit :
Créez une instance de RemoteInput.Builder que vous pouvez ajouter à l'action de votre notification. Le constructeur de cette classe accepte une chaîne que le système utilise comme clé pour l'entrée de texte. Votre application utilise ensuite cette clé pour récupérer le texte de l'entrée.
// Key for the string that's delivered in the action's intent. val replyLabel: String = context.resources.getString(R.string.reply_label) val remoteInput: RemoteInput = RemoteInput.Builder(KEY_TEXT_REPLY).run { setLabel(replyLabel) build() }
Créez un PendingIntent pour l'action de réponse.
// Build a PendingIntent for the reply action to trigger. val replyPendingIntent: PendingIntent = PendingIntent.getBroadcast(context, conversationId, getMessageReplyIntent(conversationId), PendingIntent.FLAG_MUTABLE)
Associez l'objet RemoteInput à une action à l'aide de addRemoteInput().
// Create the reply action and add the remote input. val action: NotificationCompat.Action = NotificationCompat.Action.Builder(R.drawable.reply, context.getString(R.string.reply_label), replyPendingIntent) .addRemoteInput(remoteInput) .build()
Appliquez l'action à une notification et envoyez-la.
// Build the notification and add the action.
val newMessageNotification = NotificationCompat.Builder(context, CHANNEL_ID)
    .setSmallIcon(R.drawable.ic_message)
    .setContentTitle(context.getString(R.string.title))
    .setContentText(context.getString(R.string.content))
    .addAction(action)
    .build()

// Issue the notification.
NotificationManagerCompat.from(context).notify(notificationId, newMessageNotification)
Le système invite l'utilisateur à saisir une réponse lorsqu'il déclenche l'action de notification, comme illustré à la figure 4.
Récupérer l'entrée utilisateur à partir de la réponse
Pour recevoir l'entrée utilisateur à partir de l'UI de réponse de la notification, appelez RemoteInput.getResultsFromIntent() en lui transmettant le Intent reçu par votre BroadcastReceiver :
private fun getMessageText(intent: Intent): CharSequence? { return RemoteInput.getResultsFromIntent(intent)?.getCharSequence(KEY_TEXT_REPLY) }
Une fois le texte traité, mettez à jour la notification en appelant NotificationManagerCompat.notify() avec le même ID et le même tag, le cas échéant. Cela est nécessaire pour masquer l'UI de réponse directe et confirmer à l'utilisateur que sa réponse a été reçue et traitée correctement.
// Build a new notification, which informs the user that the system // handled their interaction with the previous notification. val repliedNotification = NotificationCompat.Builder(context, CHANNEL_ID) .setSmallIcon(R.drawable.message) .setContentText(context.getString(R.string.replied)) .build() // Issue the new notification. NotificationManagerCompat.from(context).notify(notificationId, repliedNotification)
Récupérer d'autres données
Le traitement des autres types de données fonctionne de la même manière avec RemoteInput. L'exemple suivant utilise une image comme entrée.
val replyLabel: String = context.resources.getString(R.string.reply_label) val remoteInput: RemoteInput = RemoteInput.Builder(KEY_REPLY).run { setLabel(replyLabel) // Allow for image data types in the input. // This method can be used again to allow for other data types. setAllowDataType("image/*", true) build() }
Appelez RemoteInput#getDataResultsFromIntent et extrayez les données correspondantes.
class ReplyReceiver : BroadcastReceiver() { override fun onReceive(context: Context, intent: Intent) { val dataResults = RemoteInput.getDataResultsFromIntent(intent, KEY_REPLY) val imageUri: Uri? = dataResults?.get("image/*") as? Uri if (imageUri != null) { // Extract the image context.contentResolver.openInputStream(imageUri)?.use { inputStream -> val bitmap = BitmapFactory.decodeStream(inputStream) // Display the image // ... } } } companion object { const val KEY_REPLY = "key_reply" const val KEY_TEXT_REPLY = "key_text_reply" } }
Lorsque vous utilisez cette nouvelle notification, utilisez le contexte transmis à la méthode onReceive() du récepteur.
Ajoutez la réponse en bas de la notification en appelant setRemoteInputHistory(). Toutefois, si vous créez une application de chat, créez une notification de style message et ajoutez le nouveau message à la conversation.
Pour obtenir d'autres conseils sur les notifications des applications de messagerie, consultez la section sur les bonnes pratiques pour les applications de messagerie.
Afficher un message urgent
Votre application peut avoir besoin d'afficher un message urgent et sensible au facteur temps, comme un appel téléphonique entrant ou une alarme qui sonne. Dans ces situations, vous pouvez associer une intention plein écran à votre notification.
Lorsque la notification est déclenchée, les utilisateurs voient l'un des éléments suivants, en fonction de l'état de verrouillage de l'appareil :
- Si l'appareil de l'utilisateur est verrouillé, une activité en plein écran s'affiche et recouvre l'écran de verrouillage.
- Si l'appareil de l'utilisateur est déverrouillé, la notification s'affiche sous forme développée et inclut des options permettant de la gérer ou de l'ignorer.
L'extrait de code suivant montre comment associer votre notification à un intent en plein écran :
val fullScreenIntent = Intent(context, ImportantActivity::class.java) val fullScreenPendingIntent = PendingIntent.getActivity(context, 0, fullScreenIntent, PendingIntent.FLAG_IMMUTABLE) val builder = NotificationCompat.Builder(context, CHANNEL_ID) .setSmallIcon(R.drawable.ic_logo) .setContentTitle("My notification") .setContentText("Hello World!") .setPriority(NotificationCompat.PRIORITY_DEFAULT) .setFullScreenIntent(fullScreenPendingIntent, true)
Définir la visibilité de l'écran de verrouillage
Pour contrôler le niveau de détail visible dans la notification depuis l'écran de verrouillage, appelez setVisibility() et spécifiez l'une des valeurs suivantes :
VISIBILITY_PUBLIC: le contenu complet de la notification s'affiche sur l'écran de verrouillage.VISIBILITY_SECRET: aucune partie de la notification ne s'affiche sur l'écran de verrouillage.VISIBILITY_PRIVATE: seules les informations de base, telles que l'icône de la notification et le titre du contenu, s'affichent sur l'écran de verrouillage. Le contenu complet de la notification ne s'affiche pas.
Lorsque vous définissez VISIBILITY_PRIVATE, vous pouvez également fournir une version alternative du contenu de la notification qui masque certains détails. Par exemple, une application de SMS peut afficher une notification indiquant "Vous avez reçu trois nouveaux messages", mais en masquant le contenu des messages et les expéditeurs. Pour fournir cette autre notification, commencez par créer la notification alternative avec NotificationCompat.Builder comme d'habitude. Ensuite, associez la notification alternative à la notification normale avec setPublicVersion().
N'oubliez pas que l'utilisateur a toujours le contrôle ultime sur la visibilité de ses notifications sur l'écran de verrouillage. Il peut les contrôler en fonction des canaux de notification de votre application.
Modifier une notification
Pour mettre à jour une notification après l'avoir envoyée, appelez à nouveau NotificationManagerCompat.notify() en lui transmettant le même ID que celui utilisé précédemment. Si la notification précédente est ignorée, une nouvelle notification est créée à la place.
Vous pouvez éventuellement appeler setOnlyAlertOnce() pour que votre notification interrompe l'utilisateur (avec un son, une vibration ou des indices visuels) uniquement la première fois qu'elle s'affiche, et non pour les mises à jour ultérieures.
Supprimer une notification
Les notifications restent visibles jusqu'à ce que l'un des événements suivants se produise :
- L'utilisateur ignore la notification.
- L'utilisateur appuie sur la notification si vous appelez
setAutoCancel()lorsque vous créez la notification. - Vous appelez
cancel()pour un ID de notification spécifique. Cette méthode supprime également les notifications en cours. - Vous appelez
cancelAll(), ce qui supprime toutes les notifications que vous avez émises précédemment. - La durée spécifiée s'écoule si vous définissez un délai avant expiration lors de la création de la notification à l'aide de
setTimeoutAfter(). Si nécessaire, vous pouvez annuler une notification avant l'expiration du délai spécifié.
Bonnes pratiques pour les applications de messagerie
Tenez compte des bonnes pratiques listées ici lorsque vous créez des notifications pour vos applications de messagerie et de chat.
Utiliser MessagingStyle
À partir d'Android 7.0 (niveau d'API 24), Android fournit un modèle de style de notification spécifiquement pour le contenu de messagerie. La classe NotificationCompat.MessagingStyle vous permet de modifier plusieurs libellés affichés dans la notification, y compris le titre de la conversation, les messages supplémentaires et la vue du contenu de la notification.
L'extrait de code suivant montre comment personnaliser le style d'une notification à l'aide de la classe MessagingStyle.
val message1 = NotificationCompat.MessagingStyle.Message( messages[0].text, messages[0].time, messages[0].sender ) val message2 = NotificationCompat.MessagingStyle.Message( messages[1].text, messages[1].time, messages[1].sender ) notification = NotificationCompat.Builder(context, CHANNEL_ID) .setSmallIcon(R.drawable.ic_logo) .setStyle( NotificationCompat.MessagingStyle(Person.Builder().setName("Me").build()) .addMessage(message1) .addMessage(message2) ) .build()
À partir d'Android 9.0 (niveau d'API 28), il est également nécessaire d'utiliser la classe Person pour obtenir un rendu optimal de la notification et de ses avatars.
Lorsque vous utilisez NotificationCompat.MessagingStyle, procédez comme suit :
- Appelez
MessagingStyle.setConversationTitle()pour définir un titre pour les discussions de groupe avec plus de deux personnes. Un bon titre de conversation peut être le nom du chat de groupe ou, s'il n'en a pas, la liste des participants à la conversation. Sans cela, le message pourrait être confondu avec une conversation privée avec l'expéditeur du message le plus récent de la conversation. - Utilisez la méthode
MessagingStyle.setData()pour inclure des messages multimédias tels que des images. Les types MIME de l'image de motif/* sont acceptés.
Utiliser la réponse directe
La réponse directe permet à un utilisateur de répondre directement à un message.
- Une fois qu'un utilisateur a répondu à l'aide de l'action de réponse intégrée, utilisez
MessagingStyle.addMessage()pour mettre à jour la notificationMessagingStyle. Ne retirez ni n'annulez la notification. Si vous n'annulez pas la notification, l'utilisateur peut envoyer plusieurs réponses à partir de la notification. - Pour rendre l'action de réponse intégrée compatible avec Wear OS, appelez
Action.WearableExtender.setHintDisplayInlineAction(true). - Utilisez la méthode
addHistoricMessage()pour contextualiser une conversation de réponse directe en ajoutant des messages historiques à la notification.
Activer les réponses suggérées
- Pour activer la réponse suggérée, appelez
setAllowGeneratedResponses(true)sur l'action de réponse. Cela permet aux utilisateurs de disposer des réponses suggérées lorsque la notification est transférée vers un appareil Wear OS. Les réponses suggérées sont générées par un modèle de machine learning entièrement intégré à la montre, à l'aide du contexte fourni par la notificationNotificationCompat.MessagingStyle. Aucune donnée n'est importée sur Internet pour générer les réponses.
Ajouter des métadonnées de notification
- Attribuez des métadonnées de notification pour indiquer au système comment gérer les notifications de votre application lorsque l'appareil est en mode Ne pas déranger. Par exemple, utilisez la méthode
addPerson()ousetCategory(Notification.CATEGORY_MESSAGE)pour remplacer le mode Ne pas déranger.