
सूचनाएं, ऐप्लिकेशन का इस्तेमाल न करने के दौरान आपको ऐप्लिकेशन के इवेंट के बारे में कम शब्दों में और समय पर जानकारी देती हैं. इस दस्तावेज़ में, अलग-अलग सुविधाओं के साथ सूचना बनाने का तरीका बताया गया है. Android पर सूचनाएं कैसे दिखती हैं, इस बारे में जानने के लिए सूचनाओं की खास जानकारी देखें. सूचनाओं का इस्तेमाल करने वाले सैंपल कोड के लिए, GitHub पर SociaLite सैंपल देखें.
इस पेज पर मौजूद कोड, AndroidX लाइब्रेरी से NotificationCompat एपीआई का इस्तेमाल करता है. इन एपीआई की मदद से, Android के नए वर्शन में उपलब्ध सुविधाएं जोड़ी जा सकती हैं. साथ ही, Android 9 (एपीआई लेवल 28) के साथ काम करने की सुविधा भी दी जा सकती है.
हालांकि, इनलाइन जवाब देने की सुविधा जैसी कुछ सुविधाओं का इस्तेमाल, पुराने वर्शन पर नहीं किया जा सकता.
बुनियादी सूचना बनाना
सूचना का सबसे बुनियादी और छोटा रूप, कोलैप्स किया गया फ़ॉर्म कहलाता है. इसमें एक आइकॉन, एक टाइटल, और कुछ टेक्स्ट कॉन्टेंट दिखता है. इस सेक्शन में, ऐसी सूचना बनाने का तरीका बताया गया है जिस पर टैप करके उपयोगकर्ता, आपके ऐप्लिकेशन में कोई गतिविधि शुरू कर सके.
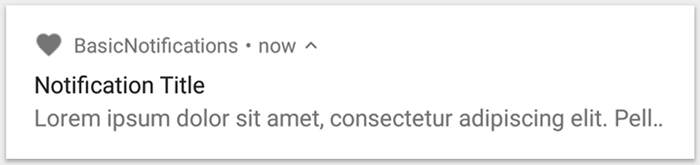
पहली इमेज. एक सूचना में आइकॉन, टाइटल, और कुछ टेक्स्ट शामिल है.
सूचना के हर हिस्से के बारे में ज़्यादा जानने के लिए, सूचना की बनावट के बारे में पढ़ें.
रनटाइम की अनुमति के बारे में जानकारी देना
Android 13 (एपीआई लेवल 33) और इसके बाद के वर्शन में, किसी ऐप्लिकेशन से सूचनाएं पोस्ट करने के लिए रनटाइम अनुमति की सुविधा उपलब्ध है. इसमें, सूचनाएं पोस्ट करने से जुड़ी ज़रूरी शर्तों को पूरा न करने वाली सूचनाएं (जैसे, फ़ोरग्राउंड सेवाओं (एफ़जीएस) से जुड़ी सूचनाएं) भी शामिल हैं.
ऐप्लिकेशन की मेनिफ़ेस्ट फ़ाइल में जिस अनुमति का एलान करना है वह इस कोड स्निपेट में दिखती है:
<manifest ...>
    <uses-permission android:name="android.permission.POST_NOTIFICATIONS"/>
    <application ...>
        ...
    </application>
</manifest>
रनटाइम अनुमतियों के बारे में ज़्यादा जानने के लिए, सूचनाओं के लिए रनटाइम अनुमति लेख पढ़ें.
सूचना का कॉन्टेंट सेट करना
शुरू करने के लिए, NotificationCompat.Builder ऑब्जेक्ट का इस्तेमाल करके, सूचना का कॉन्टेंट और चैनल सेट करें. यहां दिए गए उदाहरण में, इस तरह की सूचना बनाने का तरीका बताया गया है:
यह
setSmallIcon()सेट किया गया एक छोटा आइकॉन है. उपयोगकर्ता को दिखने वाला सिर्फ़ यही कॉन्टेंट ज़रूरी है.टाइटल, जिसे
setContentTitle()ने सेट किया है.मुख्य टेक्स्ट, जिसे
setContentText()ने सेट किया है.setPriority()ने सूचना की प्राथमिकता सेट की है. प्राथमिकता से यह तय होता है कि Android 7.1 और इससे पहले के वर्शन में सूचना कितनी बार दिखेगी. Android 8.0 और उसके बाद के वर्शन के लिए, चैनल की अहमियत को अगले सेक्शन में दिखाए गए तरीके से सेट करें.
val textTitle = "Title" val textContent = "Content" val builder = NotificationCompat.Builder(context, CHANNEL_ID) .setSmallIcon(R.drawable.ic_logo) .setContentTitle(textTitle) .setContentText(textContent) .setPriority(NotificationCompat.PRIORITY_DEFAULT)
NotificationCompat.Builder कंस्ट्रक्टर के लिए, आपको चैनल आईडी देना होगा. यह Android 8.0 (एपीआई लेवल 26) और इसके बाद के वर्शन के साथ काम करने के लिए ज़रूरी है. हालांकि, इससे पहले के वर्शन इसे अनदेखा कर देते हैं.
डिफ़ॉल्ट रूप से, सूचना के टेक्स्ट कॉन्टेंट को एक लाइन में फ़िट करने के लिए छोटा कर दिया जाता है. एक्सपैंड की जा सकने वाली सूचना बनाकर, ज़्यादा जानकारी दिखाई जा सकती है.
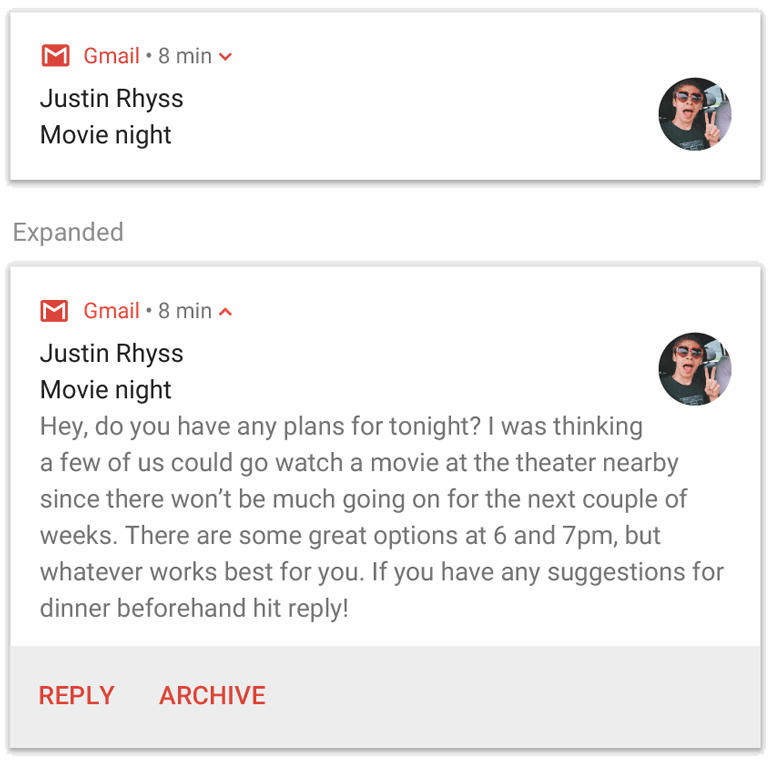
दूसरी इमेज. बड़ी की जा सकने वाली सूचना को छोटा और बड़ा करके दिखाया गया है.
अगर आपको लंबी सूचना चाहिए, तो setStyle() के साथ स्टाइल टेंप्लेट जोड़कर, बड़ी की जा सकने वाली सूचना की सुविधा चालू करें. उदाहरण के लिए,
नीचे दिया गया कोड, बड़ा टेक्स्ट एरिया बनाता है:
val builder = NotificationCompat.Builder(context, CHANNEL_ID) .setSmallIcon(R.drawable.ic_logo) .setContentTitle("My notification") .setContentText("Much longer text that cannot fit one line...") .setStyle(NotificationCompat.BigTextStyle() .bigText("Much longer text that cannot fit one line...")) .setPriority(NotificationCompat.PRIORITY_DEFAULT)
सूचनाओं को बड़े साइज़ में दिखाने की अन्य स्टाइल के बारे में ज़्यादा जानने के लिए, बड़ी की जा सकने वाली सूचना बनाना लेख पढ़ें. इसमें इमेज और मीडिया चलाने के कंट्रोल जोड़ने का तरीका भी शामिल है.
चैनल बनाना और उसकी अहमियत सेट करना
Android 8.0 और इसके बाद के वर्शन पर सूचनाएं भेजने से पहले, अपने ऐप्लिकेशन के सूचना चैनल को सिस्टम के साथ रजिस्टर करें. इसके लिए, createNotificationChannel() को NotificationChannel का इंस्टेंस पास करें. नीचे दिए गए कोड को SDK_INT वर्शन पर लागू होने वाली शर्त के तहत ब्लॉक किया गया है:
fun createNotificationChannel(context: Context) { // Create the NotificationChannel, but only on API 26+ because // the NotificationChannel class is not in the Support Library. if (Build.VERSION.SDK_INT >= Build.VERSION_CODES.O) { val name = context.getString(R.string.channel_name) val descriptionText = context.getString(R.string.channel_description) val importance = NotificationManager.IMPORTANCE_DEFAULT val channel = NotificationChannel(CHANNEL_ID, name, importance).apply { description = descriptionText } // Register the channel with the system. val notificationManager: NotificationManager = context.getSystemService(NotificationManager::class.java) as NotificationManager notificationManager.createNotificationChannel(channel) } }
Android 8.0 और इसके बाद के वर्शन पर कोई भी सूचना पोस्ट करने से पहले, आपको सूचना चैनल बनाना होगा. इसलिए, जैसे ही आपका ऐप्लिकेशन शुरू हो, इस कोड को लागू करें. इस फ़ंक्शन को बार-बार कॉल करना सुरक्षित है, क्योंकि मौजूदा सूचना चैनल बनाने से कोई कार्रवाई नहीं होती.
NotificationChannel कंस्ट्रक्टर के लिए importance की ज़रूरत होती है. इसके लिए, NotificationManager क्लास के किसी एक कॉन्स्टेंट का इस्तेमाल किया जाता है. इस पैरामीटर से यह तय होता है कि इस चैनल से मिलने वाली किसी भी सूचना के लिए, उपयोगकर्ता को कैसे इंटरप्ट किया जाए. Android 7.1 और इससे पहले के वर्शन के लिए, setPriority() की मदद से priority सेट करें. जैसा कि ऊपर दिए गए उदाहरण में दिखाया गया है.
आपको सूचना की अहमियत या प्राथमिकता को नीचे दिए गए उदाहरण के मुताबिक सेट करना होगा. हालांकि, सिस्टम इस बात की गारंटी नहीं देता कि आपको सूचनाएं उसी तरह मिलेंगी जैसा आपने सेट किया है. कुछ मामलों में, सिस्टम अन्य फ़ैक्टर के आधार पर सूचना की प्राथमिकता के लेवल में बदलाव कर सकता है. साथ ही, उपयोगकर्ता किसी भी चैनल के लिए सूचना की प्राथमिकता के लेवल को फिर से तय कर सकता है.
अलग-अलग लेवल का क्या मतलब है, इस बारे में ज़्यादा जानने के लिए, सूचना के अहमियत के लेवल के बारे में पढ़ें.
सूचना पर टैप करने की कार्रवाई सेट करना
हर सूचना पर टैप करने पर, कोई कार्रवाई होनी चाहिए. आम तौर पर, ऐसा करने पर आपके ऐप्लिकेशन में वह गतिविधि खुलनी चाहिए जिससे सूचना जुड़ी है. इसके लिए, PendingIntent ऑब्जेक्ट के साथ तय किया गया कॉन्टेंट इंटेंट तय करें और उसे setContentIntent() पर पास करें.
नीचे दिए गए स्निपेट में, सूचना पर टैप करने पर गतिविधि खोलने के लिए बुनियादी इंटेंट बनाने का तरीका बताया गया है:
// Create an explicit intent for an Activity in your app. val intent = Intent(context, AlertDetails::class.java).apply { flags = Intent.FLAG_ACTIVITY_NEW_TASK or Intent.FLAG_ACTIVITY_CLEAR_TASK } val pendingIntent: PendingIntent = PendingIntent.getActivity(context, 0, intent, PendingIntent.FLAG_IMMUTABLE) val builder = NotificationCompat.Builder(context, CHANNEL_ID) .setSmallIcon(R.drawable.ic_logo) .setContentTitle("My notification") .setContentText("Hello World!") .setPriority(NotificationCompat.PRIORITY_DEFAULT) // Set the intent that fires when the user taps the notification. .setContentIntent(pendingIntent) .setAutoCancel(true)
यह कोड, setAutoCancel() को कॉल करता है. जब उपयोगकर्ता इस पर टैप करता है, तो यह सूचना को अपने-आप हटा देता है.
ऊपर दिए गए उदाहरण में, इंटेंट फ़्लैग की मदद से यह पक्का किया जाता है कि उपयोगकर्ता को नोटिफ़िकेशन का इस्तेमाल करके आपका ऐप्लिकेशन खोलने के बाद, नेविगेशन का वैसा ही अनुभव मिले जैसा उसे उम्मीद थी. शुरू की जा रही गतिविधि के टाइप के आधार पर, आपको इसका इस्तेमाल करना पड़ सकता है. यह गतिविधि इनमें से कोई एक हो सकती है:
ऐसी गतिविधि जो सिर्फ़ सूचनाओं के जवाब देने के लिए होती है. ऐप्लिकेशन का सामान्य तरीके से इस्तेमाल करने के दौरान, उपयोगकर्ता के पास इस गतिविधि पर जाने की कोई वजह नहीं होती. इसलिए, गतिविधि को आपके ऐप्लिकेशन के मौजूदा टास्क और बैक स्टैक में जोड़ने के बजाय, एक नया टास्क शुरू किया जाता है. यह पिछले सैंपल में बनाया गया इंटेंट टाइप है.
ऐसी गतिविधि जो आपके ऐप्लिकेशन के सामान्य ऐप्लिकेशन फ़्लो में मौजूद हो. इस मामले में, गतिविधि शुरू करने पर बैक स्टैक बनता है, ताकि उपयोगकर्ता की वापस जाएं और ऊपर जाएं बटन से जुड़ी उम्मीदें पूरी हो सकें.
सूचना दिखाओ
सूचना दिखाने के लिए, NotificationManagerCompat.notify() को कॉल करें. साथ ही, सूचना के लिए यूनीक आईडी और NotificationCompat.Builder.build() का नतीजा पास करें. इसे यहां दिए गए उदाहरण में दिखाया गया है:
with(NotificationManagerCompat.from(context)) { if (ActivityCompat.checkSelfPermission( context, Manifest.permission.POST_NOTIFICATIONS ) != PackageManager.PERMISSION_GRANTED ) { // TODO: Consider calling ActivityCompat#requestPermissions here // to request the missing permissions, and then overriding // public fun onRequestPermissionsResult(requestCode: Int, permissions: Array<out String>, // grantResults: IntArray) // to handle the case where the user grants the permission. See the documentation // for ActivityCompat#requestPermissions for more details. return@with } // notificationId is a unique int for each notification that you must define. notify(notificationId, builder.build())
NotificationManagerCompat.notify() को भेजे गए सूचना आईडी को सेव करें, क्योंकि सूचना को अपडेट करने या हटाने के लिए इसकी ज़रूरत होती है.
इसके अलावा, Android 13 और इसके बाद के वर्शन पर काम करने वाले डिवाइसों पर बुनियादी सूचनाओं को टेस्ट करने के लिए, सूचनाएं मैन्युअल तरीके से चालू करें या सूचनाएं पाने का अनुरोध करने के लिए कोई डायलॉग बनाएं.
ऐक्शन बटन जोड़ना
किसी सूचना में ज़्यादा से ज़्यादा तीन ऐक्शन बटन हो सकते हैं. इनकी मदद से उपयोगकर्ता तुरंत जवाब दे सकता है. जैसे, किसी रिमाइंडर को स्नूज़ करना या किसी टेक्स्ट मैसेज का जवाब देना. हालांकि, इन ऐक्शन बटन से वही कार्रवाई नहीं होनी चाहिए जो उपयोगकर्ता के सूचना पर टैप करने से होती है.
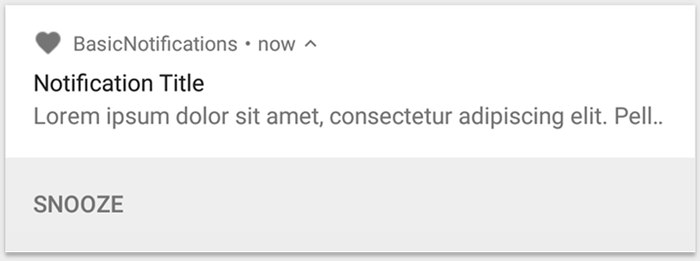
तीसरी इमेज. एक ऐक्शन बटन वाली सूचना.
ऐक्शन बटन जोड़ने के लिए, addAction() तरीके को PendingIntent पास करें. यह सूचना पर टैप करने की डिफ़ॉल्ट कार्रवाई सेट अप करने जैसा है. हालांकि, इसमें किसी गतिविधि को लॉन्च करने के बजाय, अन्य काम किए जा सकते हैं. जैसे, BroadcastReceiver शुरू करना. यह बैकग्राउंड में काम करता है, ताकि कार्रवाई से पहले से खुले हुए ऐप्लिकेशन में रुकावट न आए.
उदाहरण के लिए, यहां दिए गए कोड में बताया गया है कि किसी खास रिसीवर को ब्रॉडकास्ट कैसे भेजा जाता है:
val ACTION_SNOOZE = "snooze" val snoozeIntent = Intent(context, MyBroadcastReceiver::class.java).apply { action = ACTION_SNOOZE putExtra(EXTRA_NOTIFICATION_ID, 0) } val snoozePendingIntent: PendingIntent = PendingIntent.getBroadcast(context, 0, snoozeIntent, PendingIntent.FLAG_IMMUTABLE) val builder = NotificationCompat.Builder(context, CHANNEL_ID) .setSmallIcon(R.drawable.ic_logo) .setContentTitle("My notification") .setContentText("Hello World!") .setPriority(NotificationCompat.PRIORITY_DEFAULT) .setContentIntent(pendingIntent) .addAction(R.drawable.snooze, context.getString(R.string.snooze), snoozePendingIntent)
बैकग्राउंड में काम करने के लिए BroadcastReceiver बनाने के बारे में ज़्यादा जानकारी के लिए, ब्रॉडकास्ट की खास जानकारी देखें.
अगर आपको मीडिया प्लेबैक बटन वाली सूचना बनानी है, तो मीडिया कंट्रोल वाली सूचना बनाने का तरीका जानें. जैसे, ट्रैक को रोकना और छोड़ना.
जवाब देने की सुविधा जोड़ना
Android 7.0 (एपीआई लेवल 24) में, सीधे जवाब देने की सुविधा शुरू की गई थी. इससे लोग सीधे सूचना में टेक्स्ट डाल सकते हैं. इसके बाद, टेक्स्ट को आपके ऐप्लिकेशन पर डिलीवर कर दिया जाता है. इसके लिए, किसी गतिविधि को खोलने की ज़रूरत नहीं होती. उदाहरण के लिए, सीधे जवाब देने की सुविधा का इस्तेमाल करके, लोगों को सूचना में ही टेक्स्ट मैसेज का जवाब देने या टास्क की सूचियां अपडेट करने की सुविधा दी जा सकती है.

चौथी इमेज. "जवाब दें" बटन पर टैप करने से, टेक्स्ट डालने की सुविधा खुल जाती है.
सीधे तौर पर जवाब देने की सुविधा, सूचना में एक अतिरिक्त बटन के तौर पर दिखती है. इस बटन पर क्लिक करने से, टेक्स्ट डालने की सुविधा खुल जाती है. जब उपयोगकर्ता टाइप करना बंद कर देता है, तो सिस्टम टेक्स्ट रिस्पॉन्स को उस इंटेंट से जोड़ देता है जिसे आपने सूचना वाली कार्रवाई के लिए तय किया है. इसके बाद, सिस्टम उस इंटेंट को आपके ऐप्लिकेशन पर भेज देता है.
'जवाब दें' बटन जोड़ना
सीधे तौर पर जवाब देने की सुविधा के साथ सूचना कार्रवाई बनाने के लिए, यह तरीका अपनाएं:
RemoteInput.Builder का एक इंस्टेंस बनाएं, जिसे सूचना के ऐक्शन में जोड़ा जा सकता है. इस क्लास का कंस्ट्रक्टर, ऐसी स्ट्रिंग स्वीकार करता है जिसका इस्तेमाल सिस्टम, टेक्स्ट इनपुट के लिए कुंजी के तौर पर करता है. बाद में, आपका ऐप्लिकेशन उस कुंजी का इस्तेमाल करके, इनपुट किए गए टेक्स्ट को वापस पाता है.
// Key for the string that's delivered in the action's intent. val replyLabel: String = context.resources.getString(R.string.reply_label) val remoteInput: RemoteInput = RemoteInput.Builder(KEY_TEXT_REPLY).run { setLabel(replyLabel) build() }
जवाब देने की कार्रवाई के लिए, PendingIntent बनाएं.
// Build a PendingIntent for the reply action to trigger. val replyPendingIntent: PendingIntent = PendingIntent.getBroadcast(context, conversationId, getMessageReplyIntent(conversationId), PendingIntent.FLAG_MUTABLE)
RemoteInput ऑब्जेक्ट को किसी कार्रवाई से अटैच करने के लिए, addRemoteInput() का इस्तेमाल करें.
// Create the reply action and add the remote input. val action: NotificationCompat.Action = NotificationCompat.Action.Builder(R.drawable.reply, context.getString(R.string.reply_label), replyPendingIntent) .addRemoteInput(remoteInput) .build()
किसी सूचना पर कार्रवाई लागू करें और सूचना जारी करें.
// Build the notification and add the action.
val newMessageNotification = NotificationCompat.Builder(context, CHANNEL_ID)
    .setSmallIcon(R.drawable.ic_message)
    .setContentTitle(context.getString(R.string.title))
    .setContentText(context.getString(R.string.content))
    .addAction(action)
    .build()

// Issue the notification.
NotificationManagerCompat.from(context).notify(notificationId, newMessageNotification)
जब उपयोगकर्ता सूचना से जुड़ी कार्रवाई को ट्रिगर करता है, तो सिस्टम उससे जवाब देने के लिए कहता है. इसे चौथी इमेज में दिखाया गया है.
जवाब से उपयोगकर्ता का इनपुट वापस पाना
सूचना के जवाब वाले यूज़र इंटरफ़ेस (यूआई) से उपयोगकर्ता का इनपुट पाने के लिए, RemoteInput.getResultsFromIntent() को कॉल करें. साथ ही, इसे अपने BroadcastReceiver से मिला Intent पास करें:
private fun getMessageText(intent: Intent): CharSequence? { return RemoteInput.getResultsFromIntent(intent)?.getCharSequence(KEY_TEXT_REPLY) }
टेक्स्ट प्रोसेस करने के बाद, सूचना को अपडेट करें. इसके लिए, NotificationManagerCompat.notify() को कॉल करें. अगर इस्तेमाल किया गया हो, तो सूचना को उसी आईडी और टैग के साथ अपडेट करें. सीधे जवाब देने वाले यूज़र इंटरफ़ेस (यूआई) को छिपाने के लिए, यह ज़रूरी है. साथ ही, इससे उपयोगकर्ता को यह पुष्टि करने में मदद मिलती है कि उसका जवाब मिल गया है और उसे सही तरीके से प्रोसेस किया गया है.
// Build a new notification, which informs the user that the system // handled their interaction with the previous notification. val repliedNotification = NotificationCompat.Builder(context, CHANNEL_ID) .setSmallIcon(R.drawable.message) .setContentText(context.getString(R.string.replied)) .build() // Issue the new notification. NotificationManagerCompat.from(context).notify(notificationId, repliedNotification)
अन्य डेटा वापस पाना
RemoteInput के साथ अन्य डेटा टाइप को मैनेज करने का तरीका भी ऐसा ही होता है. इस उदाहरण में, इमेज को इनपुट के तौर पर इस्तेमाल किया गया है.
val replyLabel: String = context.resources.getString(R.string.reply_label) val remoteInput: RemoteInput = RemoteInput.Builder(KEY_REPLY).run { setLabel(replyLabel) // Allow for image data types in the input. // This method can be used again to allow for other data types. setAllowDataType("image/*", true) build() }
RemoteInput#getDataResultsFromIntent को कॉल करें और उससे जुड़ा डेटा एक्सट्रैक्ट करें.
class ReplyReceiver : BroadcastReceiver() { override fun onReceive(context: Context, intent: Intent) { val dataResults = RemoteInput.getDataResultsFromIntent(intent, KEY_REPLY) val imageUri: Uri? = dataResults?.get("image/*") as? Uri if (imageUri != null) { // Extract the image context.contentResolver.openInputStream(imageUri)?.use { inputStream -> val bitmap = BitmapFactory.decodeStream(inputStream) // Display the image // ... } } } companion object { const val KEY_REPLY = "key_reply" const val KEY_TEXT_REPLY = "key_text_reply" } }
इस नई सूचना के साथ काम करते समय, उस कॉन्टेक्स्ट का इस्तेमाल करें जिसे रिसीवर के onReceive() तरीके में पास किया गया है.
setRemoteInputHistory() को कॉल करके, सूचना के सबसे नीचे जवाब जोड़ें. हालांकि, अगर आपको मैसेजिंग ऐप्लिकेशन बनाना है, तो मैसेजिंग स्टाइल वाली सूचना बनाएं और बातचीत में नया मैसेज जोड़ें.
मैसेजिंग ऐप्लिकेशन से मिलने वाली सूचनाओं के बारे में ज़्यादा सलाह पाने के लिए, मैसेजिंग ऐप्लिकेशन के लिए सबसे सही तरीके सेक्शन देखें.
बहुत ज़रूरी मैसेज दिखाना
ऐसा हो सकता है कि आपके ऐप्लिकेशन को समय के हिसाब से ज़रूरी मैसेज दिखाना हो. जैसे, आने वाला फ़ोन कॉल या बजने वाला अलार्म. इन स्थितियों में, अपनी सूचना के साथ फ़ुल-स्क्रीन इंटेंट को जोड़ा जा सकता है.
सूचना मिलने पर, उपयोगकर्ताओं को इनमें से कोई एक विकल्प दिखता है. यह इस बात पर निर्भर करता है कि डिवाइस लॉक है या नहीं:
- अगर उपयोगकर्ता का डिवाइस लॉक है, तो फ़ुल-स्क्रीन पर एक ऐक्टिविटी दिखेगी. यह लॉकस्क्रीन को कवर करेगी.
- अगर उपयोगकर्ता का डिवाइस अनलॉक है, तो सूचना बड़ी होकर दिखती है. इसमें सूचना को मैनेज करने या खारिज करने के विकल्प शामिल होते हैं.
यहां दिए गए कोड स्निपेट में, सूचना को फ़ुल-स्क्रीन इंटेंट से जोड़ने का तरीका बताया गया है:
val fullScreenIntent = Intent(context, ImportantActivity::class.java) val fullScreenPendingIntent = PendingIntent.getActivity(context, 0, fullScreenIntent, PendingIntent.FLAG_IMMUTABLE) val builder = NotificationCompat.Builder(context, CHANNEL_ID) .setSmallIcon(R.drawable.ic_logo) .setContentTitle("My notification") .setContentText("Hello World!") .setPriority(NotificationCompat.PRIORITY_DEFAULT) .setFullScreenIntent(fullScreenPendingIntent, true)
लॉक स्क्रीन पर दिखने वाली सूचनाओं को सेट करना
लॉक स्क्रीन पर सूचना में दिखने वाली जानकारी के लेवल को कंट्रोल करने के लिए, setVisibility() को कॉल करें और इनमें से कोई एक वैल्यू डालें:
VISIBILITY_PUBLIC: सूचना का पूरा कॉन्टेंट लॉक स्क्रीन पर दिखता है.VISIBILITY_SECRET: लॉक स्क्रीन पर सूचना का कोई भी हिस्सा नहीं दिखता है.VISIBILITY_PRIVATE: लॉक स्क्रीन पर सिर्फ़ बुनियादी जानकारी दिखती है. जैसे, सूचना का आइकॉन और कॉन्टेंट का टाइटल. सूचना का पूरा कॉन्टेंट नहीं दिखता.
VISIBILITY_PRIVATE सेट करने पर, सूचना के कॉन्टेंट का कोई दूसरा वर्शन भी दिया जा सकता है. इसमें कुछ जानकारी छिपी होती है. उदाहरण के लिए, कोई एसएमएस ऐप्लिकेशन ऐसी सूचना दिखा सकता है जिसमें लिखा हो कि "आपको तीन नए मैसेज मिले हैं". हालांकि, इसमें मैसेज का कॉन्टेंट और भेजने वालों की जानकारी नहीं दिखती. सूचना पाने का यह दूसरा तरीका उपलब्ध कराने के लिए, सबसे पहले NotificationCompat.Builder का इस्तेमाल करके सूचना बनाएं. इसके बाद, setPublicVersion() का इस्तेमाल करके, सूचना पाने के दूसरे तरीके को सामान्य सूचना से अटैच करें.
ध्यान रखें कि उपयोगकर्ता के पास हमेशा यह कंट्रोल होता है कि उसकी सूचनाएं लॉक स्क्रीन पर दिखें या नहीं. साथ ही, वह आपके ऐप्लिकेशन के सूचना चैनलों के आधार पर उन्हें कंट्रोल कर सकता है.
सूचना अपडेट करना
सूचना जारी करने के बाद उसे अपडेट करने के लिए, NotificationManagerCompat.notify() को फिर से कॉल करें. साथ ही, वही आईडी पास करें जिसका इस्तेमाल आपने पहले किया था. अगर पिछली सूचना खारिज कर दी जाती है, तो उसकी जगह नई सूचना बनाई जाती है.
आपके पास setOnlyAlertOnce() को कॉल करने का विकल्प होता है, ताकि आपकी सूचना उपयोगकर्ता को सिर्फ़ पहली बार मिले. इसके बाद, सूचना के अपडेट मिलने पर उसे कोई रुकावट न हो. सूचना में आवाज़, वाइब्रेशन या विज़ुअल क्लू शामिल हो सकते हैं.
सूचना हटाना
सूचनाएं तब तक दिखती हैं, जब तक इनमें से कोई एक काम नहीं हो जाता:
- उपयोगकर्ता सूचना को खारिज कर देता है.
- अगर सूचना बनाते समय
setAutoCancel()कॉल किया जाता है, तो उपयोगकर्ता सूचना पर टैप करता है. - आपने किसी सूचना आईडी के लिए
cancel()को कॉल किया हो. इस तरीके से, बैकग्राउंड में जारी गतिविधि की सूचनाएं भी मिट जाती हैं. cancelAll()को कॉल किया जाता है. इससे, पहले भेजी गई सभी सूचनाएं हट जाती हैं.- अगर आपने सूचना बनाते समय,
setTimeoutAfter()का इस्तेमाल करके टाइम आउट सेट किया है, तो तय की गई अवधि खत्म हो जाती है. अगर ज़रूरी हो, तो टाइम आउट की तय अवधि खत्म होने से पहले सूचना रद्द की जा सकती है.
मैसेजिंग ऐप्लिकेशन के लिए सबसे सही तरीके
मैसेजिंग और चैट ऐप्लिकेशन के लिए सूचनाएं बनाते समय, यहां दिए गए सबसे सही तरीकों को ध्यान में रखें.
MessagingStyle का इस्तेमाल करना
Android 7.0 (एपीआई लेवल 24) से, Android ने सूचना के लिए एक स्टाइल टेंप्लेट उपलब्ध कराया है. यह खास तौर पर मैसेजिंग कॉन्टेंट के लिए है. NotificationCompat.MessagingStyle क्लास का इस्तेमाल करके, सूचना पर दिखने वाले कई लेबल बदले जा सकते हैं. जैसे, बातचीत का टाइटल, अतिरिक्त मैसेज, और सूचना के लिए कॉन्टेंट व्यू.
यहां दिए गए कोड स्निपेट में बताया गया है कि MessagingStyle क्लास का इस्तेमाल करके, सूचना की स्टाइल को कैसे पसंद के मुताबिक बनाया जा सकता है.
val message1 = NotificationCompat.MessagingStyle.Message( messages[0].text, messages[0].time, messages[0].sender ) val message2 = NotificationCompat.MessagingStyle.Message( messages[1].text, messages[1].time, messages[1].sender ) notification = NotificationCompat.Builder(context, CHANNEL_ID) .setSmallIcon(R.drawable.ic_logo) .setStyle( NotificationCompat.MessagingStyle(Person.Builder().setName("Me").build()) .addMessage(message1) .addMessage(message2) ) .build()
Android 9.0 (एपीआई लेवल 28) से, सूचना और उसके अवतारों को बेहतर तरीके से रेंडर करने के लिए, Person क्लास का इस्तेमाल करना भी ज़रूरी है.
NotificationCompat.MessagingStyle का इस्तेमाल करते समय, यह तरीका अपनाएं:
- दो से ज़्यादा लोगों के साथ ग्रुप चैट का टाइटल सेट करने के लिए,
MessagingStyle.setConversationTitle()को कॉल करें. बातचीत का अच्छा टाइटल, ग्रुप चैट का नाम हो सकता है. अगर ग्रुप चैट का कोई नाम नहीं है, तो बातचीत में शामिल लोगों की सूची को टाइटल के तौर पर इस्तेमाल किया जा सकता है. ऐसा न करने पर, हो सकता है कि मैसेज को बातचीत में शामिल किसी व्यक्ति के साथ हुई बातचीत का हिस्सा मान लिया जाए. - इमेज जैसे मीडिया मैसेज शामिल करने के लिए,
MessagingStyle.setData()तरीके का इस्तेमाल करें. पैटर्न इमेज/* के एमआईएमई टाइप काम करते हैं.
सीधे नोटिफ़िकेशन से ही जवाब देने की सुविधा का इस्तेमाल करना
सीधे तौर पर जवाब देने की सुविधा की मदद से, कोई व्यक्ति किसी मैसेज का इनलाइन जवाब दे सकता है.
- जब कोई उपयोगकर्ता, इनलाइन जवाब देने की सुविधा का इस्तेमाल करके जवाब देता है, तब
MessagingStyleसूचना को अपडेट करने के लिएMessagingStyle.addMessage()का इस्तेमाल करें. साथ ही, सूचना को वापस न लें या रद्द न करें. सूचना रद्द न करने पर, उपयोगकर्ता सूचना से ही कई जवाब भेज सकता है. - Wear OS के साथ इनलाइन जवाब देने की सुविधा को काम करने लायक बनाने के लिए,
Action.WearableExtender.setHintDisplayInlineAction(true)को कॉल करें. - सूचना में पुराने मैसेज जोड़कर, सीधे तौर पर जवाब देने वाली बातचीत के बारे में जानकारी देने के लिए,
addHistoricMessage()तरीके का इस्तेमाल करें.
स्मार्ट जवाब की सुविधा चालू करना
- स्मार्ट जवाब की सुविधा चालू करने के लिए, जवाब देने की कार्रवाई पर
setAllowGeneratedResponses(true)को कॉल करें. इससे, Wear OS डिवाइस पर सूचना मिलने पर, उपयोगकर्ताओं को स्मार्ट जवाब देने की सुविधा मिलती है. स्मार्ट जवाब की सुविधा से मिलने वाले जवाब, पूरी तरह से स्मार्टवॉच पर मौजूद मशीन लर्निंग मॉडल से जनरेट होते हैं. इसके लिए,NotificationCompat.MessagingStyleसूचना से मिले कॉन्टेक्स्ट का इस्तेमाल किया जाता है. जवाब जनरेट करने के लिए, इंटरनेट पर कोई डेटा अपलोड नहीं किया जाता.
सूचना का मेटाडेटा जोड़ना
- सूचना के मेटाडेटा को असाइन करें, ताकि सिस्टम को यह पता चल सके कि डिवाइस के परेशान न करें मोड में होने पर, आपके ऐप्लिकेशन की सूचनाओं को कैसे मैनेज करना है. उदाहरण के लिए, 'परेशान न करें' सुविधा को बंद करने के लिए,
addPerson()याsetCategory(Notification.CATEGORY_MESSAGE)तरीके का इस्तेमाल करें.