相對版面配置
透過集合功能整理內容
你可以依據偏好儲存及分類內容。
試用 Compose
Jetpack Compose 是 Android 推薦的 UI 工具包。瞭解如何在 Compose 中使用版面配置。
RelativeLayout
是以相對位置顯示子檢視畫面的檢視區塊群組。每個檢視畫面的位置都可以指定為相對於同層級元素 (例如
其他檢視畫面的左側或下方) 或相對於上層 RelativeLayout
區域的位置 (例如底部、左側或置中)。
注意:如要提升效能並取得更完善的工具支援,請改為使用 ConstraintLayout 建構版面配置。
RelativeLayout
是用來設計使用者介面的強大工具,讓您不須使用巢狀檢視區塊群組,因此版面配置階層能保持平坦,進而提升效能。如果您發現自己使用了多個巢狀 LinearLayout
群組,只要改用 RelativeLayout
或許就能取代這些群組。
檢視畫面位置
RelativeLayout
可讓子檢視畫面指定相對於父檢視畫面或其他子檢視畫面的位置 (以 ID 指定)。因此,您可以根據右框線對齊兩個元素,或
移到另一個下方、在畫面中央、靠左置中等等。根據預設,所有子檢視畫面均繪製在版面配置的左上角,因此您必須使用 RelativeLayout.LayoutParams
提供的各種版面配置屬性來定義每個檢視畫面的位置。
RelativeLayout
供檢視畫面使用的眾多版面配置屬性包括:
android:layout_alignParentTop
- 如果為
"true"
,會將這個檢視畫面的上緣比對父項的上緣。
android:layout_centerVertical
- 如果為
"true"
,會將這個子檢視畫面垂直置中於父檢視畫面中。
android:layout_below
- 將這個檢視畫面的上緣置於以資源 ID 指定的檢視畫面下方。
android:layout_toRightOf
- 將這個檢視畫面的左側邊緣置於以資源 ID 指定的檢視畫面右側。
以上只是其中幾種應用範例,完整的版面配置屬性列於 RelativeLayout.LayoutParams
。
各個版面配置屬性的值可能為布林值,以設為相對於父項 RelativeLayout
的版面配置位置;也可能為 ID,以參照版面配置中的另一個檢視畫面來決定檢視畫面位置。
在 XML 版面配置中,能以任何順序宣告依附於版面配置中其他檢視畫面的元件。舉例來說,即使「view2」是階層中宣告的最後一個檢視畫面,您還是可以宣告「view1」置於「view2」下方。以下是這種情境的範例。
範例
用來控制每個資料檢視相對位置的屬性均另外強調。
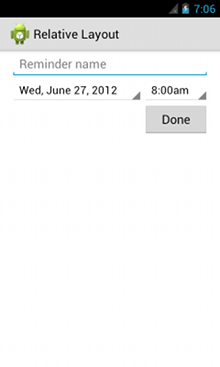
<?xml version="1.0" encoding="utf-8"?>
<RelativeLayout xmlns:android="http://schemas.android.com/apk/res/android"
android:layout_width="match_parent"
android:layout_height="match_parent"
android:paddingLeft="16dp"
android:paddingRight="16dp" >
<EditText
android:id="@+id/name"
android:layout_width="match_parent"
android:layout_height="wrap_content"
android:hint="@string/reminder" />
<Spinner
android:id="@+id/dates"
android:layout_width="0dp"
android:layout_height="wrap_content"
android:layout_below="@id/name"
android:layout_alignParentLeft="true"
android:layout_toLeftOf="@+id/times" />
<Spinner
android:id="@id/times"
android:layout_width="96dp"
android:layout_height="wrap_content"
android:layout_below="@id/name"
android:layout_alignParentRight="true" />
<Button
android:layout_width="96dp"
android:layout_height="wrap_content"
android:layout_below="@id/times"
android:layout_alignParentRight="true"
android:text="@string/done" />
</RelativeLayout>
如要進一步瞭解 RelativeLayout
每個子檢視畫面可用的版面配置屬性,請參閱 RelativeLayout.LayoutParams
。
這個頁面中的內容和程式碼範例均受《內容授權》中的授權所規範。Java 與 OpenJDK 是 Oracle 和/或其關係企業的商標或註冊商標。
上次更新時間:2025-07-27 (世界標準時間)。
[[["容易理解","easyToUnderstand","thumb-up"],["確實解決了我的問題","solvedMyProblem","thumb-up"],["其他","otherUp","thumb-up"]],[["缺少我需要的資訊","missingTheInformationINeed","thumb-down"],["過於複雜/步驟過多","tooComplicatedTooManySteps","thumb-down"],["過時","outOfDate","thumb-down"],["翻譯問題","translationIssue","thumb-down"],["示例/程式碼問題","samplesCodeIssue","thumb-down"],["其他","otherDown","thumb-down"]],["上次更新時間:2025-07-27 (世界標準時間)。"],[],[],null,["# Relative Layout\n\nTry the Compose way \nJetpack Compose is the recommended UI toolkit for Android. Learn how to work with layouts in Compose. \n[ConstraintLayout in Compose →](/jetpack/compose/layouts/constraintlayout) \n\n[RelativeLayout](/reference/android/widget/RelativeLayout) is a view group that displays child views in relative\npositions. The position of each view can be specified as relative to sibling elements (such as to\nthe left-of or below another view) or in positions relative to the parent [RelativeLayout](/reference/android/widget/RelativeLayout) area (such as aligned to the bottom, left or center).\n\n**Note:**\nFor better performance and tooling support, you should instead [build your layout with ConstraintLayout](/training/constraint-layout).\n\nA [RelativeLayout](/reference/android/widget/RelativeLayout) is a very powerful utility for designing a user interface\nbecause it can eliminate nested view groups and keep your layout hierarchy flat, which improves\nperformance. If you find yourself using several nested [LinearLayout](/reference/android/widget/LinearLayout) groups,\nyou may be able to replace them with a single [RelativeLayout](/reference/android/widget/RelativeLayout).\n\nPositioning Views\n-----------------\n\n[RelativeLayout](/reference/android/widget/RelativeLayout) lets child views specify their position relative to the\nparent view or to each other (specified by ID). So you can align two elements by right border, or\nmake one below another, centered in the screen, centered left, and so on. By default, all child\nviews are drawn at the top-left of the layout, so you must define the position of each view\nusing the various layout properties available from [RelativeLayout.LayoutParams](/reference/android/widget/RelativeLayout.LayoutParams).\n\nSome of the many layout properties available to views in a [RelativeLayout](/reference/android/widget/RelativeLayout)\ninclude:\n\n[`android:layout_alignParentTop`](/reference/android/widget/RelativeLayout.LayoutParams#attr_android:layout_alignParentTop)\n: If `\"true\"`, makes the top edge of this view match the top edge of the parent.\n\n[`android:layout_centerVertical`](/reference/android/widget/RelativeLayout.LayoutParams#attr_android:layout_centerVertical)\n: If `\"true\"`, centers this child vertically within its parent.\n\n[`android:layout_below`](/reference/android/widget/RelativeLayout.LayoutParams#attr_android:layout_below)\n: Positions the top edge of this view below the view specified with a resource ID.\n\n[`android:layout_toRightOf`](/reference/android/widget/RelativeLayout.LayoutParams#attr_android:layout_toRightOf)\n: Positions the left edge of this view to the right of the view specified with a resource ID.\n\nThese are just a few examples. All layout attributes are documented at [RelativeLayout.LayoutParams](/reference/android/widget/RelativeLayout.LayoutParams).\n\nThe value for each layout property is either a boolean to\nenable a layout position relative to the parent [RelativeLayout](/reference/android/widget/RelativeLayout) or an ID that\nreferences another view in the layout against which the view should be positioned.\n\nIn your XML layout, dependencies against other views in the layout can be declared in any order.\nFor example, you can declare that \"view1\" be positioned below \"view2\" even if \"view2\" is the last\nview declared in the hierarchy. The example below demonstrates such a scenario.\n\nExample\n-------\n\nEach of the attributes that control the relative position of each view are emphasized. \n\n```xml\n\u003c?xml version=\"1.0\" encoding=\"utf-8\"?\u003e\n\u003cRelativeLayout xmlns:android=\"http://schemas.android.com/apk/res/android\"\n android:layout_width=\"match_parent\"\n android:layout_height=\"match_parent\"\n android:paddingLeft=\"16dp\"\n android:paddingRight=\"16dp\" \u003e\n \u003cEditText\n android:id=\"@+id/name\"\n android:layout_width=\"match_parent\"\n android:layout_height=\"wrap_content\"\n android:hint=\"@string/reminder\" /\u003e\n \u003cSpinner\n android:id=\"@+id/dates\"\n android:layout_width=\"0dp\"\n android:layout_height=\"wrap_content\"\n android:layout_below=\"@id/name\"\n android:layout_alignParentLeft=\"true\"\n android:layout_toLeftOf=\"@+id/times\" /\u003e\n \u003cSpinner\n android:id=\"@id/times\"\n android:layout_width=\"96dp\"\n android:layout_height=\"wrap_content\"\n android:layout_below=\"@id/name\"\n android:layout_alignParentRight=\"true\" /\u003e\n \u003cButton\n android:layout_width=\"96dp\"\n android:layout_height=\"wrap_content\"\n android:layout_below=\"@id/times\"\n android:layout_alignParentRight=\"true\"\n android:text=\"@string/done\" /\u003e\n\u003c/RelativeLayout\u003e\n```\n\nFor details about all the layout attributes available to each child view of a [RelativeLayout](/reference/android/widget/RelativeLayout), see [RelativeLayout.LayoutParams](/reference/android/widget/RelativeLayout.LayoutParams)."]]