Phản hồi sự kiện chạm
Sử dụng bộ sưu tập để sắp xếp ngăn nắp các trang
Lưu và phân loại nội dung dựa trên lựa chọn ưu tiên của bạn.
Việc làm cho các đối tượng di chuyển theo một chương trình đặt trước như tam giác xoay sẽ hữu ích cho
thu hút được sự chú ý, nhưng nếu bạn muốn người dùng tương tác với đồ hoạ OpenGL ES của mình thì sao?
Chìa khoá để tạo ra tính tương tác cảm ứng cho ứng dụng OpenGL ES là mở rộng việc triển khai
GLSurfaceView
để ghi đè
onTouchEvent()
để theo dõi các sự kiện chạm.
Bài học này sẽ hướng dẫn bạn cách theo dõi các sự kiện chạm để cho phép người dùng xoay một đối tượng OpenGL ES.
Thiết lập trình nghe thao tác chạm
Để ứng dụng OpenGL ES của bạn phản hồi các sự kiện chạm, bạn phải triển khai
Phương thức onTouchEvent()
trong
Lớp GLSurfaceView
. Quy trình triển khai mẫu bên dưới cho biết cách lắng nghe
Các sự kiện MotionEvent.ACTION_MOVE
và dịch các sự kiện đó sang
góc quay của hình dạng.
Kotlin
private const val TOUCH_SCALE_FACTOR: Float = 180.0f / 320f
...
private var previousX: Float = 0f
private var previousY: Float = 0f
override fun onTouchEvent(e: MotionEvent): Boolean {
// MotionEvent reports input details from the touch screen
// and other input controls. In this case, you are only
// interested in events where the touch position changed.
val x: Float = e.x
val y: Float = e.y
when (e.action) {
MotionEvent.ACTION_MOVE -> {
var dx: Float = x - previousX
var dy: Float = y - previousY
// reverse direction of rotation above the mid-line
if (y > height / 2) {
dx *= -1
}
// reverse direction of rotation to left of the mid-line
if (x < width / 2) {
dy *= -1
}
renderer.angle += (dx + dy) * TOUCH_SCALE_FACTOR
requestRender()
}
}
previousX = x
previousY = y
return true
}
Java
private final float TOUCH_SCALE_FACTOR = 180.0f / 320;
private float previousX;
private float previousY;
@Override
public boolean onTouchEvent(MotionEvent e) {
// MotionEvent reports input details from the touch screen
// and other input controls. In this case, you are only
// interested in events where the touch position changed.
float x = e.getX();
float y = e.getY();
switch (e.getAction()) {
case MotionEvent.ACTION_MOVE:
float dx = x - previousX;
float dy = y - previousY;
// reverse direction of rotation above the mid-line
if (y > getHeight() / 2) {
dx = dx * -1 ;
}
// reverse direction of rotation to left of the mid-line
if (x < getWidth() / 2) {
dy = dy * -1 ;
}
renderer.setAngle(
renderer.getAngle() +
((dx + dy) * TOUCH_SCALE_FACTOR));
requestRender();
}
previousX = x;
previousY = y;
return true;
}
Lưu ý rằng sau khi tính góc xoay, phương thức này sẽ gọi
requestRender()
để cho
trình kết xuất đồ hoạ rằng đã đến lúc kết xuất khung hình. Đây là phương pháp hiệu quả nhất trong ví dụ này
vì không cần vẽ lại khung trừ khi có thay đổi về phép xoay. Tuy nhiên, việc này
không có bất kỳ ảnh hưởng nào đến hiệu quả trừ khi bạn cũng yêu cầu trình kết xuất chỉ vẽ lại khi
dữ liệu thay đổi bằng cách sử dụng setRenderMode()
, vì vậy hãy đảm bảo không nhận xét dòng này trong trình kết xuất:
Kotlin
class MyGlSurfaceView(context: Context) : GLSurfaceView(context) {
init {
// Render the view only when there is a change in the drawing data
renderMode = GLSurfaceView.RENDERMODE_WHEN_DIRTY
}
}
Java
public MyGLSurfaceView(Context context) {
...
// Render the view only when there is a change in the drawing data
setRenderMode(GLSurfaceView.RENDERMODE_WHEN_DIRTY);
}
Hiển thị góc xoay
Mã ví dụ ở trên yêu cầu bạn hiển thị góc xoay qua trình kết xuất bằng cách
thêm thành viên công khai. Vì mã kết xuất đang chạy trên một luồng riêng biệt với người dùng chính
luồng giao diện của ứng dụng, bạn phải khai báo biến công khai này dưới dạng volatile
.
Dưới đây là mã để khai báo biến và hiển thị cặp phương thức getter và setter:
Kotlin
class MyGLRenderer4 : GLSurfaceView.Renderer {
@Volatile
var angle: Float = 0f
}
Java
public class MyGLRenderer implements GLSurfaceView.Renderer {
...
public volatile float mAngle;
public float getAngle() {
return mAngle;
}
public void setAngle(float angle) {
mAngle = angle;
}
}
Áp dụng chế độ xoay
Để áp dụng chế độ xoay được tạo bằng phương thức nhập bằng cách chạm, hãy ghi chú mã tạo ra một góc và
thêm một biến chứa góc đã tạo bằng phương thức nhập bằng cách chạm:
Kotlin
override fun onDrawFrame(gl: GL10) {
...
val scratch = FloatArray(16)
// Create a rotation for the triangle
// long time = SystemClock.uptimeMillis() % 4000L;
// float angle = 0.090f * ((int) time);
Matrix.setRotateM(rotationMatrix, 0, angle, 0f, 0f, -1.0f)
// Combine the rotation matrix with the projection and camera view
// Note that the mvpMatrix factor *must be first* in order
// for the matrix multiplication product to be correct.
Matrix.multiplyMM(scratch, 0, mvpMatrix, 0, rotationMatrix, 0)
// Draw triangle
triangle.draw(scratch)
}
Java
public void onDrawFrame(GL10 gl) {
...
float[] scratch = new float[16];
// Create a rotation for the triangle
// long time = SystemClock.uptimeMillis() % 4000L;
// float angle = 0.090f * ((int) time);
Matrix.setRotateM(rotationMatrix, 0, mAngle, 0, 0, -1.0f);
// Combine the rotation matrix with the projection and camera view
// Note that the vPMatrix factor *must be first* in order
// for the matrix multiplication product to be correct.
Matrix.multiplyMM(scratch, 0, vPMatrix, 0, rotationMatrix, 0);
// Draw triangle
mTriangle.draw(scratch);
}
Khi bạn đã hoàn tất các bước được mô tả ở trên, hãy chạy chương trình và kéo ngón tay trên
màn hình để xoay tam giác:
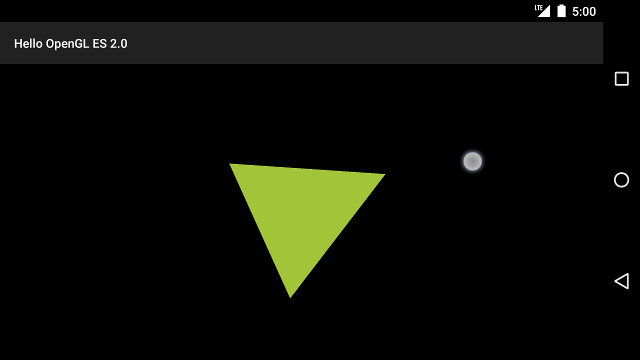
Hình 1. Hình tam giác đang xoay khi nhập bằng cách chạm (hình tròn hiển thị cử chỉ chạm
vị trí).
Nội dung và mã mẫu trên trang này phải tuân thủ các giấy phép như mô tả trong phần Giấy phép nội dung. Java và OpenJDK là nhãn hiệu hoặc nhãn hiệu đã đăng ký của Oracle và/hoặc đơn vị liên kết của Oracle.
Cập nhật lần gần đây nhất: 2025-07-27 UTC.
[[["Dễ hiểu","easyToUnderstand","thumb-up"],["Giúp tôi giải quyết được vấn đề","solvedMyProblem","thumb-up"],["Khác","otherUp","thumb-up"]],[["Thiếu thông tin tôi cần","missingTheInformationINeed","thumb-down"],["Quá phức tạp/quá nhiều bước","tooComplicatedTooManySteps","thumb-down"],["Đã lỗi thời","outOfDate","thumb-down"],["Vấn đề về bản dịch","translationIssue","thumb-down"],["Vấn đề về mẫu/mã","samplesCodeIssue","thumb-down"],["Khác","otherDown","thumb-down"]],["Cập nhật lần gần đây nhất: 2025-07-27 UTC."],[],[],null,["# Respond to touch events\n\nMaking objects move according to a preset program like the rotating triangle is useful for\ngetting some attention, but what if you want to have users interact with your OpenGL ES graphics?\nThe key to making your OpenGL ES application touch interactive is expanding your implementation of\n[GLSurfaceView](/reference/android/opengl/GLSurfaceView) to override the\n[onTouchEvent()](/reference/android/view/View#onTouchEvent(android.view.MotionEvent)) to listen for touch events.\n\nThis lesson shows you how to listen for touch events to let users rotate an OpenGL ES object.\n\nSetup a touch listener\n----------------------\n\nIn order to make your OpenGL ES application respond to touch events, you must implement the\n[onTouchEvent()](/reference/android/view/View#onTouchEvent(android.view.MotionEvent)) method in your\n[GLSurfaceView](/reference/android/opengl/GLSurfaceView) class. The example implementation below shows how to listen for\n[MotionEvent.ACTION_MOVE](/reference/android/view/MotionEvent#ACTION_MOVE) events and translate them to\nan angle of rotation for a shape. \n\n### Kotlin\n\n```kotlin\nprivate const val TOUCH_SCALE_FACTOR: Float = 180.0f / 320f\n...\nprivate var previousX: Float = 0f\nprivate var previousY: Float = 0f\n\noverride fun onTouchEvent(e: MotionEvent): Boolean {\n // MotionEvent reports input details from the touch screen\n // and other input controls. In this case, you are only\n // interested in events where the touch position changed.\n\n val x: Float = e.x\n val y: Float = e.y\n\n when (e.action) {\n MotionEvent.ACTION_MOVE -\u003e {\n\n var dx: Float = x - previousX\n var dy: Float = y - previousY\n\n // reverse direction of rotation above the mid-line\n if (y \u003e height / 2) {\n dx *= -1\n }\n\n // reverse direction of rotation to left of the mid-line\n if (x \u003c width / 2) {\n dy *= -1\n }\n\n renderer.angle += (dx + dy) * TOUCH_SCALE_FACTOR\n requestRender()\n }\n }\n\n previousX = x\n previousY = y\n return true\n}\n```\n\n### Java\n\n```java\nprivate final float TOUCH_SCALE_FACTOR = 180.0f / 320;\nprivate float previousX;\nprivate float previousY;\n\n@Override\npublic boolean onTouchEvent(MotionEvent e) {\n // MotionEvent reports input details from the touch screen\n // and other input controls. In this case, you are only\n // interested in events where the touch position changed.\n\n float x = e.getX();\n float y = e.getY();\n\n switch (e.getAction()) {\n case MotionEvent.ACTION_MOVE:\n\n float dx = x - previousX;\n float dy = y - previousY;\n\n // reverse direction of rotation above the mid-line\n if (y \u003e getHeight() / 2) {\n dx = dx * -1 ;\n }\n\n // reverse direction of rotation to left of the mid-line\n if (x \u003c getWidth() / 2) {\n dy = dy * -1 ;\n }\n\n renderer.setAngle(\n renderer.getAngle() +\n ((dx + dy) * TOUCH_SCALE_FACTOR));\n requestRender();\n }\n\n previousX = x;\n previousY = y;\n return true;\n}\n```\n\nNotice that after calculating the rotation angle, this method calls\n[requestRender()](/reference/android/opengl/GLSurfaceView#requestRender()) to tell the\nrenderer that it is time to render the frame. This approach is the most efficient in this example\nbecause the frame does not need to be redrawn unless there is a change in the rotation. However, it\ndoes not have any impact on efficiency unless you also request that the renderer only redraw when\nthe data changes using the [setRenderMode()](/reference/android/opengl/GLSurfaceView#setRenderMode(int))\nmethod, so make sure this line is uncommented in the renderer: \n\n### Kotlin\n\n```kotlin\nclass MyGlSurfaceView(context: Context) : GLSurfaceView(context) {\n\n init {\n // Render the view only when there is a change in the drawing data\n renderMode = GLSurfaceView.RENDERMODE_WHEN_DIRTY\n }\n}\n```\n\n### Java\n\n```java\npublic MyGLSurfaceView(Context context) {\n ...\n // Render the view only when there is a change in the drawing data\n setRenderMode(GLSurfaceView.RENDERMODE_WHEN_DIRTY);\n}\n```\n\nExpose the rotation angle\n-------------------------\n\nThe example code above requires that you expose the rotation angle through your renderer by\nadding a public member. Since the renderer code is running on a separate thread from the main user\ninterface thread of your application, you must declare this public variable as `volatile`.\nHere is the code to declare the variable and expose the getter and setter pair: \n\n### Kotlin\n\n```kotlin\nclass MyGLRenderer4 : GLSurfaceView.Renderer {\n\n @Volatile\n var angle: Float = 0f\n}\n```\n\n### Java\n\n```java\npublic class MyGLRenderer implements GLSurfaceView.Renderer {\n ...\n\n public volatile float mAngle;\n\n public float getAngle() {\n return mAngle;\n }\n\n public void setAngle(float angle) {\n mAngle = angle;\n }\n}\n```\n\nApply rotation\n--------------\n\nTo apply the rotation generated by touch input, comment out the code that generates an angle and\nadd a variable that contains the touch input generated angle: \n\n### Kotlin\n\n```kotlin\noverride fun onDrawFrame(gl: GL10) {\n ...\n val scratch = FloatArray(16)\n\n // Create a rotation for the triangle\n // long time = SystemClock.uptimeMillis() % 4000L;\n // float angle = 0.090f * ((int) time);\n Matrix.setRotateM(rotationMatrix, 0, angle, 0f, 0f, -1.0f)\n\n // Combine the rotation matrix with the projection and camera view\n // Note that the mvpMatrix factor *must be first* in order\n // for the matrix multiplication product to be correct.\n Matrix.multiplyMM(scratch, 0, mvpMatrix, 0, rotationMatrix, 0)\n\n // Draw triangle\n triangle.draw(scratch)\n}\n```\n\n### Java\n\n```java\npublic void onDrawFrame(GL10 gl) {\n ...\n float[] scratch = new float[16];\n\n // Create a rotation for the triangle\n // long time = SystemClock.uptimeMillis() % 4000L;\n // float angle = 0.090f * ((int) time);\n Matrix.setRotateM(rotationMatrix, 0, mAngle, 0, 0, -1.0f);\n\n // Combine the rotation matrix with the projection and camera view\n // Note that the vPMatrix factor *must be first* in order\n // for the matrix multiplication product to be correct.\n Matrix.multiplyMM(scratch, 0, vPMatrix, 0, rotationMatrix, 0);\n\n // Draw triangle\n mTriangle.draw(scratch);\n}\n```\n\nWhen you have completed the steps described above, run the program and drag your finger over the\nscreen to rotate the triangle:\n\n\n**Figure 1.** Triangle being rotated with touch input (circle shows touch\nlocation)."]]