تعريف الأشكال
تنظيم صفحاتك في مجموعات
يمكنك حفظ المحتوى وتصنيفه حسب إعداداتك المفضّلة.
إن القدرة على تحديد الأشكال المراد رسمها في سياق عرض OpenGL ES هي الخطوة الأولى في
إنشاء رسومات متطورة لتطبيقك. يمكن أن يكون الرسم باستخدام OpenGL ES صعبًا بعض الشيء بدون
عرفنا بعض الأشياء الأساسية عن الطريقة التي يتوقع منك بها OpenGL ES تعريف الكائنات الرسومية.
يشرح هذا الدرس نظام إحداثيات OpenGL ES الخاص بشاشة جهاز Android،
أساسيات تحديد الشكل وشكل الوجوه، بالإضافة إلى تحديد المثلث والمربع.
تحديد المثلث
يتيح لك OpenGL ES تحديد الكائنات المرسومة باستخدام الإحداثيات في المساحة ثلاثية الأبعاد. وبالتالي،
قبل أن تتمكن من رسم مثلث، يجب تحديد إحداثياته. في OpenGL، الطريقة المعتادة لإجراء
لتحديد صفيف رأسي لأرقام النقطة العائمة للإحداثيات. بالنسبة إلى الحد الأقصى
الكفاءة، فأنت تكتب هذه الإحداثيات في ByteBuffer
، والذي يتم تمريره إلى
مسار رسومات OpenGL ES قيد المعالجة.
Kotlin
// number of coordinates per vertex in this array
const val COORDS_PER_VERTEX = 3
var triangleCoords = floatArrayOf( // in counterclockwise order:
0.0f, 0.622008459f, 0.0f, // top
-0.5f, -0.311004243f, 0.0f, // bottom left
0.5f, -0.311004243f, 0.0f // bottom right
)
class Triangle {
// Set color with red, green, blue and alpha (opacity) values
val color = floatArrayOf(0.63671875f, 0.76953125f, 0.22265625f, 1.0f)
private var vertexBuffer: FloatBuffer =
// (number of coordinate values * 4 bytes per float)
ByteBuffer.allocateDirect(triangleCoords.size * 4).run {
// use the device hardware's native byte order
order(ByteOrder.nativeOrder())
// create a floating point buffer from the ByteBuffer
asFloatBuffer().apply {
// add the coordinates to the FloatBuffer
put(triangleCoords)
// set the buffer to read the first coordinate
position(0)
}
}
}
Java
public class Triangle {
private FloatBuffer vertexBuffer;
// number of coordinates per vertex in this array
static final int COORDS_PER_VERTEX = 3;
static float triangleCoords[] = { // in counterclockwise order:
0.0f, 0.622008459f, 0.0f, // top
-0.5f, -0.311004243f, 0.0f, // bottom left
0.5f, -0.311004243f, 0.0f // bottom right
};
// Set color with red, green, blue and alpha (opacity) values
float color[] = { 0.63671875f, 0.76953125f, 0.22265625f, 1.0f };
public Triangle() {
// initialize vertex byte buffer for shape coordinates
ByteBuffer bb = ByteBuffer.allocateDirect(
// (number of coordinate values * 4 bytes per float)
triangleCoords.length * 4);
// use the device hardware's native byte order
bb.order(ByteOrder.nativeOrder());
// create a floating point buffer from the ByteBuffer
vertexBuffer = bb.asFloatBuffer();
// add the coordinates to the FloatBuffer
vertexBuffer.put(triangleCoords);
// set the buffer to read the first coordinate
vertexBuffer.position(0);
}
}
يفترض OpenGL ES بشكل افتراضي نظام إحداثي حيث تحدد [0,0,0] (X,Y,Z) مركز
إطار GLSurfaceView
،
[1,1,0] هو الزاوية اليمنى العليا من الإطار
[-1,-1,0] هو الركن السفلي الأيسر من الإطار. للحصول على رسم توضيحي لنظام الإحداثيات هذا، راجع
مطوّر برامج OpenGL ES
الدليل.
لاحظ أن إحداثيات هذا الشكل يتم تحديدها بترتيب عكس عقارب الساعة. الرسم
الترتيب مهمًا لأنه يحدد الجانب الأمامي للشكل، والذي عادةً ما
تريد رسمها، والواجهة الخلفية، التي يمكنك اختيار عدم رسمها باستخدام خيار OpenGL ES
ميزات الوجه. لمزيد من المعلومات عن الوجوه وطريقة الانتقاء، راجع
OpenGL ES دليل المطوِّر.
تعريف مربع
يُعد تحديد المثلّثات أمرًا سهلاً للغاية في OpenGL، ولكن ماذا لو أردت الحصول على
معقدة؟ لنفترض، مربع؟ وهناك عدة طرق للقيام بذلك، ولكن المسار النموذجي لرسم
في OpenGL ES هو استخدام مثلثين مرسومين معًا:
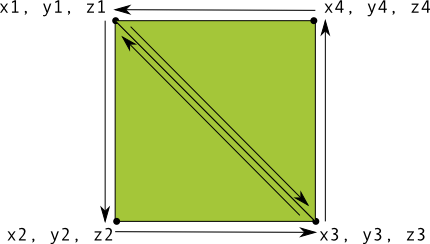
الشكل 1. رسم مربّع باستخدام مثلّثَين
مرة أخرى، يجب تحديد الرؤوس بترتيب عكس عقارب الساعة لكلا المثلثين اللذين
وتمثل هذا الشكل، وتضع القيم في ByteBuffer
. من أجل تجنب
لتحديد الإحداثيات التي يتشاركها كل مثلث مرتين، واستخدم قائمة رسم لمعرفة
برنامج رسومات OpenGL ES كيفية رسم هذه الرؤوس. إليك رمز هذا الشكل:
Kotlin
// number of coordinates per vertex in this array
const val COORDS_PER_VERTEX = 3
var squareCoords = floatArrayOf(
-0.5f, 0.5f, 0.0f, // top left
-0.5f, -0.5f, 0.0f, // bottom left
0.5f, -0.5f, 0.0f, // bottom right
0.5f, 0.5f, 0.0f // top right
)
class Square2 {
private val drawOrder = shortArrayOf(0, 1, 2, 0, 2, 3) // order to draw vertices
// initialize vertex byte buffer for shape coordinates
private val vertexBuffer: FloatBuffer =
// (# of coordinate values * 4 bytes per float)
ByteBuffer.allocateDirect(squareCoords.size * 4).run {
order(ByteOrder.nativeOrder())
asFloatBuffer().apply {
put(squareCoords)
position(0)
}
}
// initialize byte buffer for the draw list
private val drawListBuffer: ShortBuffer =
// (# of coordinate values * 2 bytes per short)
ByteBuffer.allocateDirect(drawOrder.size * 2).run {
order(ByteOrder.nativeOrder())
asShortBuffer().apply {
put(drawOrder)
position(0)
}
}
}
Java
public class Square {
private FloatBuffer vertexBuffer;
private ShortBuffer drawListBuffer;
// number of coordinates per vertex in this array
static final int COORDS_PER_VERTEX = 3;
static float squareCoords[] = {
-0.5f, 0.5f, 0.0f, // top left
-0.5f, -0.5f, 0.0f, // bottom left
0.5f, -0.5f, 0.0f, // bottom right
0.5f, 0.5f, 0.0f }; // top right
private short drawOrder[] = { 0, 1, 2, 0, 2, 3 }; // order to draw vertices
public Square() {
// initialize vertex byte buffer for shape coordinates
ByteBuffer bb = ByteBuffer.allocateDirect(
// (# of coordinate values * 4 bytes per float)
squareCoords.length * 4);
bb.order(ByteOrder.nativeOrder());
vertexBuffer = bb.asFloatBuffer();
vertexBuffer.put(squareCoords);
vertexBuffer.position(0);
// initialize byte buffer for the draw list
ByteBuffer dlb = ByteBuffer.allocateDirect(
// (# of coordinate values * 2 bytes per short)
drawOrder.length * 2);
dlb.order(ByteOrder.nativeOrder());
drawListBuffer = dlb.asShortBuffer();
drawListBuffer.put(drawOrder);
drawListBuffer.position(0);
}
}
يمنحك هذا المثال نظرة خاطفة على ما يتطلبه الأمر لإنشاء أشكال أكثر تعقيدًا باستخدام OpenGL. ضِمن
بشكل عام، يمكنك استخدام مجموعات من المثلثات لرسم الكائنات. في الدرس التالي، ستتعلم كيفية رسم
هذه الأشكال على الشاشة.
يخضع كل من المحتوى وعيّنات التعليمات البرمجية في هذه الصفحة للتراخيص الموضحّة في ترخيص استخدام المحتوى. إنّ Java وOpenJDK هما علامتان تجاريتان مسجَّلتان لشركة Oracle و/أو الشركات التابعة لها.
تاريخ التعديل الأخير: 2025-07-27 (حسب التوقيت العالمي المتفَّق عليه)
[[["يسهُل فهم المحتوى.","easyToUnderstand","thumb-up"],["ساعَدني المحتوى في حلّ مشكلتي.","solvedMyProblem","thumb-up"],["غير ذلك","otherUp","thumb-up"]],[["لا يحتوي على المعلومات التي أحتاج إليها.","missingTheInformationINeed","thumb-down"],["الخطوات معقدة للغاية / كثيرة جدًا.","tooComplicatedTooManySteps","thumb-down"],["المحتوى قديم.","outOfDate","thumb-down"],["ثمة مشكلة في الترجمة.","translationIssue","thumb-down"],["مشكلة في العيّنات / التعليمات البرمجية","samplesCodeIssue","thumb-down"],["غير ذلك","otherDown","thumb-down"]],["تاريخ التعديل الأخير: 2025-07-27 (حسب التوقيت العالمي المتفَّق عليه)"],[],[],null,["# Define shapes\n\nBeing able to define shapes to be drawn in the context of an OpenGL ES view is the first step in\ncreating high-end graphics for your app. Drawing with OpenGL ES can be a little tricky without\nknowing a few basic things about how OpenGL ES expects you to define graphic objects.\n\nThis lesson explains the OpenGL ES coordinate system relative to an Android device screen, the\nbasics of defining a shape, shape faces, as well as defining a triangle and a square.\n\nDefine a triangle\n-----------------\n\nOpenGL ES allows you to define drawn objects using coordinates in three-dimensional space. So,\nbefore you can draw a triangle, you must define its coordinates. In OpenGL, the typical way to do\nthis is to define a vertex array of floating point numbers for the coordinates. For maximum\nefficiency, you write these coordinates into a [ByteBuffer](/reference/java/nio/ByteBuffer), that is passed into the\nOpenGL ES graphics pipeline for processing. \n\n### Kotlin\n\n```kotlin\n// number of coordinates per vertex in this array\nconst val COORDS_PER_VERTEX = 3\nvar triangleCoords = floatArrayOf( // in counterclockwise order:\n 0.0f, 0.622008459f, 0.0f, // top\n -0.5f, -0.311004243f, 0.0f, // bottom left\n 0.5f, -0.311004243f, 0.0f // bottom right\n)\n\nclass Triangle {\n\n // Set color with red, green, blue and alpha (opacity) values\n val color = floatArrayOf(0.63671875f, 0.76953125f, 0.22265625f, 1.0f)\n\n private var vertexBuffer: FloatBuffer =\n // (number of coordinate values * 4 bytes per float)\n ByteBuffer.allocateDirect(triangleCoords.size * 4).run {\n // use the device hardware's native byte order\n order(ByteOrder.nativeOrder())\n\n // create a floating point buffer from the ByteBuffer\n asFloatBuffer().apply {\n // add the coordinates to the FloatBuffer\n put(triangleCoords)\n // set the buffer to read the first coordinate\n position(0)\n }\n }\n}\n```\n\n### Java\n\n```java\npublic class Triangle {\n\n private FloatBuffer vertexBuffer;\n\n // number of coordinates per vertex in this array\n static final int COORDS_PER_VERTEX = 3;\n static float triangleCoords[] = { // in counterclockwise order:\n 0.0f, 0.622008459f, 0.0f, // top\n -0.5f, -0.311004243f, 0.0f, // bottom left\n 0.5f, -0.311004243f, 0.0f // bottom right\n };\n\n // Set color with red, green, blue and alpha (opacity) values\n float color[] = { 0.63671875f, 0.76953125f, 0.22265625f, 1.0f };\n\n public Triangle() {\n // initialize vertex byte buffer for shape coordinates\n ByteBuffer bb = ByteBuffer.allocateDirect(\n // (number of coordinate values * 4 bytes per float)\n triangleCoords.length * 4);\n // use the device hardware's native byte order\n bb.order(ByteOrder.nativeOrder());\n\n // create a floating point buffer from the ByteBuffer\n vertexBuffer = bb.asFloatBuffer();\n // add the coordinates to the FloatBuffer\n vertexBuffer.put(triangleCoords);\n // set the buffer to read the first coordinate\n vertexBuffer.position(0);\n }\n}\n```\n\nBy default, OpenGL ES assumes a coordinate system where \\[0,0,0\\] (X,Y,Z) specifies the center of\nthe [GLSurfaceView](/reference/android/opengl/GLSurfaceView) frame,\n\\[1,1,0\\] is the top right corner of the frame and\n\\[-1,-1,0\\] is bottom left corner of the frame. For an illustration of this coordinate system, see the\n[OpenGL ES developer\nguide](/develop/ui/views/graphics/opengl/about-opengl#coordinate-mapping).\n\nNote that the coordinates of this shape are defined in a counterclockwise order. The drawing\norder is important because it defines which side is the front face of the shape, which you typically\nwant to have drawn, and the back face, which you can choose to not draw using the OpenGL ES cull\nface feature. For more information about faces and culling, see the\n[OpenGL ES](/develop/ui/views/graphics/opengl/about-opengl#faces-winding) developer guide.\n\nDefine a square\n---------------\n\nDefining triangles is pretty easy in OpenGL, but what if you want to get a just a little more\ncomplex? Say, a square? There are a number of ways to do this, but a typical path to drawing such a\nshape in OpenGL ES is to use two triangles drawn together:\n\n\n**Figure 1.** Drawing a square using two triangles.\n\nAgain, you should define the vertices in a counterclockwise order for both triangles that\nrepresent this shape, and put the values in a [ByteBuffer](/reference/java/nio/ByteBuffer). In order to avoid\ndefining the two coordinates shared by each triangle twice, use a drawing list to tell the\nOpenGL ES graphics pipeline how to draw these vertices. Here's the code for this shape: \n\n### Kotlin\n\n```kotlin\n// number of coordinates per vertex in this array\nconst val COORDS_PER_VERTEX = 3\nvar squareCoords = floatArrayOf(\n -0.5f, 0.5f, 0.0f, // top left\n -0.5f, -0.5f, 0.0f, // bottom left\n 0.5f, -0.5f, 0.0f, // bottom right\n 0.5f, 0.5f, 0.0f // top right\n)\n\nclass Square2 {\n\n private val drawOrder = shortArrayOf(0, 1, 2, 0, 2, 3) // order to draw vertices\n\n // initialize vertex byte buffer for shape coordinates\n private val vertexBuffer: FloatBuffer =\n // (# of coordinate values * 4 bytes per float)\n ByteBuffer.allocateDirect(squareCoords.size * 4).run {\n order(ByteOrder.nativeOrder())\n asFloatBuffer().apply {\n put(squareCoords)\n position(0)\n }\n }\n\n // initialize byte buffer for the draw list\n private val drawListBuffer: ShortBuffer =\n // (# of coordinate values * 2 bytes per short)\n ByteBuffer.allocateDirect(drawOrder.size * 2).run {\n order(ByteOrder.nativeOrder())\n asShortBuffer().apply {\n put(drawOrder)\n position(0)\n }\n }\n}\n```\n\n### Java\n\n```java\npublic class Square {\n\n private FloatBuffer vertexBuffer;\n private ShortBuffer drawListBuffer;\n\n // number of coordinates per vertex in this array\n static final int COORDS_PER_VERTEX = 3;\n static float squareCoords[] = {\n -0.5f, 0.5f, 0.0f, // top left\n -0.5f, -0.5f, 0.0f, // bottom left\n 0.5f, -0.5f, 0.0f, // bottom right\n 0.5f, 0.5f, 0.0f }; // top right\n\n private short drawOrder[] = { 0, 1, 2, 0, 2, 3 }; // order to draw vertices\n\n public Square() {\n // initialize vertex byte buffer for shape coordinates\n ByteBuffer bb = ByteBuffer.allocateDirect(\n // (# of coordinate values * 4 bytes per float)\n squareCoords.length * 4);\n bb.order(ByteOrder.nativeOrder());\n vertexBuffer = bb.asFloatBuffer();\n vertexBuffer.put(squareCoords);\n vertexBuffer.position(0);\n\n // initialize byte buffer for the draw list\n ByteBuffer dlb = ByteBuffer.allocateDirect(\n // (# of coordinate values * 2 bytes per short)\n drawOrder.length * 2);\n dlb.order(ByteOrder.nativeOrder());\n drawListBuffer = dlb.asShortBuffer();\n drawListBuffer.put(drawOrder);\n drawListBuffer.position(0);\n }\n}\n```\n\nThis example gives you a peek at what it takes to create more complex shapes with OpenGL. In\ngeneral, you use collections of triangles to draw objects. In the next lesson, you learn how to draw\nthese shapes on screen."]]