
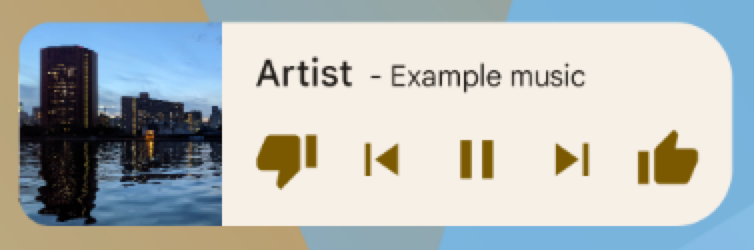
應用程式小工具是迷你應用程式檢視畫面,可以內嵌到其他應用程式 (例如主畫面),並定期接收更新。這些檢視畫面在使用者介面中稱為「小工具」,您可以透過應用程式小工具供應器 (或「小工具供應器」) 發布小工具。應用程式小工具主機 (或「小工具主機」) 是指可容納其他小工具的應用程式元件。圖 1 顯示音樂小工具範例:
本文說明如何使用小工具供應器發布小工具。如要進一步瞭解如何建立自己的 AppWidgetHost 來代管應用程式小工具,請參閱「建構小工具主機」。
如要瞭解如何設計小工具,請參閱「應用程式小工具總覽」。
小工具元件
如要建立小工具,您需要下列基本元件:
AppWidgetProviderInfo物件- 說明小工具的中繼資料,例如小工具的版面配置、更新頻率和
AppWidgetProvider類別。AppWidgetProviderInfo是以 XML 定義,如本文所述。 AppWidgetProvider類別- 定義基本方法,可讓您透過程式輔助與小工具介面互動。透過這個介面,您可以在小工具更新、啟用、停用或刪除時接收廣播。如本文所述,您可以在資訊清單中宣告
AppWidgetProvider,然後實作該類別。 - 檢視版面配置
- 定義小工具的初始版面配置。版面配置是以 XML 定義,如本文所述。
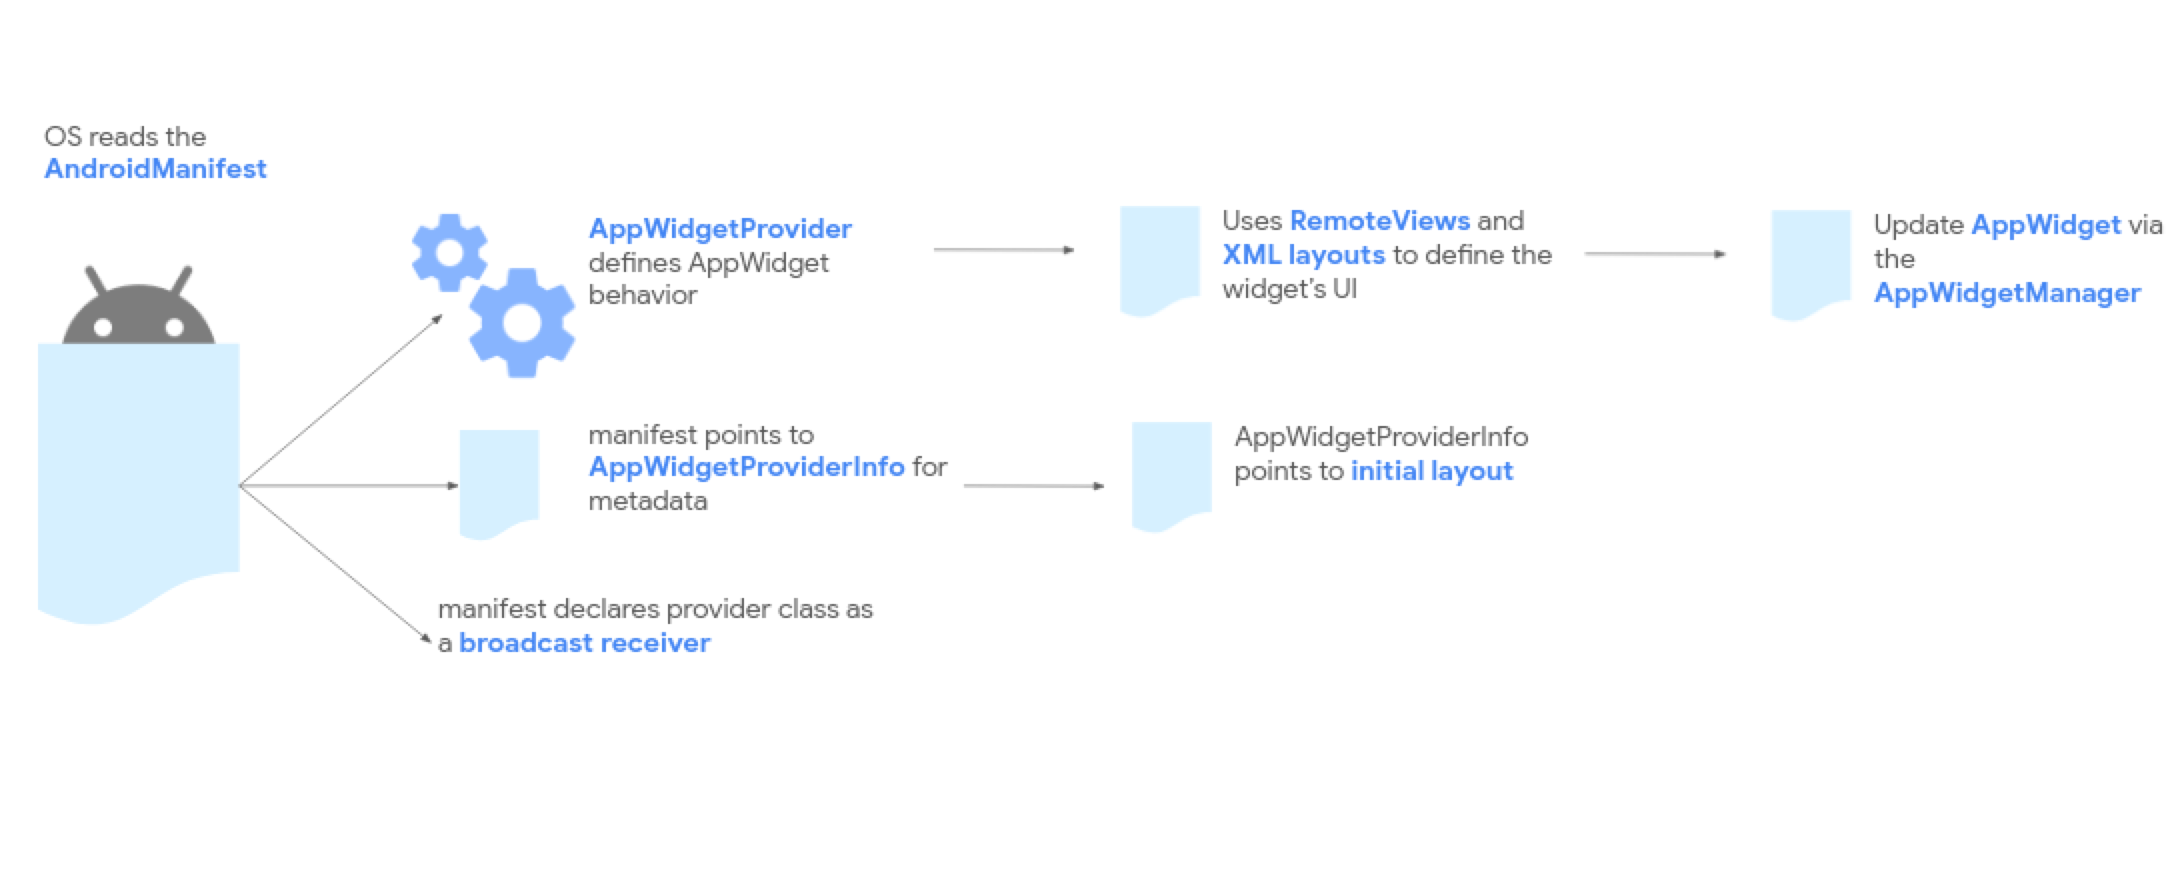
圖 2 顯示這些元件如何融入整體應用程式小工具處理流程。
如果小工具需要使用者設定,請實作應用程式小工具設定活動。使用者可透過這項活動修改小工具設定,例如時鐘小工具的時區。
- 從 Android 12 (API 級別 31) 開始,您可以提供預設設定,讓使用者稍後重新設定小工具。詳情請參閱「使用小工具的預設設定」和「允許使用者重新設定已放置的小工具」。
- 在 Android 11 (API 級別 30) 以下版本中,使用者每次將小工具新增至主畫面時,系統都會啟動這項活動。
我們也建議進行下列改善:彈性小工具版面配置、其他強化功能、進階小工具、集合小工具,以及建構小工具主機。
宣告 AppWidgetProviderInfo XML
定義中繼資料設定 (例如預設儲存格大小、大小調整限制和更新頻率) 的方式,在傳統 Views 和以 Glance 為基礎的小工具中完全相同。
如要瞭解如何定義及設定中繼資料 XML 檔案,請參閱 Glance 說明文件中的「Compose-first」宣告 AppWidgetProviderInfo XML 區段。
使用 AppWidgetProvider 類別處理小工具廣播
平台會統一處理廣播接收器機制、資訊清單宣告篩選器和生命週期事件迴圈。在以 Compose 為優先的開發作業中,這些廣播會使用 GlanceAppWidgetReceiver 包裝函式協調。
如要瞭解如何在資訊清單中註冊接收器,以及實作與 Hilt 相容的生命週期覆寫,請參閱 Glance 文件中的「Compose-first」使用 AppWidgetProvider 類別處理廣播一節。
建立小工具版面配置
您必須在 XML 中定義小工具的初始版面配置,並將其儲存在專案的 res/layout/ 目錄中。詳情請參閱設計指南。
如果您熟悉版面配置,就能輕鬆建立小工具版面配置。不過請注意,小工具版面配置是以 RemoteViews 為基礎,因此不支援所有類型的版面配置或檢視畫面小工具。您無法使用自訂檢視畫面,或 RemoteViews 支援的檢視畫面子類別。
RemoteViews 也支援 ViewStub,這是大小為零的隱藏 View,可用於在執行階段延後加載版面配置資源。
支援有狀態的行為
Android 12 新增支援使用下列現有元件的狀態行為:
小工具仍為無狀態,應用程式必須儲存狀態,並註冊狀態變更事件。
以下程式碼範例說明如何實作這些元件。
Kotlin
// Check the view.
remoteView.setCompoundButtonChecked(R.id.my_checkbox, true)

// Check a radio group.
remoteView.setRadioGroupChecked(R.id.my_radio_group, R.id.radio_button_2)

// Listen for check changes. The intent has an extra with the key
// EXTRA_CHECKED that specifies the current checked state of the view.
remoteView.setOnCheckedChangeResponse(
        R.id.my_checkbox,
        RemoteViews.RemoteResponse.fromPendingIntent(onCheckedChangePendingIntent)
)
Java
// Check the view.
remoteView.setCompoundButtonChecked(R.id.my_checkbox, true);

// Check a radio group.
remoteView.setRadioGroupChecked(R.id.my_radio_group, R.id.radio_button_2);

// Listen for check changes. The intent has an extra with the key
// EXTRA_CHECKED that specifies the current checked state of the view.
remoteView.setOnCheckedChangeResponse(
    R.id.my_checkbox,
    RemoteViews.RemoteResponse.fromPendingIntent(onCheckedChangePendingIntent));
提供兩個版面配置:一個指定 Android 12 以上版本裝置 (位於 res/layout-v31 中),另一個指定 Android 11 以下版本 (位於預設 res/layout 資料夾中)。
實作圓角
計算外側背景和內側比例半徑是標準做法,而且兩者共用。在以 Compose 為優先的開發作業中,這項設定可以在 Kotlin 中動態設定,並搭配自訂主題資源。
如要為舊版 Android 裝置實作圓角半徑或設定動態樣式,請參閱 Glance 文件中的「實作圓角」一節。