
วิดเจ็ตคอลเล็กชันมีความเชี่ยวชาญในการแสดงองค์ประกอบจำนวนมากที่มีประเภทเดียวกัน เช่น คอลเล็กชันรูปภาพจากแอปแกลเลอรี บทความจากแอปข่าว หรือข้อความจากแอปการสื่อสาร โดยปกติแล้ววิดเจ็ตคอลเล็กชันจะเน้นที่กรณีการใช้งาน 2 กรณี ได้แก่ การเรียกดูคอลเล็กชันและการเปิดองค์ประกอบของคอลเล็กชันเพื่อดูมุมมองรายละเอียด วิดเจ็ตคอลเล็กชันสามารถเลื่อนในแนวตั้งได้
วิดเจ็ตเหล่านี้ใช้
RemoteViewsService เพื่อแสดง
คอลเล็กชันที่ได้รับการสนับสนุนจากข้อมูลระยะไกล เช่น จาก ผู้ให้บริการ
เนื้อหา วิดเจ็ตจะแสดง
ข้อมูลโดยใช้ประเภทมุมมองใดประเภทหนึ่งต่อไปนี้ ซึ่งเรียกว่า มุมมอง
คอลเล็กชัน:
ListView- มุมมองที่แสดงรายการในรายการที่เลื่อนได้ในแนวตั้ง
GridView- มุมมองที่แสดงรายการในตารางกริดที่เลื่อนได้แบบ 2 มิติ
StackView- มุมมองการ์ดแบบซ้อนกัน ซึ่งคล้ายกับโรโลเดกซ์ที่ผู้ใช้สามารถปัดการ์ดด้านหน้าขึ้นหรือลงเพื่อดูการ์ดก่อนหน้าหรือถัดไปตามลำดับ
AdapterViewFlipper- `ViewAnimator`
อย่างง่ายที่ได้รับการสนับสนุนจากอะแดปเตอร์
ViewAnimatorซึ่งแสดงภาพเคลื่อนไหว ระหว่างมุมมอง 2 มุมมองขึ้นไป โดยจะแสดงองค์ประกอบย่อยเพียงครั้งละ 1 รายการ
เนื่องจากมุมมองคอลเล็กชันเหล่านี้แสดงคอลเล็กชันที่ได้รับการสนับสนุนจากข้อมูลระยะไกล พวกเขาใช้ Adapter เพื่อเชื่อมโยงอินเทอร์เฟซผู้ใช้กับข้อมูล Adapter จะผูกรายการแต่ละรายการจากชุดข้อมูล
กับออบเจ็กต์ View แต่ละรายการ
และเนื่องจากมุมมองคอลเล็กชันเหล่านี้ได้รับการสนับสนุนจากอะแดปเตอร์ เฟรมเวิร์ก Android จึงต้องมีสถาปัตยกรรมเพิ่มเติมเพื่อรองรับการใช้งานในวิดเจ็ต ในบริบท
ของวิดเจ็ต Adapter จะถูกแทนที่ด้วย
RemoteViewsFactory ซึ่งเป็น Wrapper แบบบางรอบอินเทอร์เฟซ Adapter เมื่อมีการขอรายการที่
เฉพาะเจาะจงในคอลเล็กชัน RemoteViewsFactory จะสร้างและแสดงผล
รายการสำหรับคอลเล็กชันเป็นออบเจ็กต์
RemoteViews หากต้องการรวมมุมมองคอลเล็กชันไว้ในวิดเจ็ต ให้ใช้ RemoteViewsService และ RemoteViewsFactory
RemoteViewsService เป็นบริการที่ช่วยให้อะแดปเตอร์ระยะไกลขอ
RemoteViews ออบเจ็กต์ได้ RemoteViewsFactory เป็นอินเทอร์เฟซสำหรับอะแดปเตอร์ระหว่างมุมมองคอลเล็กชัน เช่น ListView, GridView และ StackView กับข้อมูลพื้นฐานสำหรับมุมมองนั้น ตัวอย่างโค้ด Boilerplate เพื่อใช้บริการและ
อินเทอร์เฟซนี้จากตัวอย่าง StackWidget
มีดังนี้
Kotlin
class StackWidgetService : RemoteViewsService() {

    override fun onGetViewFactory(intent: Intent): RemoteViewsFactory {
        return StackRemoteViewsFactory(this.applicationContext, intent)
    }
}

class StackRemoteViewsFactory(
        private val context: Context,
        intent: Intent
) : RemoteViewsService.RemoteViewsFactory {

// See the RemoteViewsFactory API reference for the full list of methods to
// implement.

}
Java
public class StackWidgetService extends RemoteViewsService {
    @Override
    public RemoteViewsFactory onGetViewFactory(Intent intent) {
        return new StackRemoteViewsFactory(this.getApplicationContext(), intent);
    }
}

class StackRemoteViewsFactory implements RemoteViewsService.RemoteViewsFactory {

// See the RemoteViewsFactory API reference for the full list of methods to
// implement.

}
แอปพลิเคชันตัวอย่าง
ข้อมูลโค้ดในส่วนนี้ยังมาจากตัวอย่าง StackWidget
ด้วย
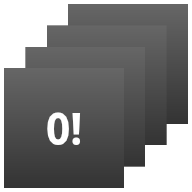
StackWidgetตัวอย่างนี้ประกอบด้วยมุมมอง 10 รายการแบบซ้อนกันซึ่งแสดงค่าตั้งแต่ 0 ถึง 9 วิดเจ็ตตัวอย่างมีลักษณะการทำงานหลักๆ ดังนี้
ผู้ใช้สามารถปัดมุมมองด้านบนในวิดเจ็ตในแนวตั้งเพื่อแสดงมุมมองถัดไปหรือก่อนหน้า ซึ่งเป็นลักษณะการทำงาน
StackViewในตัววิดเจ็ตจะเลื่อนดูมุมมองต่างๆ ตามลำดับโดยอัตโนมัติเหมือนสไลด์โชว์โดยไม่ต้องมีการโต้ตอบจากผู้ใช้ ซึ่งเป็นผลมาจากการตั้งค่า
android:autoAdvanceViewId="@id/stack_view"ในไฟล์res/xml/stackwidgetinfo.xmlการตั้งค่านี้มีผลกับรหัสมุมมอง ซึ่งในกรณีนี้คือรหัสมุมมองของมุมมองแบบซ้อนกันหากผู้ใช้แตะมุมมองด้านบน วิดเจ็ตจะแสดงข้อความ
Toast"แตะมุมมอง n," โดยที่ n คือดัชนี (ตำแหน่ง) ของมุมมองที่แตะ ดูข้อมูลเพิ่มเติมเกี่ยวกับวิธีใช้ลักษณะการทำงานได้ที่ส่วนเพิ่มลักษณะการทำงานให้กับแต่ละรายการ
ใช้วิดเจ็ตที่มีคอลเล็กชัน
หากต้องการใช้วิดเจ็ตที่มีคอลเล็กชัน ให้ทำตามขั้นตอนเพื่อ ใช้วิดเจ็ตใดก็ได้
แล้วทำตามขั้นตอนเพิ่มเติม 2-3 ขั้นตอน ได้แก่
แก้ไขไฟล์ Manifest, เพิ่มมุมมองคอลเล็กชันลงในเลย์เอาต์วิดเจ็ต และแก้ไขคลาสย่อย
AppWidgetProvider
ไฟล์ Manifest สำหรับวิดเจ็ตที่มีคอลเล็กชัน
นอกเหนือจากข้อกำหนดที่ระบุไว้ใน ประกาศวิดเจ็ตในไฟล์
Manifest แล้ว คุณต้องทำให้วิดเจ็ตที่มี
คอลเล็กชันผูกกับ RemoteViewsService ได้ โดยประกาศ
บริการในไฟล์ Manifest ด้วยสิทธิ์
BIND_REMOTEVIEWS
ซึ่งจะป้องกันไม่ให้แอปพลิเคชันอื่นๆ เข้าถึงข้อมูลของวิดเจ็ตได้อย่างอิสระ
ตัวอย่างเช่น เมื่อสร้างวิดเจ็ตที่ใช้ RemoteViewsService เพื่อป้อนข้อมูลในมุมมองคอลเล็กชัน รายการไฟล์ Manifest อาจมีลักษณะดังนี้
<service android:name="MyWidgetService"
    android:permission="android.permission.BIND_REMOTEVIEWS" />
ในตัวอย่างนี้ android:name="MyWidgetService" หมายถึงคลาสย่อยของ
RemoteViewsService
เลย์เอาต์สำหรับวิดเจ็ตที่มีคอลเล็กชัน
ข้อกำหนดหลักสำหรับไฟล์ XML เลย์เอาต์วิดเจ็ตคือต้องมีมุมมองคอลเล็กชันอย่างใดอย่างหนึ่ง ได้แก่ ListView, GridView, StackView หรือ AdapterViewFlipper นี่คือไฟล์ widget_layout.xml สำหรับตัวอย่าง
StackWidget:
<FrameLayout xmlns:android="http://schemas.android.com/apk/res/android"
    android:layout_width="match_parent"
    android:layout_height="match_parent">
    <StackView
        android:id="@+id/stack_view"
        android:layout_width="match_parent"
        android:layout_height="match_parent"
        android:gravity="center"
        android:loopViews="true" />
    <TextView
        android:id="@+id/empty_view"
        android:layout_width="match_parent"
        android:layout_height="match_parent"
        android:gravity="center"
        android:background="@drawable/widget_item_background"
        android:textColor="#ffffff"
        android:textStyle="bold"
        android:text="@string/empty_view_text"
        android:textSize="20sp" />
</FrameLayout>
โปรดทราบว่ามุมมองว่างต้องเป็นองค์ประกอบระดับเดียวกันของมุมมองคอลเล็กชันที่มุมมองว่างแสดงถึงสถานะว่าง
นอกเหนือจากไฟล์เลย์เอาต์สำหรับวิดเจ็ตทั้งหมดแล้ว ให้สร้างไฟล์เลย์เอาต์อีกไฟล์หนึ่งที่กำหนดเลย์เอาต์สำหรับแต่ละรายการในคอลเล็กชัน เช่น เลย์เอาต์สำหรับหนังสือแต่ละเล่มในคอลเล็กชันหนังสือ ตัวอย่าง StackWidget มีไฟล์เลย์เอาต์รายการเพียงไฟล์เดียวคือ widget_item.xml เนื่องจากรายการทั้งหมดใช้เลย์เอาต์เดียวกัน
คลาส AppWidgetProvider สำหรับวิดเจ็ตที่มีคอลเล็กชัน
เช่นเดียวกับวิดเจ็ตทั่วไป โค้ดส่วนใหญ่ใน
AppWidgetProviderคลาสย่อย
มักจะอยู่ใน
onUpdate()
ความแตกต่างที่สำคัญในการใช้งาน onUpdate() เมื่อสร้าง
วิดเจ็ตที่มีคอลเล็กชันคือคุณต้องเรียกใช้
setRemoteAdapter() ซึ่งจะบอกมุมมองคอลเล็กชันว่าจะรับข้อมูลจากที่ใด
จากนั้น RemoteViewsService จะแสดงผลการใช้งาน RemoteViewsFactory และวิดเจ็ตจะแสดงข้อมูลที่เหมาะสม เมื่อเรียกใช้เมธอดนี้ ให้ส่ง Intent ที่ชี้ไปยังการใช้งาน RemoteViewsService และรหัสวิดเจ็ตที่ระบุวิดเจ็ตที่จะอัปเดต
ตัวอย่างเช่น ตัวอย่าง StackWidget ใช้เมธอด Callback onUpdate() เพื่อตั้งค่า RemoteViewsService เป็นอะแดปเตอร์ระยะไกลสำหรับคอลเล็กชันวิดเจ็ตดังนี้
Kotlin
override fun onUpdate(
        context: Context,
        appWidgetManager: AppWidgetManager,
        appWidgetIds: IntArray
) {
    // Update each of the widgets with the remote adapter.
    appWidgetIds.forEach { appWidgetId ->

        // Set up the intent that starts the StackViewService, which
        // provides the views for this collection.
        val intent = Intent(context, StackWidgetService::class.java).apply {
            // Add the widget ID to the intent extras.
            putExtra(AppWidgetManager.EXTRA_APPWIDGET_ID, appWidgetId)
            data = Uri.parse(toUri(Intent.URI_INTENT_SCHEME))
        }
        // Instantiate the RemoteViews object for the widget layout.
        val views = RemoteViews(context.packageName, R.layout.widget_layout).apply {
            // Set up the RemoteViews object to use a RemoteViews adapter.
            // This adapter connects to a RemoteViewsService through the
            // specified intent.
            // This is how you populate the data.
            setRemoteAdapter(R.id.stack_view, intent)

            // The empty view is displayed when the collection has no items.
            // It must be in the same layout used to instantiate the
            // RemoteViews object.
            setEmptyView(R.id.stack_view, R.id.empty_view)
        }

        // Do additional processing specific to this widget.

        appWidgetManager.updateAppWidget(appWidgetId, views)
    }
    super.onUpdate(context, appWidgetManager, appWidgetIds)
}
Java
public void onUpdate(Context context, AppWidgetManager appWidgetManager, int[] appWidgetIds) {
    // Update each of the widgets with the remote adapter.
    for (int i = 0; i < appWidgetIds.length; ++i) {

        // Set up the intent that starts the StackViewService, which
        // provides the views for this collection.
        Intent intent = new Intent(context, StackWidgetService.class);
        // Add the widget ID to the intent extras.
        intent.putExtra(AppWidgetManager.EXTRA_APPWIDGET_ID, appWidgetIds[i]);
        intent.setData(Uri.parse(intent.toUri(Intent.URI_INTENT_SCHEME)));
        // Instantiate the RemoteViews object for the widget layout.
        RemoteViews views = new RemoteViews(context.getPackageName(), R.layout.widget_layout);
        // Set up the RemoteViews object to use a RemoteViews adapter.
        // This adapter connects to a RemoteViewsService through the specified
        // intent.
        // This is how you populate the data.
        views.setRemoteAdapter(R.id.stack_view, intent);

        // The empty view is displayed when the collection has no items.
        // It must be in the same layout used to instantiate the RemoteViews
        // object.
        views.setEmptyView(R.id.stack_view, R.id.empty_view);

        // Do additional processing specific to this widget.

        appWidgetManager.updateAppWidget(appWidgetIds[i], views);
    }
    super.onUpdate(context, appWidgetManager, appWidgetIds);
}
เก็บข้อมูลไว้
ตามที่อธิบายไว้ในหน้านี้ คลาสย่อย RemoteViewsService จะมี RemoteViewsFactory ที่ใช้ป้อนข้อมูลในมุมมองคอลเล็กชันระยะไกล
โดยเฉพาะอย่างยิ่ง ให้ทำตามขั้นตอนต่อไปนี้
สร้างคลาสย่อย
RemoteViewsServiceRemoteViewsServiceเป็นบริการที่ อะแดปเตอร์ระยะไกลใช้ขอRemoteViewsได้ในคลาสย่อย
RemoteViewsServiceให้รวมคลาสที่ใช้ อินเทอร์เฟซRemoteViewsFactoryRemoteViewsFactoryเป็นอินเทอร์เฟซสำหรับอะแดปเตอร์ระหว่างมุมมองคอลเล็กชันระยะไกล เช่นListView,GridView,StackViewกับข้อมูลพื้นฐานสำหรับมุมมองนั้น การใช้งานของคุณมีหน้าที่สร้างออบเจ็กต์RemoteViewsสำหรับแต่ละรายการในชุดข้อมูล อินเทอร์เฟซนี้เป็น Wrapper แบบบางรอบAdapter
คุณไม่สามารถอาศัยอินสแตนซ์เดียวของบริการหรือข้อมูลใดๆ ที่บริการนั้นมีอยู่เพื่อเก็บข้อมูลไว้ อย่าจัดเก็บข้อมูลใน RemoteViewsService เว้นแต่ข้อมูลนั้นจะเป็นแบบคงที่ หากต้องการเก็บข้อมูลของวิดเจ็ตไว้ วิธีที่ดีที่สุดคือใช้
ContentProvider ที่ข้อมูล
จะยังคงอยู่ต่อไปหลังจากวงจรการทำงานของกระบวนการสิ้นสุดลง ตัวอย่างเช่น วิดเจ็ตร้านขายของชำสามารถจัดเก็บสถานะของรายการของชำแต่ละรายการไว้ในตำแหน่งที่เก็บข้อมูลแบบถาวร เช่น ฐานข้อมูล SQL
เนื้อหาหลักของการใช้งาน RemoteViewsService คือ RemoteViewsFactory ซึ่งอธิบายไว้ในส่วนถัดไป
อินเทอร์เฟซ RemoteViewsFactory
คลาสที่กำหนดเองซึ่งใช้อินเทอร์เฟซ RemoteViewsFactory จะให้ข้อมูลสำหรับรายการในคอลเล็กชันแก่วิดเจ็ต โดยจะรวมไฟล์เลย์เอาต์ XML ของรายการวิดเจ็ตกับแหล่งข้อมูล แหล่งข้อมูลนี้อาจเป็นอะไรก็ได้ตั้งแต่ฐานข้อมูลไปจนถึงอาร์เรย์อย่างง่าย ในตัวอย่าง StackWidget แหล่งข้อมูลคืออาร์เรย์ของ WidgetItems RemoteViewsFactory ทำหน้าที่เป็นอะแดปเตอร์เพื่อเชื่อมข้อมูลกับมุมมองคอลเล็กชันระยะไกล
เมธอดที่สำคัญที่สุด 2 รายการที่คุณต้องใช้สำหรับคลาสย่อย
RemoteViewsFactory คือ
onCreate() และ
getViewAt()
ระบบจะเรียกใช้ onCreate() เมื่อสร้าง Factory เป็นครั้งแรก
ซึ่งเป็นตำแหน่งที่คุณตั้งค่าการเชื่อมต่อหรือเคอร์เซอร์กับแหล่งข้อมูล ตัวอย่างเช่น ตัวอย่าง StackWidget ใช้ onCreate() เพื่อเริ่มต้นอาร์เรย์ของออบเจ็กต์ WidgetItem เมื่อวิดเจ็ตทำงานอยู่ ระบบจะเข้าถึงออบเจ็กต์เหล่านี้โดยใช้ตำแหน่งดัชนีในอาร์เรย์และแสดงข้อความที่ออบเจ็กต์มีอยู่
ต่อไปนี้เป็นข้อมูลโค้ดจากการใช้งาน RemoteViewsFactory ของตัวอย่าง StackWidget ซึ่งแสดงส่วนต่างๆ ของเมธอด onCreate()
Kotlin
private const val REMOTE_VIEW_COUNT: Int = 10

class StackRemoteViewsFactory(
        private val context: Context
) : RemoteViewsService.RemoteViewsFactory {

    private lateinit var widgetItems: List<WidgetItem>

    override fun onCreate() {
        // In onCreate(), set up any connections or cursors to your data
        // source. Heavy lifting, such as downloading or creating content,
        // must be deferred to onDataSetChanged() or getViewAt(). Taking
        // more than 20 seconds on this call results in an ANR.
        widgetItems = List(REMOTE_VIEW_COUNT) { index -> WidgetItem("$index!") }
        ...
    }
    ...
}
Java
class StackRemoteViewsFactory implements RemoteViewsService.RemoteViewsFactory {
    private static final int REMOTE_VIEW_COUNT = 10;
    private List<WidgetItem> widgetItems = new ArrayList<WidgetItem>();

    public void onCreate() {
        // In onCreate(), setup any connections or cursors to your data
        // source. Heavy lifting, such as downloading or creating content,
        // must be deferred to onDataSetChanged() or getViewAt(). Taking
        // more than 20 seconds on this call results in an ANR.
        for (int i = 0; i < REMOTE_VIEW_COUNT; i++) {
            widgetItems.add(new WidgetItem(i + "!"));
        }
        ...
    }
...
เมธอด RemoteViewsFactory getViewAt() จะแสดงผลออบเจ็กต์ RemoteViews
ที่สอดคล้องกับข้อมูลที่ position ที่ระบุในชุดข้อมูล ต่อไปนี้เป็นข้อมูลโค้ดจากการใช้งาน RemoteViewsFactory ของตัวอย่าง StackWidget
Kotlin
override fun getViewAt(position: Int): RemoteViews {
    // Construct a remote views item based on the widget item XML file
    // and set the text based on the position.
    return RemoteViews(context.packageName, R.layout.widget_item).apply {
        setTextViewText(R.id.widget_item, widgetItems[position].text)
    }
}
Java
public RemoteViews getViewAt(int position) {
    // Construct a remote views item based on the widget item XML file
    // and set the text based on the position.
    RemoteViews views = new RemoteViews(context.getPackageName(), R.layout.widget_item);
    views.setTextViewText(R.id.widget_item, widgetItems.get(position).text);
    return views;
}
เพิ่มลักษณะการทำงานให้กับแต่ละรายการ
ส่วนก่อนหน้าแสดงวิธีผูกข้อมูลกับคอลเล็กชันวิดเจ็ต แต่จะทำอย่างไรหากต้องการเพิ่มลักษณะการทำงานแบบไดนามิกให้กับแต่ละรายการในมุมมองคอลเล็กชัน
ตามที่อธิบายไว้ใน จัดการเหตุการณ์ด้วยคลาส onUpdate() โดยปกติแล้วคุณจะใช้
setOnClickPendingIntent() เพื่อตั้งค่าลักษณะการทำงานเมื่อคลิกของออบเจ็กต์ เช่น ทำให้
ปุ่มเปิดใช้ Activity แต่ไม่อนุญาตให้ใช้วิธีนี้กับมุมมองย่อยในรายการคอลเล็กชันแต่ละรายการ
ตัวอย่างเช่น คุณสามารถใช้ setOnClickPendingIntent() เพื่อตั้งค่าปุ่มส่วนกลางในวิดเจ็ต Gmail ที่เปิดใช้แอปได้ แต่จะใช้กับรายการแต่ละรายการไม่ได้
ให้ใช้
setOnClickFillInIntent()แทนเพื่อเพิ่มลักษณะการทำงานเมื่อคลิกให้กับแต่ละรายการในคอลเล็กชัน ซึ่งเกี่ยวข้องกับการตั้งค่าเทมเพลต PendingIntent สำหรับมุมมองคอลเล็กชัน จากนั้นตั้งค่า Fill-in Intent ในแต่ละรายการในคอลเล็กชันผ่าน RemoteViewsFactory
ส่วนนี้ใช้ตัวอย่าง StackWidget เพื่ออธิบายวิธีเพิ่มลักษณะการทำงานให้กับแต่ละรายการ ในตัวอย่าง StackWidget หากผู้ใช้แตะมุมมองด้านบน
วิดเจ็ตจะแสดงข้อความ Toast "แตะมุมมอง n," โดยที่ n คือ
ดัชนี (ตำแหน่ง) ของมุมมองที่แตะ โดยมีวิธีการดังนี้
StackWidgetProviderซึ่งเป็นคลาสย่อยAppWidgetProviderจะสร้าง PendingIntent ที่มีการดำเนินการที่กำหนดเองชื่อTOAST_ACTIONเมื่อผู้ใช้แตะมุมมอง Intent จะเริ่มทำงานและออกอากาศ
TOAST_ACTIONการออกอากาศนี้จะถูกสกัดกั้นโดยเมธอด
onReceive()ของคลาสStackWidgetProviderและวิดเจ็ตจะแสดงข้อความToastสำหรับมุมมองที่แตะRemoteViewsFactoryจะให้ข้อมูลสำหรับรายการคอลเล็กชันผ่านRemoteViewsService
ตั้งค่าเทมเพลต PendingIntent
StackWidgetProvider (คลาสย่อย
AppWidgetProvider)
จะตั้งค่า PendingIntent รายการแต่ละรายการในคอลเล็กชันจะตั้งค่า PendingIntent ของตัวเองไม่ได้ แต่คอลเล็กชันทั้งหมดจะตั้งค่าเทมเพลต PendingIntent และรายการแต่ละรายการจะตั้งค่า Fill-in Intent เพื่อสร้างลักษณะการทำงานที่ไม่ซ้ำกันตามรายการ
คลาสนี้ยังรับการออกอากาศที่ส่งเมื่อผู้ใช้แตะมุมมองด้วย โดยจะประมวลผลเหตุการณ์นี้ในเมธอด onReceive() หากการดำเนินการของ Intent คือ TOAST_ACTION วิดเจ็ตจะแสดงข้อความ Toast สำหรับมุมมองปัจจุบัน
Kotlin
const val TOAST_ACTION = "com.example.android.stackwidget.TOAST_ACTION"
const val EXTRA_ITEM = "com.example.android.stackwidget.EXTRA_ITEM"

class StackWidgetProvider : AppWidgetProvider() {

    ...

    // Called when the BroadcastReceiver receives an Intent broadcast.
    // Checks whether the intent's action is TOAST_ACTION. If it is, the
    // widget displays a Toast message for the current item.
    override fun onReceive(context: Context, intent: Intent) {
        val mgr: AppWidgetManager = AppWidgetManager.getInstance(context)
        if (intent.action == TOAST_ACTION) {
            val appWidgetId: Int = intent.getIntExtra(
                    AppWidgetManager.EXTRA_APPWIDGET_ID,
                    AppWidgetManager.INVALID_APPWIDGET_ID
            )
            // EXTRA_ITEM represents a custom value provided by the Intent
            // passed to the setOnClickFillInIntent() method to indicate the
            // position of the clicked item. See StackRemoteViewsFactory in
            // Set the fill-in Intent for details.
            val viewIndex: Int = intent.getIntExtra(EXTRA_ITEM, 0)
            Toast.makeText(context, "Touched view $viewIndex", Toast.LENGTH_SHORT).show()
        }
        super.onReceive(context, intent)
    }

    override fun onUpdate(
            context: Context,
            appWidgetManager: AppWidgetManager,
            appWidgetIds: IntArray
    ) {
        // Update each of the widgets with the remote adapter.
        appWidgetIds.forEach { appWidgetId ->

            // Sets up the intent that points to the StackViewService that
            // provides the views for this collection.
            val intent = Intent(context, StackWidgetService::class.java).apply {
                putExtra(AppWidgetManager.EXTRA_APPWIDGET_ID, appWidgetId)
                // When intents are compared, the extras are ignored, so embed
                // the extra sinto the data so that the extras are not ignored.
                data = Uri.parse(toUri(Intent.URI_INTENT_SCHEME))
            }
            val rv = RemoteViews(context.packageName, R.layout.widget_layout).apply {
                setRemoteAdapter(R.id.stack_view, intent)

                // The empty view is displayed when the collection has no items.
                // It must be a sibling of the collection view.
                setEmptyView(R.id.stack_view, R.id.empty_view)
            }

            // This section makes it possible for items to have individualized
            // behavior. It does this by setting up a pending intent template.
            // Individuals items of a collection can't set up their own pending
            // intents. Instead, the collection as a whole sets up a pending
            // intent template, and the individual items set a fillInIntent
            // to create unique behavior on an item-by-item basis.
            val toastPendingIntent: PendingIntent = Intent(
                    context,
                    StackWidgetProvider::class.java
            ).run {
                // Set the action for the intent.
                // When the user touches a particular view, it has the effect of
                // broadcasting TOAST_ACTION.
                action = TOAST_ACTION
                putExtra(AppWidgetManager.EXTRA_APPWIDGET_ID, appWidgetId)
                data = Uri.parse(toUri(Intent.URI_INTENT_SCHEME))

                PendingIntent.getBroadcast(context, 0, this, PendingIntent.FLAG_UPDATE_CURRENT)
            }
            rv.setPendingIntentTemplate(R.id.stack_view, toastPendingIntent)

            appWidgetManager.updateAppWidget(appWidgetId, rv)
        }
        super.onUpdate(context, appWidgetManager, appWidgetIds)
    }
}
Java
public class StackWidgetProvider extends AppWidgetProvider {
    public static final String TOAST_ACTION = "com.example.android.stackwidget.TOAST_ACTION";
    public static final String EXTRA_ITEM = "com.example.android.stackwidget.EXTRA_ITEM";

    ...

    // Called when the BroadcastReceiver receives an Intent broadcast.
    // Checks whether the intent's action is TOAST_ACTION. If it is, the
    // widget displays a Toast message for the current item.
    @Override
    public void onReceive(Context context, Intent intent) {
        AppWidgetManager mgr = AppWidgetManager.getInstance(context);
        if (intent.getAction().equals(TOAST_ACTION)) {
            int appWidgetId = intent.getIntExtra(AppWidgetManager.EXTRA_APPWIDGET_ID,
                AppWidgetManager.INVALID_APPWIDGET_ID);
            // EXTRA_ITEM represents a custom value provided by the Intent
            // passed to the setOnClickFillInIntent() method to indicate the
            // position of the clicked item. See StackRemoteViewsFactory in
            // Set the fill-in Intent for details.
            int viewIndex = intent.getIntExtra(EXTRA_ITEM, 0);
            Toast.makeText(context, "Touched view " + viewIndex, Toast.LENGTH_SHORT).show();
        }
        super.onReceive(context, intent);
    }

    @Override
    public void onUpdate(Context context, AppWidgetManager appWidgetManager, int[] appWidgetIds) {
        // Update each of the widgets with the remote adapter.
        for (int i = 0; i < appWidgetIds.length; ++i) {

            // Sets up the intent that points to the StackViewService that
            // provides the views for this collection.
            Intent intent = new Intent(context, StackWidgetService.class);
            intent.putExtra(AppWidgetManager.EXTRA_APPWIDGET_ID, appWidgetIds[i]);
            // When intents are compared, the extras are ignored, so embed
            // the extras into the data so that the extras are not
            // ignored.
            intent.setData(Uri.parse(intent.toUri(Intent.URI_INTENT_SCHEME)));
            RemoteViews rv = new RemoteViews(context.getPackageName(), R.layout.widget_layout);
            rv.setRemoteAdapter(appWidgetIds[i], R.id.stack_view, intent);

            // The empty view is displayed when the collection has no items. It
            // must be a sibling of the collection view.
            rv.setEmptyView(R.id.stack_view, R.id.empty_view);

            // This section makes it possible for items to have individualized
            // behavior. It does this by setting up a pending intent template.
            // Individuals items of a collection can't set up their own pending
            // intents. Instead, the collection as a whole sets up a pending
            // intent template, and the individual items set a fillInIntent
            // to create unique behavior on an item-by-item basis.
            Intent toastIntent = new Intent(context, StackWidgetProvider.class);
            // Set the action for the intent.
            // When the user touches a particular view, it has the effect of
            // broadcasting TOAST_ACTION.
            toastIntent.setAction(StackWidgetProvider.TOAST_ACTION);
            toastIntent.putExtra(AppWidgetManager.EXTRA_APPWIDGET_ID, appWidgetIds[i]);
            intent.setData(Uri.parse(intent.toUri(Intent.URI_INTENT_SCHEME)));
            PendingIntent toastPendingIntent = PendingIntent.getBroadcast(context, 0, toastIntent,
                PendingIntent.FLAG_UPDATE_CURRENT);
            rv.setPendingIntentTemplate(R.id.stack_view, toastPendingIntent);

            appWidgetManager.updateAppWidget(appWidgetIds[i], rv);
        }
        super.onUpdate(context, appWidgetManager, appWidgetIds);
    }
}
ตั้งค่า Fill-in Intent
RemoteViewsFactory ต้องตั้งค่า Fill-in Intent ในแต่ละรายการในคอลเล็กชัน ซึ่งจะช่วยให้แยกแยะการดำเนินการเมื่อคลิกของแต่ละรายการได้ จากนั้นระบบจะรวม Fill-in Intent กับเทมเพลต
PendingIntent เพื่อกำหนด
Intent สุดท้ายที่จะดำเนินการเมื่อแตะรายการ
Kotlin
private const val REMOTE_VIEW_COUNT: Int = 10

class StackRemoteViewsFactory(
        private val context: Context,
        intent: Intent
) : RemoteViewsService.RemoteViewsFactory {

    private lateinit var widgetItems: List<WidgetItem>
    private val appWidgetId: Int = intent.getIntExtra(
            AppWidgetManager.EXTRA_APPWIDGET_ID,
            AppWidgetManager.INVALID_APPWIDGET_ID
    )

    override fun onCreate() {
        // In onCreate(), set up any connections or cursors to your data source.
        // Heavy lifting, such as downloading or creating content, must be
        // deferred to onDataSetChanged() or getViewAt(). Taking more than 20
        // seconds on this call results in an ANR.
        widgetItems = List(REMOTE_VIEW_COUNT) { index -> WidgetItem("$index!") }
        ...
    }
    ...

    override fun getViewAt(position: Int): RemoteViews {
        // Construct a remote views item based on the widget item XML file
        // and set the text based on the position.
        return RemoteViews(context.packageName, R.layout.widget_item).apply {
            setTextViewText(R.id.widget_item, widgetItems[position].text)

            // Set a fill-intent to fill in the pending intent template.
            // that is set on the collection view in StackWidgetProvider.
            val fillInIntent = Intent().apply {
                Bundle().also { extras ->
                    extras.putInt(EXTRA_ITEM, position)
                    putExtras(extras)
                }
            }
            // Make it possible to distinguish the individual on-click
            // action of a given item.
            setOnClickFillInIntent(R.id.widget_item, fillInIntent)
            ...
        }
    }
    ...
}
Java
public class StackWidgetService extends RemoteViewsService {
    @Override
    public RemoteViewsFactory onGetViewFactory(Intent intent) {
        return new StackRemoteViewsFactory(this.getApplicationContext(), intent);
    }
}

class StackRemoteViewsFactory implements RemoteViewsService.RemoteViewsFactory {
    private static final int count = 10;
    private List<WidgetItem> widgetItems = new ArrayList<WidgetItem>();
    private Context context;
    private int appWidgetId;

    public StackRemoteViewsFactory(Context context, Intent intent) {
        this.context = context;
        appWidgetId = intent.getIntExtra(AppWidgetManager.EXTRA_APPWIDGET_ID,
                AppWidgetManager.INVALID_APPWIDGET_ID);
    }

    // Initialize the data set.
    public void onCreate() {
        // In onCreate(), set up any connections or cursors to your data
        // source. Heavy lifting, such as downloading or creating
        // content, must be deferred to onDataSetChanged() or
        // getViewAt(). Taking more than 20 seconds on this call results
        // in an ANR.
        for (int i = 0; i < count; i++) {
            widgetItems.add(new WidgetItem(i + "!"));
        }
        ...
    }

    // Given the position (index) of a WidgetItem in the array, use the
    // item's text value in combination with the widget item XML file to
    // construct a RemoteViews object.
    public RemoteViews getViewAt(int position) {
        // Position always ranges from 0 to getCount() - 1.

        // Construct a RemoteViews item based on the widget item XML
        // file and set the text based on the position.
        RemoteViews rv = new RemoteViews(context.getPackageName(), R.layout.widget_item);
        rv.setTextViewText(R.id.widget_item, widgetItems.get(position).text);

        // Set a fill-intent to fill in the pending
        // intent template that is set on the collection view in
        // StackWidgetProvider.
        Bundle extras = new Bundle();
        extras.putInt(StackWidgetProvider.EXTRA_ITEM, position);
        Intent fillInIntent = new Intent();
        fillInIntent.putExtras(extras);
        // Make it possible to distinguish the individual on-click
        // action of a given item.
        rv.setOnClickFillInIntent(R.id.widget_item, fillInIntent);

        // Return the RemoteViews object.
        return rv;
    }
    ...
}
อัปเดตข้อมูลคอลเล็กชันอยู่เสมอ
รูปที่ 2 แสดงขั้นตอนการอัปเดตในวิดเจ็ตที่ใช้คอลเล็กชัน โดยแสดงวิธีที่โค้ดวิดเจ็ตโต้ตอบกับ RemoteViewsFactory และวิธีที่คุณสามารถทริกเกอร์การอัปเดตได้
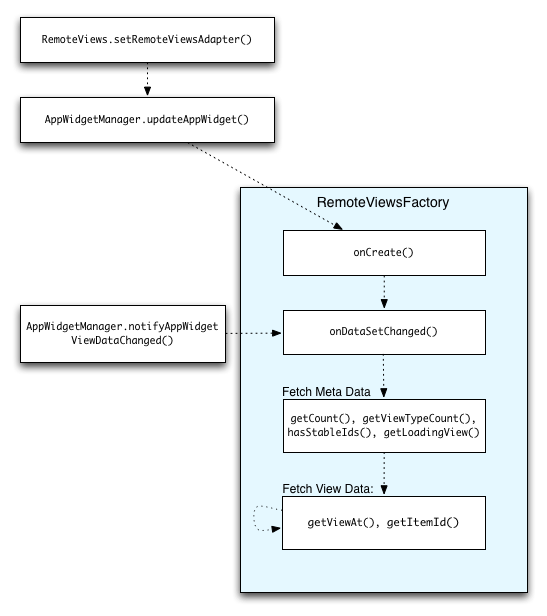
RemoteViewsFactory ระหว่างการอัปเดตวิดเจ็ตที่ใช้คอลเล็กชันสามารถแสดงเนื้อหาที่อัปเดตแก่ผู้ใช้ได้ ตัวอย่างเช่น วิดเจ็ต Gmail จะแสดงภาพรวมของกล่องจดหมายแก่ผู้ใช้ หากต้องการให้เป็นเช่นนี้ ให้ทริกเกอร์ RemoteViewsFactory และมุมมองคอลเล็กชันเพื่อดึงและแสดงข้อมูลใหม่
โดยใช้
AppWidgetManager เพื่อเรียกใช้
notifyAppWidgetViewDataChanged() การเรียกใช้นี้จะส่งผลให้มีการเรียกกลับไปยังเมธอด RemoteViewsFactory
onDataSetChanged()
ซึ่งช่วยให้คุณดึงข้อมูลใหม่ได้
คุณสามารถดำเนินการที่ใช้การประมวลผลมากแบบพร้อมกันได้ภายในเมธอดเรียกกลับ onDataSetChanged() ระบบรับประกันว่าการเรียกใช้นี้จะเสร็จสมบูรณ์ก่อนที่จะดึงข้อมูลเมตาหรือข้อมูลมุมมองจาก RemoteViewsFactory นอกจากนี้ คุณยังดำเนินการที่ใช้การประมวลผลมากได้ภายในเมธอด getViewAt() หากการเรียกใช้นี้ใช้เวลานาน มุมมองการโหลดซึ่งระบุโดย
RemoteViewsFactory ออบเจ็กต์'s
getLoadingView()
เมธอด จะแสดงในตำแหน่งที่เกี่ยวข้องของมุมมองคอลเล็กชัน
จนกว่าจะแสดงผล
ใช้ RemoteCollectionItems เพื่อส่งคอลเล็กชันโดยตรง
Android 12 (ระดับ API 31) เพิ่มเมธอด setRemoteAdapter(int viewId,
RemoteViews.RemoteCollectionItems
items) ซึ่งช่วยให้แอปส่งคอลเล็กชันโดยตรงเมื่อป้อนข้อมูลในมุมมองคอลเล็กชัน หากตั้งค่าอะแดปเตอร์โดยใช้เมธอดนี้ คุณไม่จำเป็นต้องใช้ RemoteViewsFactory และไม่จำเป็นต้องเรียกใช้ notifyAppWidgetViewDataChanged()
นอกเหนือจากการทำให้การป้อนข้อมูลในอะแดปเตอร์ง่ายขึ้นแล้ว วิธีนี้ยังช่วยลดเวลาในการตอบสนองสำหรับการป้อนข้อมูลในรายการใหม่เมื่อผู้ใช้เลื่อนลงในรายการเพื่อแสดงรายการใหม่ เราขอแนะนำให้ใช้วิธีนี้ในการตั้งค่าอะแดปเตอร์ตราบใดที่ชุดรายการคอลเล็กชันมีขนาดค่อนข้างเล็ก อย่างไรก็ตาม ตัวอย่างเช่น วิธีนี้
ใช้ได้ไม่ดีหากคอลเล็กชันมี Bitmaps จำนวนมากที่
ส่งไปยัง setImageViewBitmap
หากคอลเล็กชันไม่ได้ใช้ชุดเลย์เอาต์แบบคงที่ นั่นคือหากบางรายการมีอยู่เพียงบางครั้ง ให้ใช้ setViewTypeCount เพื่อระบุจำนวนเลย์เอาต์ที่ไม่ซ้ำกันสูงสุดที่คอลเล็กชันสามารถมีได้ ซึ่งจะช่วยให้สามารถนำอะแดปเตอร์กลับมาใช้ซ้ำในการอัปเดตวิดเจ็ตแอปได้
ต่อไปนี้เป็นตัวอย่างวิธีใช้คอลเล็กชัน RemoteViews แบบง่าย
Kotlin
val itemLayouts = listOf(
        R.layout.item_type_1,
        R.layout.item_type_2,
        ...
)

remoteView.setRemoteAdapter(
        R.id.list_view,
        RemoteViews.RemoteCollectionItems.Builder()
            .addItem(/* id= */ ID_1, RemoteViews(context.packageName, R.layout.item_type_1))
            .addItem(/* id= */ ID_2, RemoteViews(context.packageName, R.layout.item_type_2))
            ...
            .setViewTypeCount(itemLayouts.count())
            .build()
)
Java
List<Integer> itemLayouts = Arrays.asList(
    R.layout.item_type_1,
    R.layout.item_type_2,
    ...
);

remoteView.setRemoteAdapter(
    R.id.list_view,
    new RemoteViews.RemoteCollectionItems.Builder()
        .addItem(/* id= */ ID_1, new RemoteViews(context.getPackageName(), R.layout.item_type_1))
        .addItem(/* id= */ ID_2, new RemoteViews(context.getPackageName(), R.layout.item_type_2))
        ...
        .setViewTypeCount(itemLayouts.size())
        .build()
);