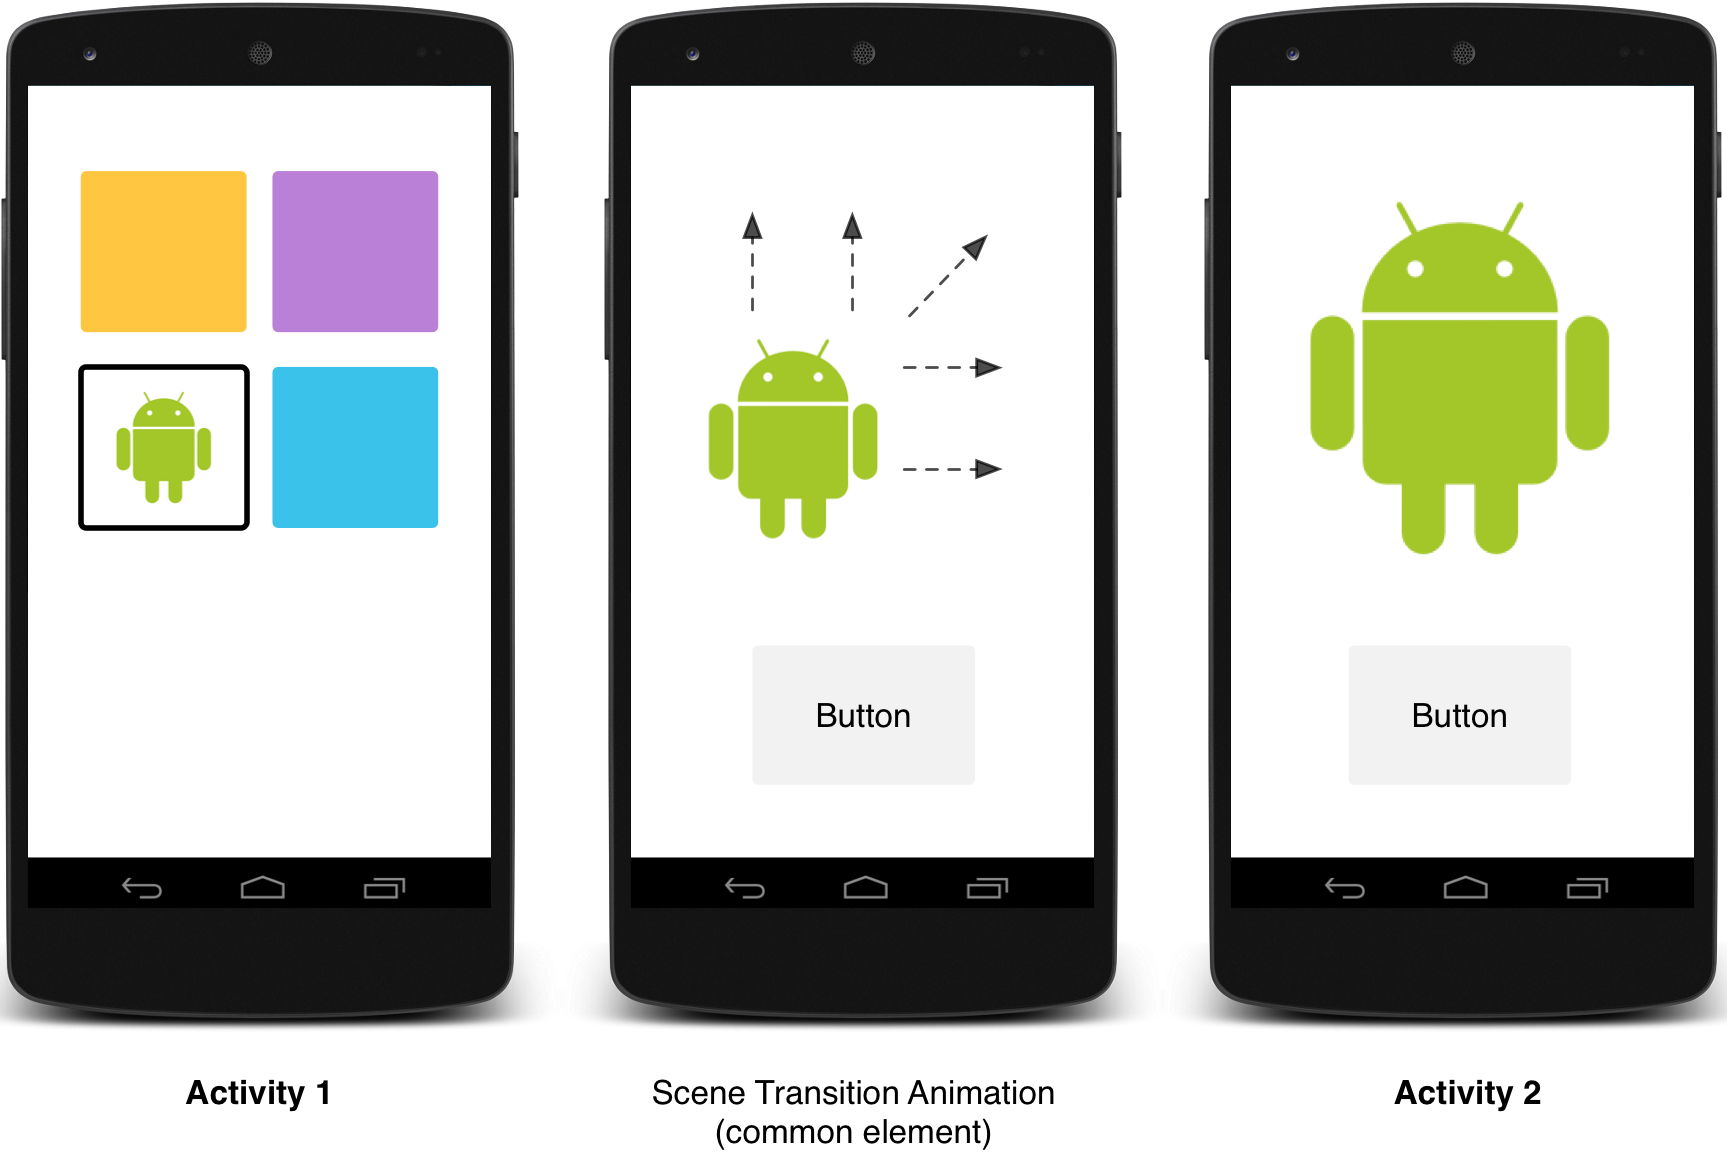
マテリアル デザイン アプリのアクティビティ遷移は、共通する要素の間での動作や変化を通じて、状態の切り替え時に視覚的なつながりを生み出します。開始遷移と終了遷移、アクティビティ間の共有要素の遷移においてカスタム アニメーションを指定できます。
図 1. 共有要素による遷移。
- 開始遷移は、アクティビティのビューがどのようにシーンに表示されるかを決定します。たとえば、
explodeの開始遷移では、ビューがシーン外からシーンに入り、画面の中心に向かって飛び込むように表示されます。 - 終了遷移は、アクティビティのビューがどのようにシーンから消えていくかを決定します。たとえば、
explodeの終了遷移では、ビューはシーン中心から外側に向かって消えていきます。 - 共有要素遷移は、2 つのアクティビティ間で共有されているビューが、各アクティビティの間でどのように遷移するかを決定します。たとえば、2 つのアクティビティで同じ画像を異なる位置とサイズで使用している場合、
changeImageTransform共有要素遷移によって、2 つのアクティビティの間でスムーズに画像が変換およびスケーリングされます。
Android では、次の開始遷移と終了遷移がサポートされます。
explode: ビューがシーンの中心から内側または外側に移動します。slide: ビューがシーンの端から現れ、シーンの端へ移動します。fade: 不透明度を変化させることで、シーンに対するビューの表示、非表示を行います。
Visibility クラスを拡張する遷移はすべて、開始遷移または終了遷移としてサポートされます。詳細については、Transition クラスの API リファレンスをご覧ください。
Android では、次の共有要素による遷移もサポートされています。
changeBounds: ターゲット ビューのレイアウト境界内の変化をアニメーション化します。changeClipBounds: ターゲット ビューのクリップ範囲内での変化をアニメーション化します。changeTransform: 対象ビューのスケールと回転の変化をアニメーション化します。changeImageTransform: 対象画像のサイズとスケールの変化をアニメーション化します。
アプリでアクティビティ遷移を有効にすると、開始アクティビティと終了アクティビティの間でデフォルトのクロス フェーディング遷移が有効になります。

図 2. 1 つの共有要素によるシーン遷移。
共有要素を使用してアクティビティ間でアニメーション化するサンプルコードについては、ActivitySceneTransitionBasic をご覧ください。
システム バージョンを確認する
アクティビティ遷移 API は、Android 5.0(API 21)以降でご利用いただけます。以前のバージョンの Android との互換性を維持するため、実行時にシステム version を確認します。上記の機能に関する API を起動する前に行ってください。
Kotlin
// Check if we're running on Android 5.0 or higher
if (Build.VERSION.SDK_INT >= Build.VERSION_CODES.LOLLIPOP) {
    // Apply activity transition
} else {
    // Swap without transition
}
Java
// Check if we're running on Android 5.0 or higher
if (Build.VERSION.SDK_INT >= Build.VERSION_CODES.LOLLIPOP) {
    // Apply activity transition
} else {
    // Swap without transition
}
カスタム遷移を指定する
最初に、マテリアル テーマから継承するスタイルを定義するときに、android:windowActivityTransitions 属性でウィンドウ コンテンツ遷移を有効にします。次のように、スタイルの定義で開始、終了、共有要素の遷移を指定することもできます。
<style name="BaseAppTheme" parent="android:Theme.Material">
  <!-- enable window content transitions -->
  <item name="android:windowActivityTransitions">true</item>

  <!-- specify enter and exit transitions -->
  <item name="android:windowEnterTransition">@transition/explode</item>
  <item name="android:windowExitTransition">@transition/explode</item>

  <!-- specify shared element transitions -->
  <item name="android:windowSharedElementEnterTransition">
    @transition/change_image_transform</item>
  <item name="android:windowSharedElementExitTransition">
    @transition/change_image_transform</item>
</style>
この例の change_image_transform 遷移に関する定義は、次のとおりです。
<!-- res/transition/change_image_transform.xml -->
<!-- (see also Shared Transitions below) -->
<transitionSet xmlns:android="http://schemas.android.com/apk/res/android">
  <changeImageTransform/>
</transitionSet>
changeImageTransform 要素は、ChangeImageTransform クラスに対応します。詳細については、Transition の API リファレンスをご覧ください。
代わりに、コードでウィンドウ コンテンツ遷移を有効にするには、次のように Window.requestFeature() 関数を呼び出します。
Kotlin
// Inside your activity (if you did not enable transitions in your theme)
with(window) {
    requestFeature(Window.FEATURE_ACTIVITY_TRANSITIONS)

    // Set an exit transition
    exitTransition = Explode()
}
Java
// Inside your activity (if you did not enable transitions in your theme)
getWindow().requestFeature(Window.FEATURE_ACTIVITY_TRANSITIONS);

// Set an exit transition
getWindow().setExitTransition(new Explode());
コードで遷移を指定するには、Transition オブジェクトで次の関数を呼び出します。
Window.setEnterTransition()Window.setExitTransition()Window.setSharedElementEnterTransition()Window.setSharedElementExitTransition()
setExitTransition() 関数と setSharedElementExitTransition() 関数は、呼び出し元アクティビティの終了遷移を定義します。setEnterTransition() 関数と setSharedElementEnterTransition() 関数は、呼び出し先アクティビティの開始遷移を定義します。
遷移の効果を最大限に活用するには、呼び出し元と呼び出し先のアクティビティ両方でウィンドウ コンテンツ遷移を有効にする必要があります。有効にしていないと、呼び出し元のアクティビティが終了遷移を開始した後、ウィンドウ遷移(スケールやフェードなど)が発生します。
できるだけ迅速に開始遷移を開始するには、呼び出し先アクティビティで Window.setAllowEnterTransitionOverlap() 関数を使用します。これにより、さらに印象的な開始遷移になります。
遷移を使ってアクティビティを開始する
遷移を有効にしてアクティビティで終了遷移を設定した場合、次のように別のアクティビティを開始したときに遷移がアクティブになります。
Kotlin
startActivity(intent,
              ActivityOptions.makeSceneTransitionAnimation(this).toBundle())
Java
startActivity(intent,
              ActivityOptions.makeSceneTransitionAnimation(this).toBundle());
2 つ目のアクティビティに開始遷移を設定している場合は、該当するアクティビティの開始時に遷移もアクティブになります。別のアクティビティの開始時に遷移を無効にするには、null オプション バンドルを指定します。
共有要素を使ってアクティビティを開始する
共有要素を持つ 2 つのアクティビティの間で画面遷移のアニメーションを作成するには、次の操作を行います。
- テーマでウィンドウ コンテンツ遷移を有効にします。
- スタイルで共有要素遷移を指定します。
- 遷移を XML リソースとして定義します。
android:transitionName属性を使用して、両方のレイアウトの共有要素に共通名を割り当てます。ActivityOptions.makeSceneTransitionAnimation()関数を使用する
Kotlin
// Get the element that receives the click event
val imgContainerView = findViewById<View>(R.id.img_container)

// Get the common element for the transition in this activity
val androidRobotView = findViewById<View>(R.id.image_small)

// Define a click listener
imgContainerView.setOnClickListener( {
    val intent = Intent(this, Activity2::class.java)
    // Create the transition animation - the images in the layouts
    // of both activities are defined with android:transitionName="robot"
    val options = ActivityOptions
            .makeSceneTransitionAnimation(this, androidRobotView, "robot")
    // Start the new activity
    startActivity(intent, options.toBundle())
})
Java
// Get the element that receives the click event
final View imgContainerView = findViewById(R.id.img_container);

// Get the common element for the transition in this activity
final View androidRobotView = findViewById(R.id.image_small);

// Define a click listener
imgContainerView.setOnClickListener(new View.OnClickListener() {
    @Override
    public void onClick(View view) {
        Intent intent = new Intent(this, Activity2.class);
        // Create the transition animation - the images in the layouts
        // of both activities are defined with android:transitionName="robot"
        ActivityOptions options = ActivityOptions
            .makeSceneTransitionAnimation(this, androidRobotView, "robot");
        // Start the new activity
        startActivity(intent, options.toBundle());
    }
});
コードで生成する共有動的ビューの場合、View.setTransitionName() 関数を使用して、両方のアクティビティで共通要素名を指定します。
2 つ目のアクティビティが終了したときにシーン遷移のアニメーションを無効にするには、Activity.finish() の代わりに Activity.finishAfterTransition() 関数を呼び出します。
複数の共有要素を使ってアクティビティを開始する
複数の共有要素を持つ 2 つのアクティビティ間のシーン遷移アニメーションを作成するには、android:transitionName 属性を使用して両方のレイアウトで共有要素を定義(または、両方のアクティビティで View.setTransitionName() 関数を使用)して、次のように ActivityOptions オブジェクトを作成します。
Kotlin
// Rename the Pair class from the Android framework to avoid a name clash
import android.util.Pair as UtilPair
...
val options = ActivityOptions.makeSceneTransitionAnimation(this,
        UtilPair.create(view1, "agreedName1"),
        UtilPair.create(view2, "agreedName2"))
Java
ActivityOptions options = ActivityOptions.makeSceneTransitionAnimation(this,
        Pair.create(view1, "agreedName1"),
        Pair.create(view2, "agreedName2"));

