
האפשרות להזיז עצמים בהתאם לתוכנית מוגדרת מראש, כמו המשולש המסתובב, שימושית
מקבלים תשומת לב מסוימת, אבל מה קורה אם רוצים שהמשתמשים יוכלו ליצור אינטראקציה עם הגרפיקה של OpenGL ES?
המפתח להפיכת אפליקציית OpenGL ES לאינטראקטיבית היא הרחבת ההטמעה של
GLSurfaceView כדי לשנות את הערכים של
onTouchEvent() כדי להאזין לאירועי מגע.
בשיעור הזה תלמדו איך להאזין לאירועי מגע כדי לאפשר למשתמשים לסובב אובייקט OpenGL ES.
הגדרת אוזן מגע
כדי שאפליקציית OpenGL ES שלך להגיב לאירועי מגע, עליך להטמיע את
שיטת 'onTouchEvent()' ב שלך
כיתה אחת (GLSurfaceView). ההטמעה לדוגמה שלמטה מראה איך להאזין ל
MotionEvent.ACTION_MOVE אירועים ולתרגם אותם ל
זווית סיבוב לצורה.
Kotlin
private const val TOUCH_SCALE_FACTOR: Float = 180.0f / 320f
...
private var previousX: Float = 0f
private var previousY: Float = 0f

override fun onTouchEvent(e: MotionEvent): Boolean {
    // MotionEvent reports input details from the touch screen
    // and other input controls. In this case, you are only
    // interested in events where the touch position changed.

    val x: Float = e.x
    val y: Float = e.y

    when (e.action) {
        MotionEvent.ACTION_MOVE -> {

            var dx: Float = x - previousX
            var dy: Float = y - previousY

            // reverse direction of rotation above the mid-line
            if (y > height / 2) {
                dx *= -1
            }

            // reverse direction of rotation to left of the mid-line
            if (x < width / 2) {
                dy *= -1
            }

            renderer.angle += (dx + dy) * TOUCH_SCALE_FACTOR
            requestRender()
        }
    }

    previousX = x
    previousY = y
    return true
}
Java
private final float TOUCH_SCALE_FACTOR = 180.0f / 320;
private float previousX;
private float previousY;

@Override
public boolean onTouchEvent(MotionEvent e) {
    // MotionEvent reports input details from the touch screen
    // and other input controls. In this case, you are only
    // interested in events where the touch position changed.

    float x = e.getX();
    float y = e.getY();

    switch (e.getAction()) {
        case MotionEvent.ACTION_MOVE:

            float dx = x - previousX;
            float dy = y - previousY;

            // reverse direction of rotation above the mid-line
            if (y > getHeight() / 2) {
              dx = dx * -1 ;
            }

            // reverse direction of rotation to left of the mid-line
            if (x < getWidth() / 2) {
              dy = dy * -1 ;
            }

            renderer.setAngle(
                    renderer.getAngle() +
                    ((dx + dy) * TOUCH_SCALE_FACTOR));
            requestRender();
    }

    previousX = x;
    previousY = y;
    return true;
}
שימו לב שאחרי חישוב זווית הסיבוב, השיטה הזאת מפעילה
requestRender() כדי לומר
כי הגיע הזמן לעבד את הפריים. הגישה הזו היא היעילה ביותר בדוגמה הזאת
מכיוון שאין צורך לשרטט מחדש את המסגרת אלא אם חל שינוי בסיבוב. עם זאת,
אין השפעה כלשהי על היעילות, אלא אם תבקשו גם שה-רינדור ימלא מחדש רק כאשר
הנתונים משתנים באמצעות setRenderMode()
, ולכן יש לוודא שהשורה הבאה בוטלה בכלי לרינדור:
Kotlin
class MyGlSurfaceView(context: Context) : GLSurfaceView(context) {

    init {
        // Render the view only when there is a change in the drawing data
        renderMode = GLSurfaceView.RENDERMODE_WHEN_DIRTY
    }
}
Java
public MyGLSurfaceView(Context context) {
    ...
    // Render the view only when there is a change in the drawing data
    setRenderMode(GLSurfaceView.RENDERMODE_WHEN_DIRTY);
}
חשיפת זווית הסיבוב
הקוד לדוגמה שלמעלה מחייב לחשוף את זווית הסיבוב דרך כלי הרינדור על ידי
הוספת חבר ציבורי. מאחר שהקוד של כלי הרינדור פועל בשרשור נפרד מהמשתמש הראשי
שרשור הממשק של האפליקציה, עליך להצהיר על המשתנה הציבורי הזה בתור volatile.
זה הקוד להצהרה על המשתנה ולחשיפת הצמד של המנצח והמגדיר:
Kotlin
class MyGLRenderer4 : GLSurfaceView.Renderer {

    @Volatile
    var angle: Float = 0f
}
Java
public class MyGLRenderer implements GLSurfaceView.Renderer {
    ...

    public volatile float mAngle;

    public float getAngle() {
        return mAngle;
    }

    public void setAngle(float angle) {
        mAngle = angle;
    }
}
החלת הסיבוב
כדי להחיל את הסיבוב שנוצר על ידי קלט המגע, יש להוסיף הערות לקוד שיוצר זווית מוסיפים משתנה שמכיל את הזווית שנוצרה באמצעות קלט המגע:
Kotlin
override fun onDrawFrame(gl: GL10) {
    ...
    val scratch = FloatArray(16)

    // Create a rotation for the triangle
    // long time = SystemClock.uptimeMillis() % 4000L;
    // float angle = 0.090f * ((int) time);
    Matrix.setRotateM(rotationMatrix, 0, angle, 0f, 0f, -1.0f)

    // Combine the rotation matrix with the projection and camera view
    // Note that the mvpMatrix factor *must be first* in order
    // for the matrix multiplication product to be correct.
    Matrix.multiplyMM(scratch, 0, mvpMatrix, 0, rotationMatrix, 0)

    // Draw triangle
    triangle.draw(scratch)
}
Java
public void onDrawFrame(GL10 gl) {
    ...
    float[] scratch = new float[16];

    // Create a rotation for the triangle
    // long time = SystemClock.uptimeMillis() % 4000L;
    // float angle = 0.090f * ((int) time);
    Matrix.setRotateM(rotationMatrix, 0, mAngle, 0, 0, -1.0f);

    // Combine the rotation matrix with the projection and camera view
    // Note that the vPMatrix factor *must be first* in order
    // for the matrix multiplication product to be correct.
    Matrix.multiplyMM(scratch, 0, vPMatrix, 0, rotationMatrix, 0);

    // Draw triangle
    mTriangle.draw(scratch);
}
לאחר שהשלמת את השלבים המתוארים למעלה, הפעילו את התוכנית וגוררים את האצבע שלך על פני כדי לסובב את המשולש:
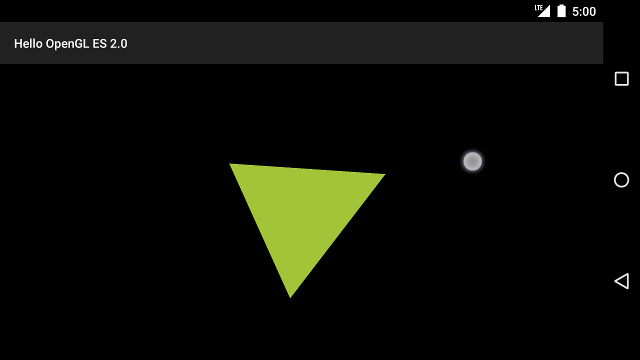
איור 1. סיבוב משולש בעזרת קלט מגע (עיגול מראה מגע המיקום).