
When adding a preview to your app, use
PreviewView, which is a
View that can be cropped, scaled, and rotated for proper display.
The image preview streams to a surface inside the PreviewView when the
camera becomes active.
Use the PreviewView
Implementing a preview for CameraX using PreviewView involves the following
steps, which are covered in later sections:
- Optionally configure a
CameraXConfig.Provider. - Add a
PreviewViewto your layout. - Request a
ProcessCameraProvider. - On
Viewcreation, check for theProcessCameraProvider. - Select a camera and bind the lifecycle and use cases.
Using PreviewView has some limitations. When using PreviewView, you can't
do any of the following things:
- Create a
SurfaceTextureto set onTextureViewandPreview.SurfaceProvider. - Retrieve the
SurfaceTexturefromTextureViewand set it onPreview.SurfaceProvider. - Get the
SurfacefromSurfaceViewand set it onPreview.SurfaceProvider.
If any of these happen, then the Preview stops streaming frames to the
PreviewView.
Add a PreviewView to your layout
The following sample shows a PreviewView in a layout:
<FrameLayout
    android:id="@+id/container">
        <androidx.camera.view.PreviewView
            android:id="@+id/previewView" />
</FrameLayout>
Request a CameraProvider
The following code shows how to request a CameraProvider:
Kotlin
import androidx.camera.lifecycle.ProcessCameraProvider
import com.google.common.util.concurrent.ListenableFuture

class MainActivity : AppCompatActivity() {
    private lateinit var cameraProviderFuture : ListenableFuture<ProcessCameraProvider>
    override fun onCreate(savedInstanceState: Bundle?) {
        cameraProviderFuture = ProcessCameraProvider.getInstance(this)
    }
}
Java
import androidx.camera.lifecycle.ProcessCameraProvider
import com.google.common.util.concurrent.ListenableFuture

public class MainActivity extends AppCompatActivity {
    private ListenableFuture<ProcessCameraProvider> cameraProviderFuture;

    @Override
    protected void onCreate(@Nullable Bundle savedInstanceState) {
        cameraProviderFuture = ProcessCameraProvider.getInstance(this);
    }
}
Check for CameraProvider availability
After requesting a CameraProvider, verify that its initialization succeeded
when the view is created. The following code shows how to do this:
Kotlin
cameraProviderFuture.addListener(Runnable {
    val cameraProvider = cameraProviderFuture.get()
    bindPreview(cameraProvider)
}, ContextCompat.getMainExecutor(this))
Java
cameraProviderFuture.addListener(() -> {
    try {
        ProcessCameraProvider cameraProvider = cameraProviderFuture.get();
        bindPreview(cameraProvider);
    } catch (ExecutionException | InterruptedException e) {
        // No errors need to be handled for this Future.
        // This should never be reached.
    }
}, ContextCompat.getMainExecutor(this));
For an example of the bindPreview function used in this sample, see the code
provided in the next section.
Select a camera and bind the lifecycle and use cases
Once you have created and confirmed the CameraProvider, do the following:
- Create a
Preview. - Specify the desired camera
LensFacingoption. - Bind the selected camera and any use cases to the lifecycle.
- Connect the
Previewto thePreviewView.
The following code shows an example:
Kotlin
fun bindPreview(cameraProvider : ProcessCameraProvider) {
    var preview : Preview = Preview.Builder()
            .build()

    var cameraSelector : CameraSelector = CameraSelector.Builder()
          .requireLensFacing(CameraSelector.LENS_FACING_BACK)
          .build()

    preview.setSurfaceProvider(previewView.getSurfaceProvider())

    var camera = cameraProvider.bindToLifecycle(this as LifecycleOwner, cameraSelector, preview)
}
Java
void bindPreview(@NonNull ProcessCameraProvider cameraProvider) {
    Preview preview = new Preview.Builder()
            .build();

    CameraSelector cameraSelector = new CameraSelector.Builder()
            .requireLensFacing(CameraSelector.LENS_FACING_BACK)
            .build();

    preview.setSurfaceProvider(previewView.getSurfaceProvider());

    Camera camera = cameraProvider.bindToLifecycle((LifecycleOwner)this, cameraSelector, preview);
}
Note that bindToLifecycle() returns a Camera
object. For more information about controlling camera output, such as zoom and
exposure, see Camera output.
You are now done implementing the camera preview. Build your app and confirm that your preview appears in your app and functions as you intend it to.
Additional controls for PreviewView
CameraX PreviewView provides some additional APIs to configure properties such
as:
- The implementation mode for rendering preview streams.
- The preview image scale type.
Implementation mode
PreviewView can use one of the following modes to render a preview stream onto
the target View:
PERFORMANCEis the default mode.PreviewViewuses aSurfaceViewto display the video stream, but falls back to aTextureViewin certain cases.SurfaceViewhas a dedicated drawing surface, which has a better chance of being implemented with a hardware overlay by the internal hardware compositor, especially when there are no other UI elements (like buttons) on top of the preview video. By rendering with a hardware overlay, video frames avoid a GPU path, which can reduce platform power consumption and latency.COMPATIBLEmode. In this mode,PreviewViewuses aTextureViewwhich, unlikeSurfaceView, does not have a dedicated drawing surface. As a result, video renders with blending so that it can be displayed. During this extra step, the application can perform additional processing, such as scaling and rotating videos without restriction.
Use PreviewView.setImplementationMode()
to select the implementation mode suitable for your application. If the default
PERFORMANCE mode isn't suitable for your application, the following code
sample shows how to set COMPATIBLE mode:
Kotlin
// viewFinder is a PreviewView instance
viewFinder.implementationMode = PreviewView.ImplementationMode.COMPATIBLE
Scale type
When the preview video resolution differs from the dimensions of your target
PreviewView, video content needs to be fit to the view either by cropping or
letterboxing (maintaining the original aspect ratio). PreviewView provides the
following ScaleTypes
for this purpose:
FIT_CENTER,FIT_START, andFIT_ENDfor letterboxing. The full video content is scaled (either up or down) to the maximum possible size that can be displayed in the targetPreviewView. However, although the full video frame is visible, some portion of the screen might be blank. Depending on which of these three scale types you choose, the video frame aligns to the center, start, or end of the target View.FILL_CENTER,FILL_START,FILL_ENDfor cropping. If a video doesn't match thePreviewViewaspect ratio, only a portion of the content is visible, but the video fills the entirePreviewView.
The default scale type CameraX uses is FILL_CENTER. Use PreviewView.setScaleType()
to set the scale type most appropriate for your application. The following code
sample sets the FIT_CENTER scale type:
Kotlin
// viewFinder is a PreviewView instance
viewFinder.scaleType = PreviewView.ScaleType.FIT_CENTER
The process for displaying a video consists of the following steps:
- Scale the video:
- For
FIT_*scale types, scale the video withmin(dst.width/src.width, dst.height/src.height). - For
FILL_*scale types, scale the video withmax(dst.width/src.width, dst.height/src.height).
- For
- Align the scaled video with the destination
PreviewView:- For
FIT_CENTER/FILL_CENTER, center align the scaled video and the destinationPreviewView. - For
FIT_START/FILL_START, align the scaled video and the destinationPreviewViewwith respect to the top-left corner of each. - For
FIT_END/FILL_END, align the scaled video and the destinationPreviewViewwith respect to the bottom-right corner of each.
- For
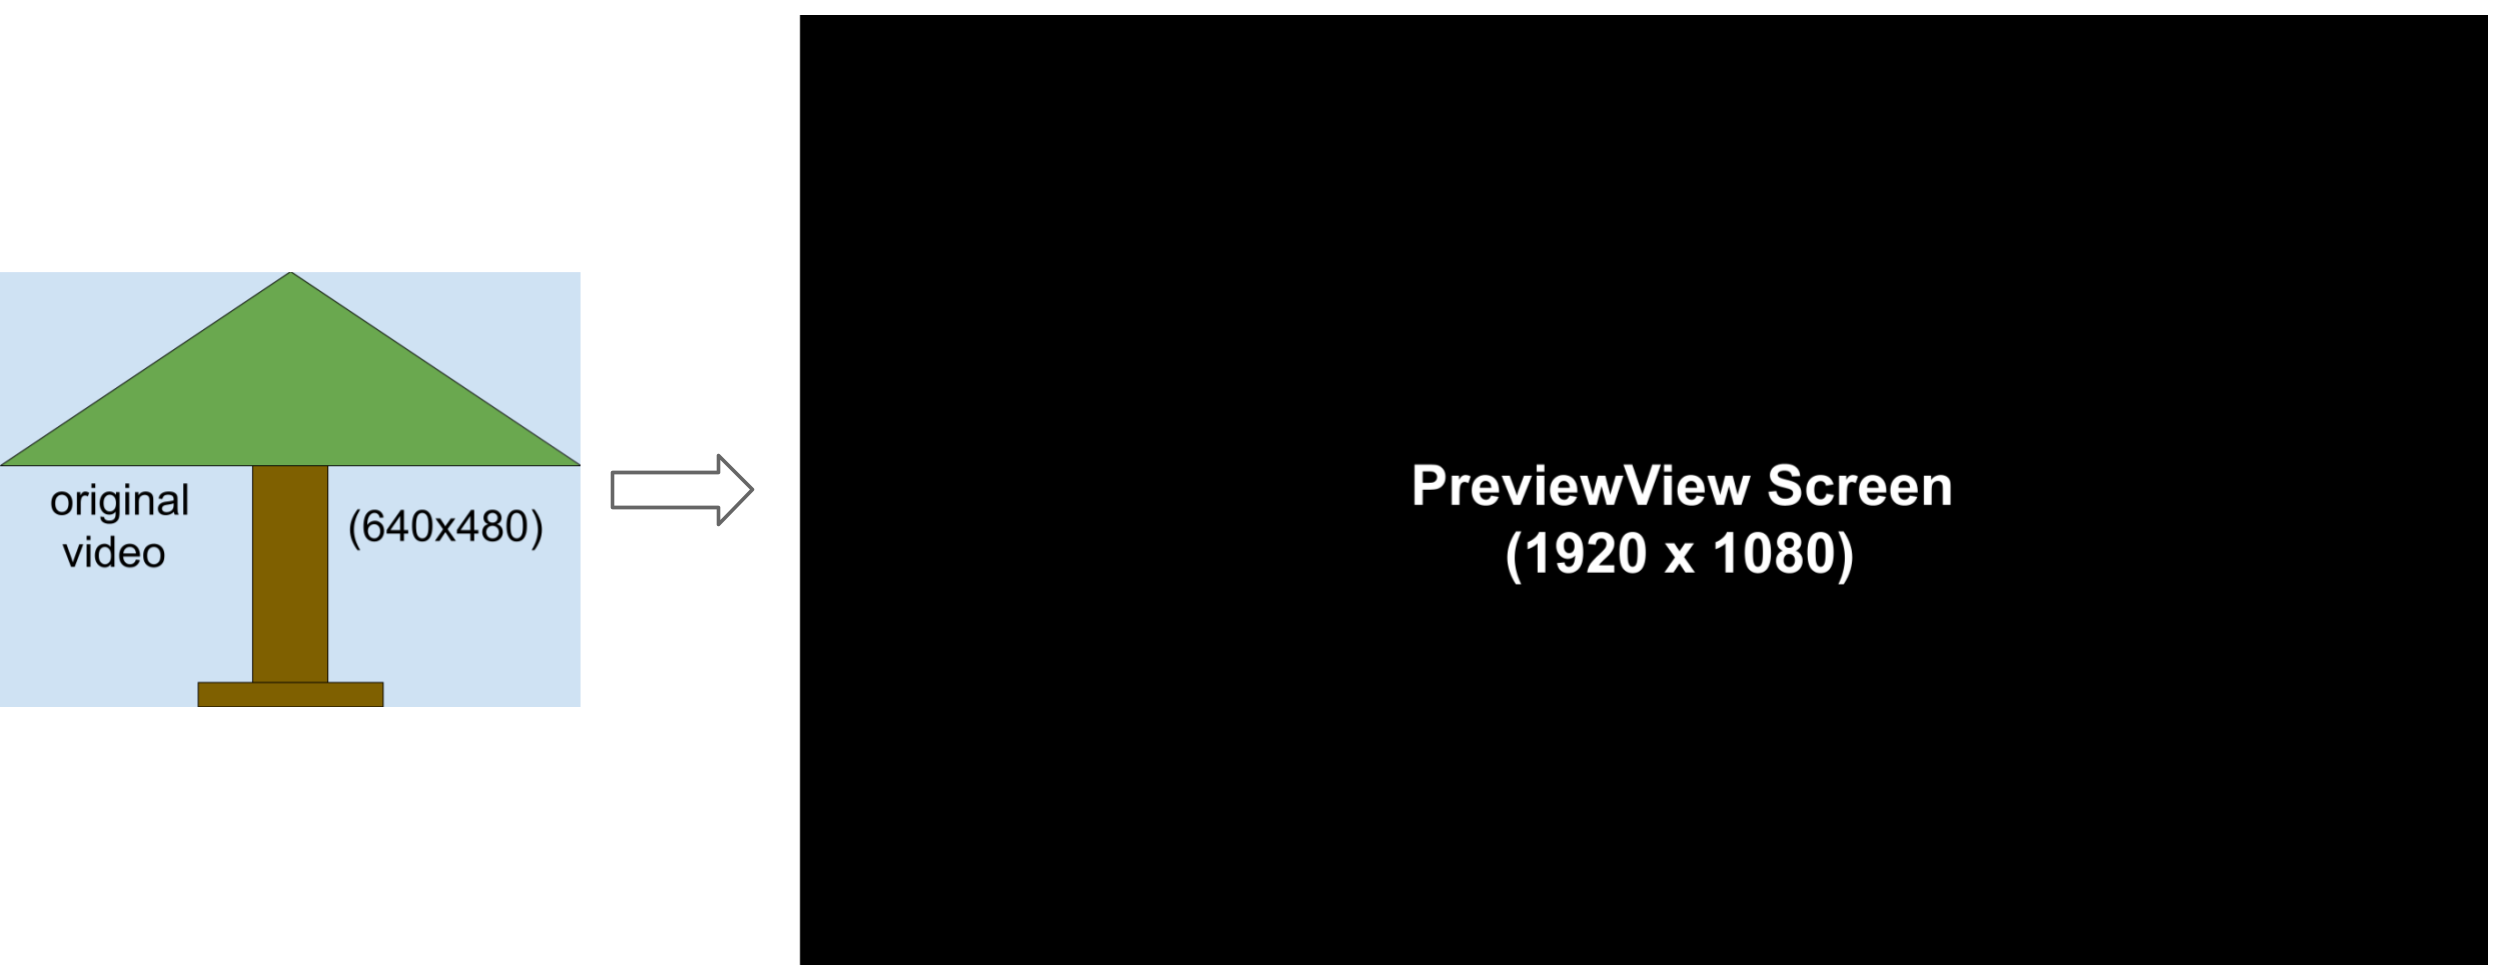
For example, here is a 640x480 source video and a 1920x1080 destination
PreviewView:
The following image shows the FIT_START / FIT_CENTER / FIT_END
scaling process:
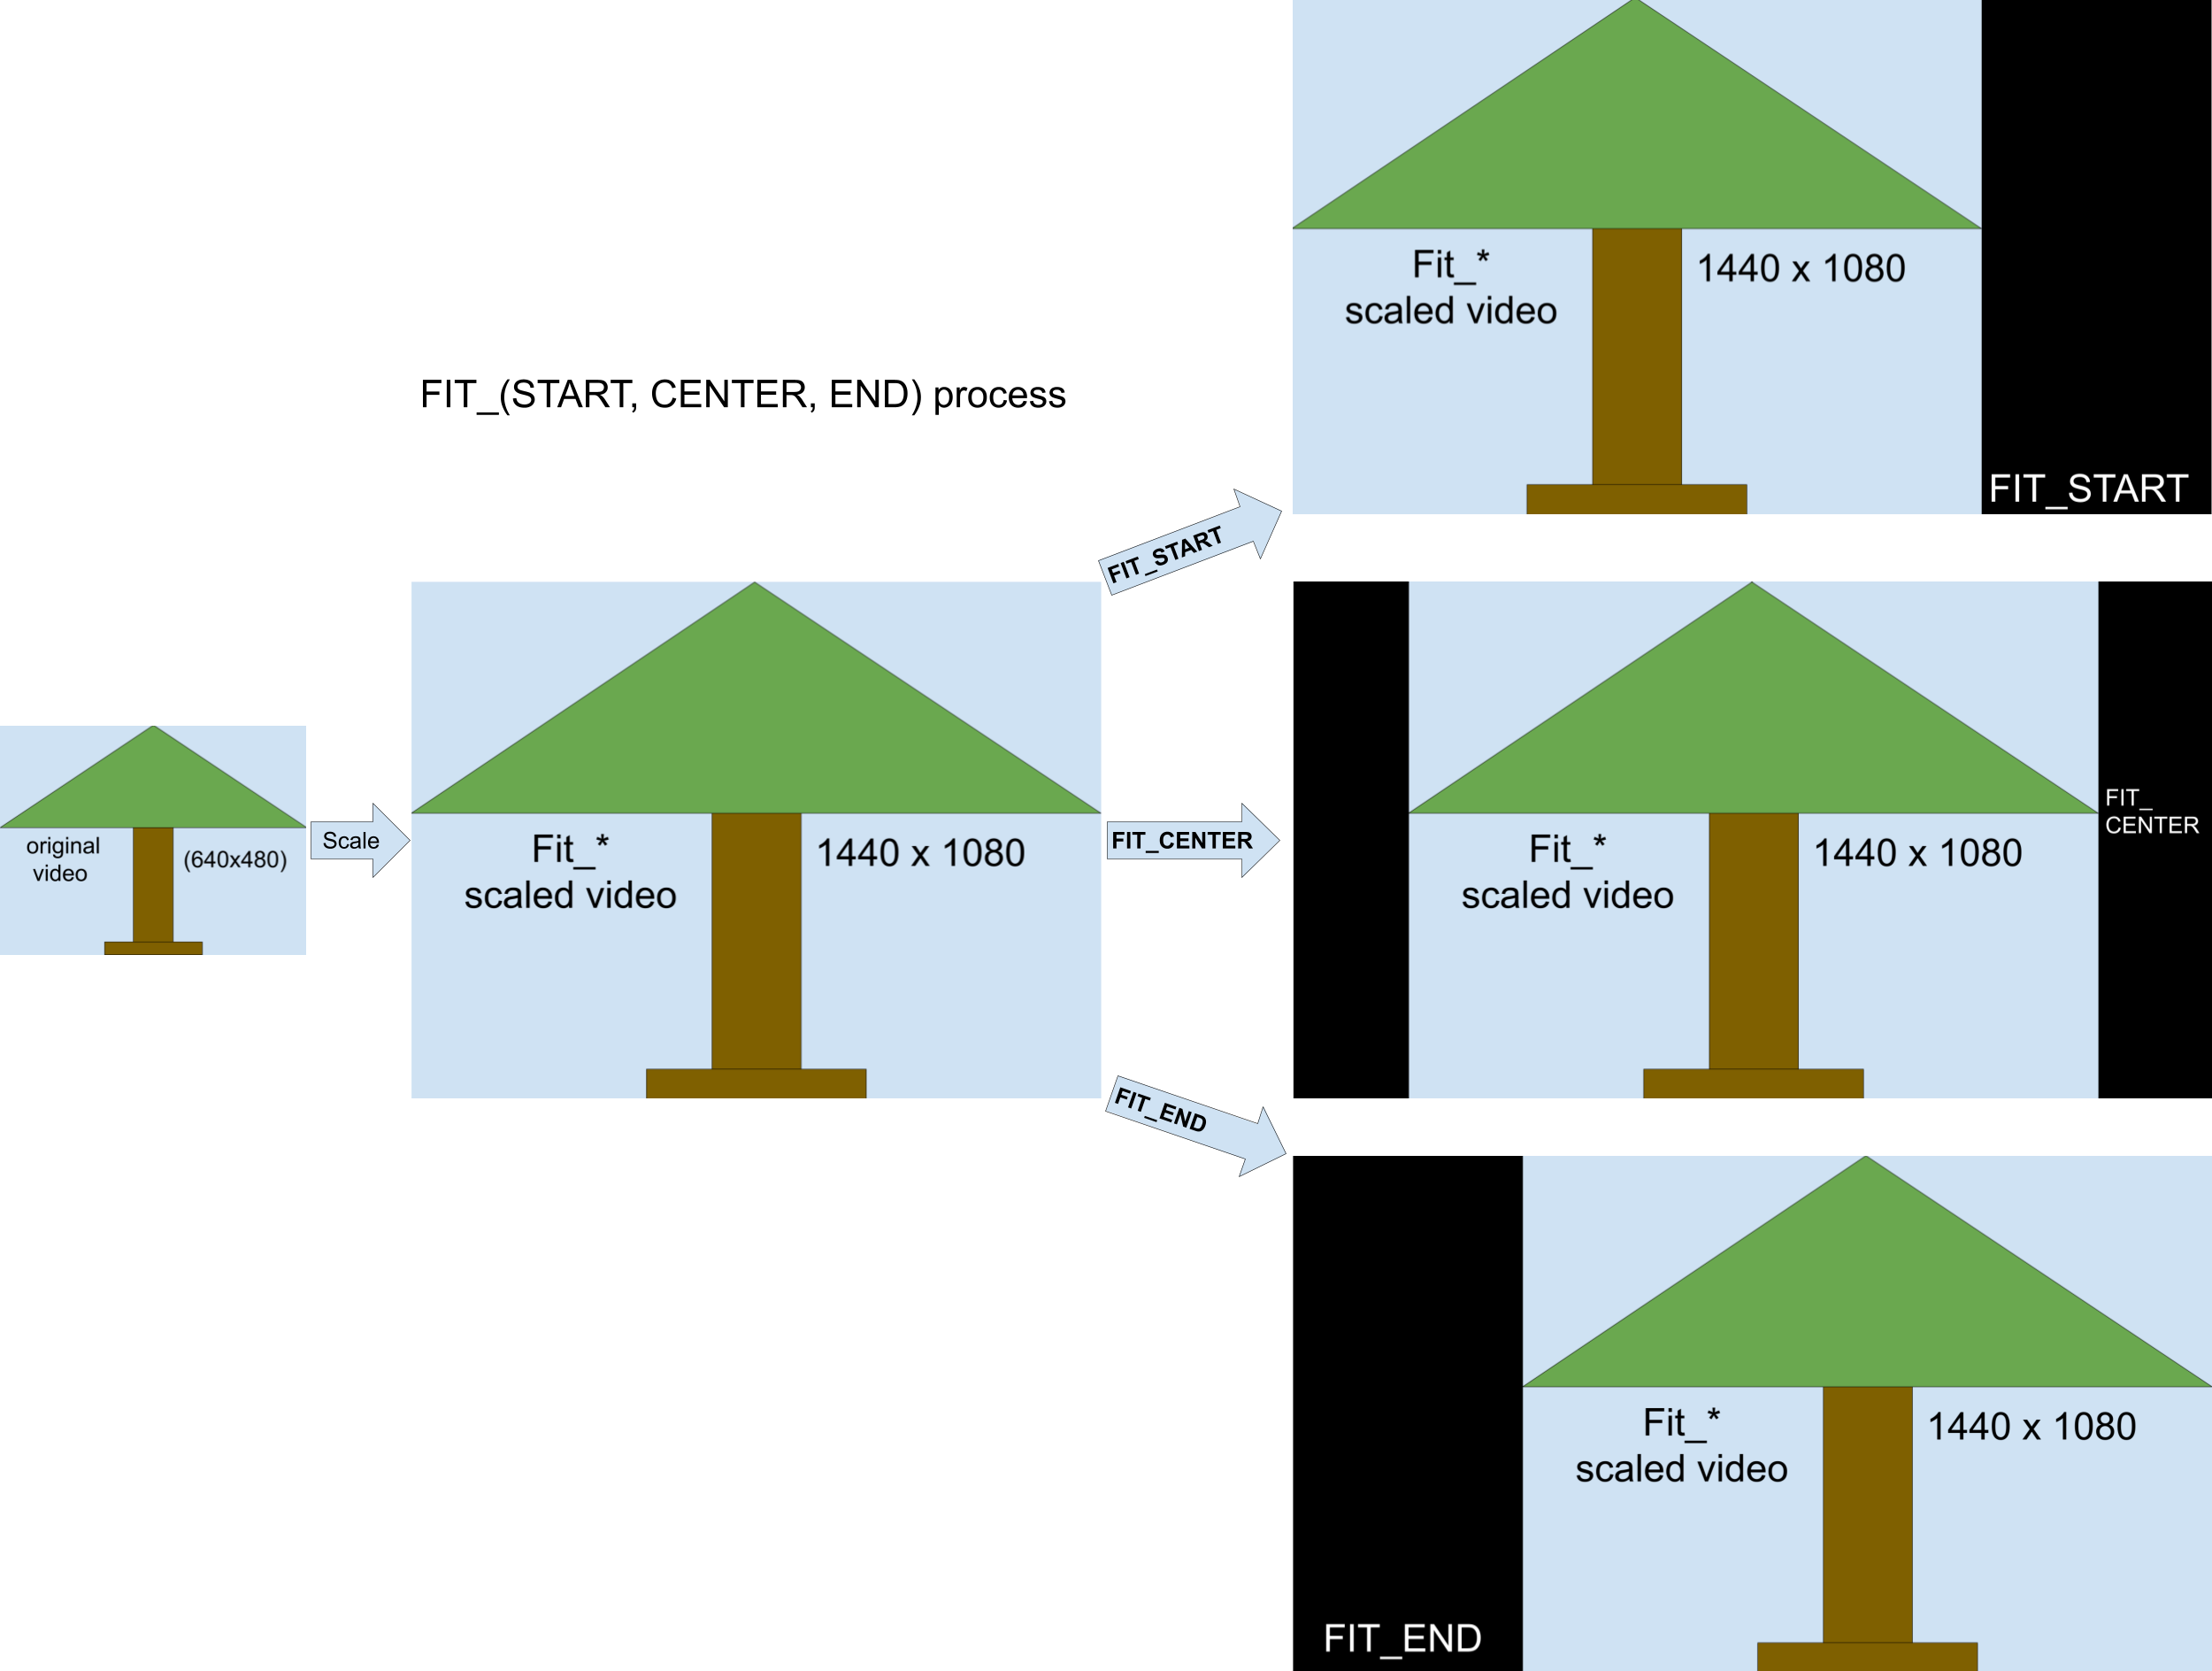
The process works like this:
- Scale the video frame (maintaining the original aspect ratio) with
min(1920/640, 1080/480) = 2.25to get an intermediate video frame of 1440x1080. - Align the 1440x1080 video frame with the 1920x1080
PreviewView.- For
FIT_CENTER, align the video frame with the center of thePreviewViewwindow. The starting and ending 240 pixel columns of thePreviewVieware blank. - For
FIT_START, align the video frame with the start (top-left corner) of thePreviewViewwindow. The ending 480 pixel columns of thePreviewVieware blank. - For
FIT_END, align the video frame with the end (bottom-right corner) of thePreviewViewwindow. The starting 480 pixel columns of thePreviewVieware blank.
- For
The following image shows the FILL_START / FILL_CENTER / FILL_END
scaling process:

The process works like this:
- Scale the video frame with
max(1920/640, 1080/480) = 3to get an intermediate video frame of 1920x1440 (which is larger than the size of thePreviewView). - Crop the 1920x1440 video frame to fit the 1920x1080
PreviewViewwindow.- For
FILL_CENTER, crop 1920x1080 from the center of the 1920x1440 scaled video. The top and bottom 180 lines of video are not visible. - For
FILL_START, crop 1920x1080 from the start of the 1920x1440 scaled video. The bottom 360 lines of video are not visible. - For
FILL_END, crop 1920x1080 from the end of the 1920x1440 scaled video. The top 360 lines of video are not visible.
- For
Additional resources
To learn more about CameraX, see the following additional resources.
Codelab
Code sample