
このガイドの手順に沿って、C / C++ コードでアプリのアセットパックにアクセスします。
ネイティブ向けのビルド
プロジェクトの Android App Bundle に Play Asset Delivery を組み込む手順は次のとおりです。この手順で Android Studio を使用する必要はありません。
プロジェクトの
build.gradleファイル内の Android Gradle プラグインのバージョンを4.0.0以降に更新します。プロジェクトの最上位ディレクトリに、Asset Pack のディレクトリを作成します。このディレクトリ名はアセットパック名として使用されます。アセットパック名の先頭は英字にしてください。その後には、英字、数字、アンダースコアのみ使用できます。
アセットパックのディレクトリに
build.gradleファイルを作成し、下記のコードを入力します。Asset Pack の名前と配信タイプを 1 つだけ指定します。// In the asset pack’s build.gradle file: plugins { id 'com.android.asset-pack' } assetPack { packName = "asset-pack-name" // Directory name for the asset pack dynamicDelivery { deliveryType = "[ install-time | fast-follow | on-demand ]" } }
プロジェクトのアプリの
build.gradleファイルで、下記のように、プロジェクト内の各 Asset Pack の名前を追加します。// In the app build.gradle file: android { ... assetPacks = [":asset-pack-name", ":asset-pack2-name"] }
プロジェクトの
settings.gradleファイルに、下記のように、プロジェクト内のすべての Asset Pack をインクルードします。// In the settings.gradle file: include ':app' include ':asset-pack-name' include ':asset-pack2-name'
Asset Pack のディレクトリにサブディレクトリ
src/main/assetsを作成します。アセットを
src/main/assetsディレクトリに配置します。ここでもサブディレクトリを作成できます。アプリのディレクトリ構造は次のようになります。build.gradlesettings.gradleapp/asset-pack-name/build.gradleasset-pack-name/src/main/assets/your-asset-directories
Gradle を使用して Android App Bundle をビルドします。生成された App Bundle のルートレベルのディレクトリには、以下が含まれるようになりました。
asset-pack-name/manifest/AndroidManifest.xml: Asset Pack の識別子と配信モードを設定しますasset-pack-name/assets/your-asset-directories: Asset Pack の一部として配信されるすべてのアセットを含むディレクトリです
Gradle は各 Asset Pack のマニフェストを生成し、
assets/ディレクトリを出力してくれます。(省略可)さまざまなテクスチャ圧縮形式をサポートするように App Bundle を構成します。
Play Asset Delivery Library と統合する
アクセスするアセットパックの配信タイプに応じて、この API を実装します。Asset Pack にアクセスする手順を次のフローチャートに示します。
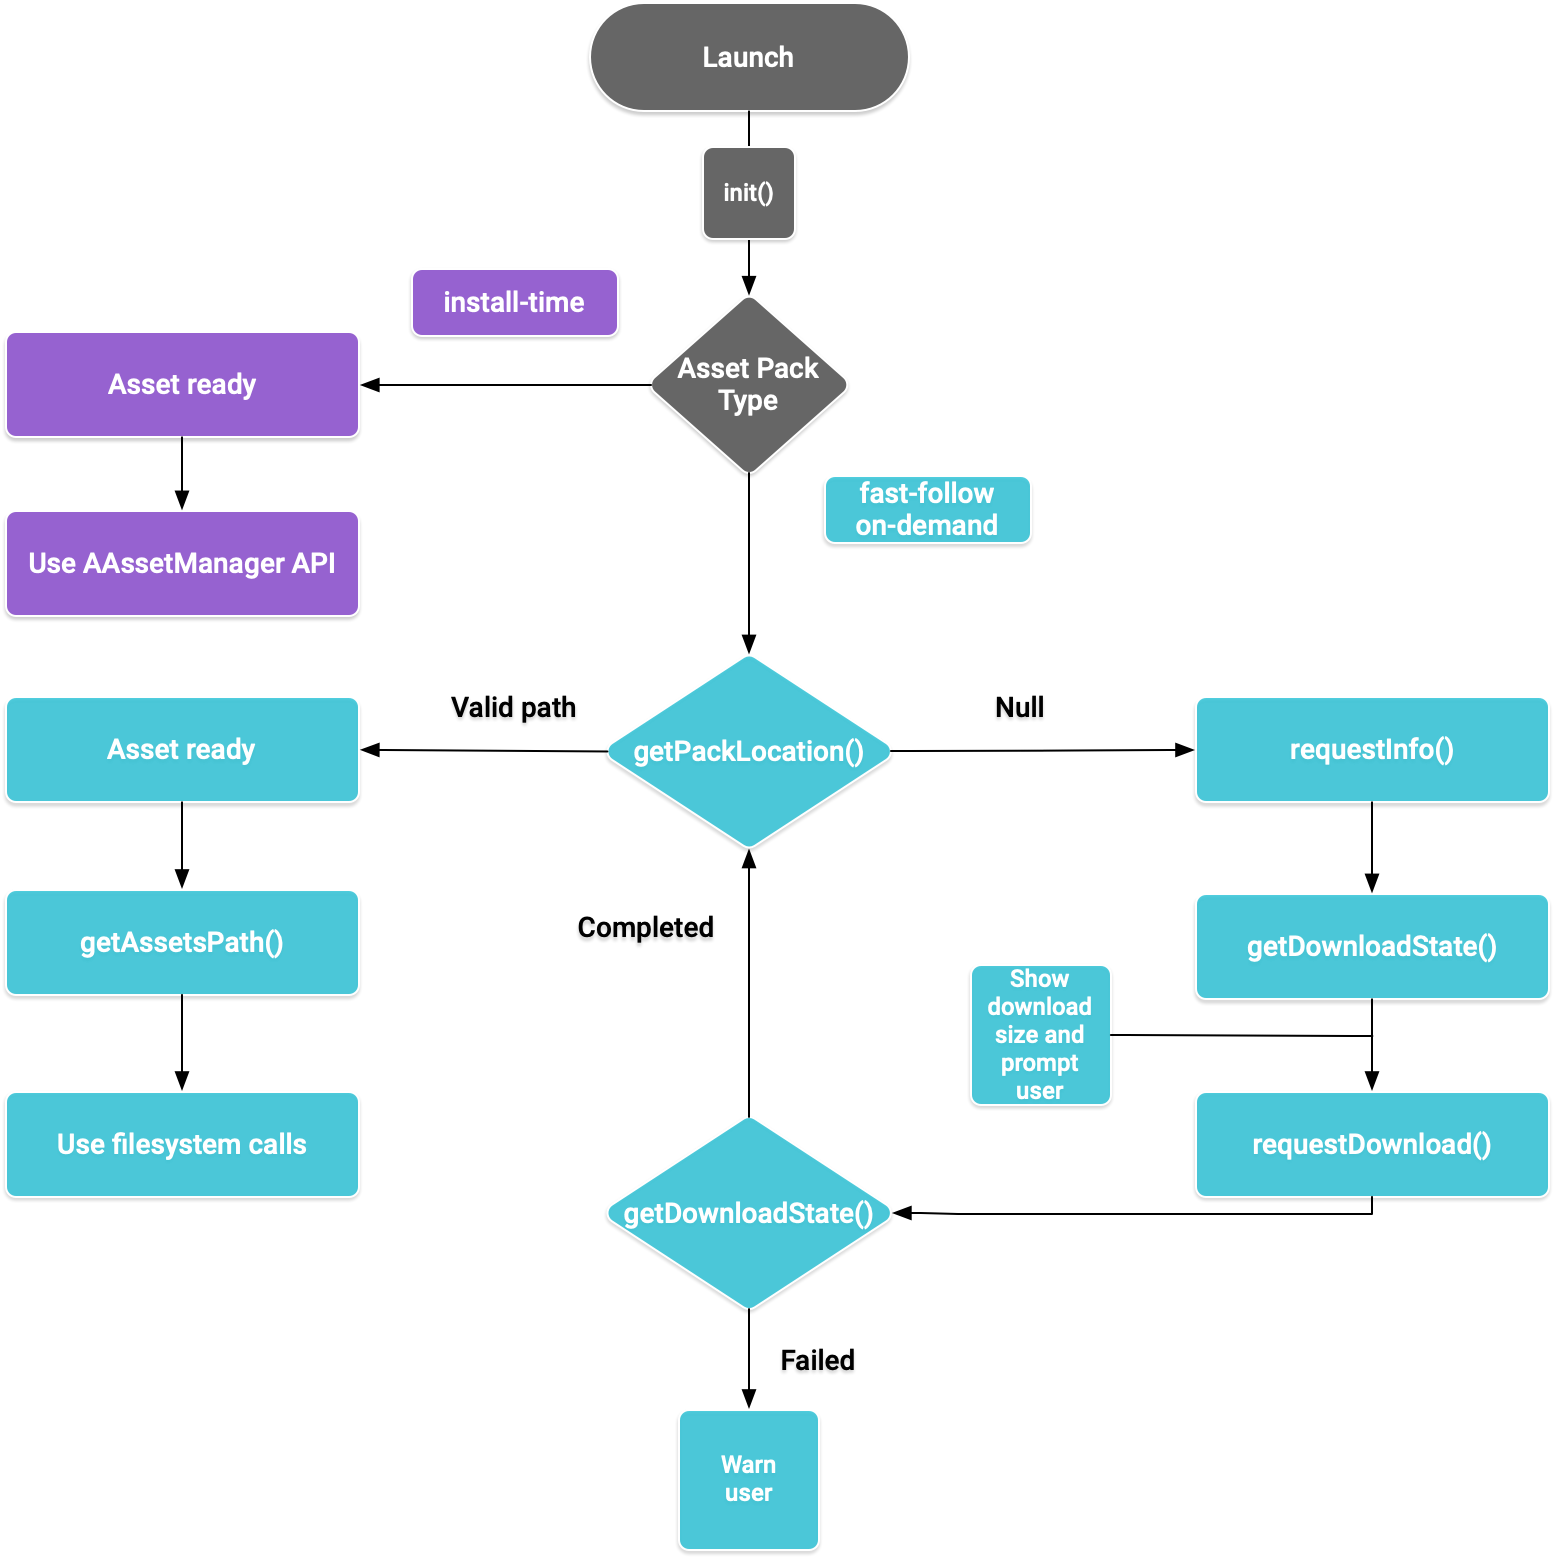
図 1:アセットパックへのアクセスのフロー図
Play Core Native SDK には、アセットパックのリクエスト、ダウンロードの管理、アセットへのアクセスのための C ヘッダー ファイル play/asset_pack.h が用意されています。
Play Core Native SDK 用に開発環境をセットアップする
ダウンロード Play Core Native SDK
ダウンロードする前に、次の利用規約に同意する必要があります。
利用規約
Last modified: September 24, 2020- By using the Play Core Software Development Kit, you agree to these terms in addition to the Google APIs Terms of Service ("API ToS"). If these terms are ever in conflict, these terms will take precedence over the API ToS. Please read these terms and the API ToS carefully.
- For purposes of these terms, "APIs" means Google's APIs, other developer services, and associated software, including any Redistributable Code.
- “Redistributable Code” means Google-provided object code or header files that call the APIs.
- Subject to these terms and the terms of the API ToS, you may copy and distribute Redistributable Code solely for inclusion as part of your API Client. Google and its licensors own all right, title and interest, including any and all intellectual property and other proprietary rights, in and to Redistributable Code. You will not modify, translate, or create derivative works of Redistributable Code.
- Google may make changes to these terms at any time with notice and the opportunity to decline further use of the Play Core Software Development Kit. Google will post notice of modifications to the terms at https://developer.android.com/guide/playcore/license. Changes will not be retroactive.
次のいずれかの操作を行います。
- Android Studio バージョン 4.0 以降をインストールし、SDK Manager UI を使用して Android SDK Platform バージョン 10.0(API レベル 29)をインストールする。
- Android SDK コマンドライン ツールをインストールし、
sdkmanagerを使用して Android SDK Platform バージョン 10.0(API レベル 29)をインストールする。
Android Studio をネイティブ開発で使用できるようにするため、SDK Manager を使用して最新の CMake と Android Native Development Kit(NDK)をインストールします。ネイティブ プロジェクトの作成やインポートの詳細については、NDK のスタートガイドをご覧ください。
zip ファイルをダウンロードして、プロジェクトと同じ場所に展開します。
ダウンロード リンク サイズ SHA-256 チェックサム 54.8 MiB 008b8fedc6179a6dc6ccc21af75591afc7036f78f3d5559d844f1b923934fef0 アプリの
build.gradleファイルを以下のように更新します。Groovy
    // App build.gradle

    plugins {
      id 'com.android.application'
    }

    // Define a path to the extracted Play Core SDK files.
    // If using a relative path, wrap it with file() since CMake requires absolute paths.
    def playcoreDir = file('../path/to/playcore-native-sdk')

    android {
        defaultConfig {
            ...
            externalNativeBuild {
                cmake {
                    // Define the PLAYCORE_LOCATION directive.
                    arguments "-DANDROID_STL=c++_static",
                              "-DPLAYCORE_LOCATION=$playcoreDir"
                }
            }
            ndk {
                // Skip deprecated ABIs. Only required when using NDK 16 or earlier.
                abiFilters 'armeabi-v7a', 'arm64-v8a', 'x86', 'x86_64'
            }
        }
        buildTypes {
            release {
                // Include Play Core Library proguard config files to strip unused code while retaining the Java symbols needed for JNI.
                proguardFile '$playcoreDir/proguard/common.pgcfg'
                proguardFile '$playcoreDir/proguard/gms_task.pgcfg'
                proguardFile '$playcoreDir/proguard/per-feature-proguard-files'
                ...
            }
            debug {
                ...
            }
        }
        externalNativeBuild {
            cmake {
                path 'src/main/CMakeLists.txt'
            }
        }
    }

    dependencies {
        // Import these feature-specific AARs for each Google Play Core library.
        implementation 'com.google.android.play:app-update:2.1.0'
        implementation 'com.google.android.play:asset-delivery:2.3.0'
        implementation 'com.google.android.play:integrity:1.6.0'
        implementation 'com.google.android.play:review:2.0.2'

        // Import these common dependencies.
        implementation 'com.google.android.gms:play-services-tasks:18.0.2'
        implementation files("$playcoreDir/playcore-native-metadata.jar")
        ...
    }
Kotlin
// App build.gradle

plugins {
    id("com.android.application")
}

// Define a path to the extracted Play Core SDK files.
// If using a relative path, wrap it with file() since CMake requires absolute paths.
val playcoreDir = file("../path/to/playcore-native-sdk")

android {
    defaultConfig {
        ...
        externalNativeBuild {
            cmake {
                // Define the PLAYCORE_LOCATION directive.
                arguments += listOf("-DANDROID_STL=c++_static", "-DPLAYCORE_LOCATION=$playcoreDir")
            }
        }
        ndk {
            // Skip deprecated ABIs. Only required when using NDK 16 or earlier.
            abiFilters.clear()
            abiFilters += listOf("armeabi-v7a", "arm64-v8a", "x86", "x86_64")
        }
    }
    buildTypes {
        release {
            // Include Play Core Library proguard config files to strip unused code while retaining the Java symbols needed for JNI.
            proguardFile("$playcoreDir/proguard/common.pgcfg")
            proguardFile("$playcoreDir/proguard/gms_task.pgcfg")
            proguardFile("$playcoreDir/proguard/per-feature-proguard-files")
            ...
        }
        debug {
            ...
        }
    }
    externalNativeBuild {
        cmake {
            path = "src/main/CMakeLists.txt"
        }
    }
}

dependencies {
    // Import these feature-specific AARs for each Google Play Core library.
    implementation("com.google.android.play:app-update:2.1.0")
    implementation("com.google.android.play:asset-delivery:2.3.0")
    implementation("com.google.android.play:integrity:1.6.0")
    implementation("com.google.android.play:review:2.0.2")

    // Import these common dependencies.
    implementation("com.google.android.gms:play-services-tasks:18.0.2")
    implementation(files("$playcoreDir/playcore-native-metadata.jar"))
    ...
}
アプリの
CMakeLists.txtファイルを以下のように更新します。cmake_minimum_required(VERSION 3.6) ... # Add a static library called “playcore” built with the c++_static STL. include(${PLAYCORE_LOCATION}/playcore.cmake) add_playcore_static_library() // In this example “main” is your native code library, i.e. libmain.so. add_library(main SHARED ...) target_include_directories(main PRIVATE ${PLAYCORE_LOCATION}/include ...) target_link_libraries(main android playcore ...)
データの収集
Play Core Native SDK は、Google がサービスを改善する目的で、バージョンに関連する次のようなデータを収集することがあります。
- アプリのパッケージ名
- アプリのパッケージ バージョン
- Play Core Native SDK のバージョン
このデータは、アプリ パッケージを Google Play Console にアップロードする際に収集されます。データ収集のプロセスを無効にするには、build.gradle ファイル内の $playcoreDir/playcore-native-metadata.jar インポートを削除します。
Play Core Native SDK の使用と Google による収集データの使用に関連するこのデータ収集は、Google Play Console にアプリ パッケージをアップロードする際に Gradle で宣言されるライブラリ依存関係の Google のデータ収集とは別のものであり、相互の関係はありません。
インストール時の配信
install-time として設定された Asset Pack は、アプリの起動時にすぐに利用できます。このモードで配信されるアセットにアクセスするには、NDK AAssetManager API を使用します。
#include <android/asset_manager.h>
#include <android_native_app_glue.h>
...
AAssetManager* assetManager = app->activity->assetManager;
AAsset* asset = AAssetManager_open(assetManager, "asset-name", AASSET_MODE_BUFFER);
size_t assetLength = AAsset_getLength(asset);
char* buffer = (char*) malloc(assetLength + 1);
AAsset_read(asset, buffer, assetLength);
fast-follow 配信と on-demand 配信
以下のセクションでは、API を初期化する方法、Asset Pack に関する情報をダウンロード前に取得する方法、API を呼び出してダウンロードを開始する方法、ダウンロードしたパックにアクセスする方法について説明します。このセクションは、fast-follow と on-demand の Asset Pack を対象としています。
アプリを起動
他の関数を呼び出す前に、必ず AssetPackManager_init() を呼び出して Asset Pack API を初期化します。Asset Pack のエラーコードがないか確認します。
#include "play/asset_pack.h"
...
AssetPackErrorCode AssetPackManager_init(JavaVM* jvm, jobject android_context);
また、次の関数は必ず ANativeActivityCallbacks の onPause() と onResume() で呼び出してください。
Asset Pack のダウンロード情報を取得
アプリは、アセットパックを取得する前に、ダウンロード サイズを開示する必要があります。ダウンロードのサイズを確認し、パックがすでにダウンロード中かどうかを判別するための
非同期リクエストを開始するには、AssetPackManager_requestInfo() 関数を使用します。次に、
AssetPackManager_getDownloadState() を使用してダウンロード状態をポーリングします
(たとえば、ゲームループ内のフレームごとにこの関数を 1 回呼び出します)。リクエストが失敗した場合、アセットパックのエラーコードを確認します。
AssetPackErrorCode AssetPackManager_requestInfo();      // Call once
AssetPackErrorCode AssetPackManager_getDownloadState(); // Call once per frame in your game loop
The AssetPackManager_getDownloadState() 関数は、不透明型
AssetPackDownloadState
を出力ポインタとして返します。このポインタを使用して、次の関数を呼び出します。
AssetPackDownloadState* state;
AssetPackErrorCode error_code = AssetPackManager_getDownloadState(asset-pack-name, &state);
AssetPackDownloadStatus status = AssetPackDownloadState_getStatus(state);
uint64_t downloadedBytes = AssetPackDownloadState_getBytesDownloaded(state);
uint64_t totalBytes = AssetPackDownloadState_getTotalBytesToDownload(state));
AssetPackDownloadState_destroy(state);
インストール
Asset Pack の最初のダウンロードや、Asset Pack を更新して完了するためのリクエストを行うには、AssetPackManager_requestDownload() を使用します。
AssetPackErrorCode AssetPackManager_requestDownload();  // Call once
AssetPackErrorCode AssetPackManager_getDownloadState(); // Call once per frame in your game loop
AssetPackManager_getDownloadState() 関数は、不透明型の AssetPackDownloadState を返します。この型の使用方法については、ダウンロード情報を取得をご覧ください。
大規模なダウンロード
ダウンロードのサイズが 200 MB を超えていて、ユーザーが Wi-Fi に接続していない場合、モバイルデータ通信でダウンロードを続行することにユーザーが明示的に同意するまで、ダウンロードは開始されません。同様に、ダウンロードのサイズが大きく、ユーザーの Wi-Fi 接続が切断された場合は、ダウンロードが一時停止され、モバイルデータ通信を使用してダウンロードを続行するにはユーザーの明示的な同意が必要になります。一時停止されたパックは WAITING_FOR_WIFI の状態になります。ユーザーに同意を求める UI フローをトリガーするには、次の関数を使用します。
ユーザーの確認が必要
パックが REQUIRES_USER_CONFIRMATION ステータスの場合、AssetPackManager_showConfirmationDialog() で表示されるダイアログをユーザーが受け入れるまで、ダウンロードは続行されません。このステータスは、アプリが Google Play で認識されない場合に発生することがあります。この場合、AssetPackManager_showConfirmationDialog() を呼び出すと、アプリが更新されます。更新後、アセットを再度リクエストします。
アセットパックにアクセスする
ダウンロード リクエストが COMPLETED 状態になった後、ファイル システム呼び出しを使用して Asset Pack にアクセスできます。各 Asset Pack は、アプリの内部ストレージ内の個別のディレクトリに保存されます。AssetPackManager_getAssetPackLocation() を使用して、指定した Asset Pack の AssetPackLocation を取得します。その場所で AssetPackLocation_getStorageMethod() を使用して格納方法を確認します。
ASSET_PACK_STORAGE_APK: Asset Pack は APK としてインストールされます。これらのアセットにアクセスするには、install-time 配信をご覧ください。ASSET_PACK_STORAGE_FILES:AssetPackLocation_getAssetsPath()を使用して、アセットが格納されているディレクトリへのファイルパスを取得します。アセットがダウンロードされていない場合は null が返されます。このファイルパスでは、ダウンロードしたファイルを変更しないでください。
AssetPackLocation* location;

AssetPackErrorCode error_code = AssetPackManager_getAssetPackLocation(asset-pack-name, &location);

if (error_code == ASSET_PACK_NO_ERROR) {
    AssetPackStorageMethod storage_method = AssetPackLocation_getStorageMethod(location);
    const char* assets_path = AssetPackLocation_getAssetsPath(location);
    AssetPackLocation_destroy(location);
}
アセットが見つかったら、fopen や ifstream などの関数を使用してファイルにアクセスします。
その他の Play Core API メソッド
アプリで使用できるその他の API メソッドを次にいくつか示します。
リクエストをキャンセルする
アクティブなアセットパック リクエストをキャンセルするには、AssetPackManager_cancelDownload() を使用します。このリクエストはベスト エフォート型のオペレーションです。
削除をリクエスト
アセットパックの削除をスケジュールするには、
AssetPackManager_requestRemoval()
を使用します。
次のステップ
Play Asset Delivery をローカルおよび Google Play からテストします。