
Introduction
Play for On-device AI brings the benefits of Android App Bundles and Google Play delivery to custom ML model distribution so you can improve model performance with less device ecosystem complexity at no additional cost. It lets you publish a single artifact to Play containing your code, assets, and ML models and to choose from a number of delivery modes and targeting options.
Benefits
- Upload a single publishing artifact to Google Play and delegate hosting, delivery, updates, and targeting to Play at no additional cost.
- Deliver your ML models at install-time, fast-follow, or on-demand.
- Install-time delivery can guarantee that a very large model is present when your app is opened. Your model will be installed as an APK.
- Fast-follow delivery occurs automatically in the background after your app has been installed. Users may open your app before your model has been fully downloaded. Your model will be downloaded to your app's internal storage space.
- On-demand delivery lets you request the model at runtime, which is useful if the model is only required for certain user-flows. Your model will be downloaded to your app's internal storage space.
- Deliver variants of your ML models that are targeted to specific devices based on device model, system properties, or RAM.
- Keep app updates small and optimized with Play's automatic patching, which means only the differences in files need to be downloaded.
Considerations
- By using Play for On-device AI you agree to the terms in the Google Play Developer Distribution Agreement and the Play Core Software Development Kit Terms of Service.
- Models downloaded by Play for On-device AI should only be used by your apps. Models shouldn't be offered to other apps.
- Individual AI packs can be up to 1.5GB, based on their compressed download sizes. The maximum cumulative app size of any version of your app generated from your app bundle is 4GB.
- Apps over 1GB in size must set min SDK Level to 21 or higher.
How to use Play for On-device AI
Play for On-device AI uses AI packs. You package custom models that are ready for distribution in AI packs in your app bundle. You can choose whether the AI pack should be delivered at install-time, fast-follow, or on-demand.
By packaging AI packs with your app bundle, you can use all of Play's existing testing and release tools, such as test tracks and staged rollouts to manage your app's distribution with your custom models.
AI packs are updated together with the app binary. If your new app release doesn't make changes to an AI pack, then Play's automatic patching process will ensure the user doesn't have to re-download it. Play will just download what's changed when it updates the app.
AI packs only contain models. Java/Kotlin and native libraries are not allowed. If you need to ship libraries or code to run your ML model, move it into the base module or a feature module. You can configure your feature module so that it has the same download and targeting settings as the AI pack.
Use LiteRT and MediaPipe with AI packs
You can use LiteRT and MediaPipe with AI packs. Package your model in an AI pack and then access it using the instructions for install-time packs or for fast-follow and on-demand packs.
Further reading:
- Getting started with LiteRT
- The sample app shows how you can package a LiteRT model in an AI pack and load it at runtime.
- There are many pretrained LiteRT models that you can use in AI packs to get started.
- Getting started with MediaPipe
- For fast-follow and on-demand packs, you can use
AssetCache.java
to load your assets (eg.
.binarypbfiles) by their file paths. - For install-time packs, you can use AndroidAssetUtil.java.
- For fast-follow and on-demand packs, you can use
AssetCache.java
to load your assets (eg.
Get started with AI packs
At a high level, here's how you can start using Play for On-device AI:
- Package your models into AI packs into your Android App Bundle and specify how the AI packs should be delivered.
- [Optional] If you want to deliver different models to different devices, you can configure device targeting for your AI packs. For example, you could deliver AI pack A to a specific device model, AI pack B to devices with at least 6GB of RAM, and all other devices could receive no model.
- [Optional] If you're using on-demand or fast-follow delivery, integrate the Play AI Delivery Library into your app to download your AI packs as needed.
- Test and release your app bundle to Google Play.
Check Android Gradle Plugin version
To use AI packs, ensure that your Android Gradle Plugin (AGP) version is at least 8.8. This version is packaged with Android Studio Ladybug 2.
Extract your model into an AI pack
Android Studio is not required for the following steps.
- In the top-level directory of your project, create a directory for the AI pack. This directory name is used as the AI pack name. AI pack names must start with a letter and can only contain letters, numbers, and underscores.
In the AI pack directory, create a
build.gradlefile and add the following code. Make sure to specify the name of the AI pack and only one delivery type:// In the AI pack's build.gradle file: plugins { id 'com.android.ai-pack' } aiPack { packName = "ai-pack-name" // Directory name for the AI pack dynamicDelivery { deliveryType = "[ install-time | fast-follow | on-demand ]" } }In the project's app
build.gradlefile, add the name of every AI pack in your project as shown below:// In the app build.gradle file: android { ... assetPacks = [":ai-pack-name", ":ai-pack2-name"] }In the project's
settings.gradlefile, include all AI packs in your project as shown below:// In the settings.gradle file: include ':app' include ':ai-pack-name' include ':ai-pack2-name'Inside your AI pack, create a
src/main/assets/directory.Place your models in the
src/main/assetsdirectory. You can create subdirectories in here as well. The directory structure for your app should now look like the following:build.gradlesettings.gradleapp/ai-pack-name/build.gradleai-pack-name/src/main/assets/your-model-directories
Add code to load and run your models. How you do this will depend on the delivery mode of your AI packs. See instructions for install-time and fast-follow/on-demand below.
[Optional] Configure device targeting to deliver different models to different devices.
Build the Android App Bundle with Gradle. In the generated app bundle, the root-level directory now includes the following:
ai-pack-name/manifest/AndroidManifest.xml: Configures the AI pack's identifier and delivery modeai-pack-name/assets/your-model-directories: Directory that contains all assets delivered as part of the AI pack
Gradle generates the manifest for each AI pack and outputs the
assets/directory for you.
Configure install-time delivery
AI packs configured as install-time are immediately available at app launch. Use the Java AssetManager API to access AI packs served in this mode:
import android.content.res.AssetManager;
...
Context context = createPackageContext("com.example.app", 0);
AssetManager assetManager = context.getAssets();
InputStream is = assetManager.open("model-name");
Configure fast-follow and on-demand delivery
To download AI packs with fast-follow or on-demand delivery, use the Play AI Delivery Library.
Declare dependency on the Play AI Delivery Library
In your app's build.gradle file, declare a dependency on the Play AI Delivery
Library:
dependencies {
  ...
  implementation "com.google.android.play:ai-delivery:0.1.1-alpha01"
}
Check status
Each AI pack is stored in a separate folder in the app's internal storage. Use
the
getPackLocation()
method to determine the root folder of an AI pack. This method returns the
following values:
| Return value | Status |
|---|---|
A valid AiPackLocation object |
AI pack root folder is ready for immediate access at assetsPath() |
null |
Unknown AI pack or AI packs are not available |
Get download information about AI packs
Use the
getPackStates()
method to determine the size of the download and whether the pack is already
downloading.
Task<AiPackStates> getPackStates(List<String> packNames)
getPackStates() is an asynchronous method that returns a Task<AiPackStates>.
The
packStates()
method of an AiPackStates object returns a Map<String, AiPackState>. This
map contains the state of each requested AI pack, keyed by its name:
Map<String, AiPackState> AiPackStates#packStates()
The final request is shown by the following:
final String aiPackName = "myAiPackName";

aiPackManager
    .getPackStates(Collections.singletonList(aiPackName))
    .addOnCompleteListener(new OnCompleteListener<AiPackStates>() {
        @Override
        public void onComplete(Task<AiPackStates> task) {
            AiPackStates aiPackStates;
            try {
                aiPackStates = task.getResult();
                AiPackState aiPackState =
                    aiPackStates.packStates().get(aiPackName);
            } catch (RuntimeExecutionException e) {
                Log.d("MainActivity", e.getMessage());
                return;
            });
The following
AiPackState
methods provide the size of the AI pack, the downloaded amount so far (if
requested), and the amount already transferred to the app:
To get the status of an AI pack, use the
status()
method, which returns the status as an integer that corresponds to a constant
field in the
AiPackStatus
class. An AI pack that's not installed yet has the status
AiPackStatus.NOT_INSTALLED.
If a request fails, use the
errorCode()
method, whose return value corresponds to a constant field in the
AiPackErrorCode
class.
Install
Use the
fetch()
method to download an AI pack for the first time or call for the update of an AI
pack to complete:
Task<AiPackStates> fetch(List<String> packNames)
This method returns an
AiPackStates
object containing a list of packs and their initial download states and sizes.
If an AI pack requested via fetch() is already downloading, the download
status is returned and no additional download is started.
Monitor download states
You should implement an
AiPackStateUpdateListener
to track the installation progress of AI packs. The status updates are broken
down per pack to support tracking the status of individual AI packs. You can
start using available AI packs before all other downloads for your request have
completed.
void registerListener(AiPackStateUpdateListener listener)
void unregisterListener(AiPackStateUpdateListener listener)
Large downloads
If the download is larger than 200 MB and the user is not on Wi-Fi, the download
does not start until the user explicitly gives their consent to proceed with the
download using a mobile data connection. Similarly, if the download is large and
the user loses Wi-Fi, the download is paused and explicit consent is required to
proceed using a mobile data connection. A paused pack has state
WAITING_FOR_WIFI. To trigger the UI flow to prompt the user for consent, use
the
showConfirmationDialog()
method.
Note that if the app does not call this method, the download is paused and will resume automatically only when the user is back on a Wi-Fi connection.
Required user confirmation
If a pack has the REQUIRES_USER_CONFIRMATION status, the download won't
proceed until the user accepts the dialog that is shown with
showConfirmationDialog().
This status can occur when the app is not recognized by Play—for example, if the
app was sideloaded. Note that calling
showConfirmationDialog()
in this case will cause the app to be updated. After the update, you will need
to request the AI packs again.
The following is an example implementation of a listener:
AiPackStateUpdateListener aiPackStateUpdateListener = new AiPackStateUpdateListener() {
    private final ActivityResultLauncher<IntentSenderRequest> activityResultLauncher =
      registerForActivityResult(
          new ActivityResultContracts.StartIntentSenderForResult(),
          new ActivityResultCallback<ActivityResult>() {
            @Override
            public void onActivityResult(ActivityResult result) {
              if (result.getResultCode() == RESULT_OK) {
                Log.d(TAG, "Confirmation dialog has been accepted.");
              } else if (result.getResultCode() == RESULT_CANCELED) {
                Log.d(TAG, "Confirmation dialog has been denied by the user.");
              }
            }
          });

    @Override
    public void onStateUpdate(AiPackState aiPackState) {
      switch (aiPackState.status()) {
        case AiPackStatus.PENDING:
          Log.i(TAG, "Pending");
          break;

        case AiPackStatus.DOWNLOADING:
          long downloaded = aiPackState.bytesDownloaded();
          long totalSize = aiPackState.totalBytesToDownload();
          double percent = 100.0 * downloaded / totalSize;

          Log.i(TAG, "PercentDone=" + String.format("%.2f", percent));
          break;

        case AiPackStatus.TRANSFERRING:
          // 100% downloaded and assets are being transferred.
          // Notify user to wait until transfer is complete.
          break;

        case AiPackStatus.COMPLETED:
          // AI pack is ready to use. Run the model.
          break;

        case AiPackStatus.FAILED:
          // Request failed. Notify user.
          Log.e(TAG, aiPackState.errorCode());
          break;

        case AiPackStatus.CANCELED:
          // Request canceled. Notify user.
          break;

        case AiPackStatus.WAITING_FOR_WIFI:
        case AiPackStatus.REQUIRES_USER_CONFIRMATION:
          if (!confirmationDialogShown) {
            aiPackManager.showConfirmationDialog(activityResultLauncher);
            confirmationDialogShown = true;
          }
          break;

        case AiPackStatus.NOT_INSTALLED:
          // AI pack is not downloaded yet.
          break;
        case AiPackStatus.UNKNOWN:
          Log.wtf(TAG, "AI pack status unknown")
          break;
      }
    }
}
Alternatively, you can use the
getPackStates()
method to get the status of current downloads.
AiPackStates
contains the download progress, download status, and any failure error codes.
Access AI packs
You can access an AI pack using file system calls after the download request
reaches the
COMPLETED
state. Use the
getPackLocation()
method to get the root folder of the AI pack.
AI packs are stored in the assets directory within the AI pack root directory.
You can get the path to the assets directory by using the convenience method
assetsPath().
Use the following method to get the path to a specific asset:
private String getAbsoluteAiAssetPath(String aiPack, String relativeAiAssetPath) {
    AiPackLocation aiPackPath = aiPackManager.getPackLocation(aiPack);

    if (aiPackPath == null) {
        // AI pack is not ready
        return null;
    }

    String aiAssetsFolderPath = aiPackPath.assetsPath();
    // equivalent to: FilenameUtils.concat(aiPackPath.path(), "assets");
    String aiAssetPath = FilenameUtils.concat(aiAssetsFolderPath, relativeAiAssetPath);
    return aiAssetPath;
}
Configure device targeting
You can follow the device targeting instructions to specify devices or groups of devices that should receive your AI packs.
Other Play AI Delivery API methods
The following are some additional API methods you may want to use in your app.
Cancel request
Use
cancel()
to cancel an active AI pack request. Note that this request is a best-effort
operation.
Remove an AI pack
Use
removePack()
to schedule the removal of an AI pack.
Get locations of multiple AI packs
Use
getPackLocations()
to query the status of multiple AI packs in bulk, which returns a map of AI
packs and their locations. The map returned by getPackLocations() contains an
entry for each pack that is currently downloaded and up-to-date.
Device targeting
Device targeting gives you finer control over which parts of your app bundle are delivered to specific devices. For example, you could ensure that a large model is only delivered to devices with high RAM or you could deliver different versions of a model to different devices.
You can target device properties such as:
- System on chip
- Device model
- Device RAM
- System features
Overview of required steps
The following steps are required to enable device targeting:
- Define your device groups in an XML file.
- Specify which parts of your bundle should go to which device groups.
- [Optional] Test your configuration locally.
- Upload your bundle (containing the XML file) to Google Play.
Check Android Gradle Plugin version
To use device targeting, ensure that your Android Gradle Plugin (AGP) version is at least 8.10.0. This is packaged with Android Studio (Meerkat 2 and later). Download the latest stable version of Android Studio.
Enable this feature in Android Gradle Plugin
Device targeting must be enabled explicitly in your gradle.properties file:
android.experimental.enableDeviceTargetingConfigApi=true
Create a device targeting configuration XML file
The device targeting configuration file is an XML file in which you define your
custom device groups. For example, you could define a device group called
qti_v79 that contains all devices with the Qualcomm SM8750 system on chip:
<config:device-targeting-config
    xmlns:config="http://schemas.android.com/apk/config">

    <config:device-group name="qti_v79">
        <config:device-selector>
            <config:system-on-chip manufacturer="QTI" model="SM8750"/>
        </config:device-selector>
    </config:device-group>

</config:device-targeting-config>
A device group is composed of up to 5 device selectors. A device is included in a device group if it satisfies any of its device selectors.
A device selector can have one or more device properties. A device is selected if it matches all of the selector's device properties.
If a device matches multiple groups, it will be served the content for the group that is defined first in the XML file. The order you define groups in the XML file is your priority order.
If a device matches no groups, it will receive the default "other" group. This group is automatically generated and shouldn't be defined explicitly.
Available device properties
- device_ram: Device RAM requirements
- min_bytes (inclusive): Minimum required RAM (in bytes)
- max_bytes (exclusive): Maximum required RAM (in bytes)
- included_device_ids: Device models to be included in this selector
(max of 10000 device_ids per group). This property is satisfied if the
device matches any device_id in the list.
- build_brand: Device manufacturer
- build_device: Device model code
- excluded_device_ids: Device models to be excluded in this selector
(max of 10000 device_ids per group). This property is satisfied if the
device matches no device_id in the list.
- build_brand: Device manufacturer
- build_device: Device model code
required_system_features: Features that a device needs to have to be included by this selector (max of 100 features per group). A device needs to have all system features in this list to satisfy this property.
System feature reference
- name: A system feature
forbidden_system_features: Features that a device mustn't have to be included by this selector (max of 100 features per group). If a device has any of the system features in this list it doesn't satisfy this property.
System feature reference
- name: A system feature
system-on-chip: System on chips to be included in this selector. A device needs to have any chip in this list to satisfy this property.
- manufacturer: System on chip manufacturer
- model: System on chip model
Here is an example showing all possible device properties:
<config:device-targeting-config
    xmlns:config="http://schemas.android.com/apk/config">

    <config:device-group name="myCustomGroup1">
      <config:device-selector ram-min-bytes="8000000000">
        <config:included-device-id brand="google" device="redfin"/>
        <config:included-device-id brand="google" device="sailfish"/>
        <config:included-device-id brand="good-brand"/>
        <config:excluded-device-id brand="google" device="caiman"/>
        <config:system-on-chip manufacturer="Sinclair" model="ZX80"/>
        <config:system-on-chip manufacturer="Commodore" model="C64"/>
      </config:device-selector>
      <config:device-selector ram-min-bytes="16000000000"/>
    </config:device-group>

    <config:device-group name="myCustomGroup2">
      <config:device-selector ram-min-bytes="4000000000" ram-max-bytes="8000000000">
        <config:required-system-feature name="android.hardware.bluetooth"/>
        <config:required-system-feature name="android.hardware.location"/>
        <config:forbidden-system-feature name="android.hardware.camera"/>
        <config:forbidden-system-feature name="mindcontrol.laser"/>
      </config:device-selector>
    </config:device-group>

</config:device-targeting-config>
Official device manufacturer and device model codes
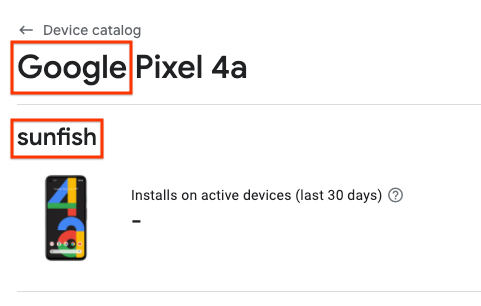
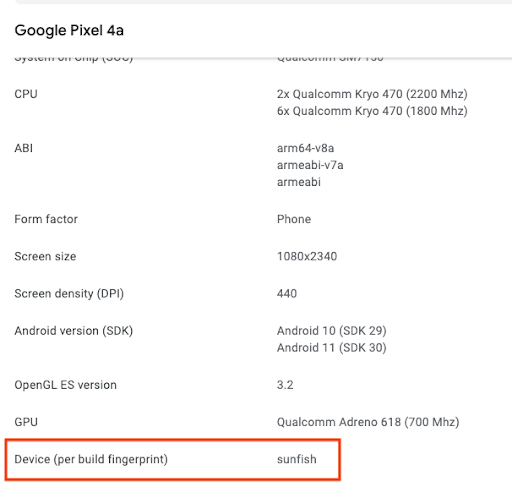
You can find the correct formatting for the device manufacturer and model code by using the Device Catalog on the Google Play Console, by either:
Inspecting individual devices using the Device Catalog, and finding the manufacturer and model code in the locations as shown in the example below (For a Google Pixel 4a, the manufacturer is "Google" and the model code is "sunfish")'
Downloading a CSV of supported devices, and using the Manufacturer and Model Code for the build_brand and build_device fields, respectively.
Include your device targeting configuration file in your app bundle
Add the following to your main module's build.gradle file:
android {
  ...
  bundle {
    deviceTargetingConfig = file('device_targeting_config.xml')
    deviceGroup {
      enableSplit = true   // split bundle by #group
      defaultGroup = "other"  // group used for standalone APKs
    }
  }
  ...
}
device_targeting_config.xml is the path of your configuration file relative to
the main module. This ensures that your configuration file is packaged with your
app bundle.
The deviceGroup clause ensures that the APKs generated from your bundle are
split by device groups.
Use device targeting for your AI packs
You can keep size optimized on devices by only delivering your large models to devices that can run them.
Subdivide your AI packs by device groups by taking the existing AI pack directories created in the last step, and post-fixing the appropriate folders (as described below) with #group_myCustomGroup1, #group_myCustomGroup2, etc. When using the AI packs in your app, you won't need to address folders by postfix (in other words, the postfix is automatically stripped during the build process).
After the previous step, this might look like:
...
.../ai-pack-name/src/main/assets/image-classifier#group_myCustomGroup1/
.../ai-pack-name/src/main/assets/image-classifier#group_myCustomGroup2/
...
In this example, you would reference ai-pack-name/assets/image-classifier/
without any postfixes.
Devices in myCustomGroup1 will receive all the assets under
image-classifier#group_myCustomGroup1/, while devices in myCustomGroup2 will
receive all the assets under image-classifier#group_myCustomGroup2/.
Devices that don't belong to either myCustomGroup1 or myCustomGroup2 will
receive an empty ai-pack-name pack.
This is because devices that don't match any device group will receive the
default variant of your AI pack. This includes anything that is not inside a
directory with a #group_suffix.
Once you have downloaded the AI pack, you can check whether your model is present by using the AssetManager for install-time packs or the AiPackManager for fast-follow and on-demand packs. Examples for doing this are shown for all delivery modes in the sample app.
Use device targeting for your feature modules
You can also use device targeting for feature modules. Instead of subdividing feature modules by device group, you specify whether the entire module should be delivered based on device group membership.
To deliver a feature module to devices that belong to either myCustomGroup1 or
myCustomGroup2, modify its AndroidManifest.xml:
<manifest ...>
  ...
  <dist:module dist:title="...">
    <dist:delivery>
      <dist:install-time>
        <dist:conditions>
          <dist:device-groups>
            <dist:device-group dist:name="myCustomGroup1"/>
            <dist:device-group dist:name="myCustomGroup2"/>
          </dist:device-groups>
          ...
        </dist:conditions>
      </dist:install-time>
    </dist:delivery>
  </dist:module>
  ...
</manifest>
Test locally
Before creating a release for your new bundle, you can test locally with either Internal App Sharing or Bundletool.
Internal App Sharing
Internal App Sharing lets you use an app bundle to quickly generate a URL that you can tap on a local device to install exactly what Google Play would install for that device if that version of the app was live in a test or prod track.
Take a look at the internal app sharing instructions.
Bundletool
Alternatively, you can generate APKs using
bundletool (1.18.0 or above) and sideload
them onto your device. Follow these steps to test your app locally using
bundletool:
Build your app bundle with Android Studio or bundletool.
Generate APKs with the
--local-testingflag:java -jar bundletool-all.jar build-apks --bundle=path/to/your/bundle.aab \ --output=output.apks --local-testing
Connect a device and run
bundletoolto sideload the APKs:# Example without Device Targeting Configuration java -jar bundletool.jar install-apks --apks=output.apks
# Example with Device Targeting Configuration (you must specify which groups the connected device belongs to)
java -jar bundletool.jar install-apks --apks=output.apks --device-groups=myCustomGroup1,myCustomGroup2
Limitations of local testing with bundletool
The following are limitations of local testing with bundletool:
fast-followpacks behave ason-demandpacks. That is, they won't be automatically fetched when the app is sideloaded. Developers need to request them manually when the app starts; this does not require any code changes in your app.- Packs fetch from external storage instead of Play, so you cannot test how your code behaves in the case of network errors.
- Local testing does not cover the wait-for-Wi-Fi scenario.
- Updates are not supported. Before installing a new version of your build, manually uninstall the previous version.
Verify that the correct APKs are being installed
Use the following method to ensure only the correct APKs are installed on the device
adb shell pm path {packageName}
You should see something like:
package:{...}/base.apk
package:{...}/split_config.en.apk
package:{...}/split_config.xxhdpi.apk
package:{...}/split_main_ai-pack-name.apk
package:{...}/split_main_ai-pack-name.config.group_myCustomGroup1.apk
Note that you will only see APKs in this list, which are made from feature modules and install-time AI packs. On-demand and fast-follow AI packs are not installed as APKs.
Test and release on Google Play
We recommend that you test your app end to end on Google Play with an internal test track.
Once you've done this, you can incrementally release your app update to production with staged roll-outs.
Sample app using Play for On-device AI
Download the sample app.
It demonstrates how to use each of the delivery modes as well as the device targeting configuration. See the local testing section to get started.
Related content
Learn more about Android App Bundles and read the references for the AI Delivery SDK.