Restez organisé à l'aide des collections
Enregistrez et classez les contenus selon vos préférences.
Le composant Navigation vous permet d'ajouter à la fois des propriétés et des animations de vue aux actions. Pour créer vos propres animations, consultez Ressources d'animation.
Le composant Navigation comprend également plusieurs animations par défaut pour vous aider à démarrer. Pour ajouter des animations à une action, procédez comme suit :
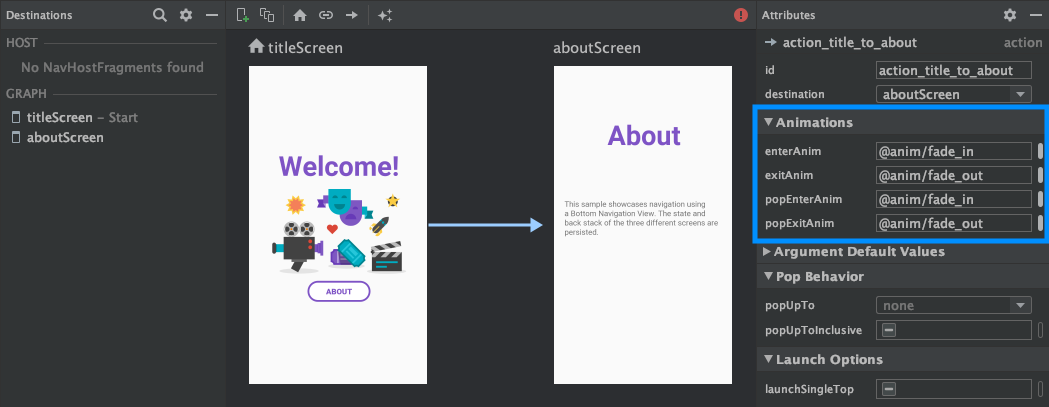
Dans l'éditeur Navigation, cliquez sur l'action dans laquelle l'animation doit se produire.
Dans la section Animations du panneau Attributes (Attributs), cliquez sur la flèche du menu déroulant à côté de l'animation que vous souhaitez ajouter. Vous avez le choix entre les types suivants :
Arriver sur une destination
Quitter une destination
Arriver sur une destination via une action pop : action qui fait sortir des destinations de la pile "Retour" lors de la navigation.
Quitter une destination via une action pop
Choisissez une animation dans la liste des animations qui s'affiche.
Figure 1. Section Animations du panneau Attributes (Attributs).
Après avoir ajouté des animations, cliquez sur l'onglet Text (Texte) pour passer à la vue de texte XML. Le code XML des animations apparaît désormais dans l'élément <action> correspondant. Dans l'exemple suivant, specifyAmountFragment est la destination source de l'action confirmationAction :
Ajouter des transitions d'éléments partagés entre les destinations
Lorsqu'une vue est partagée entre deux destinations, vous pouvez utiliser une transition d'élément partagé pour définir la manière dont la vue passe d'une destination à l'autre. Les transitions d'éléments partagés font partie du framework Transition.
Les éléments partagés sont fournis de manière programmatique plutôt que via votre fichier XML de navigation. Les destinations d'activité et de fragment disposent chacune d'une sous-classe de l'interface Navigator.Extras qui accepte des options de navigation supplémentaires, y compris des éléments partagés. Vous pouvez transmettre ces Extras lors de l'appel de navigate().
Transitions d'éléments partagés vers une destination de fragment
La classe FragmentNavigator.Extras vous permet de mapper les éléments partagés d'une destination à la suivante via le nom de transition, comme si vous utilisiez FragmentTransaction.addSharedElement().
Vous pouvez ensuite transmettre les extras à navigate(), comme illustré dans l'exemple suivant :
Kotlin
valextras=FragmentNavigatorExtras(view1to"hero_image")view.findNavController().navigate(R.id.confirmationAction,null,// Bundle of argsnull,// NavOptionsextras)
Java
FragmentNavigator.Extrasextras=newFragmentNavigator.Extras.Builder().addSharedElement(view1,"hero_image").build();Navigation.findNavController(view).navigate(R.id.details,null,// Bundle of argsnull,// NavOptionsextras);
Transitions d'éléments partagés vers une destination d'activité
// Rename the Pair class from the Android framework to avoid a name clashimportandroid.util.PairasUtilPair...valoptions=ActivityOptionsCompat.makeSceneTransitionAnimation(activity,UtilPair.create(view1,"hero_image"))valextras=ActivityNavigatorExtras(options)view.findNavController().navigate(R.id.details,null,// Bundle of argsnull,// NavOptionsextras)
Java
ActivityOptionsoptions=ActivityOptions.makeSceneTransitionAnimation(this,Pair.create(view1,"hero_image"));ActivityNavigatorExtrasextras=newActivityNavigatorExtras.Builder().setActivityOptions(options).build();Navigation.findNavController(view).navigate(R.id.details,null,// Bundle of argsnull,// NavOptionsextras);
Appliquer des animations pop aux transitions d'activité
Lorsque vous naviguez vers ou depuis une Activity, les animations pop ne sont pas appliquées automatiquement. À la place, vous devez appeler ActivityNavigator.applyPopAnimationsToPendingTransition() à partir de la destination Activity cible où l'animation doit se produire :
Le contenu et les exemples de code de cette page sont soumis aux licences décrites dans la Licence de contenu. Java et OpenJDK sont des marques ou des marques déposées d'Oracle et/ou de ses sociétés affiliées.
Dernière mise à jour le 2025/07/27 (UTC).
[[["Facile à comprendre","easyToUnderstand","thumb-up"],["J'ai pu résoudre mon problème","solvedMyProblem","thumb-up"],["Autre","otherUp","thumb-up"]],[["Il n'y a pas l'information dont j'ai besoin","missingTheInformationINeed","thumb-down"],["Trop compliqué/Trop d'étapes","tooComplicatedTooManySteps","thumb-down"],["Obsolète","outOfDate","thumb-down"],["Problème de traduction","translationIssue","thumb-down"],["Mauvais exemple/Erreur de code","samplesCodeIssue","thumb-down"],["Autre","otherDown","thumb-down"]],["Dernière mise à jour le 2025/07/27 (UTC)."],[],[],null,["# Animate transitions between destinations\n\nThe Navigation component lets you add both property and view animations to\nactions. To create your own animations, check out\n[Animation resources](/guide/topics/resources/animation-resource).\n\nNavigation also includes several default animations to get you started. To add\nanimations to an action, do the following:\n\n1. In the Navigation editor, click on the action where the animation should occur.\n2. In the **Animations** section of the **Attributes** panel, click the dropdown arrow next to the animation you'd like to add. You can choose between the following types:\n - Entering a destination\n - Exiting a destination\n - Entering a destination via a [*pop action*](/guide/navigation/navigation-navigate#pop), an action that pops additional destinations off of the back stack when navigating.\n - Exiting a destination via a pop action\n3. Choose an animation from the list of project animations that appears.\n\n**Figure 1.** The **Animations** section of the **Attributes** panel.\n\nOnce you've added animations, click the **Text** tab to toggle to the XML text\nview. The XML for the animations now appears in the corresponding\n`\u003caction\u003e` element. In the following example, `specifyAmountFragment` is the\nsource destination for the `confirmationAction` action: \n\n```xml\n\u003cfragment\n android:id=\"@+id/specifyAmountFragment\"\n android:name=\"com.example.buybuddy.buybuddy.SpecifyAmountFragment\"\n android:label=\"fragment_specify_amount\"\n tools:layout=\"@layout/fragment_specify_amount\"\u003e\n \u003caction\n android:id=\"@+id/confirmationAction\"\n app:destination=\"@id/confirmationFragment\"\n app:enterAnim=\"@anim/slide_in_right\"\n app:exitAnim=\"@anim/slide_out_left\"\n app:popEnterAnim=\"@anim/slide_in_left\"\n app:popExitAnim=\"@anim/slide_out_right\" /\u003e\n\u003c/fragment\u003e\n```\n\nAdd shared element transitions between destinations\n---------------------------------------------------\n\nWhen a view is shared between two destinations, you can use a\n*shared element transition* to define how the view transitions when\nnavigating from one destination to the other. Shared element transitions\nare part of the Transition Framework.\n| **Note:** When using shared elements transitions, you should **not** use the Animation Framework (`enterAnim`, `exitAnim`, and so on from the previous section). Instead, you should be using only the Transition Framework for setting your enter and exit transitions.\n\nShared elements are supplied programmatically rather than through your\nnavigation XML file. Activity and fragment destinations each have a subclass\nof the [`Navigator.Extras`](/reference/androidx/navigation/Navigator.Extras)\ninterface that accepts additional options for navigation, including shared\nelements. You can pass these `Extras` when calling\n[`navigate()`](/reference/androidx/navigation/NavController#navigate(int,%20android.os.Bundle,%20androidx.navigation.NavOptions,%20androidx.navigation.Navigator.Extras)).\n| **Note:** Be sure to familiarize yourself with shared element transitions before continuing. For fragment shared element transitions, see [Navigate between fragments using animations](/training/basics/fragments/animate). For activity shared element transitions, see [Start an activity using an animation](/training/transitions/start-activity#start-with-element).\n\n### Shared element transitions to a fragment destination\n\nThe [`FragmentNavigator.Extras`](/reference/androidx/navigation/fragment/FragmentNavigator.Extras)\nclass allows you to map shared elements from one destination to the next\nby their transition name, similar to using\n[`FragmentTransaction.addSharedElement()`](/reference/androidx/fragment/app/FragmentTransaction#addSharedElement(android.view.View,%20java.lang.String)).\nYou can then pass the extras to `navigate()`, as shown in the following\nexample: \n\n### Kotlin\n\n```kotlin\nval extras = FragmentNavigatorExtras(view1 to \"hero_image\")\n\nview.findNavController().navigate(\n R.id.confirmationAction,\n null, // Bundle of args\n null, // NavOptions\n extras)\n```\n\n### Java\n\n```java\nFragmentNavigator.Extras extras = new FragmentNavigator.Extras.Builder()\n .addSharedElement(view1, \"hero_image\")\n .build();\n\nNavigation.findNavController(view).navigate(\n R.id.details,\n null, // Bundle of args\n null, // NavOptions\n extras);\n```\n\n### Shared element transitions to an activity destination\n\nActivities rely on [ActivityOptionsCompat](https://developer.android.com/reference/androidx/core/app/ActivityOptionsCompat) to control Shared Element Transitions as detailed in the [Start an activity with a shared element](https://developer.android.com/training/transitions/start-activity#start-transition) documentation and as shown in the example below: \n\n### Kotlin\n\n```kotlin\n// Rename the Pair class from the Android framework to avoid a name clash\nimport android.util.Pair as UtilPair\n...\nval options = ActivityOptionsCompat.makeSceneTransitionAnimation(activity,\n UtilPair.create(view1, \"hero_image\"))\nval extras = ActivityNavigatorExtras(options)\nview.findNavController().navigate(\n R.id.details,\n null, // Bundle of args\n null, // NavOptions\n extras)\n```\n\n### Java\n\n```java\nActivityOptions options = ActivityOptions.makeSceneTransitionAnimation(this,\n Pair.create(view1, \"hero_image\"));\n\nActivityNavigatorExtras extras = new ActivityNavigatorExtras.Builder()\n .setActivityOptions(options)\n .build();\n\n\nNavigation.findNavController(view).navigate(\n R.id.details,\n null, // Bundle of args\n null, // NavOptions\n extras);\n```\n\nApply pop animations to activity transitions\n--------------------------------------------\n\nWhen you navigate to or from an `Activity`, pop animations are not applied\nautomatically. Instead, you must call\n[`ActivityNavigator.applyPopAnimationsToPendingTransition()`](/reference/androidx/navigation/ActivityNavigator#applyPopAnimationsToPendingTransition(android.app.Activity))\nfrom the target `Activity` destination where the animation should occur: \n\n### Kotlin\n\n```kotlin\noverride fun finish() {\n super.finish()\n ActivityNavigator.applyPopAnimationsToPendingTransition(this)\n}\n```\n\n### Java\n\n```java\n@Override\npublic void finish() {\n super.finish();\n ActivityNavigator.applyPopAnimationsToPendingTransition(this);\n}\n```"]]