Tetap teratur dengan koleksi
Simpan dan kategorikan konten berdasarkan preferensi Anda.
Komponen Navigasi memungkinkan Anda menambahkan properti dan animasi tampilan
ke tindakan. Untuk membuat animasi sendiri, lihat
Referensi animasi.
Navigasi juga menyertakan beberapa animasi default untuk memulai. Untuk menambahkan
animasi ke tindakan, lakukan hal berikut:
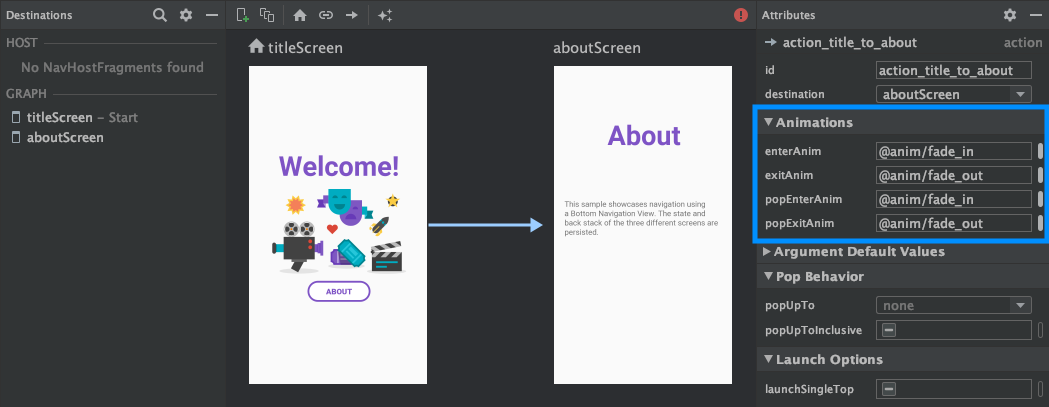
Di editor Navigasi, klik tindakan tempat animasi akan
ditampilkan.
Di bagian Animasi dari panel Atribut, klik panah drop-down
di samping animasi yang ingin Anda tambahkan. Anda dapat memilih antara
jenis berikut:
Memasuki tujuan
Keluar dari tujuan
Memasukkan tujuan melalui
pop action, yakni tindakan
yang memunculkan tujuan tambahan dari data sebelumnya saat melakukan navigasi.
Keluar dari tujuan melalui pop action
Pilih animasi dari daftar animasi project yang muncul.
Gambar 1. Bagian Animasi dari panel
Attributes.
Setelah Anda menambahkan animasi, klik tab Teks untuk beralih ke tampilan
teks XML. XML untuk animasi ini sekarang muncul pada elemen
<action> yang sesuai. Pada contoh berikut, specifyAmountFragment adalah
tujuan asal untuk tindakan confirmationAction:
Saat tampilan ditayangkan di antara dua tujuan, Anda dapat menggunakan
transisi elemen bersama untuk menentukan cara transisi tampilan
navigasi dilakukan dari satu tujuan ke tujuan lainnya. Transisi elemen bersama
adalah bagian dari Framework Transisi.
Elemen bersama disediakan secara terprogram, bukan melalui
file XML navigasi Anda. Tujuan aktivitas dan fragmen masing-masing memiliki subclass
antarmuka Navigator.Extras
yang menerima opsi tambahan untuk navigasi, termasuk elemen
bersama. Anda dapat meneruskan Extras ini saat memanggil navigate().
Transisi elemen bersama ke tujuan fragmen
Class FragmentNavigator.Extras
memungkinkan Anda memetakan elemen bersama dari satu tujuan ke tujuan berikutnya menurut nama transisinya, seperti halnya ketika menggunakan
FragmentTransaction.addSharedElement().g
Anda kemudian dapat meneruskan tambahan ke navigate(), seperti yang ditunjukkan dalam contoh
berikut:
Kotlin
valextras=FragmentNavigatorExtras(view1to"hero_image")view.findNavController().navigate(R.id.confirmationAction,null,// Bundle of argsnull,// NavOptionsextras)
Java
FragmentNavigator.Extrasextras=newFragmentNavigator.Extras.Builder().addSharedElement(view1,"hero_image").build();Navigation.findNavController(view).navigate(R.id.details,null,// Bundle of argsnull,// NavOptionsextras);
// Rename the Pair class from the Android framework to avoid a name clashimportandroid.util.PairasUtilPair...valoptions=ActivityOptionsCompat.makeSceneTransitionAnimation(activity,UtilPair.create(view1,"hero_image"))valextras=ActivityNavigatorExtras(options)view.findNavController().navigate(R.id.details,null,// Bundle of argsnull,// NavOptionsextras)
Java
ActivityOptionsoptions=ActivityOptions.makeSceneTransitionAnimation(this,Pair.create(view1,"hero_image"));ActivityNavigatorExtrasextras=newActivityNavigatorExtras.Builder().setActivityOptions(options).build();Navigation.findNavController(view).navigate(R.id.details,null,// Bundle of argsnull,// NavOptionsextras);
Menerapkan animasi pop ke transisi aktivitas
Saat Anda menavigasi ke atau dari Activity, animasi pop tidak otomatis
diterapkan. Sebagai gantinya, Anda harus memanggil
ActivityNavigator.applyPopAnimationsToPendingTransition()
dari tujuan Activity target tempat animasi akan muncul:
Konten dan contoh kode di halaman ini tunduk kepada lisensi yang dijelaskan dalam Lisensi Konten. Java dan OpenJDK adalah merek dagang atau merek dagang terdaftar dari Oracle dan/atau afiliasinya.
Terakhir diperbarui pada 2025-07-27 UTC.
[[["Mudah dipahami","easyToUnderstand","thumb-up"],["Memecahkan masalah saya","solvedMyProblem","thumb-up"],["Lainnya","otherUp","thumb-up"]],[["Informasi yang saya butuhkan tidak ada","missingTheInformationINeed","thumb-down"],["Terlalu rumit/langkahnya terlalu banyak","tooComplicatedTooManySteps","thumb-down"],["Sudah usang","outOfDate","thumb-down"],["Masalah terjemahan","translationIssue","thumb-down"],["Masalah kode / contoh","samplesCodeIssue","thumb-down"],["Lainnya","otherDown","thumb-down"]],["Terakhir diperbarui pada 2025-07-27 UTC."],[],[],null,["# Animate transitions between destinations\n\nThe Navigation component lets you add both property and view animations to\nactions. To create your own animations, check out\n[Animation resources](/guide/topics/resources/animation-resource).\n\nNavigation also includes several default animations to get you started. To add\nanimations to an action, do the following:\n\n1. In the Navigation editor, click on the action where the animation should occur.\n2. In the **Animations** section of the **Attributes** panel, click the dropdown arrow next to the animation you'd like to add. You can choose between the following types:\n - Entering a destination\n - Exiting a destination\n - Entering a destination via a [*pop action*](/guide/navigation/navigation-navigate#pop), an action that pops additional destinations off of the back stack when navigating.\n - Exiting a destination via a pop action\n3. Choose an animation from the list of project animations that appears.\n\n**Figure 1.** The **Animations** section of the **Attributes** panel.\n\nOnce you've added animations, click the **Text** tab to toggle to the XML text\nview. The XML for the animations now appears in the corresponding\n`\u003caction\u003e` element. In the following example, `specifyAmountFragment` is the\nsource destination for the `confirmationAction` action: \n\n```xml\n\u003cfragment\n android:id=\"@+id/specifyAmountFragment\"\n android:name=\"com.example.buybuddy.buybuddy.SpecifyAmountFragment\"\n android:label=\"fragment_specify_amount\"\n tools:layout=\"@layout/fragment_specify_amount\"\u003e\n \u003caction\n android:id=\"@+id/confirmationAction\"\n app:destination=\"@id/confirmationFragment\"\n app:enterAnim=\"@anim/slide_in_right\"\n app:exitAnim=\"@anim/slide_out_left\"\n app:popEnterAnim=\"@anim/slide_in_left\"\n app:popExitAnim=\"@anim/slide_out_right\" /\u003e\n\u003c/fragment\u003e\n```\n\nAdd shared element transitions between destinations\n---------------------------------------------------\n\nWhen a view is shared between two destinations, you can use a\n*shared element transition* to define how the view transitions when\nnavigating from one destination to the other. Shared element transitions\nare part of the Transition Framework.\n| **Note:** When using shared elements transitions, you should **not** use the Animation Framework (`enterAnim`, `exitAnim`, and so on from the previous section). Instead, you should be using only the Transition Framework for setting your enter and exit transitions.\n\nShared elements are supplied programmatically rather than through your\nnavigation XML file. Activity and fragment destinations each have a subclass\nof the [`Navigator.Extras`](/reference/androidx/navigation/Navigator.Extras)\ninterface that accepts additional options for navigation, including shared\nelements. You can pass these `Extras` when calling\n[`navigate()`](/reference/androidx/navigation/NavController#navigate(int,%20android.os.Bundle,%20androidx.navigation.NavOptions,%20androidx.navigation.Navigator.Extras)).\n| **Note:** Be sure to familiarize yourself with shared element transitions before continuing. For fragment shared element transitions, see [Navigate between fragments using animations](/training/basics/fragments/animate). For activity shared element transitions, see [Start an activity using an animation](/training/transitions/start-activity#start-with-element).\n\n### Shared element transitions to a fragment destination\n\nThe [`FragmentNavigator.Extras`](/reference/androidx/navigation/fragment/FragmentNavigator.Extras)\nclass allows you to map shared elements from one destination to the next\nby their transition name, similar to using\n[`FragmentTransaction.addSharedElement()`](/reference/androidx/fragment/app/FragmentTransaction#addSharedElement(android.view.View,%20java.lang.String)).\nYou can then pass the extras to `navigate()`, as shown in the following\nexample: \n\n### Kotlin\n\n```kotlin\nval extras = FragmentNavigatorExtras(view1 to \"hero_image\")\n\nview.findNavController().navigate(\n R.id.confirmationAction,\n null, // Bundle of args\n null, // NavOptions\n extras)\n```\n\n### Java\n\n```java\nFragmentNavigator.Extras extras = new FragmentNavigator.Extras.Builder()\n .addSharedElement(view1, \"hero_image\")\n .build();\n\nNavigation.findNavController(view).navigate(\n R.id.details,\n null, // Bundle of args\n null, // NavOptions\n extras);\n```\n\n### Shared element transitions to an activity destination\n\nActivities rely on [ActivityOptionsCompat](https://developer.android.com/reference/androidx/core/app/ActivityOptionsCompat) to control Shared Element Transitions as detailed in the [Start an activity with a shared element](https://developer.android.com/training/transitions/start-activity#start-transition) documentation and as shown in the example below: \n\n### Kotlin\n\n```kotlin\n// Rename the Pair class from the Android framework to avoid a name clash\nimport android.util.Pair as UtilPair\n...\nval options = ActivityOptionsCompat.makeSceneTransitionAnimation(activity,\n UtilPair.create(view1, \"hero_image\"))\nval extras = ActivityNavigatorExtras(options)\nview.findNavController().navigate(\n R.id.details,\n null, // Bundle of args\n null, // NavOptions\n extras)\n```\n\n### Java\n\n```java\nActivityOptions options = ActivityOptions.makeSceneTransitionAnimation(this,\n Pair.create(view1, \"hero_image\"));\n\nActivityNavigatorExtras extras = new ActivityNavigatorExtras.Builder()\n .setActivityOptions(options)\n .build();\n\n\nNavigation.findNavController(view).navigate(\n R.id.details,\n null, // Bundle of args\n null, // NavOptions\n extras);\n```\n\nApply pop animations to activity transitions\n--------------------------------------------\n\nWhen you navigate to or from an `Activity`, pop animations are not applied\nautomatically. Instead, you must call\n[`ActivityNavigator.applyPopAnimationsToPendingTransition()`](/reference/androidx/navigation/ActivityNavigator#applyPopAnimationsToPendingTransition(android.app.Activity))\nfrom the target `Activity` destination where the animation should occur: \n\n### Kotlin\n\n```kotlin\noverride fun finish() {\n super.finish()\n ActivityNavigator.applyPopAnimationsToPendingTransition(this)\n}\n```\n\n### Java\n\n```java\n@Override\npublic void finish() {\n super.finish();\n ActivityNavigator.applyPopAnimationsToPendingTransition(this);\n}\n```"]]