
탐색은 사용자가 앱 내에서 이동하는 방식을 나타냅니다. 사용자는 일반적으로 탭하거나 클릭하여 UI 요소와 상호작용하며 앱은 새 콘텐츠를 표시하여 응답합니다. 사용자가 이전 콘텐츠로 돌아가려는 경우에는 뒤로 동작을 사용하거나 뒤로 버튼을 탭합니다.
탐색 상태 모델링
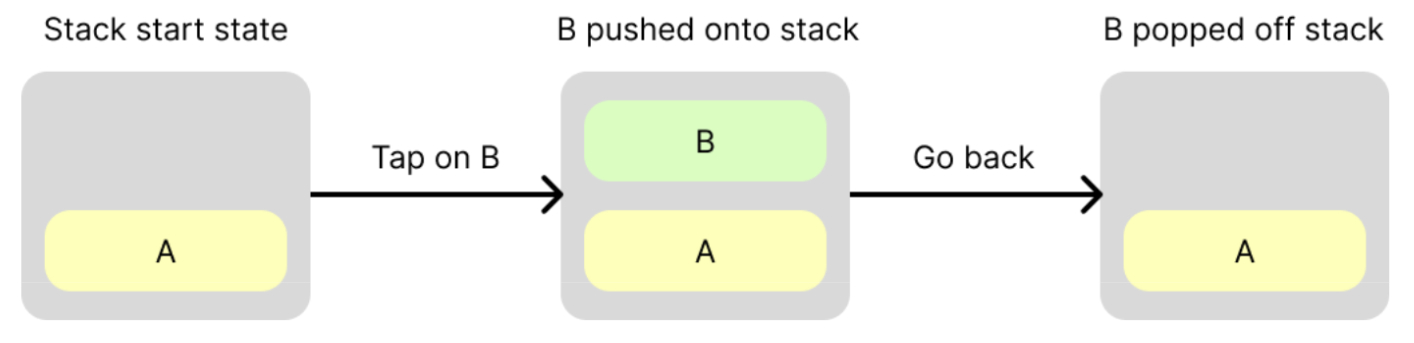
이 동작을 모델링하는 편리한 방법은 콘텐츠 스택을 사용하는 것입니다. 사용자가 새 콘텐츠로 앞으로 이동하면 스택 상단에 푸시됩니다. 해당 콘텐츠에서 뒤로 이동하면 스택에서 팝되고 이전 콘텐츠가 표시됩니다. 탐색 용어로 이 스택은 사용자가 돌아갈 수 있는 콘텐츠를 나타내므로 일반적으로 뒤로 스택이라고 합니다.
뒤로 스택 만들기
탐색 3에서 백 스택에는 실제로 콘텐츠가 포함되지 않습니다. 대신 키라고 하는 콘텐츠 참조가 포함됩니다. 키는 모든 유형이 될 수 있지만 일반적으로 간단한 직렬화 가능한 데이터 클래스입니다. 콘텐츠 대신 참조를 사용하면 다음과 같은 이점이 있습니다.
- 키를 백 스택으로 푸시하여 간단하게 탐색할 수 있습니다.
- 키가 직렬화 가능하면 백 스택을 영구 저장소에 저장하여 구성 변경과 프로세스 종료를 견딜 수 있습니다. 사용자는 앱을 나갔다가 나중에 다시 돌아와서 중단한 지점부터 동일한 콘텐츠가 표시되기를 기대하므로 이 점이 중요합니다. 자세한 내용은 뒤로 스택 저장을 참고하세요.
Navigation 3 API의 핵심 개념은 개발자가 백 스택을 소유한다는 것입니다. 라이브러리는 다음을 충족해야 합니다.
- 백 스택이 스냅샷 상태 지원
List<T>일 것으로 예상합니다. 여기서T은 백 스택keys의 유형입니다.Any을 사용하거나 더 강력한 유형의 키를 직접 제공할 수 있습니다. '푸시' 또는 '팝'이라는 용어가 표시되면 기본 구현은 목록의 끝에서 항목을 추가하거나 삭제하는 것입니다. - 백 스택을 관찰하고
NavDisplay를 사용하여 UI에 상태를 반영합니다.
다음 예에서는 키와 뒤로 스택을 만들고 사용자 탐색 이벤트에 따라 뒤로 스택을 수정하는 방법을 보여줍니다.
// Define keys that will identify content data object ProductList data class ProductDetail(val id: String) @Composable fun MyApp() { // Create a back stack, specifying the key the app should start with val backStack = remember { mutableStateListOf<Any>(ProductList) } // Supply your back stack to a NavDisplay so it can reflect changes in the UI // ...more on this below... // Push a key onto the back stack (navigate forward), the navigation library will reflect the change in state backStack.add(ProductDetail(id = "ABC")) // Pop a key off the back stack (navigate back), the navigation library will reflect the change in state backStack.removeLastOrNull() }
콘텐츠 키 해결
콘텐츠는 컴포저블 함수가 포함된 클래스인 NavEntry을 사용하여 Navigation 3에서 모델링됩니다. 대상을 나타냅니다. 사용자가 앞으로 이동하고 뒤로 이동할 수 있는 단일 콘텐츠입니다.
NavEntry에는 콘텐츠에 관한 정보인 메타데이터도 포함될 수 있습니다. 이 메타데이터는 NavDisplay와 같은 컨테이너 객체가 NavEntry의 콘텐츠를 표시하는 방법을 결정하는 데 도움이 되도록 읽을 수 있습니다. 예를 들어 메타데이터를 사용하여 특정 NavEntry의 기본 애니메이션을 재정의할 수 있습니다. NavEntry
metadata는 String 키를 Any 값에 매핑하는 맵으로, 다용도 데이터 저장소를 제공합니다.
key를 NavEntry로 변환하려면 항목 제공자를 만드세요. key를 허용하고 해당 key의 NavEntry을 반환하는 함수입니다. NavDisplay를 만들 때 람다 매개변수로 정의되는 경우가 많습니다.
항목 제공자를 만드는 방법에는 두 가지가 있습니다. 람다 함수를 직접 만들거나 entryProvider DSL을 사용하는 것입니다.
항목 제공자 함수를 직접 만듭니다.
일반적으로 각 키의 분기가 있는 when 문을 사용하여 항목 제공자 함수를 만듭니다.
entryProvider = { key -> when (key) { is ProductList -> NavEntry(key) { Text("Product List") } is ProductDetail -> NavEntry( key, metadata = mapOf("extraDataKey" to "extraDataValue") ) { Text("Product ${key.id} ") } else -> { NavEntry(Unit) { Text(text = "Invalid Key: $it") } } } }
entryProvider DSL 사용
entryProvider DSL을 사용하면 각 키 유형에 대해 테스트하고 각 키 유형에 대해 NavEntry을 구성할 필요가 없으므로 람다 함수를 간소화할 수 있습니다.
이를 위해 entryProvider 빌더 함수를 사용합니다. 키를 찾을 수 없는 경우 오류를 발생시키는 기본 대체 동작도 포함됩니다.
entryProvider = entryProvider { entry<ProductList> { Text("Product List") } entry<ProductDetail>( metadata = mapOf("extraDataKey" to "extraDataValue") ) { key -> Text("Product ${key.id} ") } }
스니펫에서 다음 사항을 참고하세요.
entry는 지정된 유형과 컴포저블 콘텐츠로NavEntry를 정의하는 데 사용됩니다.entry는NavEntry.metadata를 설정하기 위해metadata매개변수를 허용합니다.
백 스택 표시
백 스택은 앱의 탐색 상태를 나타냅니다. 백 스택이 변경될 때마다 앱 UI는 새로운 백 스택 상태를 반영해야 합니다. 탐색 3에서 NavDisplay는 백 스택을 관찰하고 그에 따라 UI를 업데이트합니다. 다음 매개변수를 사용하여 생성합니다.
- 뒤로 스택 -
T이 뒤로 스택 키의 유형인SnapshotStateList<T>유형이어야 합니다. 변경될 때NavDisplay의 리컴포지션을 트리거할 수 있도록 관찰 가능한List입니다. - 뒤로 스택의 키를
NavEntry객체로 변환하는entryProvider - 원하는 경우
onBack매개변수에 람다를 제공합니다. 사용자가 뒤로 이벤트를 트리거할 때 호출됩니다.
다음 예는 NavDisplay를 만드는 방법을 보여줍니다.
data object Home data class Product(val id: String) @Composable fun NavExample() { val backStack = remember { mutableStateListOf<Any>(Home) } NavDisplay( backStack = backStack, onBack = { backStack.removeLastOrNull() }, entryProvider = { key -> when (key) { is Home -> NavEntry(key) { ContentGreen("Welcome to Nav3") { Button(onClick = { backStack.add(Product("123")) }) { Text("Click to navigate") } } } is Product -> NavEntry(key) { ContentBlue("Product ${key.id} ") } else -> NavEntry(Unit) { Text("Unknown route") } } } ) }
기본적으로 NavDisplay는 단일 창 레이아웃에서 백 스택의 최상위 NavEntry를 표시합니다. 다음 녹화 영상은 이 앱이 실행되는 모습을 보여줍니다.
NavDisplay 기본 동작(대상 2개)종합적으로 살펴보기
다음 다이어그램은 탐색 3의 다양한 객체 간에 데이터가 흐르는 방식을 보여줍니다.
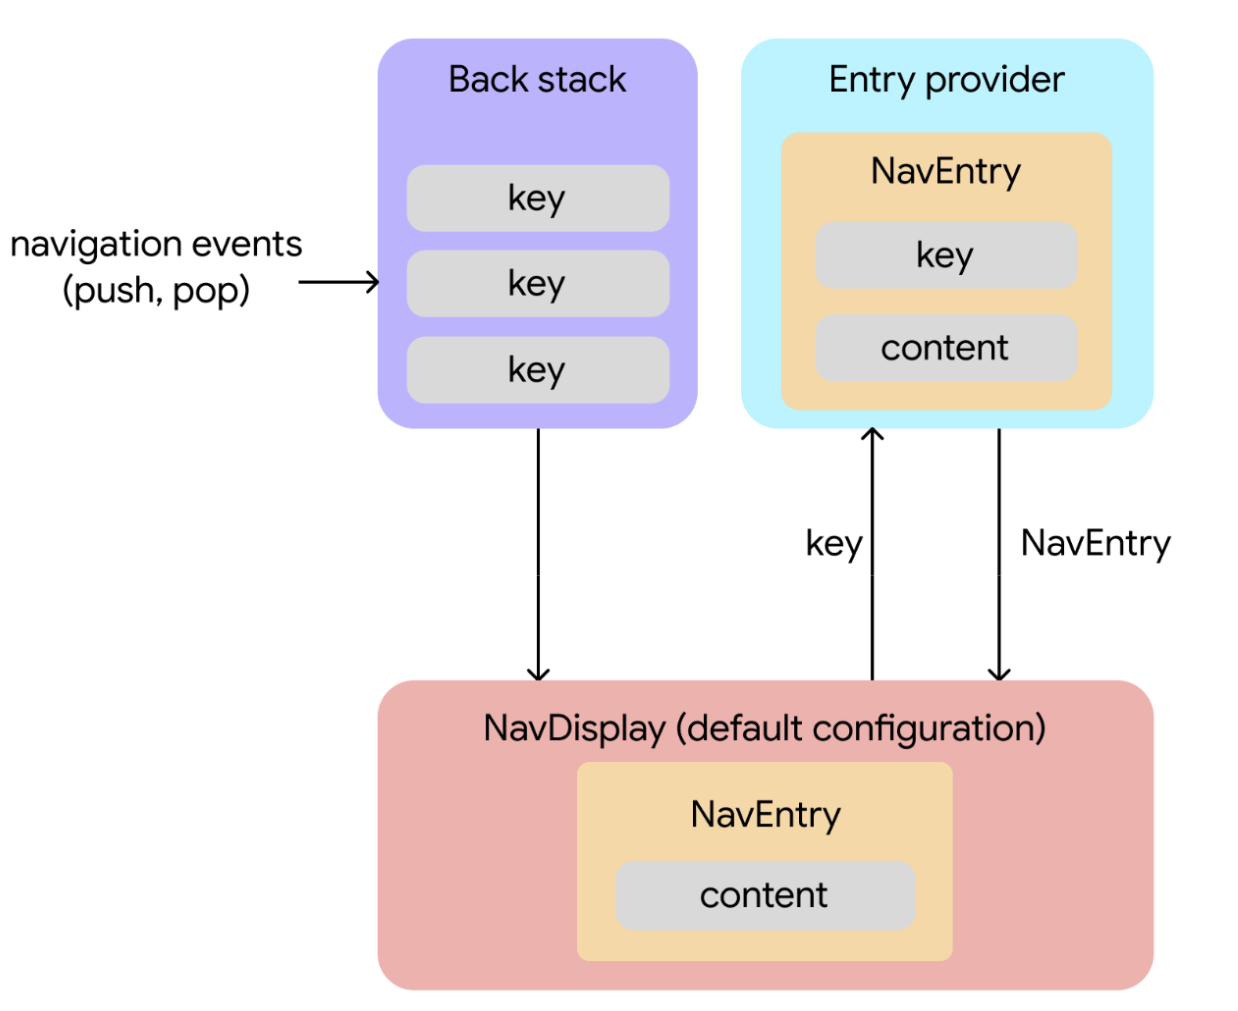
탐색 이벤트는 변경을 시작합니다. 사용자 상호작용에 따라 키가 백 스택에 추가되거나 삭제됩니다.
뒤로 스택 상태 변경으로 콘텐츠 가져오기 트리거
NavDisplay(백 스택을 렌더링하는 컴포저블)는 백 스택을 관찰합니다. 기본 구성에서는 최상위 백 스택 항목을 단일 창 레이아웃에 표시합니다. 백 스택의 상단 키가 변경되면NavDisplay는 이 키를 사용하여 항목 제공자로부터 해당 콘텐츠를 요청합니다.항목 제공자가 콘텐츠를 제공합니다. 항목 제공자는 키를
NavEntry로 확인하는 함수입니다.NavDisplay에서 키를 수신하면 항목 제공자는 키와 콘텐츠를 모두 포함하는 연결된NavEntry를 제공합니다.콘텐츠가 표시됩니다.
NavDisplay는NavEntry를 수신하고 콘텐츠를 표시합니다.