
Android Studio 包含一个 GUI,让您能够创建和修改导航图。这在本质上是底层 XML 资源文件的编辑器。
概览
向应用添加 XML 图表后,Android Studio 会在 Navigation Editor 中打开该图表。在 Navigation Editor 中,您可以直观地修改导航图,或直接修改底层 XML。
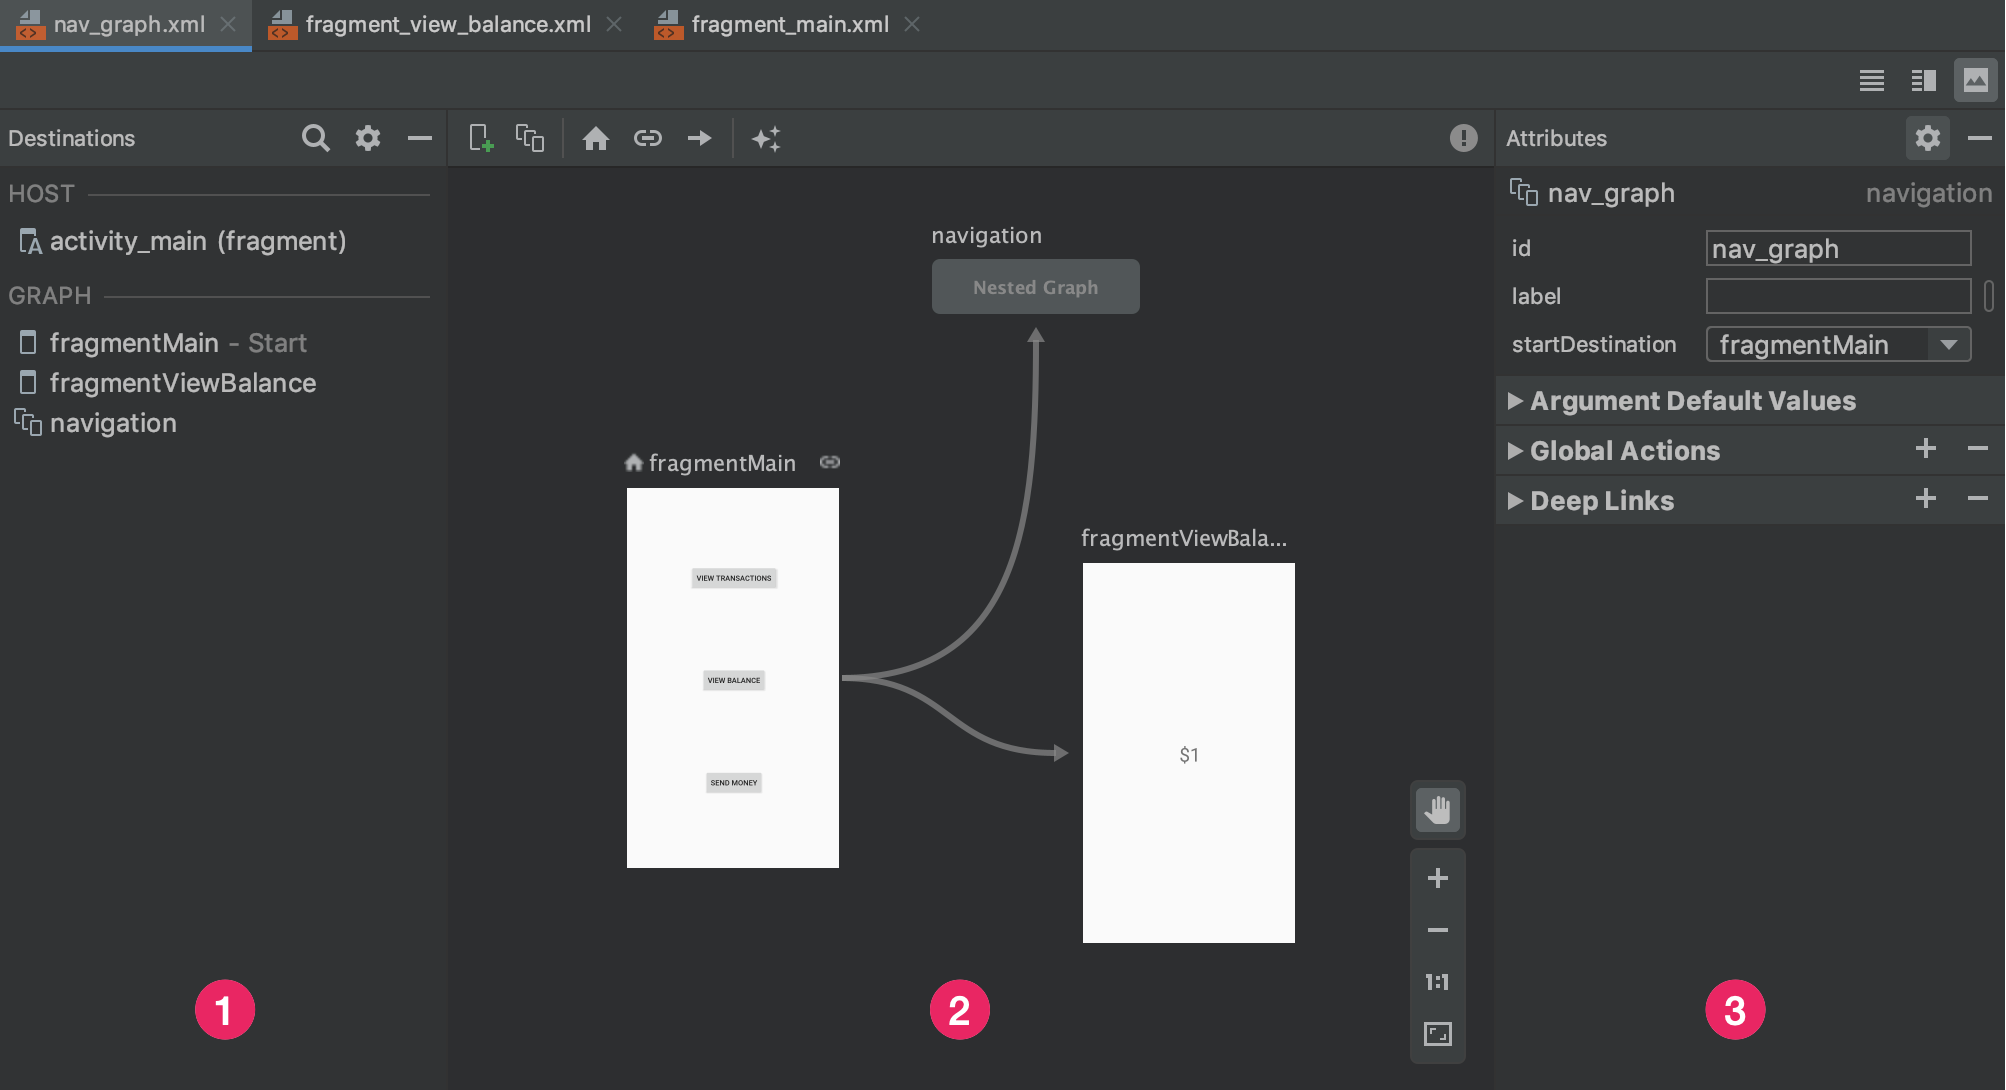
- “Destinations”面板:列出了导航宿主和位于 Graph Editor 中的所有目的地。
- Graph Editor:包含导航图的视觉表示形式。您可以在 Design 视图和 Text 视图中的底层 XML 表示形式之间切换。
- Attributes:显示导航图中所选项的属性。
点击 Text 标签页可查看相应的 XML,它应类似于以下代码段:
<?xml version="1.0" encoding="utf-8"?>
<navigation xmlns:android="http://schemas.android.com/apk/res/android"
            xmlns:app="http://schemas.android.com/apk/res-auto"
            android:id="@+id/nav_graph">

</navigation>
<navigation> 元素是导航图的根元素。当您向图表添加目的地和连接操作时,可以看到相应的 <destination> 和 <action> 元素在此处显示为子元素。如果您有 [嵌套图][2],它们将显示为子 <navigation> 元素。
添加目的地
您可以基于现有的 fragment 或 activity 创建目的地。您还可以使用 Navigation Editor 创建新目的地,或创建占位符以便稍后替换为 fragment 或 activity。
此示例演示了如何创建新目的地。如需使用 Navigation Editor 添加新目的地,请执行以下操作:
- 在 Navigation Editor 中,点击 New Destination 图标
 ,然后点击 Create new destination。
 - 在随即显示的 New Android Component 对话框中,创建您的 fragment。如需详细了解 fragment,请参阅 [fragment 概览][3]。
当您返回到 Navigation Editor 中时,会发现 Android Studio 已将此目的地添加到导航图中。
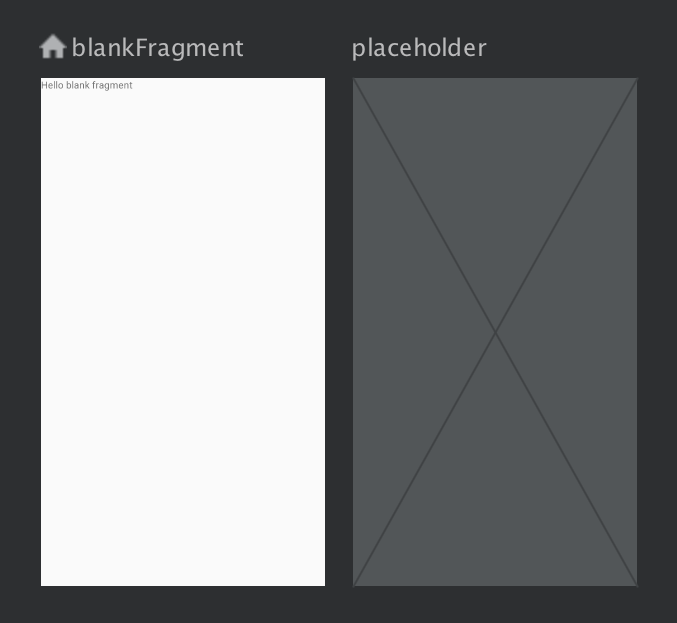
图 2 显示了目的地和 [占位符目的地][4]的示例。
如需了解向导航图添加目的地的其他方式,请参阅 [其他目的地][5]。
从现有的 Fragment 或 Activity 创建目的地
在 Navigation Editor 中,如果您有现有目的地类型要添加到导航图,请点击 New Destination ![]() 。
。
接下来,在显示的下拉菜单中点击相应目的地。您现在可以在导航图的 Design 视图中看到目的地的预览,并在 Text 视图中看到相应 XML 文本。
创建新的 fragment 目的地
如需使用 Navigation Editor 添加新目的地类型,请执行以下操作:
在 Navigation Editor 中,点击 New Destination 图标
。接下来,点击创建新目的地。
在随即显示的 New Android Component 对话框中,创建您的 fragment。
当您返回到 Navigation Editor 中时,会发现 Android Studio 已将此目的地添加到导航图中。
图 3 显示了目的地和 [占位符目的地][2]的示例。
目的地详解
点击一个目的地以将其选中,并注意 Attributes 面板中显示的以下属性:
- Type 字段指示在您的源代码中,该目的地是作为 fragment、activity 还是其他自定义类实现的。
- Label 字段包含该目的地的用户可读名称。例如,如果您使用 [
setupWithNavController()][11] 将 [NavGraph][10] 连接到Toolbar,就可能在界面上看到此字段。所以,请为此值使用资源字符串。 - ID 字段包含目的地 ID,用于在代码中引用目的地。
- Class 下拉列表显示与该目的地相关联的类的名称。点击此下拉菜单可将关联的类更改为另一目的地类型。
点击 Text 标签页可查看导航图的 XML 视图。XML 中同样包含该目的地的 id、name、label 和 layout 属性,如以下代码段所示:
<?xml version="1.0" encoding="utf-8"?>
<navigation xmlns:app="http://schemas.android.com/apk/res-auto"
    xmlns:tools="http://schemas.android.com/tools"
    xmlns:android="http://schemas.android.com/apk/res/android"
    app:startDestination="@id/blankFragment">
    <fragment
        android:id="@+id/blankFragment"
        android:name="com.example.cashdog.cashdog.BlankFragment"
        android:label="@string/label_blank"
        tools:layout="@layout/fragment_blank" />
</navigation>
NavHostFragment
您也可以使用 [布局编辑器][1] 向 activity 添加 NavHostFragment,具体操作步骤如下:
- 在项目文件列表中,双击 activity 的布局 XML 文件,以在布局编辑器中将其打开。
- 在 Palette 窗格内,选择 Containers 类别,或者搜索“NavHostFragment”。
- 将
NavHostFragment视图拖动到您的 activity 上。 - 在随即显示的 Navigation Graphs 对话框中,选择需要与此
NavHostFragment关联的相应导航图,然后点击 OK。
连接目的地
操作是指目的地之间的逻辑连接。操作在导航图中以箭头表示。操作通常会将一个目的地连接到另一个目的地,不过您也可以创建 [全局操作][6],此类操作可让您从应用中的任意位置转到特定目的地。
借助操作,您可以表示用户在您的应用中导航时可以采取的不同路径。请注意,如需实际导航到各个目的地,您仍然需要编写代码以执行导航操作。
您可以使用 Navigation Editor 将两个目的地连接起来,具体操作步骤如下:
在 Design 标签页中,将鼠标指针悬停在您希望用户从中导航出来的目的地的右侧。该目的地右侧上方会显示一个圆圈,如图 4 所示。
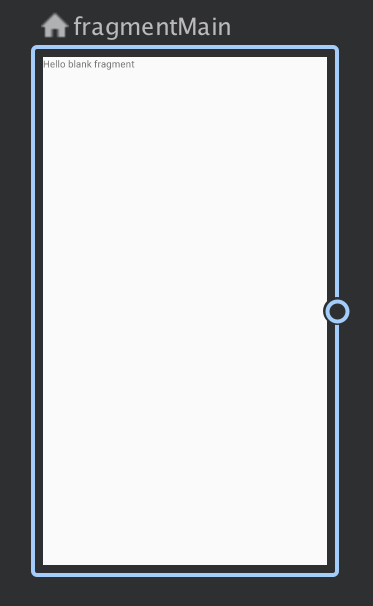
图 4. 一个包含操作连接圆圈的目的地 将光标拖到您希望用户导航到的目的地上,然后松开手指。这两个目的地之间生成的线条表示操作,如图 5 所示。
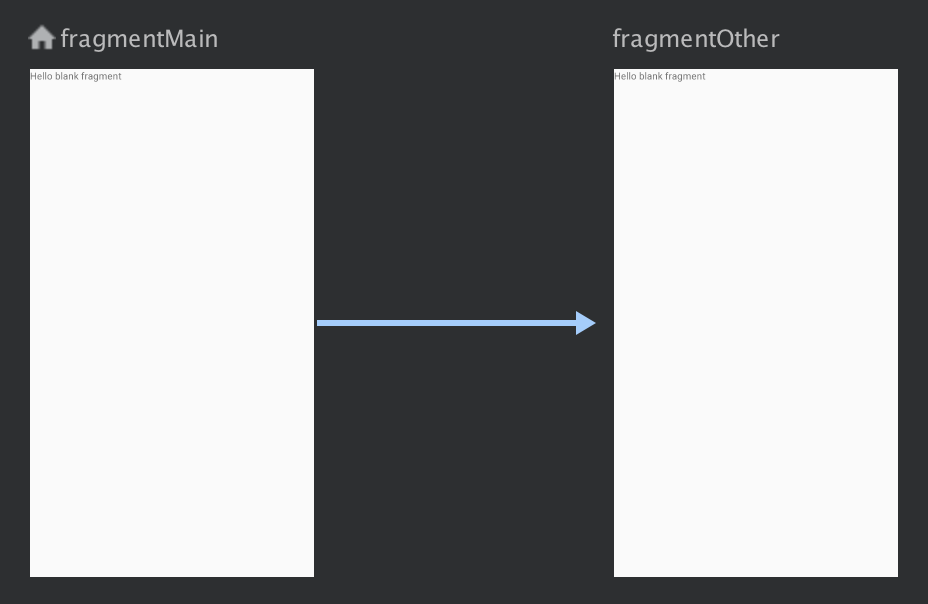
图 5. 通过操作连接目的地 点击箭头以突出显示该操作。此时 Attributes 面板中会显示以下属性:
- Type 字段包含“Action”。
- ID 字段包含该操作的 ID。
- Destination 字段包含目的地 fragment 或 activity 的 ID。
点击 Text 标签页,以切换到 XML 视图。现在,一个 action 元素已添加到源目的地中。该操作有一个 ID 和一个目的地属性(其中包含下一个目的地的 ID),如以下示例所示:
<?xml version="1.0" encoding="utf-8"?>
<navigation xmlns:app="http://schemas.android.com/apk/res-auto"
   xmlns:tools="http://schemas.android.com/tools"
   xmlns:android="http://schemas.android.com/apk/res/android"
   app:startDestination="@id/blankFragment">
   <fragment
       android:id="@+id/blankFragment"
       android:name="com.example.cashdog.cashdog.BlankFragment"
       android:label="@string/label_blank"
       tools:layout="@layout/fragment_blank" >
       <action
           android:id="@+id/action_blankFragment_to_blankFragment2"
           app:destination="@id/blankFragment2" />
   </fragment>
   <fragment
       android:id="@+id/blankFragment2"
       android:name="com.example.cashdog.cashdog.BlankFragment2"
       android:label="@string/label_blank_2"
       tools:layout="@layout/fragment_blank_fragment2" />
</navigation>
在导航图中,操作由 <action> 元素表示。操作至少应包含自己的 ID 和用户应转到的目的地的 ID。
占位符目的地
您可以使用占位符来表示尚未实现的目的地。占位符充当目的地的视觉表示形式。在 Navigation Editor 中,您可以像使用任何其他目的地一样使用占位符。
[1]:/studio/write/layout-editor [2]:/guide/navigation/navigation-nested-graphs [3]:/guide/components/fragments [4]:/guide/navigation/navigation-create-destinations#placeholders [5]:/guide/navigation/navigation-create-destinations [6]:/guide/navigation/navigation-global-action [10]:/reference/androidx/navigation/NavGraph [11]:/reference/androidx/navigation/ui/NavigationUI#setupWithNavController(androidx.appcompat.widget.Toolbar,%20androidx.navigation.NavController)