
บริการหรือการแทรกทรัพยากร Dependency ด้วยตนเอง ตัวระบุตำแหน่งในแอป Android อาจทำให้เกิดปัญหาได้ ทั้งนี้ขึ้นอยู่กับขนาด คุณสามารถจำกัดความซับซ้อนของโปรเจ็กต์เมื่อปรับขนาดได้โดยใช้ Dagger เพื่อจัดการทรัพยากร Dependency
Dagger จะสร้างโค้ดที่เลียนแบบโค้ดที่คุณจะทำโดยอัตโนมัติ ที่เขียนด้วยลายมือ เนื่องจากโค้ดจะสร้างขึ้นในเวลาคอมไพล์ จึงสามารถตรวจสอบย้อนกลับได้ และมีประสิทธิภาพมากกว่าโซลูชันอื่นๆ ที่อาศัยการสะท้อนความรู้สึก เช่น Guice
ประโยชน์ของการใช้ Dagger
Dagger จะช่วยหลีกเลี่ยงการเขียนโค้ดต้นแบบที่น่าเบื่อหน่ายและมีโอกาสเกิดข้อผิดพลาดได้ง่ายๆ โดยทำดังนี้
การสร้างโค้ด
AppContainer(กราฟแอปพลิเคชัน) ที่คุณดำเนินการด้วยตนเอง นำไปใช้ในส่วน DI ด้วยตนเองการสร้างโรงงานสําหรับชั้นเรียนที่มีอยู่ในกราฟของแอปพลิเคชัน ช่วงเวลานี้ คือการตอบสนองภายในทรัพยากร Dependency อย่างไร
ตัดสินใจว่าจะใช้ทรัพยากร Dependency ซ้ำหรือสร้างอินสแตนซ์ใหม่ผ่าน การใช้ขอบเขต
การสร้างคอนเทนเนอร์สำหรับขั้นตอนเฉพาะเหมือนกับที่คุณทำกับขั้นตอนการเข้าสู่ระบบใน ส่วนก่อนหน้าโดยใช้องค์ประกอบย่อยของ Dagger ซึ่งจะช่วยปรับปรุงประสิทธิภาพ โดยปล่อยออบเจ็กต์ในหน่วยความจำเมื่อไม่จำเป็นต้องใช้อีกต่อไป
Dagger จะทำทุกอย่างนี้โดยอัตโนมัติที่เวลาสร้าง ตราบใดที่คุณ ประกาศทรัพยากร Dependency ของคลาสและระบุวิธีตอบสนองด้วยคลาส คำอธิบายประกอบ Dagger จะสร้างโค้ดที่คล้ายคลึงกับโค้ดที่คุณอาจเขียนไว้ ด้วยตนเอง จากนั้น Dagger จะสร้างกราฟของวัตถุที่ใช้อ้างอิงได้ เพื่อค้นหาวิธีจัดทำอินสแตนซ์ของชั้นเรียน สำหรับทุกชั้นเรียนในกราฟ Dagger จะสร้างคลาสประเภทจากโรงงานที่ใช้ ภายในเพื่อรับอินสแตนซ์ของประเภทนั้นๆ
ขณะสร้าง Dagger จะค่อยๆ ตรวจสอบโค้ดของคุณและ:
สร้างและตรวจสอบกราฟทรัพยากร Dependency เพื่อให้มั่นใจว่า
- สามารถตอบสนองทรัพยากร Dependency ของออบเจ็กต์ทุกรายการได้ ดังนั้นจึงไม่มีรันไทม์ ข้อยกเว้น
- ไม่มีรอบการขึ้นต่อกัน จึงไม่มีการวนซ้ำ
สร้างคลาสที่ใช้ขณะรันไทม์เพื่อสร้างออบเจ็กต์จริงและทรัพยากร Dependency ของออบเจ็กต์
กรณีการใช้งานง่ายๆ ใน Dagger: การสร้างโรงงาน
เพื่อแสดงให้เห็นว่าคุณจะทำงานกับ Dagger ได้อย่างไร ลองสร้าง
factory ของคลาส UserRepository ที่แสดงใน
แผนภาพต่อไปนี้
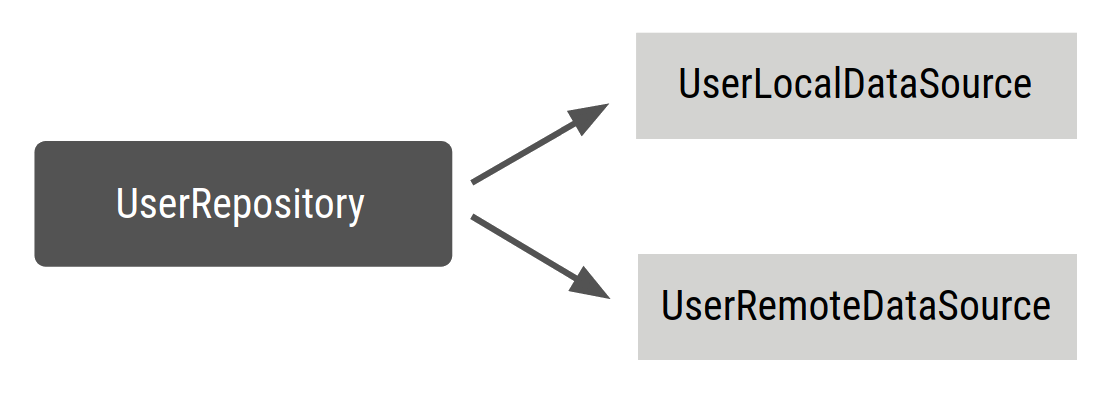
กําหนด UserRepository ดังนี้
Kotlin
class UserRepository(
    private val localDataSource: UserLocalDataSource,
    private val remoteDataSource: UserRemoteDataSource
) { ... }
Java
public class UserRepository {

    private final UserLocalDataSource userLocalDataSource;
    private final UserRemoteDataSource userRemoteDataSource;

    public UserRepository(UserLocalDataSource userLocalDataSource, UserRemoteDataSource userRemoteDataSource) {
        this.userLocalDataSource = userLocalDataSource;
        this.userRemoteDataSource = userRemoteDataSource;
    }

    ...
}
เพิ่มคำอธิบายประกอบ @Inject ลงในตัวสร้าง UserRepository เพื่อให้ Dagger รู้
วิธีสร้าง UserRepository:
Kotlin
// @Inject lets Dagger know how to create instances of this object
class UserRepository @Inject constructor(
    private val localDataSource: UserLocalDataSource,
    private val remoteDataSource: UserRemoteDataSource
) { ... }
Java
public class UserRepository {

    private final UserLocalDataSource userLocalDataSource;
    private final UserRemoteDataSource userRemoteDataSource;

    // @Inject lets Dagger know how to create instances of this object
    @Inject
    public UserRepository(UserLocalDataSource userLocalDataSource, UserRemoteDataSource userRemoteDataSource) {
        this.userLocalDataSource = userLocalDataSource;
        this.userRemoteDataSource = userRemoteDataSource;
    }
}
ในข้อมูลโค้ดด้านบน คุณกำลังบอก Dagger ว่า
วิธีสร้างอินสแตนซ์
UserRepositoryที่มีคำอธิบายประกอบ@Injectเครื่องมือสร้างขึ้นมาทรัพยากร Dependency คืออะไร:
UserLocalDataSourceและUserRemoteDataSource
ตอนนี้ Dagger รู้วิธีสร้างอินสแตนซ์ของ UserRepository แล้ว แต่มันไม่
รู้วิธีสร้างทรัพยากร Dependency ได้ หากคุณใส่คำอธิบายประกอบ
ในชั้นเรียนอื่นด้วย
Dagger รู้วิธีสร้างแท็ก
Kotlin
// @Inject lets Dagger know how to create instances of these objects
class UserLocalDataSource @Inject constructor() { ... }
class UserRemoteDataSource @Inject constructor() { ... }
Java
public class UserLocalDataSource {
    @Inject
    public UserLocalDataSource() { }
}

public class UserRemoteDataSource {
    @Inject
    public UserRemoteDataSource() { }
}
ส่วนประกอบของเครื่องหมายกริช
Dagger สามารถสร้างกราฟของทรัพยากร Dependency ในโปรเจ็กต์ของคุณได้
ใช้เพื่อดูว่าควรรับทรัพยากร Dependency ได้จากที่ใดเมื่อจำเป็น
ในการทำให้ Dagger ทำเช่นนี้ คุณต้องสร้างอินเทอร์เฟซและทำคำอธิบายประกอบ
@Component Dagger จะสร้างคอนเทนเนอร์เหมือนที่คุณทำด้วยตัวเอง
Dependency Injection
ภายในอินเทอร์เฟซ @Component คุณสามารถกำหนดฟังก์ชันที่แสดงผล
อินสแตนซ์ของคลาสที่คุณต้องการ (เช่น UserRepository) @Component บอก
Dagger จะสร้างคอนเทนเนอร์ที่มีทรัพยากร Dependency ทั้งหมดที่จำเป็นเพื่อให้เป็นไปตามข้อกำหนด
ที่แสดงออกมา วิธีนี้เรียกว่าคอมโพเนนต์กริช ประกอบด้วย
กราฟที่ประกอบด้วยวัตถุต่างๆ ที่ Dagger รู้วิธีแสดง
ระบุและทรัพยากร Dependency ที่เกี่ยวข้อง
Kotlin
// @Component makes Dagger create a graph of dependencies
@Component
interface ApplicationGraph {
    // The return type  of functions inside the component interface is
    // what can be provided from the container
    fun repository(): UserRepository
}
Java
// @Component makes Dagger create a graph of dependencies
@Component
public interface ApplicationGraph {
    // The return type  of functions inside the component interface is
    // what can be consumed from the graph
    UserRepository userRepository();
}
เมื่อคุณสร้างโปรเจ็กต์ Dagger จะสร้างการติดตั้งใช้งานของ
อินเทอร์เฟซ ApplicationGraph สำหรับคุณ: DaggerApplicationGraph ด้วย
ตัวประมวลผลคำอธิบายประกอบ Dagger จะสร้างกราฟทรัพยากร Dependency ที่ประกอบด้วย
ความสัมพันธ์ระหว่างทั้ง 3 คลาส (UserRepository
UserLocalDatasource และ UserRemoteDataSource) ที่มีจุดแรกเข้าเพียงจุดเดียว:
กำลังรับอินสแตนซ์ UserRepository วิธีการคือ
Kotlin
// Create an instance of the application graph
val applicationGraph: ApplicationGraph = DaggerApplicationGraph.create()
// Grab an instance of UserRepository from the application graph
val userRepository: UserRepository = applicationGraph.repository()
Java
// Create an instance of the application graph
ApplicationGraph applicationGraph = DaggerApplicationGraph.create();

// Grab an instance of UserRepository from the application graph
UserRepository userRepository = applicationGraph.userRepository();
Dagger จะสร้างอินสแตนซ์ใหม่ของ UserRepository ทุกครั้งที่มีการขอ
Kotlin
val applicationGraph: ApplicationGraph = DaggerApplicationGraph.create()

val userRepository: UserRepository = applicationGraph.repository()
val userRepository2: UserRepository = applicationGraph.repository()

assert(userRepository != userRepository2)
Java
ApplicationGraph applicationGraph = DaggerApplicationGraph.create();

UserRepository userRepository = applicationGraph.userRepository();
UserRepository userRepository2 = applicationGraph.userRepository();

assert(userRepository != userRepository2)
บางครั้ง คุณก็ต้องมีอินสแตนซ์ที่ไม่ซ้ำกันของทรัพยากร Dependency ในคอนเทนเนอร์ ซึ่งอาจเกิดจากหลายสาเหตุดังนี้
คุณต้องการให้ประเภทอื่นๆ ที่มีประเภทนี้เป็นทรัพยากร Dependency แชร์เหมือนกันหรือไม่ เช่น ออบเจ็กต์
ViewModelหลายรายการในขั้นตอนการเข้าสู่ระบบที่ใช้ออบเจ็กต์เดียวกันLoginUserDataการสร้างออบเจ็กต์มีราคาแพงและคุณไม่ต้องการสร้างออบเจ็กต์ใหม่ ทุกครั้งที่มีการประกาศว่าเป็นทรัพยากร Dependency (เช่น โปรแกรมแยกวิเคราะห์ JSON)
ในตัวอย่างนี้ คุณอาจต้องการอินสแตนซ์ที่ไม่ซ้ำกันของ UserRepository
อยู่ในกราฟ ดังนั้นทุกครั้งที่คุณขอ UserRepository
จะได้รับอินสแตนซ์เดียวกันเสมอ ซึ่งจะเป็นประโยชน์ในตัวอย่างของคุณเนื่องจาก
การใช้งานจริงที่มีกราฟ ของแอปพลิเคชันที่ซับซ้อนขึ้น
ออบเจ็กต์ ViewModel หลายรายการขึ้นอยู่กับ UserRepository ซึ่งคุณไม่ต้องการ
เพื่อสร้างอินสแตนซ์ใหม่ของ UserLocalDataSource และ UserRemoteDataSource
ทุกครั้งที่ต้องระบุ UserRepository
ในการแทรกทรัพยากร Dependency ด้วยตนเอง คุณจะทำได้โดยการส่งผ่าน
UserRepository ให้กับตัวสร้างของคลาส ViewModel แต่
ใน Dagger เนื่องจากคุณไม่ได้เขียนโค้ดเอง คุณจะต้องปล่อยให้
Dagger รู้ว่าคุณต้องการใช้อินสแตนซ์เดียวกัน ซึ่งทำได้ด้วยขอบเขต
คำอธิบายประกอบ
กำหนดขอบเขตด้วยกริช
คุณสามารถใช้คำอธิบายประกอบขอบเขตเพื่อจำกัดอายุการใช้งานของออบเจ็กต์เป็นอายุการใช้งาน ของส่วนประกอบ ซึ่งหมายความว่าระบบจะใช้อินสแตนซ์เดียวกันของทรัพยากร Dependency ทุกครั้งที่ต้องระบุประเภทดังกล่าว
เพื่อให้มีอินสแตนซ์ที่ไม่ซ้ำกันของ UserRepository เมื่อคุณขอที่เก็บ
ใน ApplicationGraph ให้ใช้คำอธิบายประกอบขอบเขตเดียวกันสำหรับ @Component
ของอินเทอร์เฟซและUserRepository คุณสามารถใช้คำอธิบายประกอบ @Singleton ที่
มาพร้อมกับแพ็คเกจ javax.inject ที่ Dagger ใช้อยู่แล้ว:
Kotlin
// Scope annotations on a @Component interface informs Dagger that classes annotated
// with this annotation (i.e. @Singleton) are bound to the life of the graph and so
// the same instance of that type is provided every time the type is requested.
@Singleton
@Component
interface ApplicationGraph {
    fun repository(): UserRepository
}

// Scope this class to a component using @Singleton scope (i.e. ApplicationGraph)
@Singleton
class UserRepository @Inject constructor(
    private val localDataSource: UserLocalDataSource,
    private val remoteDataSource: UserRemoteDataSource
) { ... }
Java
// Scope annotations on a @Component interface informs Dagger that classes annotated
// with this annotation (i.e. @Singleton) are scoped to the graph and the same
// instance of that type is provided every time the type is requested.
@Singleton
@Component
public interface ApplicationGraph {
    UserRepository userRepository();
}

// Scope this class to a component using @Singleton scope (i.e. ApplicationGraph)
@Singleton
public class UserRepository {

    private final UserLocalDataSource userLocalDataSource;
    private final UserRemoteDataSource userRemoteDataSource;

    @Inject
    public UserRepository(UserLocalDataSource userLocalDataSource, UserRemoteDataSource userRemoteDataSource) {
        this.userLocalDataSource = userLocalDataSource;
        this.userRemoteDataSource = userRemoteDataSource;
    }
}
หรือคุณจะสร้างและใช้คำอธิบายประกอบขอบเขตที่กำหนดเองก็ได้ คุณสามารถสร้างคำอธิบายประกอบขอบเขตได้ดังนี้
Kotlin
// Creates MyCustomScope
@Scope
@MustBeDocumented
@Retention(value = AnnotationRetention.RUNTIME)
annotation class MyCustomScope
Java
// Creates MyCustomScope
@Scope
@Retention(RetentionPolicy.RUNTIME)
public @interface MyCustomScope {}
จากนั้นคุณจะใช้งานได้ตามเดิมดังนี้
Kotlin
@MyCustomScope
@Component
interface ApplicationGraph {
    fun repository(): UserRepository
}

@MyCustomScope
class UserRepository @Inject constructor(
    private val localDataSource: UserLocalDataSource,
    private val service: UserService
) { ... }
Java
@MyCustomScope
@Component
public interface ApplicationGraph {
    UserRepository userRepository();
}

@MyCustomScope
public class UserRepository {

    private final UserLocalDataSource userLocalDataSource;
    private final UserRemoteDataSource userRemoteDataSource;

    @Inject
    public UserRepository(UserLocalDataSource userLocalDataSource, UserRemoteDataSource userRemoteDataSource) {
        this.userLocalDataSource = userLocalDataSource;
        this.userRemoteDataSource = userRemoteDataSource;
    }
}
ในทั้ง 2 กรณี ออบเจ็กต์จะมีขอบเขตเดียวกับที่ใช้ใส่คำอธิบายประกอบ
อินเทอร์เฟซของ @Component ดังนั้น ทุกครั้งที่คุณโทร
applicationGraph.repository() คุณจะได้รับอินสแตนซ์เดียวกันของ
UserRepository
Kotlin
val applicationGraph: ApplicationGraph = DaggerApplicationGraph.create()

val userRepository: UserRepository = applicationGraph.repository()
val userRepository2: UserRepository = applicationGraph.repository()

assert(userRepository == userRepository2)
Java
ApplicationGraph applicationGraph = DaggerApplicationGraph.create();

UserRepository userRepository = applicationGraph.userRepository();
UserRepository userRepository2 = applicationGraph.userRepository();

assert(userRepository == userRepository2)
บทสรุป
สิ่งสำคัญคือการตระหนักถึงประโยชน์ของ Dagger และพื้นฐานการทำงานของ Dagger ก่อนที่จะใช้งานในสถานการณ์ที่ซับซ้อนยิ่งขึ้นได้
ในหน้าถัดไป คุณจะได้เรียนรู้วิธีเพิ่ม Dagger ในแอปพลิเคชัน Android