
หน้าข้อมูลเบื้องต้นเกี่ยวกับ Dagger อธิบายว่า Dagger จะช่วยให้คุณใช้ทรัพยากร Dependency โดยอัตโนมัติได้อย่างไร ในแอปของคุณ เมื่อมี Dagger คุณไม่จำเป็นต้องเขียนอะไรให้น่าเบื่อ โค้ดต้นแบบที่เกิดข้อผิดพลาดได้ง่าย
สรุปแนวทางปฏิบัติแนะนำ
- ใช้การแทรกตัวสร้างด้วย
@Injectเพื่อเพิ่มประเภทให้กับ Dagger กราฟทุกครั้งที่เป็นไปได้ หรือไม่เช่นนั้น- ใช้
@Bindsเพื่อบอก Dagger ว่าควรใช้อินเทอร์เฟซใด - ใช้
@Providesเพื่อบอก Dagger เกี่ยวกับวิธีจัดชั้นเรียนที่โปรเจ็กต์ของคุณ ไม่ได้เป็นเจ้าของ
- ใช้
- คุณควรประกาศโมดูลเพียงครั้งเดียวในคอมโพเนนต์
- ตั้งชื่อคำอธิบายประกอบขอบเขต โดยพิจารณาจากอายุการใช้งานที่ฟิลด์
เช่น
@ApplicationScope,@LoggedUserScopeและ@ActivityScope
การเพิ่มทรัพยากร Dependency
หากต้องการใช้ Dagger ในโปรเจ็กต์ของคุณ ให้เพิ่มทรัพยากร Dependency เหล่านี้ไปยังแอปพลิเคชันของคุณใน
ไฟล์ build.gradle คุณสามารถค้นหา Dagger เวอร์ชันล่าสุดได้
ในโปรเจ็กต์ GitHub นี้
Kotlin
plugins {
  id 'kotlin-kapt'
}

dependencies {
    implementation 'com.google.dagger:dagger:2.x'
    kapt 'com.google.dagger:dagger-compiler:2.x'
}
Java
dependencies {
    implementation 'com.google.dagger:dagger:2.x'
    annotationProcessor 'com.google.dagger:dagger-compiler:2.x'
}
เครื่องหมายกริชใน Android
ลองใช้ตัวอย่างแอป Android ที่มีกราฟทรัพยากร Dependency จากรูปที่ 1
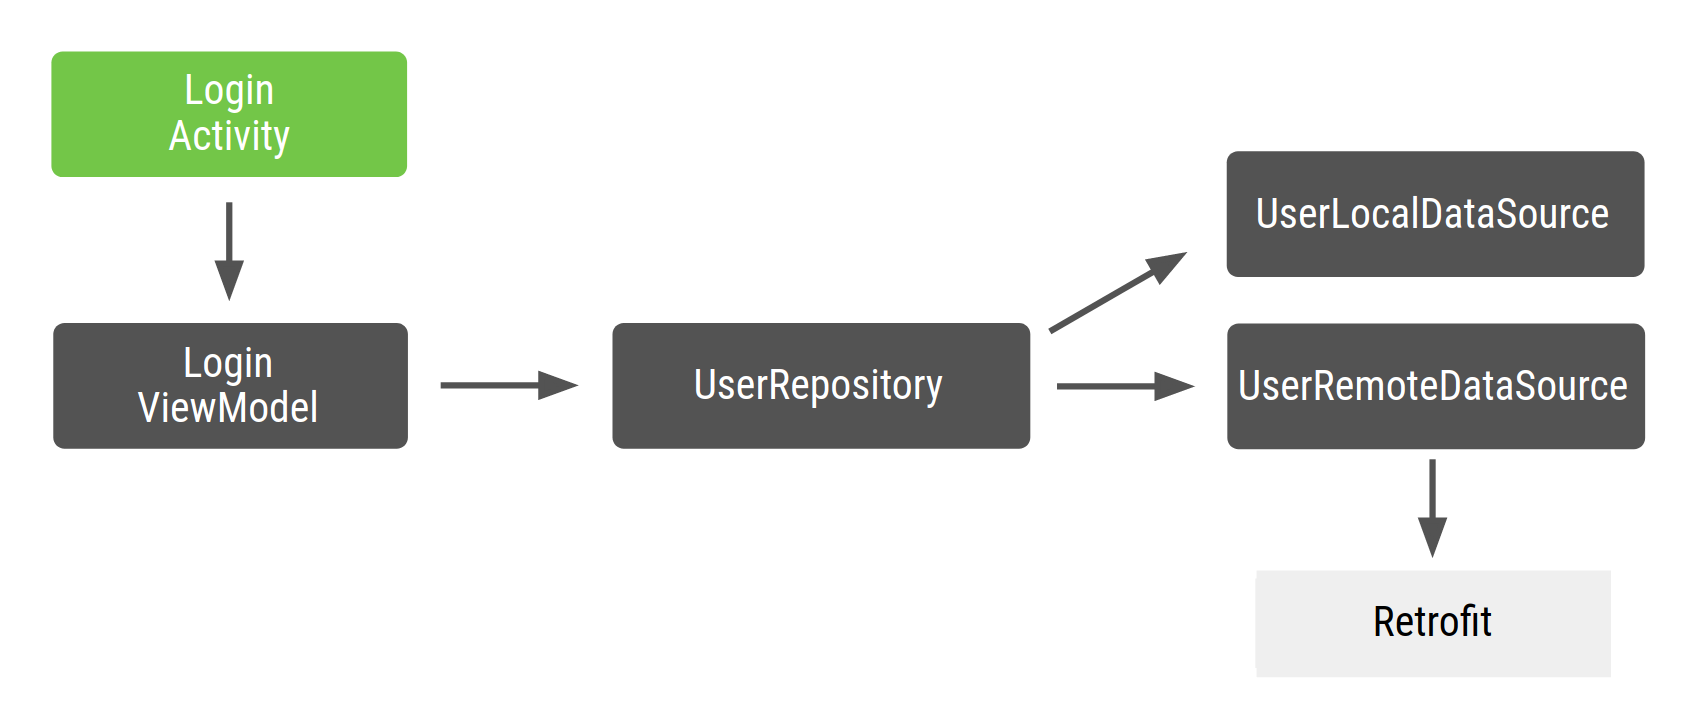
รูปที่ 1 กราฟการขึ้นต่อกันของตัวอย่าง รหัส
ใน Android โดยปกติแล้วคุณจะสร้างกราฟ Dagger ที่แสดงอยู่ในแอปพลิเคชันของคุณ
เพราะคุณต้องการให้อินสแตนซ์ของกราฟอยู่ในหน่วยความจำตราบใดที่
ที่กำลังทำงาน ด้วยวิธีนี้ กราฟจะแนบไปกับวงจรของแอป ในบางส่วน
คุณอาจต้องการให้มีบริบทของแอปพลิเคชันใน
กราฟ นอกจากนี้ คุณยังต้องให้กราฟอยู่ใน
Application ข้อดีอย่างหนึ่งของวิธีนี้
วิธีการก็คือกราฟนี้ใช้ได้ในคลาสเฟรมเวิร์กอื่นๆ ของ Android
นอกจากนี้ ยังทำให้การทดสอบง่ายขึ้นโดยอนุญาตให้คุณใช้
Application ชั้นเรียนในการทดสอบ
เนื่องจากอินเทอร์เฟซที่สร้างกราฟมีคำอธิบายประกอบ @Component
คุณสามารถตั้งชื่อว่า ApplicationComponent หรือ ApplicationGraph คุณมักจะเก็บไว้
อินสแตนซ์ของคอมโพเนนต์นั้นในคลาส Application ที่กำหนดเองแล้วเรียกใช้
ทุกครั้งที่คุณต้องการกราฟของแอปพลิเคชัน ดังที่แสดงในโค้ดต่อไปนี้
snippet:
Kotlin
// Definition of the Application graph
@Component
interface ApplicationComponent { ... }

// appComponent lives in the Application class to share its lifecycle
class MyApplication: Application() {
    // Reference to the application graph that is used across the whole app
    val appComponent = DaggerApplicationComponent.create()
}
Java
// Definition of the Application graph
@Component
public interface ApplicationComponent {
}

// appComponent lives in the Application class to share its lifecycle
public class MyApplication extends Application {

    // Reference to the application graph that is used across the whole app
    ApplicationComponent appComponent = DaggerApplicationComponent.create();
}
เนื่องจากคลาสเฟรมเวิร์กของ Android บางคลาส เช่น กิจกรรมและส่วนย่อย
สร้างอินสแตนซ์โดยระบบ Dagger จะสร้างรูปภาพเหล่านั้นให้คุณไม่ได้ สำหรับกิจกรรม
โค้ดเริ่มต้นจะต้องอยู่ในเมธอด onCreate()
ซึ่งหมายความว่าคุณไม่สามารถใช้คำอธิบายประกอบ @Inject ในเครื่องมือสร้างของ
class (การแทรกตัวสร้าง) แบบเดียวกับที่คุณทำในตัวอย่างก่อนหน้านี้ แต่
คุณต้องใช้การแทรกช่อง
แทนการสร้างทรัพยากร Dependency ที่กิจกรรมต้องการใน onCreate()
คุณต้องให้ Dagger เติมข้อมูล Dependency เหล่านั้นให้คุณ สำหรับฟิลด์
คุณจะใช้คำอธิบายประกอบ @Inject กับช่องที่คุณแทรก
ต้องการรับจากกราฟ Dagger
Kotlin
class LoginActivity: Activity() {
    // You want Dagger to provide an instance of LoginViewModel from the graph
    @Inject lateinit var loginViewModel: LoginViewModel
}
Java
public class LoginActivity extends Activity {

    // You want Dagger to provide an instance of LoginViewModel from the graph
    @Inject
    LoginViewModel loginViewModel;
}
เพื่อความง่าย LoginViewModel จึงไม่ใช่คอมโพเนนต์สถาปัตยกรรมของ Android
ViewModel; นี่เป็นเพียงคลาสปกติที่ทำหน้าที่เป็น ViewModel
ดูข้อมูลเพิ่มเติมเกี่ยวกับวิธีแทรกชั้นเรียนเหล่านี้ได้ที่โค้ด
ในการใช้งาน Android Blueprints Dagger อย่างเป็นทางการใน
สาขา dev-dagger
ข้อพิจารณาอย่างหนึ่งของ Dagger ก็คือฟิลด์ที่แทรกเข้าไปต้องไม่เป็นส่วนตัว โดยจำเป็นต้องมีระดับการเข้าถึงแพ็กเกจส่วนตัวเป็นอย่างน้อยอย่างเช่นในโค้ดก่อนหน้านี้
การแทรกกิจกรรม
Dagger จำเป็นต้องทราบว่า LoginActivity จำเป็นต้องเข้าถึงกราฟเพื่อ
ระบุ ViewModel ที่จำเป็น ในหน้าข้อมูลเบื้องต้นเกี่ยวกับ Dagger คุณใช้
อินเทอร์เฟซ @Component เพื่อรับวัตถุจากกราฟ
โดยแสดงฟังก์ชันที่มีประเภทผลลัพธ์ที่คุณต้องการจาก
กราฟ ในกรณีนี้ คุณต้องบอก Dagger เกี่ยวกับวัตถุ (LoginActivity
ในกรณีนี้) ที่ต้องมีการแทรกทรัพยากร Dependency สำหรับการดำเนินการดังกล่าว คุณจะได้
ฟังก์ชันที่ใช้เป็นพารามิเตอร์ให้กับออบเจ็กต์ที่ขอการแทรก
Kotlin
@Component
interface ApplicationComponent {
    // This tells Dagger that LoginActivity requests injection so the graph needs to
    // satisfy all the dependencies of the fields that LoginActivity is requesting.
    fun inject(activity: LoginActivity)
}
Java
@Component
public interface ApplicationComponent {
    // This tells Dagger that LoginActivity requests injection so the graph needs to
    // satisfy all the dependencies of the fields that LoginActivity is injecting.
    void inject(LoginActivity loginActivity);
}
ฟังก์ชันนี้จะบอกให้ Dagger ทราบว่า LoginActivity ต้องการเข้าถึงกราฟและ
ส่งคำขอแทรก Dagger จำเป็นต้องตอบสนองทรัพยากร Dependency ทั้งหมดที่
LoginActivity ต้องการ (LoginViewModel ที่มีทรัพยากร Dependency ของตนเอง)
หากมีหลายชั้นเรียนที่ขอให้แทรกข้อมูล คุณต้อง
ประกาศทั้งหมดในคอมโพเนนต์ด้วยประเภทที่ถูกต้อง ตัวอย่างเช่น หากคุณมี
LoginActivity และ RegistrationActivity ขอแทรก คุณจะมี 2 รายการ
inject() แทนที่จะเป็นวิธีทั่วไปซึ่งครอบคลุมทั้ง 2 กรณี ทั่วไป
เมธอด inject() ไม่ได้บอก Dagger ว่าต้องระบุอะไร ฟังก์ชัน
ในอินเทอร์เฟซอาจมีชื่อใดก็ได้ แต่เป็นการเรียกชื่อ inject() เมื่อพวกเขา
การรับวัตถุที่จะแทรกเป็นพารามิเตอร์เป็นกฎเกณฑ์ใน Dagger
หากต้องการแทรกออบเจ็กต์ในกิจกรรม คุณจะใช้ appComponent ที่กำหนดไว้ใน
คลาส Application และเรียกเมธอด inject() โดยส่งในอินสแตนซ์
ของกิจกรรมที่ขอการแทรก
เมื่อใช้กิจกรรม ให้ใส่ Dagger ใน
เมธอด onCreate() ของกิจกรรมก่อนเรียกใช้ super.onCreate() เพื่อหลีกเลี่ยงปัญหา
ด้วยการกู้คืนส่วนย่อย ระหว่างช่วงคืนค่าใน super.onCreate()
กิจกรรมจะแนบส่วนย่อยที่อาจต้องการเข้าถึงการเชื่อมโยงกิจกรรม
เมื่อใช้ส่วนย่อย ให้แทรก Dagger ใน onAttach() ของแฟรกเมนต์
ในกรณีนี้ คุณสามารถดำเนินการก่อนหรือหลังการโทรหา super.onAttach()
Kotlin
class LoginActivity: Activity() {
    // You want Dagger to provide an instance of LoginViewModel from the graph
    @Inject lateinit var loginViewModel: LoginViewModel

    override fun onCreate(savedInstanceState: Bundle?) {
        // Make Dagger instantiate @Inject fields in LoginActivity
        (applicationContext as MyApplication).appComponent.inject(this)
        // Now loginViewModel is available

        super.onCreate(savedInstanceState)
    }
}

// @Inject tells Dagger how to create instances of LoginViewModel
class LoginViewModel @Inject constructor(
    private val userRepository: UserRepository
) { ... }
Java
public class LoginActivity extends Activity {

    // You want Dagger to provide an instance of LoginViewModel from the graph
    @Inject
    LoginViewModel loginViewModel;

    @Override
    protected void onCreate(Bundle savedInstanceState) {
        // Make Dagger instantiate @Inject fields in LoginActivity
        ((MyApplication) getApplicationContext()).appComponent.inject(this);
        // Now loginViewModel is available

        super.onCreate(savedInstanceState);
    }
}

public class LoginViewModel {

    private final UserRepository userRepository;

    // @Inject tells Dagger how to create instances of LoginViewModel
    @Inject
    public LoginViewModel(UserRepository userRepository) {
        this.userRepository = userRepository;
    }
}
มาบอก Dagger ถึงวิธีจัดเตรียมทรัพยากร Dependency อื่นๆ ในการสร้าง กราฟ
Kotlin
class UserRepository @Inject constructor(
    private val localDataSource: UserLocalDataSource,
    private val remoteDataSource: UserRemoteDataSource
) { ... }

class UserLocalDataSource @Inject constructor() { ... }
class UserRemoteDataSource @Inject constructor(
    private val loginService: LoginRetrofitService
) { ... }
Java
public class UserRepository {

    private final UserLocalDataSource userLocalDataSource;
    private final UserRemoteDataSource userRemoteDataSource;

    @Inject
    public UserRepository(UserLocalDataSource userLocalDataSource, UserRemoteDataSource userRemoteDataSource) {
        this.userLocalDataSource = userLocalDataSource;
        this.userRemoteDataSource = userRemoteDataSource;
    }
}

public class UserLocalDataSource {

    @Inject
    public UserLocalDataSource() {}
}

public class UserRemoteDataSource {

    private final LoginRetrofitService loginRetrofitService;

    @Inject
    public UserRemoteDataSource(LoginRetrofitService loginRetrofitService) {
        this.loginRetrofitService = loginRetrofitService;
    }
}
โมดูลกริช
สำหรับตัวอย่างนี้ คุณใช้ไลบรารีเครือข่าย Retrofit
UserRemoteDataSource มีการพึ่งพา LoginRetrofitService อย่างไรก็ตาม
วิธีการสร้างอินสแตนซ์ของ LoginRetrofitService นั้นแตกต่างจาก
ที่คุณได้ทำมาจนถึงตอนนี้ ไม่ใช่การเริ่มต้นคลาส เกิดจาก
กำลังเรียกใช้ Retrofit.Builder() และส่งผ่านพารามิเตอร์อื่นเพื่อกำหนดค่า
บริการเข้าสู่ระบบ
นอกจากคำอธิบายประกอบ @Inject แล้ว ยังมีอีกวิธีหนึ่งที่จะบอก Dagger ว่า
ให้ตัวอย่างคลาส นั่นคือข้อมูลภายในโมดูล Dagger เครื่องหมายกริช
โมดูลคือคลาสที่มีการใส่คำอธิบายประกอบด้วย @Module ในหน้านี้ คุณสามารถกำหนด
ทรัพยากร Dependency ที่มีคำอธิบายประกอบ @Provides
Kotlin
// @Module informs Dagger that this class is a Dagger Module
@Module
class NetworkModule {

    // @Provides tell Dagger how to create instances of the type that this function
    // returns (i.e. LoginRetrofitService).
    // Function parameters are the dependencies of this type.
    @Provides
    fun provideLoginRetrofitService(): LoginRetrofitService {
        // Whenever Dagger needs to provide an instance of type LoginRetrofitService,
        // this code (the one inside the @Provides method) is run.
        return Retrofit.Builder()
                .baseUrl("https://example.com")
                .build()
                .create(LoginService::class.java)
    }
}
Java
// @Module informs Dagger that this class is a Dagger Module
@Module
public class NetworkModule {

    // @Provides tell Dagger how to create instances of the type that this function
    // returns (i.e. LoginRetrofitService).
    // Function parameters are the dependencies of this type.
    @Provides
    public LoginRetrofitService provideLoginRetrofitService() {
        // Whenever Dagger needs to provide an instance of type LoginRetrofitService,
        // this code (the one inside the @Provides method) is run.
        return new Retrofit.Builder()
                .baseUrl("https://example.com")
                .build()
                .create(LoginService.class);
    }
}
โมดูลเป็นวิธีสรุปข้อมูลเกี่ยวกับวิธีให้
ออบเจ็กต์ อย่างที่เห็น คุณเรียกชั้นเรียน NetworkModule เพื่อจัดกลุ่มตรรกะ
ในการมอบออบเจ็กต์ที่เกี่ยวข้องกับเครือข่าย หากแอปพลิเคชันขยายออก คุณสามารถ
ให้เพิ่มวิธีระบุ OkHttpClient ที่นี่ด้วย หรือวิธีการ
กำหนดค่า Gson หรือ Moshi
ทรัพยากร Dependency ของเมธอด @Provides คือพารามิเตอร์ของเมธอดนั้น สำหรับ
วิธีการก่อนหน้าสามารถระบุ LoginRetrofitService โดยไม่มีทรัพยากร Dependency ได้
เนื่องจากเมธอดไม่มีพารามิเตอร์ หากคุณประกาศ OkHttpClient เป็น
Dagger จะต้องระบุอินสแตนซ์ OkHttpClient จากพารามิเตอร์
เพื่อตอบสนองทรัพยากร Dependency ของ LoginRetrofitService เช่น
Kotlin
@Module
class NetworkModule {
    // Hypothetical dependency on LoginRetrofitService
    @Provides
    fun provideLoginRetrofitService(
        okHttpClient: OkHttpClient
    ): LoginRetrofitService { ... }
}
Java
@Module
public class NetworkModule {

    @Provides
    public LoginRetrofitService provideLoginRetrofitService(OkHttpClient okHttpClient) {
        ...
    }
}
เพื่อให้กราฟ Dagger ทราบเกี่ยวกับโมดูลนี้ คุณต้องเพิ่มโมดูลนี้ลงใน
อินเทอร์เฟซของ @Component ดังนี้
Kotlin
// The "modules" attribute in the @Component annotation tells Dagger what Modules
// to include when building the graph
@Component(modules = [NetworkModule::class])
interface ApplicationComponent {
    ...
}
Java
// The "modules" attribute in the @Component annotation tells Dagger what Modules
// to include when building the graph
@Component(modules = NetworkModule.class)
public interface ApplicationComponent {
    ...
}
วิธีที่แนะนำในการเพิ่มประเภทลงในกราฟ Dagger คือการใช้ตัวสร้าง
(เช่น ที่มีคำอธิบายประกอบ @Inject ในเครื่องมือสร้างของคลาส)
บางครั้งเป็นไปไม่ได้และคุณต้องใช้โมดูล Dagger ตัวอย่าง 1 รายการ
คือเวลาที่คุณต้องการให้ Dagger ใช้ผลลัพธ์จากการคำนวณเพื่อกำหนดวิธีการ
สร้างอินสแตนซ์ของออบเจ็กต์ เมื่อใดก็ตามที่จำเป็นต้องระบุอินสแตนซ์
Dagger จะเรียกใช้โค้ดภายในเมธอด @Provides
นี่คือลักษณะของกราฟ Dagger ในตัวอย่างในขณะนี้:
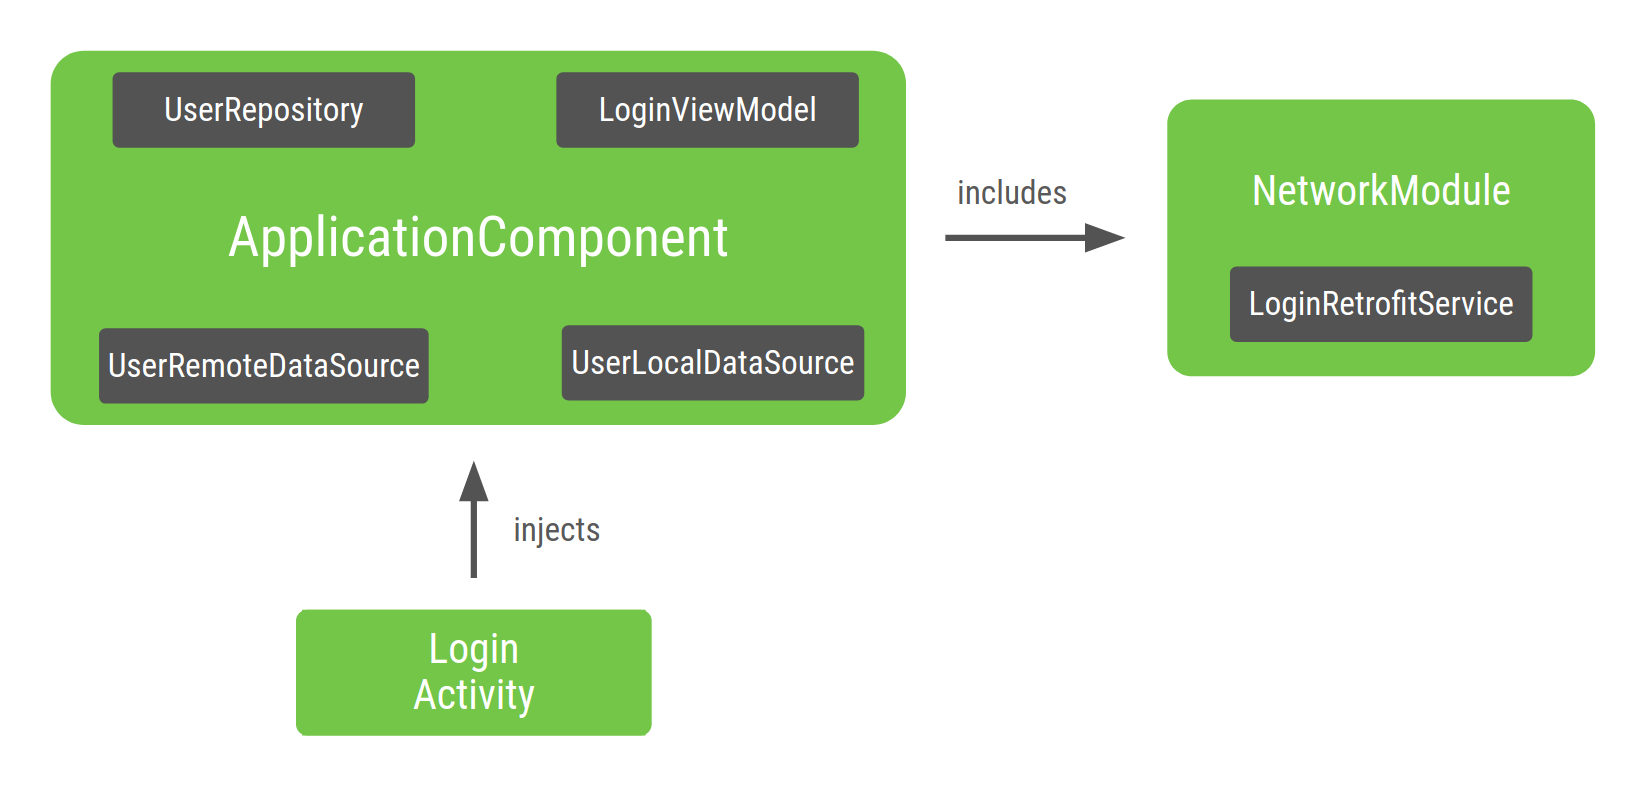
รูปที่ 2 การนำเสนอกราฟที่มี
Dagger ฉีด LoginActivity แล้ว
จุดแรกเข้าของกราฟคือ LoginActivity เนื่องจาก LoginActivity แทรก
LoginViewModel Dagger จะสร้างกราฟที่รู้วิธีแสดงอินสแตนซ์
ของ LoginViewModel และทรัพยากร Dependency แบบเกิดซ้ำ กริชรู้วิธี
เนื่องจากคำอธิบายประกอบ @Inject ในชั้นเรียน เครื่องมือสร้างขึ้นมา
ภายใน ApplicationComponent ที่สร้างโดย Dagger จะมีประเภทจากโรงงาน
เพื่อรับอินสแตนซ์ของ
คลาสทั้งหมดที่รู้วิธีระบุ ด้วยวิธีนี้
ตัวอย่างเช่น Dagger มอบสิทธิ์ให้ NetworkModule ที่รวมอยู่ใน
ApplicationComponent เพื่อรับอินสแตนซ์ LoginRetrofitService
ขอบเขตของกริช
มีการพูดถึงขอบเขตในหน้าข้อมูลเบื้องต้นเกี่ยวกับ Dagger แล้วเพื่อให้ทราบวิธี อินสแตนซ์ที่ไม่ซ้ำของประเภทหนึ่งๆ ในคอมโพเนนต์ สิ่งนี้หมายความว่า กำหนดขอบเขตประเภทให้กับวงจรการใช้งานของคอมโพเนนต์
เนื่องจากคุณอาจต้องการใช้ UserRepository ในฟีเจอร์อื่นๆ ของแอปและ
อาจไม่ต้องการสร้างออบเจ็กต์ใหม่ทุกครั้งที่คุณต้องการ คุณสามารถระบุ
ถือเป็นอินสแตนซ์ที่ไม่ซ้ำ
สำหรับทั้งแอป ซึ่งจะเหมือนกันสำหรับ
LoginRetrofitService: การสร้างอาจมีค่าใช้จ่ายสูง และคุณยังต้องการ
อินสแตนซ์ที่ไม่ซ้ำของออบเจ็กต์นั้น
เพื่อนำมาใช้ซ้ำ กำลังสร้างอินสแตนซ์ของ
UserRemoteDataSource ไม่ได้มีราคาแพงขนาดนั้น คุณจึงต้องกำหนดขอบเขตให้
ไม่จำเป็นต้องมีวงจรการใช้งานของคอมโพเนนต์
@Singleton เป็นคำอธิบายประกอบขอบเขตเพียงรายการเดียวที่มาพร้อมกับ
แพ็กเกจ javax.inject คุณใช้คำอธิบายประกอบ ApplicationComponent ได้
และออบเจ็กต์ที่ต้องการใช้ซ้ำ
กับทั้งแอปพลิเคชัน
Kotlin
@Singleton
@Component(modules = [NetworkModule::class])
interface ApplicationComponent {
    fun inject(activity: LoginActivity)
}

@Singleton
class UserRepository @Inject constructor(
    private val localDataSource: UserLocalDataSource,
    private val remoteDataSource: UserRemoteDataSource
) { ... }

@Module
class NetworkModule {
    // Way to scope types inside a Dagger Module
    @Singleton
    @Provides
    fun provideLoginRetrofitService(): LoginRetrofitService { ... }
}
Java
@Singleton
@Component(modules = NetworkModule.class)
public interface ApplicationComponent {
    void inject(LoginActivity loginActivity);
}

@Singleton
public class UserRepository {

    private final UserLocalDataSource userLocalDataSource;
    private final UserRemoteDataSource userRemoteDataSource;

    @Inject
    public UserRepository(UserLocalDataSource userLocalDataSource, UserRemoteDataSource userRemoteDataSource) {
        this.userLocalDataSource = userLocalDataSource;
        this.userRemoteDataSource = userRemoteDataSource;
    }
}

@Module
public class NetworkModule {

    @Singleton
    @Provides
    public LoginRetrofitService provideLoginRetrofitService() { ... }
}
โปรดระวังอย่าให้หน่วยความจำรั่วไหลเมื่อใช้ขอบเขตกับวัตถุ อาส
ตราบใดที่คอมโพเนนต์ที่กำหนดขอบเขตอยู่ในหน่วยความจำ ออบเจ็กต์ที่สร้างก็จะอยู่ในหน่วยความจำ
ด้วย เนื่องจาก ApplicationComponent สร้างขึ้นเมื่อมีการเปิดแอป (ใน
Application) ระบบจะทำลายแอปเมื่อถูกทำลาย ดังนั้น
อินสแตนซ์ที่ไม่ซ้ำของ UserRepository จะยังคงอยู่ในหน่วยความจำจนกว่า
แอปพลิเคชันถูกทำลาย
องค์ประกอบย่อยของ Dagger
หากกระบวนการเข้าสู่ระบบของคุณ (จัดการโดย LoginActivity เดียว) ประกอบด้วย
คุณควรใช้อินสแตนซ์เดียวกันของ LoginViewModel ในทุกๆ
ส่วนย่อย @Singleton ไม่สามารถใส่คำอธิบายประกอบ LoginViewModel เพื่อใช้อินสแตนซ์ซ้ำ
ด้วยเหตุผลต่อไปนี้
อินสแตนซ์ของ
LoginViewModelจะยังคงอยู่ในหน่วยความจำหลังจากที่โฟลว์มี เสร็จสิ้นแล้วคุณต้องการใช้
LoginViewModelอินสแตนซ์ที่แตกต่างกันสำหรับขั้นตอนการเข้าสู่ระบบแต่ละขั้น ตัวอย่างเช่น หากผู้ใช้ออกจากระบบ คุณจะต้องใช้LoginViewModelแทนที่จะเป็นอินสแตนซ์เดียวกันกับเมื่อผู้ใช้เข้าสู่ระบบ เป็นครั้งแรก
หากต้องการกำหนดขอบเขต LoginViewModel ให้กับวงจรของ LoginActivity คุณต้องสร้าง
คอมโพเนนต์ใหม่ (กราฟย่อยใหม่) สำหรับขั้นตอนการเข้าสู่ระบบและขอบเขตใหม่
เรามาสร้างกราฟสำหรับขั้นตอนการลงชื่อเข้าใช้โดยเฉพาะกัน
Kotlin
@Component
interface LoginComponent {}
Java
@Component
public interface LoginComponent {
}
ตอนนี้ LoginActivity ควรได้รับการฉีดจาก LoginComponent เนื่องจาก
มีการกำหนดค่าเฉพาะการเข้าสู่ระบบ ซึ่งจะนำความรับผิดชอบในการแทรก
LoginActivity จากชั้นเรียน ApplicationComponent
Kotlin
@Component
interface LoginComponent {
    fun inject(activity: LoginActivity)
}
Java
@Component
public interface LoginComponent {
    void inject(LoginActivity loginActivity);
}
LoginComponent ต้องเข้าถึงออบเจ็กต์จาก ApplicationComponent ได้
เนื่องจาก LoginViewModel ขึ้นอยู่ UserRepository วิธีบอก Dagger ว่า
ที่คุณต้องการให้คอมโพเนนต์ใหม่ใช้ส่วนหนึ่งของคอมโพเนนต์อื่น
องค์ประกอบย่อยของตัวดึง คอมโพเนนต์ใหม่ต้องเป็นองค์ประกอบย่อยของ
ที่มีทรัพยากรที่แชร์ร่วมกัน
คอมโพเนนต์ย่อยคือคอมโพเนนต์ที่สืบทอดและขยายกราฟออบเจ็กต์ของ คอมโพเนนต์หลัก ดังนั้น ออบเจ็กต์ทั้งหมดที่ระบุในคอมโพเนนต์หลัก ที่มีในคอมโพเนนต์ย่อยด้วย ในลักษณะนี้ วัตถุจากองค์ประกอบย่อย อาจขึ้นอยู่กับออบเจ็กต์ที่คอมโพเนนต์หลักให้ไว้
ในการสร้างอินสแตนซ์ของคอมโพเนนต์ย่อย คุณต้องมีอินสแตนซ์ของคอมโพเนนต์หลัก คอมโพเนนต์ ดังนั้น ออบเจ็กต์ที่คอมโพเนนต์หลักให้ไว้ไปยัง คอมโพเนนต์ย่อยยังคงมีขอบเขตอยู่ที่คอมโพเนนต์หลัก
ในตัวอย่างนี้ คุณต้องกำหนด LoginComponent เป็นองค์ประกอบย่อยของ
ApplicationComponent โดยใส่คำอธิบายประกอบ LoginComponent ด้วย
@Subcomponent:
Kotlin
// @Subcomponent annotation informs Dagger this interface is a Dagger Subcomponent
@Subcomponent
interface LoginComponent {

    // This tells Dagger that LoginActivity requests injection from LoginComponent
    // so that this subcomponent graph needs to satisfy all the dependencies of the
    // fields that LoginActivity is injecting
    fun inject(loginActivity: LoginActivity)
}
Java
// @Subcomponent annotation informs Dagger this interface is a Dagger Subcomponent
@Subcomponent
public interface LoginComponent {

    // This tells Dagger that LoginActivity requests injection from LoginComponent
    // so that this subcomponent graph needs to satisfy all the dependencies of the
    // fields that LoginActivity is injecting
    void inject(LoginActivity loginActivity);
}
คุณต้องกำหนดโรงงานผลิตย่อยภายใน LoginComponent ด้วยเพื่อให้
ApplicationComponent รู้วิธีสร้างอินสแตนซ์ของ LoginComponent
Kotlin
@Subcomponent
interface LoginComponent {

    // Factory that is used to create instances of this subcomponent
    @Subcomponent.Factory
    interface Factory {
        fun create(): LoginComponent
    }

    fun inject(loginActivity: LoginActivity)
}
Java
@Subcomponent
public interface LoginComponent {

    // Factory that is used to create instances of this subcomponent
    @Subcomponent.Factory
    interface Factory {
        LoginComponent create();
    }

    void inject(LoginActivity loginActivity);
}
เพื่อบอก Dagger ว่า LoginComponent เป็นองค์ประกอบย่อยของ
ApplicationComponent คุณต้องระบุรหัสตาม:
การสร้างโมดูล Dagger ใหม่ (เช่น
SubcomponentsModule) ที่ผ่าน คลาสของคอมโพเนนต์ย่อยเป็นแอตทริบิวต์subcomponentsของคำอธิบายประกอบKotlin
// The "subcomponents" attribute in the @Module annotation tells Dagger what
// Subcomponents are children of the Component this module is included in.
@Module(subcomponents = LoginComponent::class)
class SubcomponentsModule {}
Java
// The "subcomponents" attribute in the @Module annotation tells Dagger what
// Subcomponents are children of the Component this module is included in.
@Module(subcomponents = LoginComponent.class)
public class SubcomponentsModule {
}
การเพิ่มโมดูลใหม่ (เช่น
SubcomponentsModule) ไปยังApplicationComponent:Kotlin
// Including SubcomponentsModule, tell ApplicationComponent that
// LoginComponent is its subcomponent.
@Singleton
@Component(modules = [NetworkModule::class, SubcomponentsModule::class])
interface ApplicationComponent {
}
Java
// Including SubcomponentsModule, tell ApplicationComponent that
// LoginComponent is its subcomponent.
@Singleton
@Component(modules = {NetworkModule.class, SubcomponentsModule.class})
public interface ApplicationComponent {
}
โปรดทราบว่า
ApplicationComponentไม่จำเป็นต้องแทรกLoginActivityอีกต่อไป เพราะตอนนี้ความรับผิดชอบเป็นของLoginComponentแล้ว ดังนั้นคุณสามารถนำออก เมธอดinject()จากApplicationComponentผู้บริโภคของ
ApplicationComponentจำเป็นต้องทราบวิธีสร้างอินสแตนซ์ของLoginComponentคอมโพเนนต์หลักต้องเพิ่มเมธอดลงในอินเทอร์เฟซเพื่อให้ ผู้บริโภคสร้างอินสแตนซ์ของคอมโพเนนต์ย่อยจากอินสแตนซ์ของ คอมโพเนนต์หลักแสดงโรงงานที่สร้างอินสแตนซ์ของ
LoginComponentใน อินเทอร์เฟซ:Kotlin
@Singleton
@Component(modules = [NetworkModule::class, SubcomponentsModule::class])
interface ApplicationComponent {
// This function exposes the LoginComponent Factory out of the graph so consumers
// can use it to obtain new instances of LoginComponent
fun loginComponent(): LoginComponent.Factory
}
Java
@Singleton
@Component(modules = { NetworkModule.class, SubcomponentsModule.class} )
public interface ApplicationComponent {
// This function exposes the LoginComponent Factory out of the graph so consumers
// can use it to obtain new instances of LoginComponent
LoginComponent.Factory loginComponent();
}
การกำหนดขอบเขตให้กับคอมโพเนนต์ย่อย
หากสร้างโปรเจ็กต์ คุณจะสร้างอินสแตนซ์ของทั้ง ApplicationComponent ได้
และ LoginComponent ApplicationComponent แนบอยู่กับวงจรของ
เพราะคุณต้องการใช้กราฟตัวเดียวกัน
แอปพลิเคชันนั้นอยู่ในหน่วยความจำ
LoginComponent มีวงจรชีวิตอย่างไร หนึ่งในเหตุผลที่คุณอยากให้
LoginComponent เพราะคุณต้องแชร์อินสแตนซ์เดียวกันของ
LoginViewModel ระหว่างส่วนย่อยที่เกี่ยวข้องกับการเข้าสู่ระบบ แต่ยังต้องการความแตกต่าง
อินสแตนซ์ของ LoginViewModel เมื่อมีขั้นตอนการเข้าสู่ระบบใหม่ LoginActivity
คืออายุการใช้งานที่เหมาะสมสำหรับ LoginComponent: สำหรับทุกกิจกรรมใหม่ คุณต้องมี
อินสแตนซ์ใหม่ของ LoginComponent และส่วนย่อยที่ใช้อินสแตนซ์ของ
LoginComponent
เนื่องจาก LoginComponent แนบอยู่กับวงจร LoginActivity คุณจึงต้องทำสิ่งต่อไปนี้
เก็บการอ้างอิงไปยังคอมโพเนนต์ในกิจกรรมในลักษณะเดียวกับที่คุณเก็บ
การอ้างถึง applicationComponent ในคลาส Application ด้วยวิธีนี้
ส่วนย่อยเข้าถึงได้
Kotlin
class LoginActivity: Activity() {
    // Reference to the Login graph
    lateinit var loginComponent: LoginComponent
    ...
}
Java
public class LoginActivity extends Activity {

    // Reference to the Login graph
    LoginComponent loginComponent;

    ...
}
โปรดสังเกตว่าตัวแปร loginComponent จะไม่มีคำอธิบายประกอบด้วย @Inject
เพราะคุณไม่คิดว่า Dagger จะให้ตัวแปรนั้น
คุณใช้ ApplicationComponent เพื่อรับการอ้างอิงไปยัง LoginComponent ได้
จากนั้นแทรก LoginActivity ดังนี้
Kotlin
class LoginActivity: Activity() {
    // Reference to the Login graph
    lateinit var loginComponent: LoginComponent

    // Fields that need to be injected by the login graph
    @Inject lateinit var loginViewModel: LoginViewModel

    override fun onCreate(savedInstanceState: Bundle?) {
        // Creation of the login graph using the application graph
        loginComponent = (applicationContext as MyDaggerApplication)
                            .appComponent.loginComponent().create()

        // Make Dagger instantiate @Inject fields in LoginActivity
        loginComponent.inject(this)

        // Now loginViewModel is available

        super.onCreate(savedInstanceState)
    }
}
Java
public class LoginActivity extends Activity {

    // Reference to the Login graph
    LoginComponent loginComponent;

    // Fields that need to be injected by the login graph
    @Inject
    LoginViewModel loginViewModel;

    @Override
    protected void onCreate(Bundle savedInstanceState) {
        // Creation of the login graph using the application graph
        loginComponent = ((MyApplication) getApplicationContext())
                                .appComponent.loginComponent().create();

        // Make Dagger instantiate @Inject fields in LoginActivity
        loginComponent.inject(this);

        // Now loginViewModel is available

        super.onCreate(savedInstanceState);
    }
}
LoginComponent สร้างขึ้นในเมธอด onCreate() ของกิจกรรม และคุณจะได้รับ
ถูกทำลายโดยปริยายเมื่อกิจกรรมถูกทำลาย
LoginComponent ต้องระบุอินสแตนซ์ของ LoginViewModel เหมือนกันเสมอ
ทุกครั้งที่มีการขอ คุณทำได้โดยสร้างคำอธิบายประกอบที่กำหนดเอง
และระบุคำอธิบายประกอบทั้ง LoginComponent และ LoginViewModel ด้วยขอบเขตดังกล่าว หมายเหตุ
ว่าคุณไม่สามารถใช้คำอธิบายประกอบ @Singleton ได้ เนื่องจากมีการใช้งานอยู่แล้ว
คอมโพเนนต์ระดับบนสุดและนั่นจะทำให้ออบเจ็กต์เป็นแอปพลิเคชันซิงเกิล
(อินสแตนซ์ที่ไม่ซ้ำสำหรับทั้งแอป) คุณต้องสร้างคำอธิบายประกอบอื่น
ในกรณีนี้ คุณอาจเรียกใช้ขอบเขตนี้ @LoginScope แต่ขอบเขตนี้ไม่ถูกต้อง
ฝึกฝน ชื่อคำอธิบายประกอบขอบเขตไม่ควรสื่อถึงวัตถุประสงค์ที่ชัดเจน
ตอบสนองความต้องการ แต่ควรตั้งชื่อตามอายุการใช้งานเนื่องจาก
คำอธิบายประกอบที่นำมาใช้ซ้ำได้โดยคอมโพเนนต์ระดับเดียวกัน เช่น RegistrationComponent
และ SettingsComponent นั่นจึงเป็นเหตุผลที่คุณควรตั้งชื่อว่า @ActivityScope แทน
ของ @LoginScope
Kotlin
// Definition of a custom scope called ActivityScope
@Scope
@Retention(value = AnnotationRetention.RUNTIME)
annotation class ActivityScope

// Classes annotated with @ActivityScope are scoped to the graph and the same
// instance of that type is provided every time the type is requested.
@ActivityScope
@Subcomponent
interface LoginComponent { ... }

// A unique instance of LoginViewModel is provided in Components
// annotated with @ActivityScope
@ActivityScope
class LoginViewModel @Inject constructor(
    private val userRepository: UserRepository
) { ... }
Java
// Definition of a custom scope called ActivityScope
@Scope
@Retention(RetentionPolicy.RUNTIME)
public @interface ActivityScope {}

// Classes annotated with @ActivityScope are scoped to the graph and the same
// instance of that type is provided every time the type is requested.
@ActivityScope
@Subcomponent
public interface LoginComponent { ... }

// A unique instance of LoginViewModel is provided in Components
// annotated with @ActivityScope
@ActivityScope
public class LoginViewModel {

    private final UserRepository userRepository;

    @Inject
    public LoginViewModel(UserRepository userRepository) {
        this.userRepository = userRepository;
    }
}
คราวนี้ถ้าคุณมีส่วนย่อย 2 ส่วนที่ต้องใช้ LoginViewModel ส่วนย่อยทั้งคู่
ที่มีให้ในอินสแตนซ์เดียวกัน ตัวอย่างเช่น หากคุณมี
LoginUsernameFragment และ LoginPasswordFragment ที่ต้องฉีด
โดย LoginComponent:
Kotlin
@ActivityScope
@Subcomponent
interface LoginComponent {

    @Subcomponent.Factory
    interface Factory {
        fun create(): LoginComponent
    }

    // All LoginActivity, LoginUsernameFragment and LoginPasswordFragment
    // request injection from LoginComponent. The graph needs to satisfy
    // all the dependencies of the fields those classes are injecting
    fun inject(loginActivity: LoginActivity)
    fun inject(usernameFragment: LoginUsernameFragment)
    fun inject(passwordFragment: LoginPasswordFragment)
}
Java
@ActivityScope
@Subcomponent
public interface LoginComponent {

    @Subcomponent.Factory
    interface Factory {
        LoginComponent create();
    }

    // All LoginActivity, LoginUsernameFragment and LoginPasswordFragment
    // request injection from LoginComponent. The graph needs to satisfy
    // all the dependencies of the fields those classes are injecting
    void inject(LoginActivity loginActivity);
    void inject(LoginUsernameFragment loginUsernameFragment);
    void inject(LoginPasswordFragment loginPasswordFragment);
}
คอมโพเนนต์เข้าถึงอินสแตนซ์ของคอมโพเนนต์ที่อยู่ใน
ออบเจ็กต์ LoginActivity รายการ โค้ดตัวอย่างสำหรับ LoginUserNameFragment ปรากฏใน
ข้อมูลโค้ดต่อไปนี้
Kotlin
class LoginUsernameFragment: Fragment() {

    // Fields that need to be injected by the login graph
    @Inject lateinit var loginViewModel: LoginViewModel

    override fun onAttach(context: Context) {
        super.onAttach(context)

        // Obtaining the login graph from LoginActivity and instantiate
        // the @Inject fields with objects from the graph
        (activity as LoginActivity).loginComponent.inject(this)

        // Now you can access loginViewModel here and onCreateView too
        // (shared instance with the Activity and the other Fragment)
    }
}
Java
public class LoginUsernameFragment extends Fragment {

    // Fields that need to be injected by the login graph
    @Inject
    LoginViewModel loginViewModel;

    @Override
    public void onAttach(Context context) {
        super.onAttach(context);

        // Obtaining the login graph from LoginActivity and instantiate
        // the @Inject fields with objects from the graph
        ((LoginActivity) getActivity()).loginComponent.inject(this);

        // Now you can access loginViewModel here and onCreateView too
        // (shared instance with the Activity and the other Fragment)
    }
}
และเช่นเดียวกันสำหรับ LoginPasswordFragment
Kotlin
class LoginPasswordFragment: Fragment() {

    // Fields that need to be injected by the login graph
    @Inject lateinit var loginViewModel: LoginViewModel

    override fun onAttach(context: Context) {
        super.onAttach(context)

        (activity as LoginActivity).loginComponent.inject(this)

        // Now you can access loginViewModel here and onCreateView too
        // (shared instance with the Activity and the other Fragment)
    }
}
Java
public class LoginPasswordFragment extends Fragment {

    // Fields that need to be injected by the login graph
    @Inject
    LoginViewModel loginViewModel;

    @Override
    public void onAttach(Context context) {
        super.onAttach(context);

        ((LoginActivity) getActivity()).loginComponent.inject(this);

        // Now you can access loginViewModel here and onCreateView too
        // (shared instance with the Activity and the other Fragment)
    }
}
รูปที่ 3 แสดงลักษณะของกราฟ Dagger พร้อมกับองค์ประกอบย่อยใหม่ ชั้นเรียน
มีจุดสีขาว (UserRepository, LoginRetrofitService และ LoginViewModel)
คืออินสแตนซ์ที่มีอินสแตนซ์ที่ไม่ซ้ำกันซึ่งกำหนดขอบเขตอยู่ที่คอมโพเนนต์ที่เกี่ยวข้อง
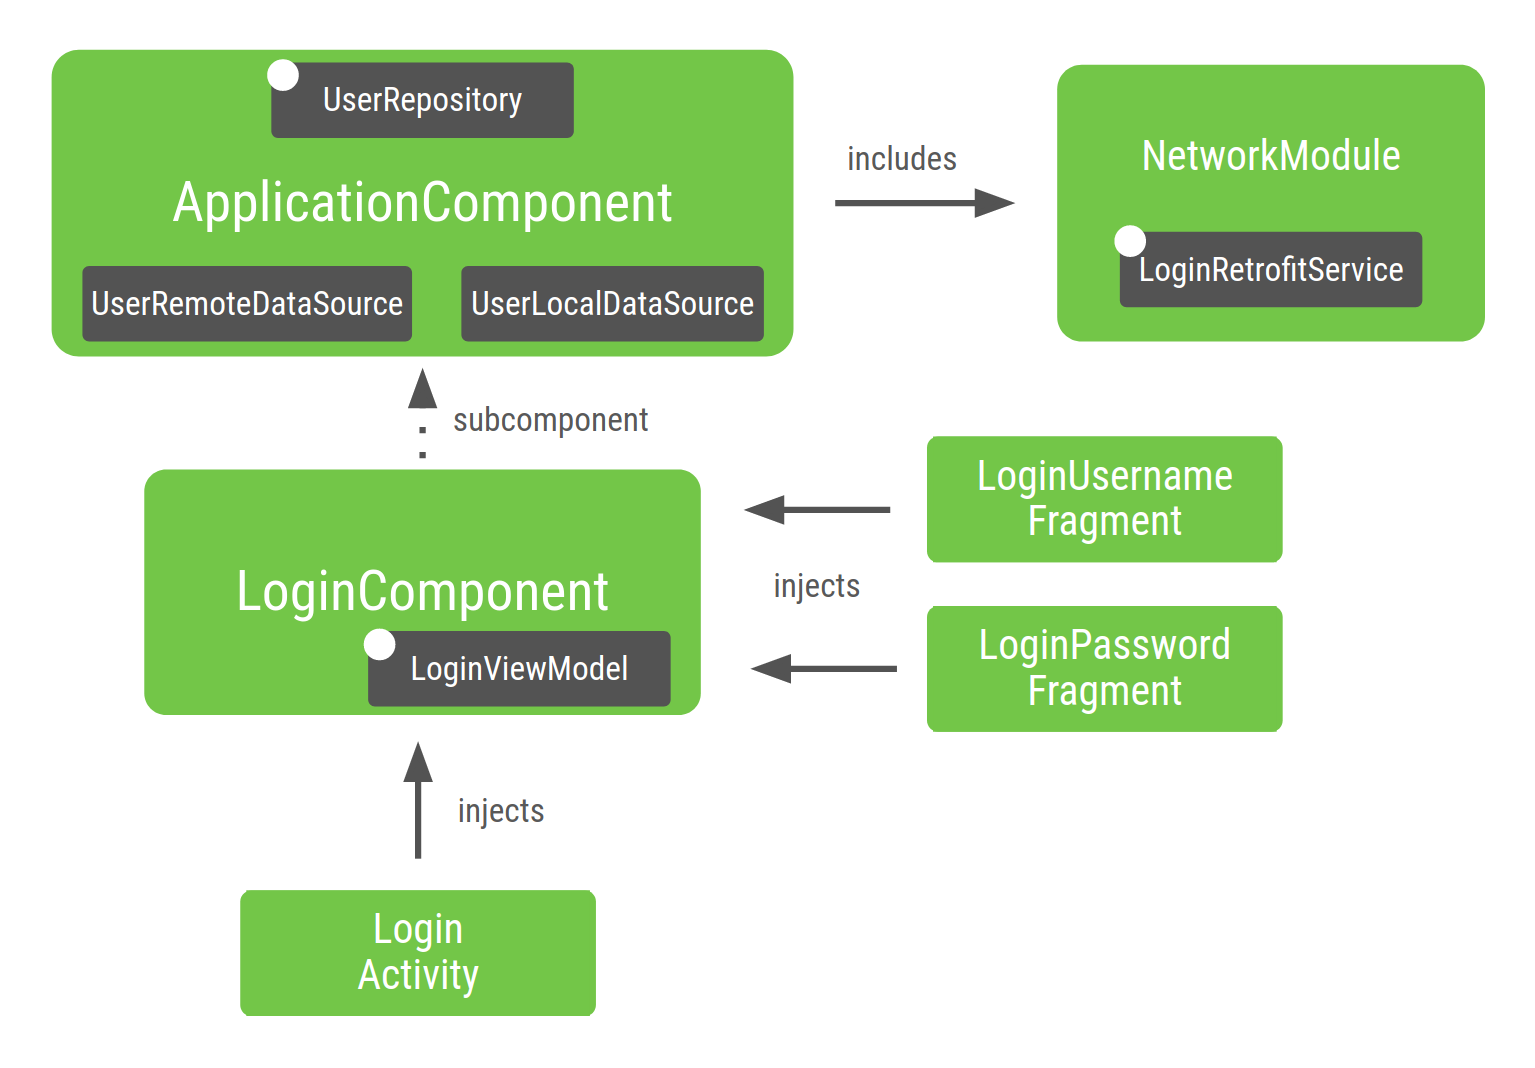
รูปที่ 3 ภาพกราฟที่คุณสร้าง สำหรับตัวอย่างแอป Android
มาดูรายละเอียดส่วนต่างๆ ของกราฟกัน
รวม
NetworkModule(และLoginRetrofitService) ไว้ด้วย ในApplicationComponentเนื่องจากคุณระบุไว้ในคอมโพเนนต์UserRepositoryยังคงอยู่ในApplicationComponentเนื่องจากมีขอบเขตเป็นApplicationComponentหากโปรเจ็กต์เติบโตขึ้น คุณก็ต้องการแชร์ ในฟีเจอร์ต่างๆ (เช่น การลงทะเบียน)เนื่องจาก
UserRepositoryเป็นส่วนหนึ่งของApplicationComponentทรัพยากร Dependency ของพารามิเตอร์นี้ (เช่นUserLocalDataSourceและUserRemoteDataSource) ต้องอยู่ใน ด้วย เพื่อให้ระบุอินสแตนซ์ของUserRepositoryได้LoginViewModelรวมอยู่ในLoginComponentเนื่องจากจำเป็นเท่านั้น โดยคลาสที่แทรกโดยLoginComponentLoginViewModelไม่รวมอยู่ในApplicationComponentเนื่องจากไม่จำเป็นต้องมีผู้ต้องพึ่งพาApplicationComponentLoginViewModelในทำนองเดียวกัน ถ้าคุณไม่ได้กำหนดขอบเขตระดับ
UserRepositoryเป็นApplicationComponentDagger จะรวมUserRepositoryและทรัพยากร Dependency ไว้โดยอัตโนมัติ เป็นส่วนหนึ่งของLoginComponentเนื่องจากขณะนี้เป็นที่เดียว ใช้งานUserRepository
นอกจากการกำหนดขอบเขตวัตถุไปยังวงจรชีวิตที่แตกต่างกันแล้ว การสร้างคอมโพเนนต์ย่อยยัง แนวทางปฏิบัติที่ดีในการสรุปส่วนต่างๆ ของแอปพลิเคชัน ระหว่างกัน
การจัดโครงสร้างแอปเพื่อสร้างกราฟย่อย Dagger แบบต่างๆ ตามโฟลว์ ของแอปจะช่วยทำให้แอปพลิเคชันมีประสิทธิภาพและรองรับการปรับขนาดมากขึ้นใน หน่วยความจำและเวลาเริ่มต้น
แนวทางปฏิบัติแนะนำเมื่อสร้างกราฟ Dagger
เมื่อสร้างกราฟ Dagger สำหรับแอปพลิเคชันของคุณ:
เมื่อสร้างคอมโพเนนต์ คุณควรพิจารณาว่าองค์ประกอบใด ตลอดอายุการใช้งานของส่วนประกอบนั้น ในกรณีนี้ ชั้นเรียน
Applicationอยู่ใน การเรียกเก็บเงินจำนวนApplicationComponentและLoginActivityจะเป็นผู้ดูแลLoginComponentใช้การกำหนดขอบเขตเฉพาะเมื่อเหมาะสมเท่านั้น การใช้ขอบเขตมากเกินไปอาจทำให้เกิดผลลบ ผลกระทบต่อประสิทธิภาพรันไทม์ของแอป: ออบเจ็กต์อยู่ในหน่วยความจำเป็นเวลานาน เนื่องจากคอมโพเนนต์อยู่ในหน่วยความจำและการรับวัตถุที่มีขอบเขตจะมีราคาแพงกว่า เมื่อ Dagger ให้วัตถุ ก็จะใช้การล็อก
DoubleCheckแทน ของผู้ให้บริการประเภทเริ่มต้น
การทดสอบโปรเจ็กต์ที่ใช้ Dagger
ข้อดีอย่างหนึ่งของการใช้เฟรมเวิร์กการแทรกทรัพยากร Dependency อย่าง Dagger ก็คือ จะทำให้ทดสอบโค้ดได้ง่ายขึ้น
การทดสอบ 1 หน่วย
คุณไม่จำเป็นต้องใช้ Dagger สำหรับการทดสอบ 1 หน่วย เมื่อทดสอบคลาสที่ใช้ การแทรกตัวสร้าง คุณไม่จำเป็นต้องใช้ Dagger เพื่อสร้างอินสแตนซ์ของคลาสนั้น คุณสามารถเรียกใช้การส่งผ่านตัวสร้างได้โดยตรงในทรัพยากร Dependency ปลอมหรือจำลอง โดยตรงเช่นเดียวกับที่คุณทำได้ หากไม่มีการใส่คำอธิบายประกอบ
ตัวอย่างเช่น เมื่อทดสอบ LoginViewModel:
Kotlin
@ActivityScope
class LoginViewModel @Inject constructor(
    private val userRepository: UserRepository
) { ... }

class LoginViewModelTest {

    @Test
    fun `Happy path`() {
        // You don't need Dagger to create an instance of LoginViewModel
        // You can pass a fake or mock UserRepository
        val viewModel = LoginViewModel(fakeUserRepository)
        assertEquals(...)
    }
}
Java
@ActivityScope
public class LoginViewModel {

    private final UserRepository userRepository;

    @Inject
    public LoginViewModel(UserRepository userRepository) {
        this.userRepository = userRepository;
    }
}

public class LoginViewModelTest {

    @Test
    public void happyPath() {
        // You don't need Dagger to create an instance of LoginViewModel
        // You can pass a fake or mock UserRepository
        LoginViewModel viewModel = new LoginViewModel(fakeUserRepository);
        assertEquals(...);
    }
}
การทดสอบแบบเอนด์ทูเอนด์
สำหรับการทดสอบการผสานรวม แนวทางปฏิบัติที่ดีคือการสร้าง
TestApplicationComponent มีไว้สำหรับการทดสอบ
เวอร์ชันที่ใช้งานจริงและการทดสอบใช้การกำหนดค่าคอมโพเนนต์ที่แตกต่างกัน
ซึ่งจำเป็นต้องมีการออกแบบโมดูลที่ตรงไปตรงมามากขึ้นใน แอปพลิเคชันของคุณ องค์ประกอบการทดสอบจะขยายองค์ประกอบเวอร์ชันที่ใช้งานจริงและ ติดตั้งชุดโมดูลอื่น
Kotlin
// TestApplicationComponent extends from ApplicationComponent to have them both
// with the same interface methods. You need to include the modules of the
// component here as well, and you can replace the ones you want to override.
// This sample uses FakeNetworkModule instead of NetworkModule
@Singleton
@Component(modules = [FakeNetworkModule::class, SubcomponentsModule::class])
interface TestApplicationComponent : ApplicationComponent {
}
Java
// TestApplicationComponent extends from ApplicationComponent to have them both
// with the same interface methods. You need to include the modules of the
// Component here as well, and you can replace the ones you want to override.
// This sample uses FakeNetworkModule instead of NetworkModule
@Singleton
@Component(modules = {FakeNetworkModule.class, SubcomponentsModule.class})
public interface TestApplicationComponent extends ApplicationComponent {
}
FakeNetworkModule มีการใช้ NetworkModule เดิมแบบปลอม
จากจุดนี้ คุณสามารถใส่อินสแตนซ์ปลอมหรือจำลองสิ่งที่คุณต้องการแทนที่ได้
Kotlin
// In the FakeNetworkModule, pass a fake implementation of LoginRetrofitService
// that you can use in your tests.
@Module
class FakeNetworkModule {
    @Provides
    fun provideLoginRetrofitService(): LoginRetrofitService {
        return FakeLoginService()
    }
}
Java
// In the FakeNetworkModule, pass a fake implementation of LoginRetrofitService
// that you can use in your tests.
@Module
public class FakeNetworkModule {

    @Provides
    public LoginRetrofitService provideLoginRetrofitService() {
        return new FakeLoginService();
    }
}
ในการผสานรวมหรือการทดสอบแบบต้นทางถึงปลายทาง คุณควรใช้ TestApplication ที่
สร้าง TestApplicationComponent แทน ApplicationComponent
Kotlin
// Your test application needs an instance of the test graph
class MyTestApplication: MyApplication() {
    override val appComponent = DaggerTestApplicationComponent.create()
}
Java
// Your test application needs an instance of the test graph
public class MyTestApplication extends MyApplication {
    ApplicationComponent appComponent = DaggerTestApplicationComponent.create();
}
จากนั้น แอปพลิเคชันทดสอบนี้จะใช้ใน TestRunner ที่กำหนดเองซึ่งคุณจะใช้เพื่อ
ทำการทดสอบการวัดคุม สำหรับข้อมูลเพิ่มเติมเกี่ยวกับเรื่องนี้ โปรดดูที่การใช้
กริชใน Codelab ของแอป Android
การใช้งานโมดูล Dagger
โมดูลกริชเป็นวิธีสรุปวิธีจัดเตรียมวัตถุในเชิงความหมาย คุณสามารถรวมโมดูลในคอมโพเนนต์ แต่คุณสามารถรวมโมดูล ภายในโมดูลอื่นๆ ข้อความนี้มีประสิทธิภาพแต่อาจถูกนำไปใช้ในทางที่ผิดได้ง่าย
เมื่อเพิ่มโมดูลลงในคอมโพเนนต์ใดคอมโพเนนต์หนึ่งหรือโมดูลอื่น อยู่ในกราฟ Dagger แล้ว กริชสามารถให้วัตถุเหล่านั้นในคอมโพเนนต์นั้นได้ ก่อนที่จะเพิ่มโมดูล โปรดตรวจสอบว่าโมดูลดังกล่าวเป็นส่วนหนึ่งของกราฟ Dagger อยู่แล้วหรือไม่ โดยตรวจสอบว่ามีการเพิ่มลงในคอมโพเนนต์แล้วหรือด้วยการคอมไพล์โปรเจ็กต์ และดูว่า Dagger จะหา Dependencies ที่จำเป็นสำหรับโมดูลนั้นได้ไหม
แนวทางปฏิบัติที่ดีระบุว่าควรมีการประกาศโมดูลเพียงครั้งเดียวในคอมโพเนนต์ (นอกเหนือจาก Use Case ขั้นสูงเฉพาะของ Dagger)
สมมติว่าคุณได้กำหนดค่ากราฟไว้แบบนี้ ApplicationComponent
รวม Module1 และ Module2 และ Module1 รวม ModuleX
Kotlin
@Component(modules = [Module1::class, Module2::class])
interface ApplicationComponent { ... }

@Module(includes = [ModuleX::class])
class Module1 { ... }

@Module
class Module2 { ... }
Java
@Component(modules = {Module1.class, Module2.class})
public interface ApplicationComponent { ... }

@Module(includes = {ModuleX.class})
public class Module1 { ... }

@Module
public class Module2 { ... }
หากตอนนี้ Module2 จะขึ้นอยู่กับชั้นเรียนของ ModuleX แนวทางปฏิบัติที่ไม่ดี
รวม ModuleX ใน Module2 เนื่องจาก ModuleX ถูกรวม 2 ครั้งใน
กราฟตามที่แสดงในข้อมูลโค้ดต่อไปนี้
Kotlin
// Bad practice: ModuleX is declared multiple times in this Dagger graph
@Component(modules = [Module1::class, Module2::class])
interface ApplicationComponent { ... }

@Module(includes = [ModuleX::class])
class Module1 { ... }

@Module(includes = [ModuleX::class])
class Module2 { ... }
Java
// Bad practice: ModuleX is declared multiple times in this Dagger graph.
@Component(modules = {Module1.class, Module2.class})
public interface ApplicationComponent { ... }

@Module(includes = ModuleX.class)
public class Module1 { ... }

@Module(includes = ModuleX.class)
public class Module2 { ... }
แต่คุณควรทำอย่างใดอย่างหนึ่งต่อไปนี้แทน
- เปลี่ยนโครงสร้างภายในโมดูลและแยกโมดูลทั่วไปออกไปยังฟังก์ชัน คอมโพเนนต์
- สร้างโมดูลใหม่ด้วยออบเจ็กต์ที่ทั้งโมดูลแชร์และแตกข้อมูล ส่งไปถึงคอมโพเนนต์
การไม่เปลี่ยนโครงสร้างภายในโค้ดด้วยวิธีนี้จะทำให้เกิดโมดูลจำนวนมากรวมทั้งโมดูลที่ต่อเนื่องกัน เมื่อขาดความเข้าใจที่ชัดเจนว่าเป็นองค์กร และทำให้มองเห็นได้ยากขึ้น ทรัพยากร Dependency แต่ละรายการมาจากไหน
แนวทางปฏิบัติที่ดี (ตัวเลือกที่ 1): มีการประกาศ ModuleX 1 ครั้งในกราฟ Dagger
Kotlin
@Component(modules = [Module1::class, Module2::class, ModuleX::class])
interface ApplicationComponent { ... }

@Module
class Module1 { ... }

@Module
class Module2 { ... }
Java
@Component(modules = {Module1.class, Module2.class, ModuleX.class})
public interface ApplicationComponent { ... }

@Module
public class Module1 { ... }

@Module
public class Module2 { ... }
แนวทางปฏิบัติที่ดี (ตัวเลือกที่ 2): ทรัพยากร Dependency ทั่วไปจาก Module1 และ Module2
ใน ModuleX จะถูกแยกออกไปยังโมดูลใหม่ชื่อ ModuleXCommon ที่
ที่รวมอยู่ในคอมโพเนนต์ จากนั้นโมดูลอื่นอีก 2 รายการชื่อว่า
ModuleXWithModule1Dependencies และ ModuleXWithModule2Dependencies
ที่สร้างขึ้นด้วยทรัพยากร Dependency ที่เฉพาะเจาะจงสำหรับแต่ละโมดูล โมดูลทั้งหมด
มีการประกาศหนึ่งครั้งในกราฟ Dagger
Kotlin
@Component(modules = [Module1::class, Module2::class, ModuleXCommon::class])
interface ApplicationComponent { ... }

@Module
class ModuleXCommon { ... }

@Module
class ModuleXWithModule1SpecificDependencies { ... }

@Module
class ModuleXWithModule2SpecificDependencies { ... }

@Module(includes = [ModuleXWithModule1SpecificDependencies::class])
class Module1 { ... }

@Module(includes = [ModuleXWithModule2SpecificDependencies::class])
class Module2 { ... }
Java
@Component(modules = {Module1.class, Module2.class, ModuleXCommon.class})
public interface ApplicationComponent { ... }

@Module
public class ModuleXCommon { ... }

@Module
public class ModuleXWithModule1SpecificDependencies { ... }

@Module
public class ModuleXWithModule2SpecificDependencies { ... }

@Module(includes = ModuleXWithModule1SpecificDependencies.class)
public class Module1 { ... }

@Module(includes = ModuleXWithModule2SpecificDependencies.class)
public class Module2 { ... }
ระบบช่วยฉีด
Assist Injection เป็นรูปแบบ DI ที่ใช้สร้างออบเจ็กต์ที่ พารามิเตอร์บางรายการอาจให้โดยเฟรมเวิร์ก DI และต้องส่งพารามิเตอร์อื่นๆ ขณะสร้างโดยผู้ใช้
ใน Android รูปแบบนี้พบได้ทั่วไปในหน้าจอรายละเอียด ซึ่งรหัสของ องค์ประกอบที่จะแสดงจะรู้เฉพาะที่รันไทม์เท่านั้น ไม่ใช่เวลาที่คอมไพล์เมื่อ Dagger สร้างกราฟ DI หากต้องการเรียนรู้เพิ่มเติมเกี่ยวกับระบบช่วยฉีดด้วย Dagger ดูเอกสารประกอบของ Dagger
บทสรุป
โปรดอ่านส่วนแนวทางปฏิบัติแนะนำหากยังไม่ได้อ่าน ถึง ดูวิธีใช้ Dagger ในแอป Android ได้ที่การใช้ Dagger ในแอป Android Codelab