
일반적으로 앱 내의 로그인 흐름, 마법사 또는 기타 하위 흐름은 중첩 탐색 그래프로 가장 잘 표현됩니다. 이런 방식으로 자체 포함된 하위 탐색 흐름을 중첩하면 앱 UI의 기본 흐름을 더 쉽게 이해하고 관리할 수 있습니다.
또한 중첩 그래프는 재사용할 수 있습니다. 또한 특정 수준의 캡슐화를 제공합니다. 중첩 그래프 외부의 대상은 중첩 그래프 내의 대상에 직접 액세스할 수 없습니다. 대신 대상은 내부 로직이 그래프의 나머지 부분에 영향을 주지 않고 변경될 수 있는 중첩 그래프 자체로 navigate()해야 합니다.
예
앱의 최상위 수준 탐색 그래프는 사용자가 앱을 실행할 때 표시되는 최초 대상으로 시작해야 하며 앱에서 이동할 때 보게 되는 대상을 포함해야 합니다.
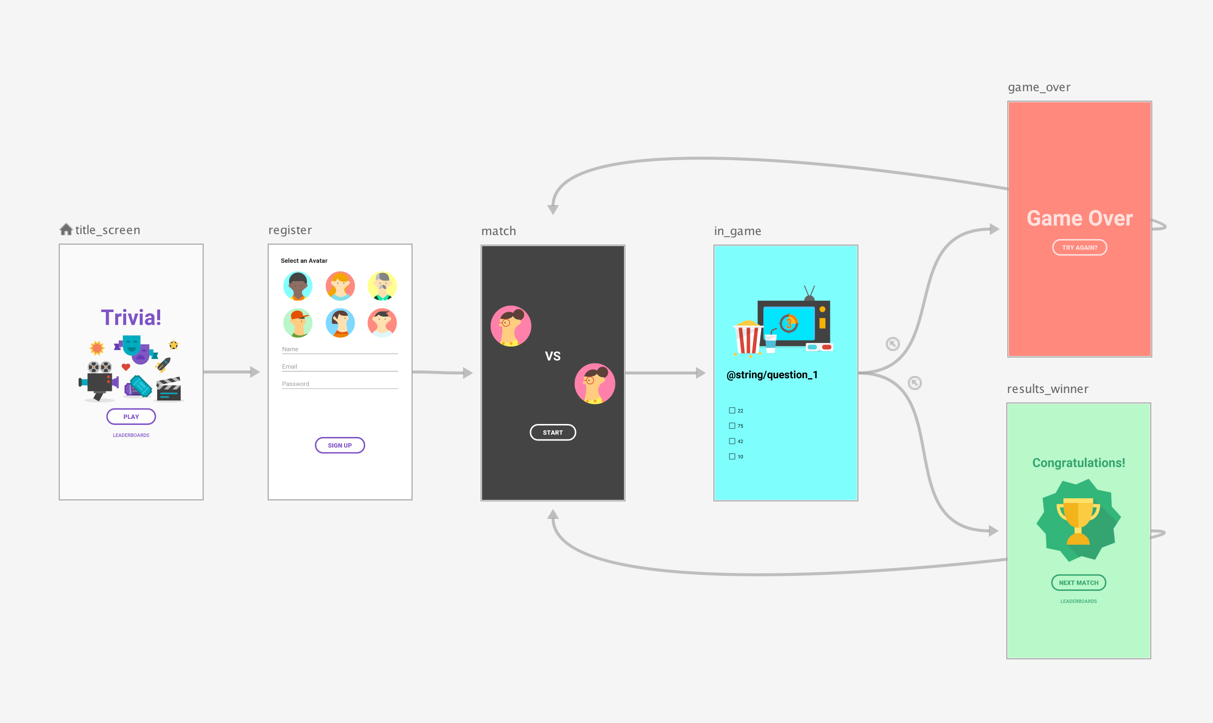
한 예로 그림 1의 최상위 수준 탐색 그래프를 사용하여 앱이 처음 실행될 때만 사용자에게 title_screen 및 register 화면이 표시되도록 한다고 가정해 보겠습니다. 그 후 사용자 정보는 저장되고 이어지는 앱의 시작 절차에서 match 화면으로 바로 이동해야 합니다.
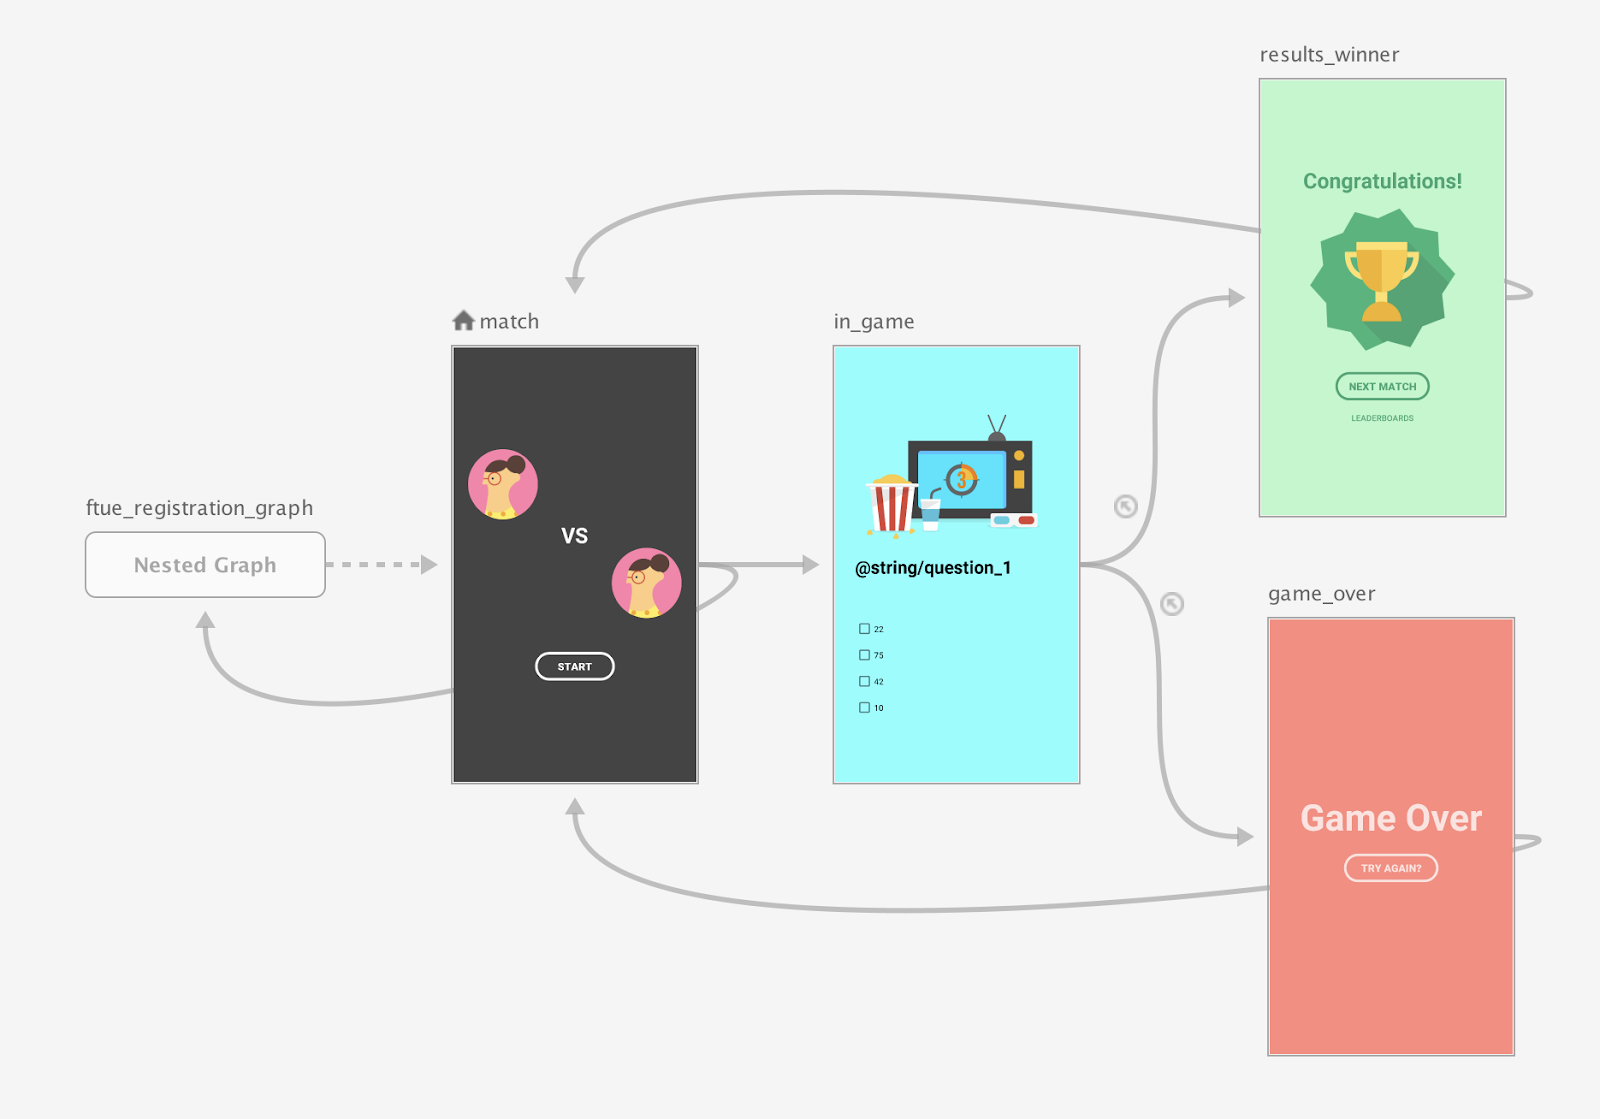
모범 사례로 match 화면을 최상위 수준 탐색 그래프의 시작 대상 으로 설정하고 제목 화면과 register 화면을 중첩 그래프로 이동합니다.
매치 화면이 시작되면 등록된 사용자가 있는지 확인합니다. 사용자가 등록되지 않은 경우 사용자를 등록 화면으로 이동합니다.
조건부 탐색 시나리오에 관한 자세한 내용은 Conditional navigation을 참고하세요.
Compose
Compose를 사용하여 중첩된 탐색 그래프를 만들려면 NavGraphBuilder.navigation() 함수를 사용하세요. 그래프에 대상을 추가할 때 NavGraphBuilder.composable() 및 NavGraphBuilder.dialog() 함수와 마찬가지로 navigation()을 사용합니다.
주요 차이점은 navigation이 새 대상이 아닌 중첩 그래프를 만든다는 것입니다. 그런 다음 navigation()의 람다 내에서 composable() 및 dialog()를 호출하여 중첩 그래프에 대상을 추가합니다.
다음 스니펫에서 Compose를 사용하여 그림 2의 그래프를 구현하는 방법을 살펴보세요.
// Routes
@Serializable object Title
@Serializable object Register

// Route for nested graph
@Serializable object Game

// Routes inside nested graph
@Serializable object Match
@Serializable object InGame
@Serializable object ResultsWinner
@Serializable object GameOver

NavHost(navController, startDestination = Title) {
   composable<Title> {
       TitleScreen(
           onPlayClicked = { navController.navigate(route = Register) },
           onLeaderboardsClicked = { /* Navigate to leaderboards */ }
       )
   }
   composable<Register> {
       RegisterScreen(
           onSignUpComplete = { navController.navigate(route = Game) }
       )
   }
   navigation<Game>(startDestination = Match) {
       composable<Match> {
           MatchScreen(
               onStartGame = { navController.navigate(route = InGame) }
           )
       }
       composable<InGame> {
           InGameScreen(
               onGameWin = { navController.navigate(route = ResultsWinner) },
               onGameLose = { navController.navigate(route = GameOver) }
           )
       }
       composable<ResultsWinner> {
           ResultsWinnerScreen(
               onNextMatchClicked = {
                   navController.navigate(route = Match) {
                       popUpTo(route = Match) { inclusive = true }
                   }
               },
               onLeaderboardsClicked = { /* Navigate to leaderboards */ }
           )
       }
       composable<GameOver> {
           GameOverScreen(
               onTryAgainClicked = {
                   navController.navigate(route = Match) {
                       popUpTo(route = Match) { inclusive = true }
                   }
               }
           )
       }
   }
}
중첩된 대상으로 직접 이동하려면 다른 대상과 마찬가지로 경로 유형을 사용합니다. 경로는 모든 화면에서 이동할 수 있는 대상을 식별하는 데 사용되는 전역 개념이기 때문입니다.
navController.navigate(route = Match)
XML
XML을 사용할 때는 Navigation Editor를 사용하여 중첩 그래프를 만들 수 있습니다. 방법은 다음과 같습니다.
- Navigation Editor에서 Shift 키를 길게 누른 상태에서 중첩 그래프에 포함할 대상을 클릭합니다.
컨텍스트 메뉴를 마우스 오른쪽 버튼으로 클릭하여 열고 Move to Nested Graph > New Graph를 선택합니다. 대상은 중첩 그래프에 포함되어 있습니다. 그림 2에서는 탐색 편집기의 중첩 그래프를 보여줍니다.
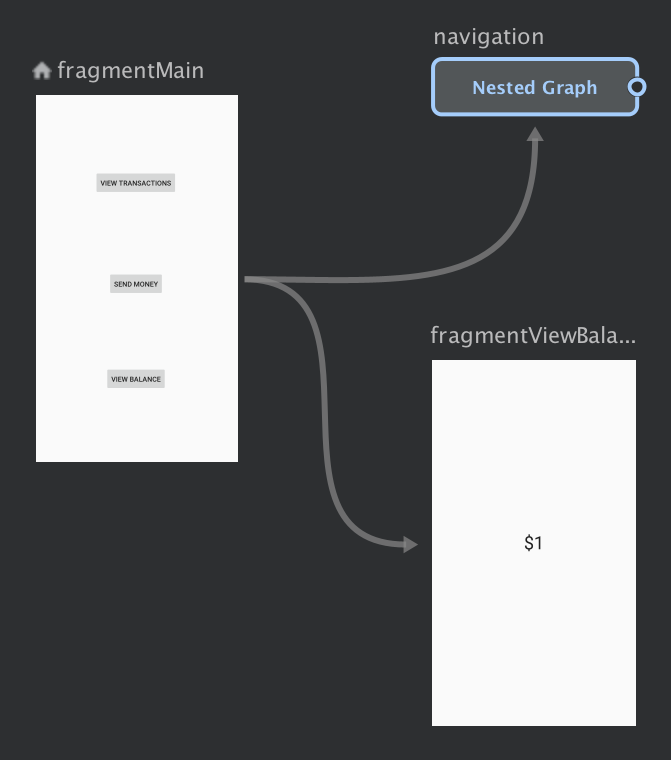
그림 2. Navigation Editor의 중첩 그래프 중첩 그래프를 클릭합니다. 다음 속성은 Attributes 패널에 표시됩니다.
- Type - '중첩 그래프'를 포함합니다.
- ID - 중첩 그래프의 시스템 지정 ID를 포함합니다. 이 ID는 코드에서 중첩 그래프를 참조하는 데 사용됩니다.
중첩 그래프를 더블클릭하여 대상을 표시합니다.
Text 탭을 클릭하여 XML 뷰를 전환합니다. 중첩된 탐색 그래프가 그래프에 추가되었습니다. 이 탐색 그래프에는 자체
navigation요소와 자체 ID 및 중첩 그래프의 첫 번째 대상을 가리키는startDestination속성이 있습니다.<?xml version="1.0" encoding="utf-8"?> <navigation xmlns:app="http://schemas.android.com/apk/res-auto" xmlns:tools="http://schemas.android.com/tools" xmlns:android="http://schemas.android.com/apk/res/android" app:startDestination="@id/mainFragment"> <fragment android:id="@+id/mainFragment" android:name="com.example.cashdog.cashdog.MainFragment" android:label="fragment_main" tools:layout="@layout/fragment_main" > <action android:id="@+id/action_mainFragment_to_sendMoneyGraph" app:destination="@id/sendMoneyGraph" /> <action android:id="@+id/action_mainFragment_to_viewBalanceFragment" app:destination="@id/viewBalanceFragment" /> </fragment> <fragment android:id="@+id/viewBalanceFragment" android:name="com.example.cashdog.cashdog.ViewBalanceFragment" android:label="fragment_view_balance" tools:layout="@layout/fragment_view_balance" /> <navigation android:id="@+id/sendMoneyGraph" app:startDestination="@id/chooseRecipient"> <fragment android:id="@+id/chooseRecipient" android:name="com.example.cashdog.cashdog.ChooseRecipient" android:label="fragment_choose_recipient" tools:layout="@layout/fragment_choose_recipient"> <action android:id="@+id/action_chooseRecipient_to_chooseAmountFragment" app:destination="@id/chooseAmountFragment" /> </fragment> <fragment android:id="@+id/chooseAmountFragment" android:name="com.example.cashdog.cashdog.ChooseAmountFragment" android:label="fragment_choose_amount" tools:layout="@layout/fragment_choose_amount" /> </navigation> </navigation>코드에서 루트 그래프를 중첩 그래프에 연결하는 작업의 리소스 ID를 전달합니다.
Kotlin
view.findNavController().navigate(R.id.action_mainFragment_to_sendMoneyGraph)
자바
Navigation.findNavController(view).navigate(R.id.action_mainFragment_to_sendMoneyGraph);
- Design 탭으로 돌아가서 Root 를 클릭하여 루트 그래프로 돌아갑니다.
include를 사용하여 다른 탐색 그래프 참조
그래프 구조를 모듈화하는 또 다른 방법은 상위 탐색 그래프의 <include> 요소를 사용하여 다른 그래프 내에 한 그래프를 포함하는 것입니다. 이렇게 하면 포함된 그래프는 별도의 모듈 또는 프로젝트에 함께 정의되어 재사용성이 극대화됩니다.
다음 스니펫은 <include>를 사용하는 방법을 보여줍니다.
<!-- (root) nav_graph.xml -->
<?xml version="1.0" encoding="utf-8"?>
<navigation xmlns:android="http://schemas.android.com/apk/res/android"
    xmlns:app="http://schemas.android.com/apk/res-auto"
    xmlns:tools="http://schemas.android.com/tools"
    android:id="@+id/nav_graph"
    app:startDestination="@id/fragment">

    <include app:graph="@navigation/included_graph" />

    <fragment
        android:id="@+id/fragment"
        android:name="com.example.myapplication.BlankFragment"
        android:label="Fragment in Root Graph"
        tools:layout="@layout/fragment_blank">
        <action
            android:id="@+id/action_fragment_to_second_graph"
            app:destination="@id/second_graph" />
    </fragment>

    ...
</navigation>
<!-- included_graph.xml -->
<?xml version="1.0" encoding="utf-8"?>
<navigation xmlns:android="http://schemas.android.com/apk/res/android"
    xmlns:app="http://schemas.android.com/apk/res-auto"
    xmlns:tools="http://schemas.android.com/tools"
    android:id="@+id/second_graph"
    app:startDestination="@id/includedStart">

    <fragment
        android:id="@+id/includedStart"
        android:name="com.example.myapplication.IncludedStart"
        android:label="fragment_included_start"
        tools:layout="@layout/fragment_included_start" />
</navigation>