


如果您需要在应用内显示静态图片,可以使用 Drawable 类及其子类绘制形状和图片。Drawable 是可绘制对象的常规抽象。不同的子类可用于特定的图片场景,您可以对其进行扩展以定义您自己的行为方式独特的可绘制对象。
除了使用类构造函数之外,还可以通过另外两种方法定义和实例化 Drawable:
- 扩充保存在项目中的图片资源(位图文件)。
- 扩充用于定义可绘制属性的 XML 资源。
注意:您可以改用矢量可绘制对象,它通过一组点、线条和曲线以及相关颜色信息定义图片。这样一来,就可以在不降低质量的情况下将矢量可绘制对象缩放为不同的尺寸。如需了解详情,请参阅矢量可绘制对象概览。
通过资源图片创建可绘制对象
您可以通过引用项目资源中的图片文件向您的应用添加图形。支持的文件类型包括 PNG(首选)、JPG(可接受)和 GIF(不推荐)。这种方法非常适合添加应用图标、徽标和其他图形(例如游戏中使用的图形)。
如需使用图片资源,请将相应文件添加到项目的 res/drawable/ 目录下。在项目中,您可以从代码或 XML 布局中引用图片资源。无论是哪种方式,都是通过资源 ID(不包含文件类型扩展名的文件名)引用的。例如,my_image.png 引用为 my_image。
注意:res/drawable/ 目录下的图片资源可由 aapt 工具在构建过程中自动完成无损图片压缩优化。例如,可以通过调色板将不需要超过 256 种颜色的真彩色 PNG 转换为 8 位 PNG。这样做会生成质量相同但内存占用量更小的图片。因此,此目录下的图片二进制文件可能会在构建时发生更改。如果您打算将某张图片作为比特流进行读取以将其转换为位图,请改为将图片放在 res/raw/ 文件夹下,这样的话,aapt 工具便无法对其进行修改。
以下代码段演示了如何使用通过可绘制资源创建的图片构建一个 ImageView 并将其添加到布局中:
Kotlin
private lateinit var constraintLayout: ConstraintLayout

override fun onCreate(savedInstanceState: Bundle?) {
    super.onCreate(savedInstanceState)

    // Instantiate an ImageView and define its properties
    val i = ImageView(this).apply {
        setImageResource(R.drawable.my_image)
        contentDescription = resources.getString(R.string.my_image_desc)

        // set the ImageView bounds to match the Drawable's dimensions
        adjustViewBounds = true
        layoutParams = ViewGroup.LayoutParams(
                ViewGroup.LayoutParams.WRAP_CONTENT,
                ViewGroup.LayoutParams.WRAP_CONTENT)
    }

    // Create a ConstraintLayout in which to add the ImageView
    constraintLayout = ConstraintLayout(this).apply {

        // Add the ImageView to the layout.
        addView(i)
    }

    // Set the layout as the content view.
    setContentView(constraintLayout)
}
Java
ConstraintLayout constraintLayout;

protected void onCreate(Bundle savedInstanceState) {
  super.onCreate(savedInstanceState);

  // Create a ConstraintLayout in which to add the ImageView
  constraintLayout = new ConstraintLayout(this);

  // Instantiate an ImageView and define its properties
  ImageView i = new ImageView(this);
  i.setImageResource(R.drawable.my_image);
  i.setContentDescription(getResources().getString(R.string.my_image_desc));

  // set the ImageView bounds to match the Drawable's dimensions
  i.setAdjustViewBounds(true);
  i.setLayoutParams(new ViewGroup.LayoutParams(
          ViewGroup.LayoutParams.WRAP_CONTENT,
          ViewGroup.LayoutParams.WRAP_CONTENT));

  // Add the ImageView to the layout and set the layout as the content view.
  constraintLayout.addView(i);
  setContentView(constraintLayout);
}
在其他情况下,您可能需要将图片资源作为 Drawable 对象进行处理,如下例所示:
Kotlin
val myImage: Drawable = ResourcesCompat.getDrawable(context.resources, R.drawable.my_image, null)
Java
Resources res = context.getResources();
Drawable myImage = ResourcesCompat.getDrawable(res, R.drawable.my_image, null);
警告:项目中的每个唯一资源只能具有一种状态,无论您为其实例化多少个不同的对象。例如,如果您用同一图片资源实例化了两个 Drawable 对象,并更改其中一个对象的属性(例如不透明度),则另一个对象也会受到影响。在处理图片资源的多个实例时,您应执行补间动画,而不是直接转换 Drawable 对象。
以下 XML 代码段展示了如何在 XML 布局中向 ImageView 添加可绘制资源:
<ImageView
        android:layout_width="wrap_content"
        android:layout_height="wrap_content"
        android:src="@drawable/my_image"
        android:contentDescription="@string/my_image_desc" />
如需详细了解如何使用项目资源,请参阅资源。
注意:将图片资源用作可绘制对象的来源时,请确保图片的尺寸适合不同的像素密度。如果图片的尺寸不合适,系统会将其缩放为合适的尺寸,而这可能会导致可绘制对象失真。如需了解详情,请参阅支持不同的像素密度。
通过 XML 资源创建可绘制对象
如果您想创建一个 Drawable 对象,该对象最初并不依赖于由您的代码定义的变量或用户互动,则最好在 XML 中定义 Drawable。即使您预期 Drawable 在用户与您的应用互动时属性会更改,您也应考虑在 XML 中定义该对象,因为您可以在对该对象进行实例化之后修改其属性。
在 XML 中定义 Drawable 之后,将文件保存在项目的 res/drawable/ 目录下。以下示例展示了定义 TransitionDrawable 资源(继承自 Drawable)的 XML:
<!-- res/drawable/expand_collapse.xml -->
<transition xmlns:android="http://schemas.android.com/apk/res/android">
    <item android:drawable="@drawable/image_expand"/>
    <item android:drawable="@drawable/image_collapse"/>
</transition>
然后,通过调用 Resources#getDrawable() 并传入 XML 文件的资源 ID 来检索并实例化相应对象。支持 inflate() 方法的任何 Drawable 子类都可以在 XML 中进行定义并由您的应用实例化。
支持 XML 扩充的各个可绘制类利用特定的 XML 属性来帮助定义对象属性。以下代码会实例化 TransitionDrawable 并将其设置为 ImageView 对象的内容:
Kotlin
val transition= ResourcesCompat.getDrawable(
        context.resources,
        R.drawable.expand_collapse,
        null
) as TransitionDrawable

val image: ImageView = findViewById(R.id.toggle_image)
image.setImageDrawable(transition)

// Description of the initial state that the drawable represents.
image.contentDescription = resources.getString(R.string.collapsed)

// Then you can call the TransitionDrawable object's methods.
transition.startTransition(1000)

// After the transition is complete, change the image's content description
// to reflect the new state.
Java
Resources res = context.getResources();
TransitionDrawable transition =
    (TransitionDrawable) ResourcesCompat.getDrawable(res, R.drawable.expand_collapse, null);

ImageView image = (ImageView) findViewById(R.id.toggle_image);
image.setImageDrawable(transition);

// Description of the initial state that the drawable represents.
image.setContentDescription(getResources().getString(R.string.collapsed));

// Then you can call the TransitionDrawable object's methods.
transition.startTransition(1000);

// After the transition is complete, change the image's content description
// to reflect the new state.
如需详细了解支持的 XML 属性,请参阅上面列出的类。
形状可绘制对象
如果您想动态绘制二维图形,ShapeDrawable 对象是一种不错的选择。您可以程序化地在 ShapeDrawable 对象上绘制基元形状,并采用您的应用所需的样式。
ShapeDrawable 是 Drawable 的子类。因此,您可以在需要使用 Drawable 时使用 ShapeDrawable。例如,您可以使用 ShapeDrawable 对象设置视图的背景,具体方法是将其传递给视图的 setBackgroundDrawable() 方法。您还可以绘制形状作为其自定义视图,然后将其添加到应用的布局中。
ShapeDrawable 有自己的 draw() 方法,因此您可以创建一个在 onDraw() 事件期间绘制 ShapeDrawable 对象的 View 的子类,如以下代码示例所示:
Kotlin
class CustomDrawableView(context: Context) : View(context) {
    private val drawable: ShapeDrawable = run {
        val x = 10
        val y = 10
        val width = 300
        val height = 50
        contentDescription = context.resources.getString(R.string.my_view_desc)

        ShapeDrawable(OvalShape()).apply {
            // If the color isn't set, the shape uses black as the default.
            paint.color = 0xff74AC23.toInt()
            // If the bounds aren't set, the shape can't be drawn.
            setBounds(x, y, x + width, y + height)
        }
    }

    override fun onDraw(canvas: Canvas) {
        drawable.draw(canvas)
    }
}
Java
public class CustomDrawableView extends View {
  private ShapeDrawable drawable;

  public CustomDrawableView(Context context) {
    super(context);

    int x = 10;
    int y = 10;
    int width = 300;
    int height = 50;
    setContentDescription(context.getResources().getString(
            R.string.my_view_desc));

    drawable = new ShapeDrawable(new OvalShape());
    // If the color isn't set, the shape uses black as the default.
    drawable.getPaint().setColor(0xff74AC23);
    // If the bounds aren't set, the shape can't be drawn.
    drawable.setBounds(x, y, x + width, y + height);
  }

  protected void onDraw(Canvas canvas) {
    drawable.draw(canvas);
  }
}
您可以像使用任何其他自定义视图一样使用上述代码示例中的 CustomDrawableView 类。例如,您可以程序化地将其添加到应用中的某个 activity,如下例所示:
Kotlin
private lateinit var customDrawableView: CustomDrawableView

override fun onCreate(savedInstanceState: Bundle?) {
    super.onCreate(savedInstanceState)
    customDrawableView = CustomDrawableView(this)

    setContentView(customDrawableView)
}
Java
CustomDrawableView customDrawableView;

protected void onCreate(Bundle savedInstanceState) {
  super.onCreate(savedInstanceState);
  customDrawableView = new CustomDrawableView(this);

  setContentView(customDrawableView);
}
如果您想改为在 XML 布局中使用自定义视图,则 CustomDrawableView 类必须替换 View(Context, AttributeSet) 构造函数(在该类从 XML 中扩充时调用)。以下示例展示了如何在 XML 布局中声明 CustomDrawableView:
<com.example.shapedrawable.CustomDrawableView
        android:layout_width="fill_parent"
        android:layout_height="wrap_content"
        />
ShapeDrawable 类与 android.graphics.drawable 软件包中的很多其他可绘制类型一样,可让您使用公开方法定义对象的各种属性。您可能需要调整的一些示例属性包括 alpha 透明度、色彩滤镜、抖动、不透明度和颜色。
您还可以使用 XML 资源定义基元可绘制形状。如需了解详情,请参阅 可绘制资源类型中的 形状可绘制对象。
NinePatch 可绘制对象
NinePatchDrawable 图形是一种可拉伸的位图,可用作视图的背景。Android 会自动调整图形的大小以适应视图的内容。NinePatch 图片的其中一项用途是用作标准 Android 按钮(按钮必须拉伸以适应各种长度的字符串)的背景。NinePatch 图形是标准 PNG 图片,包含一个额外的 1 像素边框。必须使用 9.png 扩展名将其保存在项目的 res/drawable/ 目录下。
使用边框可定义图片的可拉伸区域和静态区域。您可以通过在边框的左侧和顶部绘制一条(或多条)1 像素宽的黑线来指定可拉伸部分(其他边框像素应完全透明或为白色)。您可以根据需要添加任意数量的可拉伸部分。可拉伸部分的相对尺寸保持不变,因此最大部分始终为最大。
您还可以定义图片的可选可绘制部分(有效的方法是添加内边距线),方法是在右侧和底部各画一条线。如果 View 对象将 NinePatch 图形设置为其背景,然后指定视图的文本,则它会拉伸其自身以便所有文本仅位于右侧和底部的线所指定的区域(如有)。如果没有添加内边距线,则 Android 会使用左侧和顶部的线定义这一可绘制区域。
为了明确区分各条线,左侧和顶部的线定义允许复制图片的哪些像素来拉伸图片。底部和右侧的线定义图片中允许放置视图内容的相对区域。
图 1 显示了定义按钮的 NinePatch 图形示例:
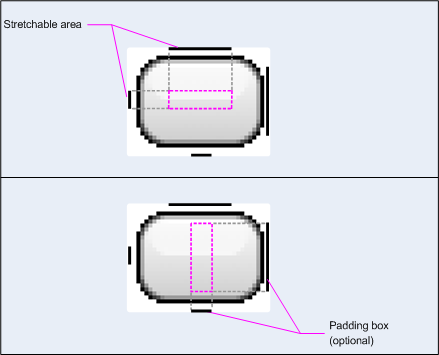
图 1:定义按钮的 NinePatch 图形示例
此 NinePatch 图形通过左侧和顶部的线定义可拉伸区域,通过底部和右侧的线定义可绘制区域。在上方的图片中,灰色虚线表示图片中为了拉伸图片而复制的区域。在下方的图片中,粉色矩形表示允许放置视图内容的区域。如果内容不适合此区域,则图片会拉伸以使其合适。
您可以使用 Draw 9-patch 工具提供的 WYSIWYG 图形编辑器创建 NinePatch 图片,极其方便。如果您定义的可拉伸区域可能会因像素复制而失真,该工具甚至会发出警告。
以下示例布局 XML 演示了如何为多个按钮添加 NinePatch 图形。NinePatch 图片会保存到 res/drawable/my_button_background.9.png。
<Button android:id="@+id/tiny"
        android:layout_width="wrap_content"
        android:layout_height="wrap_content"
        android:layout_alignParentTop="true"
        android:layout_centerInParent="true"
        android:text="Tiny"
        android:textSize="8sp"
        android:background="@drawable/my_button_background"/>

<Button android:id="@+id/big"
        android:layout_width="wrap_content"
        android:layout_height="wrap_content"
        android:layout_alignParentBottom="true"
        android:layout_centerInParent="true"
        android:text="Biiiiiiig text!"
        android:textSize="30sp"
        android:background="@drawable/my_button_background"/>
请注意,layout_width 和 layout_height 属性均设置为 wrap_content 以使按钮恰好适合文本内容。
图 2 显示了通过上述 XML 和 NinePatch 图片渲染的两个按钮。请注意按钮的宽度和高度如何随文本而发生变化,以及背景图片如何拉伸以适应文本。
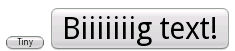
图 2:通过 XML 资源和 NinePatch 图形渲染的按钮
自定义可绘制对象
如果您想创建一些自定义可绘制对象,可以通过扩展 Drawable 类(或其任何子类)来实现。
要实现的最重要方法是 draw(Canvas),因为它提供了您在提供绘制指令时必须使用的 Canvas 对象。
以下代码展示了用于绘制圆形的 Drawable 的简单子类:
Kotlin
class MyDrawable : Drawable() {
    private val redPaint: Paint = Paint().apply { setARGB(255, 255, 0, 0) }

    override fun draw(canvas: Canvas) {
        // Get the drawable's bounds
        val width: Int = bounds.width()
        val height: Int = bounds.height()
        val radius: Float = Math.min(width, height).toFloat() / 2f

        // Draw a red circle in the center
        canvas.drawCircle((width / 2).toFloat(), (height / 2).toFloat(), radius, redPaint)
    }

    override fun setAlpha(alpha: Int) {
        // This method is required
    }

    override fun setColorFilter(colorFilter: ColorFilter?) {
        // This method is required
    }

    override fun getOpacity(): Int =
        // Must be PixelFormat.UNKNOWN, TRANSLUCENT, TRANSPARENT, or OPAQUE
        PixelFormat.OPAQUE
}
Java
public class MyDrawable extends Drawable {
    private final Paint redPaint;

    public MyDrawable() {
        // Set up color and text size
        redPaint = new Paint();
        redPaint.setARGB(255, 255, 0, 0);
    }

    @Override
    public void draw(Canvas canvas) {
        // Get the drawable's bounds
        int width = getBounds().width();
        int height = getBounds().height();
        float radius = Math.min(width, height) / 2;

        // Draw a red circle in the center
        canvas.drawCircle(width/2, height/2, radius, redPaint);
    }

    @Override
    public void setAlpha(int alpha) {
        // This method is required
    }

    @Override
    public void setColorFilter(ColorFilter colorFilter) {
        // This method is required
    }

    @Override
    public int getOpacity() {
        // Must be PixelFormat.UNKNOWN, TRANSLUCENT, TRANSPARENT, or OPAQUE
        return PixelFormat.OPAQUE;
    }
}
然后,您可以将可绘制对象添加到任意位置;例如添加到 ImageView(如下所示):
Kotlin
val myDrawing = MyDrawable()
val image: ImageView = findViewById(R.id.imageView)
image.setImageDrawable(myDrawing)
image.contentDescription = resources.getString(R.string.my_image_desc)
Java
MyDrawable mydrawing = new MyDrawable();
ImageView image = findViewById(R.id.imageView);
image.setImageDrawable(mydrawing);
image.setContentDescription(getResources().getString(R.string.my_image_desc));
在 Android 7.0(API 级别 24)及更高版本上,您还可以使用 XML 定义自定义可绘制对象的实例,方法如下:
- 将完全限定类名用作 XML 元素名称。对于这种方法,自定义可绘制类必须是顶级公开类:
<com.myapp.MyDrawable xmlns:android="http://schemas.android.com/apk/res/android"
    android:color="#ffff0000" />
- 将
drawable用作 XML 标记名称,并通过类属性指定完全限定的类名称。此方法可同时用于顶级公开类和公开静态内部类:<drawable xmlns:android="http://schemas.android.com/apk/res/android" class="com.myapp.MyTopLevelClass$MyDrawable" android:color="#ffff0000" />
向可绘制对象添加色调
对于 Android 5.0(API 级别 21)及更高版本,您可以对定义为 Alpha 掩码的位图和九宫图进行色调调节。您可以使用颜色资源或解析为颜色资源的主题背景属性(例如 ?android:attr/colorPrimary)进行色调调节。通常情况下,您只需创建这些资源一次,然后自动为其着色以与您的主题背景相符。
您可以使用 setTint() 方法对 BitmapDrawable、NinePatchDrawable 或 VectorDrawable 对象着色。您还可以使用 android:tint 和 android:tintMode 属性在布局中设置着色颜色和模式。
从图像中萃取突出颜色
Android 支持库包含 Palette 类,可让您从图片中萃取突出颜色。您可以将可绘制对象作为 Bitmap 进行加载,并将其传递到 Palette 以访问其颜色。如需了解详情,请参阅使用 Palette API 选择颜色。