
בדף היסודות של Dagger מוסבר איך Dagger יכול לעזור לכם להפוך תלות אוטומטית הזרקה באפליקציה שלך. עם צלבון, לא צריך לכתוב קוד סטנדרטי שעלול לשגיאות.
סיכום השיטות המומלצות
- אפשר להשתמש בהחדרה של constructor עם
@Injectכדי להוסיף סוגים לטאגר בתרשים ככל האפשר. כשהערך לא חוקי:- משתמשים ב-
@Bindsכדי להנחות את Dagger איזו הטמעה צריכה להיות לממשק. - משתמשים ב-
@Providesכדי להנחות את Dagger איך לספק כיתות שהפרויקט אינו הבעלים של.
- משתמשים ב-
- צריך להצהיר על מודולים רק פעם אחת ברכיב.
- נותנים שם להערות של ההיקף בהתאם למשך החיים שבו
היא בשימוש. לדוגמה:
@ApplicationScope,@LoggedUserScope, ו-@ActivityScope.
הוספת יחסי תלות
כדי להשתמש ב-Dagger בפרויקט, צריך להוסיף את יחסי התלות האלה לאפליקציה
את קובץ build.gradle שלך. אפשר למצוא את הגרסה העדכנית ביותר של Dagger
בפרויקט הזה ב-GitHub.
Kotlin
plugins {
  id 'kotlin-kapt'
}

dependencies {
    implementation 'com.google.dagger:dagger:2.x'
    kapt 'com.google.dagger:dagger-compiler:2.x'
}
Java
dependencies {
    implementation 'com.google.dagger:dagger:2.x'
    annotationProcessor 'com.google.dagger:dagger-compiler:2.x'
}
Dagger ב-Android
ניקח לדוגמה אפליקציה ל-Android עם תרשים התלות מאיור 1.
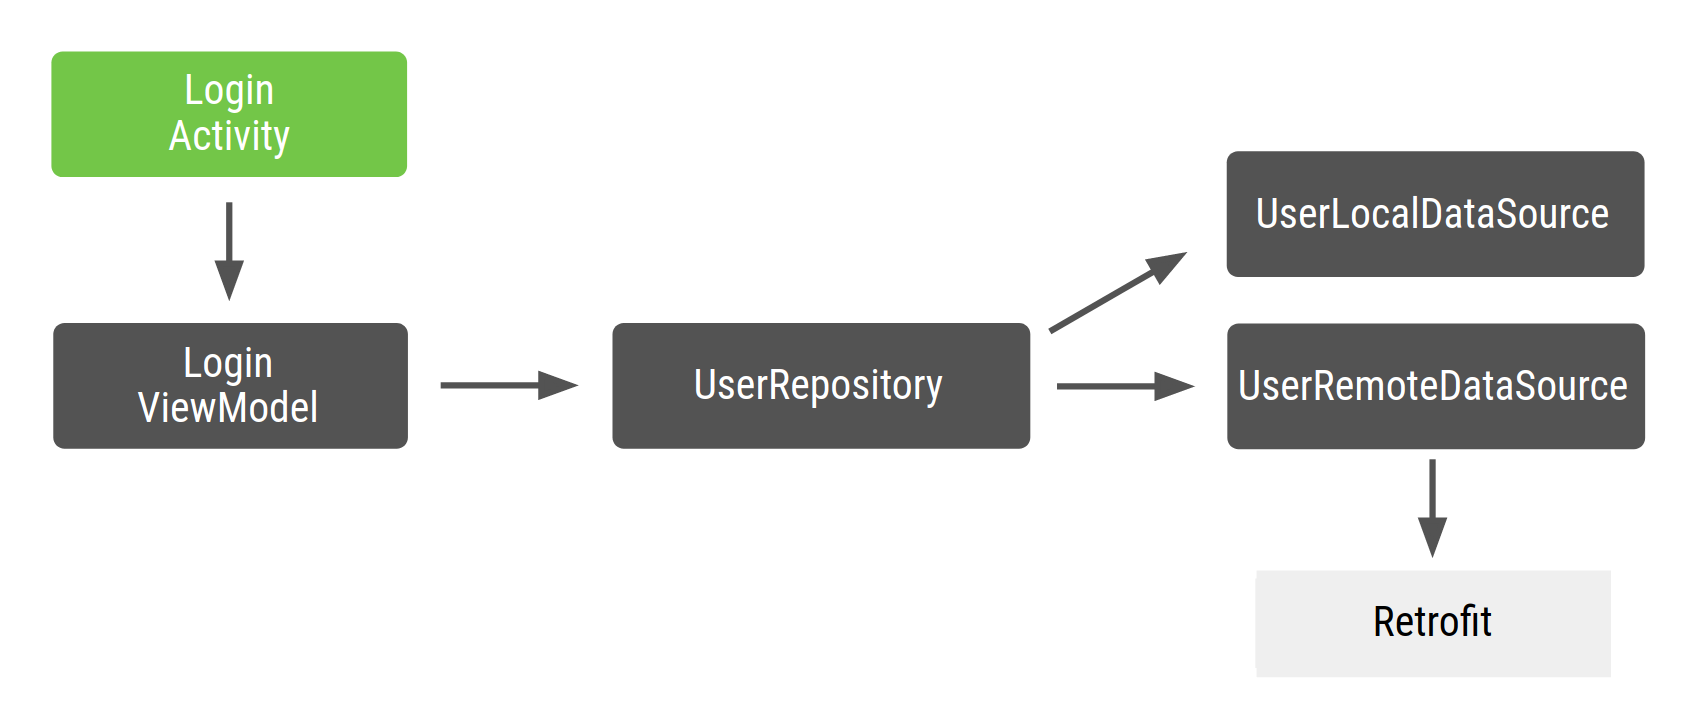
איור 1. תרשים התלות של הדוגמה קוד
ב-Android, בדרך כלל יוצרים תרשים Dagger שמופיע באפליקציה שלכם
כי אתם רוצים שמופע של התרשים יהיה בזיכרון כל עוד
האפליקציה פועלת. כך, התרשים מצורף למחזור החיים של האפליקציה. בחלק מהמקרים
כדאי גם שההקשר של האפליקציה יהיה זמין
גרפי. לשם כך, אתם צריכים גם שהתרשים יופיע
Application. אחד היתרונות של האפשרות הזו
היא שהתרשים זמין למחלקות אחרות של framework ב-Android.
בנוסף, היא מפשטת את הבדיקה בכך שהיא מאפשרת לך להשתמש
כיתה אחת (Application) בבדיקות.
מכיוון שבממשק שיוצר את התרשים יש הערות @Component,
אפשר לקרוא לו ApplicationComponent או ApplicationGraph. לרוב שמירה על המינוי
מופע של הרכיב הזה במחלקה המותאמת אישית Application וקוראים לו
בכל פעם שצריך את התרשים של האפליקציה, כפי שמוצג בקוד הבא
snippet:
Kotlin
// Definition of the Application graph
@Component
interface ApplicationComponent { ... }

// appComponent lives in the Application class to share its lifecycle
class MyApplication: Application() {
    // Reference to the application graph that is used across the whole app
    val appComponent = DaggerApplicationComponent.create()
}
Java
// Definition of the Application graph
@Component
public interface ApplicationComponent {
}

// appComponent lives in the Application class to share its lifecycle
public class MyApplication extends Application {

    // Reference to the application graph that is used across the whole app
    ApplicationComponent appComponent = DaggerApplicationComponent.create();
}
כי מחלקות מסוימות של Android, כמו פעילויות ומקטעים,
נוצר על ידי המערכת, Dagger לא יכול ליצור אותם בשבילכם. לפעילויות
באופן ספציפי, כל קוד אתחול צריך לעבור ל-method onCreate().
המשמעות היא שלא ניתן להשתמש בהערה @Inject ב-constructor של
class (החדרת מבנה) כפי שעשיתם בדוגמאות הקודמות. במקום זאת,
אתם צריכים להשתמש בהחדרת שדה.
במקום ליצור את יחסי התלות שפעילות נדרשת בהם ב-onCreate()
רוצים ש-Dagger יאוכלס את יחסי התלות במקומכם. לשדה
החדרת נתונים, במקום זאת מחילים את ההערה @Inject על השדות
שרוצים לקבל מתרשים Dagger.
Kotlin
class LoginActivity: Activity() {
    // You want Dagger to provide an instance of LoginViewModel from the graph
    @Inject lateinit var loginViewModel: LoginViewModel
}
Java
public class LoginActivity extends Activity {

    // You want Dagger to provide an instance of LoginViewModel from the graph
    @Inject
    LoginViewModel loginViewModel;
}
כדי לשמור על פשטות, LoginViewModel אינו רכיבי ארכיטקטורה של Android
ViewModel; הוא פשוט מחלקה רגילה שמשמשת כ-ViewModel.
לקבלת מידע נוסף על החדרת המחלקות האלה, כדאי לבדוק את הקוד
בהטמעה הרשמית של Dagger ב-Android,
הסתעפות dev-dagger.
אחד השיקולים ב-Dagger הוא ששדות שהוחדרו לא יכולים להיות פרטיים. הם צריכים להיות בעלי גישה פרטית לחבילה, כמו בקוד הקודם.
פעילויות הזרקה
Dagger צריך לדעת ש-LoginActivity צריך לגשת לתרשים כדי
יש לספק את ה-ViewModel שנדרש. בדף היסודות של Dagger השתמשתם
בממשק @Component כדי לקבל אובייקטים מהתרשים
חושפים פונקציות עם סוג ההחזרה שרוצים לקבל
גרפי. במקרה הזה, צריך ליידע את Dagger לגבי אובייקט (LoginActivity
במקרה הזה) שדורשות יחסי תלות. כדי לעשות את זה, צריך לחשוף
פונקציה שלוקחת כפרמטר את האובייקט שמבקש הזרקה.
Kotlin
@Component
interface ApplicationComponent {
    // This tells Dagger that LoginActivity requests injection so the graph needs to
    // satisfy all the dependencies of the fields that LoginActivity is requesting.
    fun inject(activity: LoginActivity)
}
Java
@Component
public interface ApplicationComponent {
    // This tells Dagger that LoginActivity requests injection so the graph needs to
    // satisfy all the dependencies of the fields that LoginActivity is injecting.
    void inject(LoginActivity loginActivity);
}
הפונקציה הזו מנחה את Dagger ש-LoginActivity רוצה לגשת לתרשים
מבקשת החדרת קוד. צלבון צריך לספק את כל יחסי התלות
לפונקציה LoginActivity נדרש (LoginViewModel עם יחסי תלות משלו).
אם יש לכם כמה מחלקות שמבקשות הזרקה, אתם צריכים באופן ספציפי
צריך להצהיר על כולם ברכיב עם הסוג המדויק שלהם. לדוגמה, אם היו לכם
מ-LoginActivity ומ-RegistrationActivity מבקשים הזרקה, נעשה שימוש בשניים
inject() במקום שימוש כללי שמתייחס לשני המקרים. כללי
שיטת inject() לא מנחה את Dagger מה צריך לספק. הפונקציות
בממשק יכולים להיות כל שם, אבל לקרוא ל-inject() כשהם
לקבל את האובייקט כדי להחדיר אותו כפרמטר, היא מוסכמות ב-Dagger.
כדי להחדיר אובייקט בפעילות צריך להשתמש ב-appComponent שמוגדר
את המחלקה Application וקוראים ל-method inject(), מעבירים במכונה
בפעילות שמבקשת הזרקה.
בעת השימוש בפעילויות, מחדירים את צלבון
השיטה onCreate() של הפעילות לפני הקריאה ל-super.onCreate() כדי למנוע בעיות
באמצעות שחזור מקטעים. במהלך שלב השחזור ב-super.onCreate(),
פעילות מצרפת מקטעים שאולי ירצו לגשת לקישורי פעילויות.
כשמשתמשים במקטעים, צריך להחדיר את Dagger ב-onAttach() של המקטע.
. במקרה הזה, אפשר לעשות זאת לפני או אחרי השיחה אל super.onAttach().
Kotlin
class LoginActivity: Activity() {
    // You want Dagger to provide an instance of LoginViewModel from the graph
    @Inject lateinit var loginViewModel: LoginViewModel

    override fun onCreate(savedInstanceState: Bundle?) {
        // Make Dagger instantiate @Inject fields in LoginActivity
        (applicationContext as MyApplication).appComponent.inject(this)
        // Now loginViewModel is available

        super.onCreate(savedInstanceState)
    }
}

// @Inject tells Dagger how to create instances of LoginViewModel
class LoginViewModel @Inject constructor(
    private val userRepository: UserRepository
) { ... }
Java
public class LoginActivity extends Activity {

    // You want Dagger to provide an instance of LoginViewModel from the graph
    @Inject
    LoginViewModel loginViewModel;

    @Override
    protected void onCreate(Bundle savedInstanceState) {
        // Make Dagger instantiate @Inject fields in LoginActivity
        ((MyApplication) getApplicationContext()).appComponent.inject(this);
        // Now loginViewModel is available

        super.onCreate(savedInstanceState);
    }
}

public class LoginViewModel {

    private final UserRepository userRepository;

    // @Inject tells Dagger how to create instances of LoginViewModel
    @Inject
    public LoginViewModel(UserRepository userRepository) {
        this.userRepository = userRepository;
    }
}
בואו נאמר ל-Dagger איך לספק את שאר יחסי התלות בתרשים:
Kotlin
class UserRepository @Inject constructor(
    private val localDataSource: UserLocalDataSource,
    private val remoteDataSource: UserRemoteDataSource
) { ... }

class UserLocalDataSource @Inject constructor() { ... }
class UserRemoteDataSource @Inject constructor(
    private val loginService: LoginRetrofitService
) { ... }
Java
public class UserRepository {

    private final UserLocalDataSource userLocalDataSource;
    private final UserRemoteDataSource userRemoteDataSource;

    @Inject
    public UserRepository(UserLocalDataSource userLocalDataSource, UserRemoteDataSource userRemoteDataSource) {
        this.userLocalDataSource = userLocalDataSource;
        this.userRemoteDataSource = userRemoteDataSource;
    }
}

public class UserLocalDataSource {

    @Inject
    public UserLocalDataSource() {}
}

public class UserRemoteDataSource {

    private final LoginRetrofitService loginRetrofitService;

    @Inject
    public UserRemoteDataSource(LoginRetrofitService loginRetrofitService) {
        this.loginRetrofitService = loginRetrofitService;
    }
}
מודולים של Dagger
בדוגמה הזו נעשה שימוש בספריית הרשת Retrofit.
UserRemoteDataSource תלויה ב-LoginRetrofitService. אבל, לפעמים
הדרך ליצור מופע של LoginRetrofitService שונה
שעשיתם עד עכשיו. זו לא יצירה של מופע כיתתי; הוא התוצאה של
קריאה ל-Retrofit.Builder() והעברת פרמטרים שונים כדי להגדיר
שירות ההתחברות.
מלבד ההערה בנושא @Inject, יש דרך נוספת ללמד את Dagger איך
מספקים מופע של מחלקה: המידע שנמצא במודולים של Dagger. צלבון
המודול הוא מחלקה שיש בה הערות עם @Module. שם אפשר להגדיר
יחסי תלות עם ההערה @Provides.
Kotlin
// @Module informs Dagger that this class is a Dagger Module
@Module
class NetworkModule {

    // @Provides tell Dagger how to create instances of the type that this function
    // returns (i.e. LoginRetrofitService).
    // Function parameters are the dependencies of this type.
    @Provides
    fun provideLoginRetrofitService(): LoginRetrofitService {
        // Whenever Dagger needs to provide an instance of type LoginRetrofitService,
        // this code (the one inside the @Provides method) is run.
        return Retrofit.Builder()
                .baseUrl("https://example.com")
                .build()
                .create(LoginService::class.java)
    }
}
Java
// @Module informs Dagger that this class is a Dagger Module
@Module
public class NetworkModule {

    // @Provides tell Dagger how to create instances of the type that this function
    // returns (i.e. LoginRetrofitService).
    // Function parameters are the dependencies of this type.
    @Provides
    public LoginRetrofitService provideLoginRetrofitService() {
        // Whenever Dagger needs to provide an instance of type LoginRetrofitService,
        // this code (the one inside the @Provides method) is run.
        return new Retrofit.Builder()
                .baseUrl("https://example.com")
                .build()
                .create(LoginService.class);
    }
}
מודולים הם דרך להסתיר מידע סמנטי על האופן שבו מספקים
אובייקטים. כמו שאפשר לראות, התקשרת לכיתה NetworkModule כדי לקבץ את הלוגיקה
של אספקת אובייקטים שקשורים לרישות. אם האפליקציה תתרחב, תוכלו לבצע את הפעולות הבאות:
כאן מוסבר איך להוסיף OkHttpClient כאן, או איך
להגדיר את Gson או Moshi.
יחסי התלות של method @Provides הם הפרמטרים של אותה שיטה. עבור
את השיטה הקודמת, אפשר לציין LoginRetrofitService ללא יחסי תלות
כי ל-method אין פרמטרים. אם הצהרת על OkHttpClient בתור
Dagger יצטרך לספק מופע OkHttpClient
כדי לספק את יחסי התלות של LoginRetrofitService. לדוגמה:
Kotlin
@Module
class NetworkModule {
    // Hypothetical dependency on LoginRetrofitService
    @Provides
    fun provideLoginRetrofitService(
        okHttpClient: OkHttpClient
    ): LoginRetrofitService { ... }
}
Java
@Module
public class NetworkModule {

    @Provides
    public LoginRetrofitService provideLoginRetrofitService(OkHttpClient okHttpClient) {
        ...
    }
}
כדי שתרשים Dagger ידע על המודול הזה, צריך להוסיף אותו
ממשק @Component באופן הבא:
Kotlin
// The "modules" attribute in the @Component annotation tells Dagger what Modules
// to include when building the graph
@Component(modules = [NetworkModule::class])
interface ApplicationComponent {
    ...
}
Java
// The "modules" attribute in the @Component annotation tells Dagger what Modules
// to include when building the graph
@Component(modules = NetworkModule.class)
public interface ApplicationComponent {
    ...
}
הדרך המומלצת להוספת סוגים לתרשים של Dagger היא באמצעות שימוש ב-constructor
החדרת נתונים (כלומר עם ההערה @Inject ב-constructor של המחלקה).
לפעמים הדבר אינו אפשרי וצריך להשתמש במודולים של Dagger. דוגמה אחת
הוא כשרוצים ש-Dagger ישתמש בתוצאה של חישוב כדי לקבוע איך
יוצרים מופע של אובייקט. בכל פעם שהוא צריך לספק מופע כזה
Dagger מריץ את הקוד שבתוך השיטה @Provides.
כך נראה עכשיו תרשים Dagger שבדוגמה:
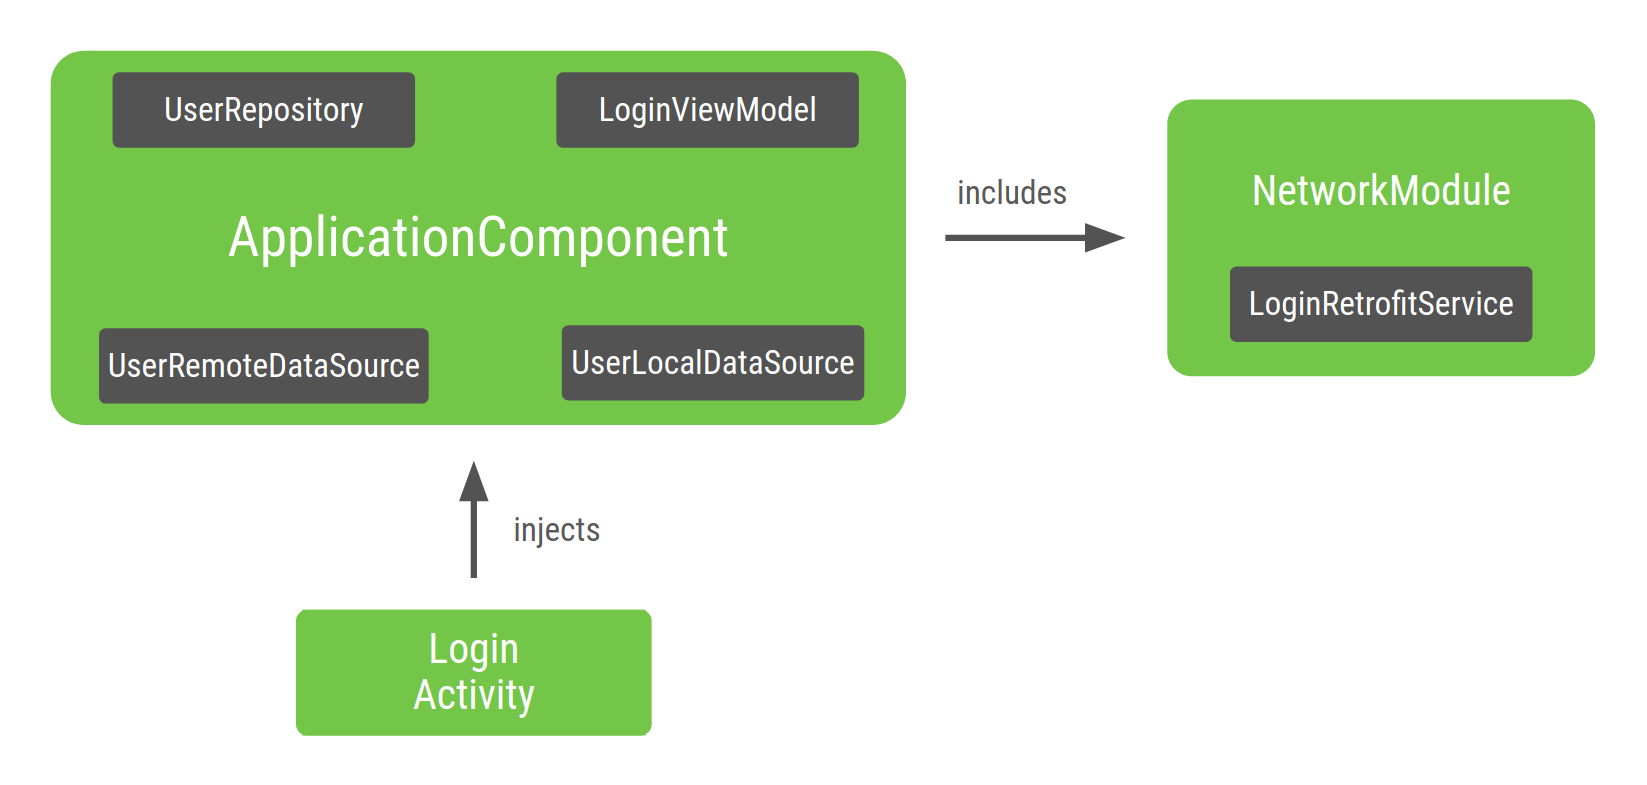
איור 2. ייצוג הגרף באמצעות
המכשיר LoginActivity מוזרק על ידי צלבון
נקודת הכניסה לתרשים היא LoginActivity. כי LoginActivity מבצע הזרקה
LoginViewModel, Dagger בונה גרף שיודע איך לספק מופע
של LoginViewModel, ובאופן רקורסיבי, של יחסי התלות שלו. צלבון יודע איך
לעשות את זה בגלל ההערה @Inject בכיתות constructor.
בתוך ApplicationComponent שנוצר על ידי Dagger יש סוג יצרן
כדי לקבל מופעים של כל המחלקות שהוא יודע איך לספק. כאן
לדוגמה, Dagger מעניק גישה ל-NetworkModule שנכלל
ApplicationComponent כדי לקבל מופע של LoginRetrofitService.
היקפים של צלבון
היקפי ההרשאות הוזכרו בדף היסודות של אינדקסים כדרך מופע ייחודי של סוג ברכיב. זו הכוונה הגדרת היקף למחזור החיים של הרכיב.
כי כדאי לך להשתמש ב-UserRepository בתכונות אחרות של האפליקציה
ייתכן שלא תרצו ליצור אובייקט חדש בכל פעם שתזדקקו לו, תוכלו להקצות
הוא מופע ייחודי של האפליקציה כולה. כך גם
LoginRetrofitService: יכול להיות שהיצירה תהיה יקרה, ואתם רוצים גם
מופע ייחודי של האובייקט שנעשה בו שימוש חוזר. יצירת מופע של
UserRemoteDataSource לא כל כך יקר, לכן ההיקף הוא
מחזור החיים של הרכיב אינו הכרחי.
@Singleton הוא הערת ההיקף היחידה שכוללת
החבילה javax.inject. אפשר להשתמש בו כדי להוסיף הערות ל-ApplicationComponent
ואת האובייקטים שרוצים להשתמש בהם שוב בכל האפליקציה.
Kotlin
@Singleton
@Component(modules = [NetworkModule::class])
interface ApplicationComponent {
    fun inject(activity: LoginActivity)
}

@Singleton
class UserRepository @Inject constructor(
    private val localDataSource: UserLocalDataSource,
    private val remoteDataSource: UserRemoteDataSource
) { ... }

@Module
class NetworkModule {
    // Way to scope types inside a Dagger Module
    @Singleton
    @Provides
    fun provideLoginRetrofitService(): LoginRetrofitService { ... }
}
Java
@Singleton
@Component(modules = NetworkModule.class)
public interface ApplicationComponent {
    void inject(LoginActivity loginActivity);
}

@Singleton
public class UserRepository {

    private final UserLocalDataSource userLocalDataSource;
    private final UserRemoteDataSource userRemoteDataSource;

    @Inject
    public UserRepository(UserLocalDataSource userLocalDataSource, UserRemoteDataSource userRemoteDataSource) {
        this.userLocalDataSource = userLocalDataSource;
        this.userRemoteDataSource = userRemoteDataSource;
    }
}

@Module
public class NetworkModule {

    @Singleton
    @Provides
    public LoginRetrofitService provideLoginRetrofitService() { ... }
}
הקפידו לא ליצור דליפות זיכרון כשמחילים היקפים על אובייקטים. בתור
כל עוד הרכיב בהיקף נמצא בזיכרון, האובייקט שנוצר נמצא בזיכרון
גם. כי ApplicationComponent נוצר כשהאפליקציה מופעלת (ב
Application class), הוא מושמד כשהאפליקציה מושמדת. לכן,
המופע הייחודי של UserRepository תמיד נשאר בזיכרון עד
האפליקציה תושמד.
רכיבי משנה של צלבון
אם תהליך ההתחברות שלך (מנוהל על ידי LoginActivity יחיד) מורכב מכמה גורמים
צריך להשתמש שוב באותו מופע של LoginViewModel
של קטעים שונים. ל-@Singleton אי אפשר להוסיף הערות ב-LoginViewModel כדי לעשות שימוש חוזר במכונה
מהסיבות הבאות:
המופע של
LoginViewModelיישאר בזיכרון אחרי שהתהליך הסתיים.צריך ליצור מופע שונה של
LoginViewModelלכל תהליך התחברות. לדוגמה, אם המשתמש מתנתק, מומלץ ליצור מופע אחר שלLoginViewModel, במקום אותו מופע שבו המשתמש נכנס לצורך בפעם הראשונה.
כדי להגביל את LoginViewModel למחזור החיים של LoginActivity צריך ליצור
רכיב חדש (משנה חדש) לתהליך ההתחברות והיקף חדש.
בואו ניצור תרשים ספציפי לזרימת ההתחברות.
Kotlin
@Component
interface LoginComponent {}
Java
@Component
public interface LoginComponent {
}
עכשיו צריך לקבל זריקות לLoginActivity מ-LoginComponent כי
כולל הגדרות ספציפיות להתחברות. הפעולה הזו מסירה את האחריות לבצע
LoginActivity מהכיתה ApplicationComponent.
Kotlin
@Component
interface LoginComponent {
    fun inject(activity: LoginActivity)
}
Java
@Component
public interface LoginComponent {
    void inject(LoginActivity loginActivity);
}
ל-LoginComponent צריכה להיות גישה לאובייקטים מ-ApplicationComponent
כי LoginViewModel תלוי בערך UserRepository. הדרך לומר ל-Dagger
כשרכיב חדש ישתמש בחלק של רכיב אחר,
רכיבי משנה של Dagger. הרכיב החדש חייב להיות רכיב משנה של
רכיב שמכיל משאבים משותפים.
רכיבי משנה הם רכיבים שיורשים ומרחיבים את תרשים האובייקטים של רכיב הורה. כך, כל האובייקטים המסופקים ברכיב ההורה שמופיעים גם ברכיב המשנה. באופן הזה, אובייקט מרכיב משנה יכולה להיות תלויה באובייקט שסופק על ידי רכיב ההורה.
כדי ליצור מופעים של רכיבי משנה, צריך מופע של רכיב ההורה לרכיב הזה. לכן, האובייקטים שסופקו על ידי רכיב ההורה רכיבי המשנה עדיין בהיקף של רכיב ההורה.
בדוגמה, עליך להגדיר את LoginComponent כרכיב משנה של
ApplicationComponent. כדי לעשות זאת, הוספת הערות ל-LoginComponent עם
@Subcomponent:
Kotlin
// @Subcomponent annotation informs Dagger this interface is a Dagger Subcomponent
@Subcomponent
interface LoginComponent {

    // This tells Dagger that LoginActivity requests injection from LoginComponent
    // so that this subcomponent graph needs to satisfy all the dependencies of the
    // fields that LoginActivity is injecting
    fun inject(loginActivity: LoginActivity)
}
Java
// @Subcomponent annotation informs Dagger this interface is a Dagger Subcomponent
@Subcomponent
public interface LoginComponent {

    // This tells Dagger that LoginActivity requests injection from LoginComponent
    // so that this subcomponent graph needs to satisfy all the dependencies of the
    // fields that LoginActivity is injecting
    void inject(LoginActivity loginActivity);
}
כמו כן, צריך להגדיר מפעל לרכיבי משנה בתוך LoginComponent, כדי
ApplicationComponent יודע איך ליצור מופעים של LoginComponent.
Kotlin
@Subcomponent
interface LoginComponent {

    // Factory that is used to create instances of this subcomponent
    @Subcomponent.Factory
    interface Factory {
        fun create(): LoginComponent
    }

    fun inject(loginActivity: LoginActivity)
}
Java
@Subcomponent
public interface LoginComponent {

    // Factory that is used to create instances of this subcomponent
    @Subcomponent.Factory
    interface Factory {
        LoginComponent create();
    }

    void inject(LoginActivity loginActivity);
}
כדי לומר ל-Dagger ש-LoginComponent הוא רכיב משנה של
ApplicationComponent, עליך לציין זאת באמצעות:
יצירת מודול Dagger חדש (למשל
SubcomponentsModule) שעובר המחלקה של רכיב המשנה למאפייןsubcomponentsשל ההערה.Kotlin
// The "subcomponents" attribute in the @Module annotation tells Dagger what
// Subcomponents are children of the Component this module is included in.
@Module(subcomponents = LoginComponent::class)
class SubcomponentsModule {}
Java
// The "subcomponents" attribute in the @Module annotation tells Dagger what
// Subcomponents are children of the Component this module is included in.
@Module(subcomponents = LoginComponent.class)
public class SubcomponentsModule {
}
הוספת המודול החדש (כלומר
SubcomponentsModule) ל-ApplicationComponent:Kotlin
// Including SubcomponentsModule, tell ApplicationComponent that
// LoginComponent is its subcomponent.
@Singleton
@Component(modules = [NetworkModule::class, SubcomponentsModule::class])
interface ApplicationComponent {
}
Java
// Including SubcomponentsModule, tell ApplicationComponent that
// LoginComponent is its subcomponent.
@Singleton
@Component(modules = {NetworkModule.class, SubcomponentsModule.class})
public interface ApplicationComponent {
}
לתשומת ליבך, ל-
ApplicationComponentאין יותר צורך להחדיר אתLoginActivityכי האחריות הזו שייכת עכשיו לLoginComponent, לכן ניתן להסיר השיטהinject()מ-ApplicationComponent.הצרכנים של
ApplicationComponentצריכים לדעת איך ליצור מופעים שלLoginComponent. רכיב ההורה חייב להוסיף שיטה בממשק שלו כדי לאפשר לצרכנים יוצרים מופעים של רכיב המשנה מתוך מופע רכיב הורה:תחשוף את המפעל שיוצר מכונות של
LoginComponentממשק:Kotlin
@Singleton
@Component(modules = [NetworkModule::class, SubcomponentsModule::class])
interface ApplicationComponent {
// This function exposes the LoginComponent Factory out of the graph so consumers
// can use it to obtain new instances of LoginComponent
fun loginComponent(): LoginComponent.Factory
}
Java
@Singleton
@Component(modules = { NetworkModule.class, SubcomponentsModule.class} )
public interface ApplicationComponent {
// This function exposes the LoginComponent Factory out of the graph so consumers
// can use it to obtain new instances of LoginComponent
LoginComponent.Factory loginComponent();
}
הקצאת היקפים לרכיבי משנה
אם יוצרים את הפרויקט, אפשר ליצור מופעים של ApplicationComponent
ו-LoginComponent. ApplicationComponent מצורף למחזור החיים של
בגלל שאתם רוצים להשתמש באותו מופע של התרשים כל עוד
שהאפליקציה נמצאת בזיכרון.
מה מחזור החיים של LoginComponent? אחת הסיבות לכך
LoginComponent הסיבה לכך היא שצריך לשתף את אותו מופע של
LoginViewModel בין מקטעים שקשורים להתחברות. אבל גם רוצים להגדיר
מופעים של LoginViewModel בכל פעם שיש תהליך התחברות חדש. LoginActivity
הוא משך החיים הנכון של LoginComponent: לכל פעילות חדשה צריך
מופע חדש של LoginComponent ומקטעים שיכולים להשתמש במופע הזה של
LoginComponent.
החשבון LoginComponent מצורף למחזור החיים LoginActivity, לכן צריך
לשמור הפניה לרכיב בפעילות באותו אופן שבו שמרתם את
התייחסות ל-applicationComponent במחלקה Application. כך,
מקטעים יכולים לגשת אליו.
Kotlin
class LoginActivity: Activity() {
    // Reference to the Login graph
    lateinit var loginComponent: LoginComponent
    ...
}
Java
public class LoginActivity extends Activity {

    // Reference to the Login graph
    LoginComponent loginComponent;

    ...
}
שימו לב שלמשתנה loginComponent אין הערות עם @Inject
כי אתם לא מצפים שהמשתנה הזה יסופק על ידי Dagger.
אפשר להשתמש בApplicationComponent כדי לקבל הפניה אל LoginComponent
ואז מחדירים את LoginActivity באופן הבא:
Kotlin
class LoginActivity: Activity() {
    // Reference to the Login graph
    lateinit var loginComponent: LoginComponent

    // Fields that need to be injected by the login graph
    @Inject lateinit var loginViewModel: LoginViewModel

    override fun onCreate(savedInstanceState: Bundle?) {
        // Creation of the login graph using the application graph
        loginComponent = (applicationContext as MyDaggerApplication)
                            .appComponent.loginComponent().create()

        // Make Dagger instantiate @Inject fields in LoginActivity
        loginComponent.inject(this)

        // Now loginViewModel is available

        super.onCreate(savedInstanceState)
    }
}
Java
public class LoginActivity extends Activity {

    // Reference to the Login graph
    LoginComponent loginComponent;

    // Fields that need to be injected by the login graph
    @Inject
    LoginViewModel loginViewModel;

    @Override
    protected void onCreate(Bundle savedInstanceState) {
        // Creation of the login graph using the application graph
        loginComponent = ((MyApplication) getApplicationContext())
                                .appComponent.loginComponent().create();

        // Make Dagger instantiate @Inject fields in LoginActivity
        loginComponent.inject(this);

        // Now loginViewModel is available

        super.onCreate(savedInstanceState);
    }
}
LoginComponent נוצר בשיטה onCreate() של הפעילות, והוא יקבל
הם מושמדים באופן מרומז כשהפעילות נמחקת.
LoginComponent תמיד צריך לספק את אותה מופע של LoginViewModel
בכל פעם שמבקשים אותו. אפשר להבטיח את זה על ידי יצירת הערה בהתאמה אישית
את ההיקף ואת ההערות גם ב-LoginComponent וגם ב-LoginViewModel. הערה
שלא ניתן להשתמש בהערה @Singleton כי כבר נעשה בה שימוש
על ידי רכיב ההורה, וזה יהפוך את האובייקט ל-Singleton
(מופע ייחודי של כל האפליקציה). עליך ליצור הערה אחרת
היקף.
במקרה הזה, אפשר לקרוא להיקף הזה @LoginScope, אבל הוא לא טוב
בפועל. השם של הערות ההיקף לא יכול להיות מפורש למטרה
ממלאת. במקום זאת, צריך לתת לו שם בהתאם למשך החיים שלו,
יכול להיות שנעשה שימוש חוזר בהערות באמצעות רכיבים אחים כמו RegistrationComponent
ו-SettingsComponent. לכן כדאי לקרוא לה @ActivityScope במקום זאת
מתוך @LoginScope.
Kotlin
// Definition of a custom scope called ActivityScope
@Scope
@Retention(value = AnnotationRetention.RUNTIME)
annotation class ActivityScope

// Classes annotated with @ActivityScope are scoped to the graph and the same
// instance of that type is provided every time the type is requested.
@ActivityScope
@Subcomponent
interface LoginComponent { ... }

// A unique instance of LoginViewModel is provided in Components
// annotated with @ActivityScope
@ActivityScope
class LoginViewModel @Inject constructor(
    private val userRepository: UserRepository
) { ... }
Java
// Definition of a custom scope called ActivityScope
@Scope
@Retention(RetentionPolicy.RUNTIME)
public @interface ActivityScope {}

// Classes annotated with @ActivityScope are scoped to the graph and the same
// instance of that type is provided every time the type is requested.
@ActivityScope
@Subcomponent
public interface LoginComponent { ... }

// A unique instance of LoginViewModel is provided in Components
// annotated with @ActivityScope
@ActivityScope
public class LoginViewModel {

    private final UserRepository userRepository;

    @Inject
    public LoginViewModel(UserRepository userRepository) {
        this.userRepository = userRepository;
    }
}
עכשיו, אם יש שני מקטעים שצריכים LoginViewModel, שניהם
שסופקו באמצעות אותו מופע. לדוגמה, אם יש לך
צריך להזריק את LoginUsernameFragment ואת LoginPasswordFragment
על ידי LoginComponent:
Kotlin
@ActivityScope
@Subcomponent
interface LoginComponent {

    @Subcomponent.Factory
    interface Factory {
        fun create(): LoginComponent
    }

    // All LoginActivity, LoginUsernameFragment and LoginPasswordFragment
    // request injection from LoginComponent. The graph needs to satisfy
    // all the dependencies of the fields those classes are injecting
    fun inject(loginActivity: LoginActivity)
    fun inject(usernameFragment: LoginUsernameFragment)
    fun inject(passwordFragment: LoginPasswordFragment)
}
Java
@ActivityScope
@Subcomponent
public interface LoginComponent {

    @Subcomponent.Factory
    interface Factory {
        LoginComponent create();
    }

    // All LoginActivity, LoginUsernameFragment and LoginPasswordFragment
    // request injection from LoginComponent. The graph needs to satisfy
    // all the dependencies of the fields those classes are injecting
    void inject(LoginActivity loginActivity);
    void inject(LoginUsernameFragment loginUsernameFragment);
    void inject(LoginPasswordFragment loginPasswordFragment);
}
הרכיבים ניגשים למופע של הרכיב שנמצא
אובייקט LoginActivity. קוד לדוגמה עבור LoginUserNameFragment מופיע בשדה
את קטע הקוד הבא:
Kotlin
class LoginUsernameFragment: Fragment() {

    // Fields that need to be injected by the login graph
    @Inject lateinit var loginViewModel: LoginViewModel

    override fun onAttach(context: Context) {
        super.onAttach(context)

        // Obtaining the login graph from LoginActivity and instantiate
        // the @Inject fields with objects from the graph
        (activity as LoginActivity).loginComponent.inject(this)

        // Now you can access loginViewModel here and onCreateView too
        // (shared instance with the Activity and the other Fragment)
    }
}
Java
public class LoginUsernameFragment extends Fragment {

    // Fields that need to be injected by the login graph
    @Inject
    LoginViewModel loginViewModel;

    @Override
    public void onAttach(Context context) {
        super.onAttach(context);

        // Obtaining the login graph from LoginActivity and instantiate
        // the @Inject fields with objects from the graph
        ((LoginActivity) getActivity()).loginComponent.inject(this);

        // Now you can access loginViewModel here and onCreateView too
        // (shared instance with the Activity and the other Fragment)
    }
}
וכך גם לגבי LoginPasswordFragment:
Kotlin
class LoginPasswordFragment: Fragment() {

    // Fields that need to be injected by the login graph
    @Inject lateinit var loginViewModel: LoginViewModel

    override fun onAttach(context: Context) {
        super.onAttach(context)

        (activity as LoginActivity).loginComponent.inject(this)

        // Now you can access loginViewModel here and onCreateView too
        // (shared instance with the Activity and the other Fragment)
    }
}
Java
public class LoginPasswordFragment extends Fragment {

    // Fields that need to be injected by the login graph
    @Inject
    LoginViewModel loginViewModel;

    @Override
    public void onAttach(Context context) {
        super.onAttach(context);

        ((LoginActivity) getActivity()).loginComponent.inject(this);

        // Now you can access loginViewModel here and onCreateView too
        // (shared instance with the Activity and the other Fragment)
    }
}
איור 3 מראה איך נראה תרשים הפגיונות עם רכיב המשנה החדש. הכיתות
עם נקודה לבנה (UserRepository, LoginRetrofitService ו-LoginViewModel)
הם אלה שיש להם מכונה ייחודית בהיקף הרכיבים התואמים שלהם.
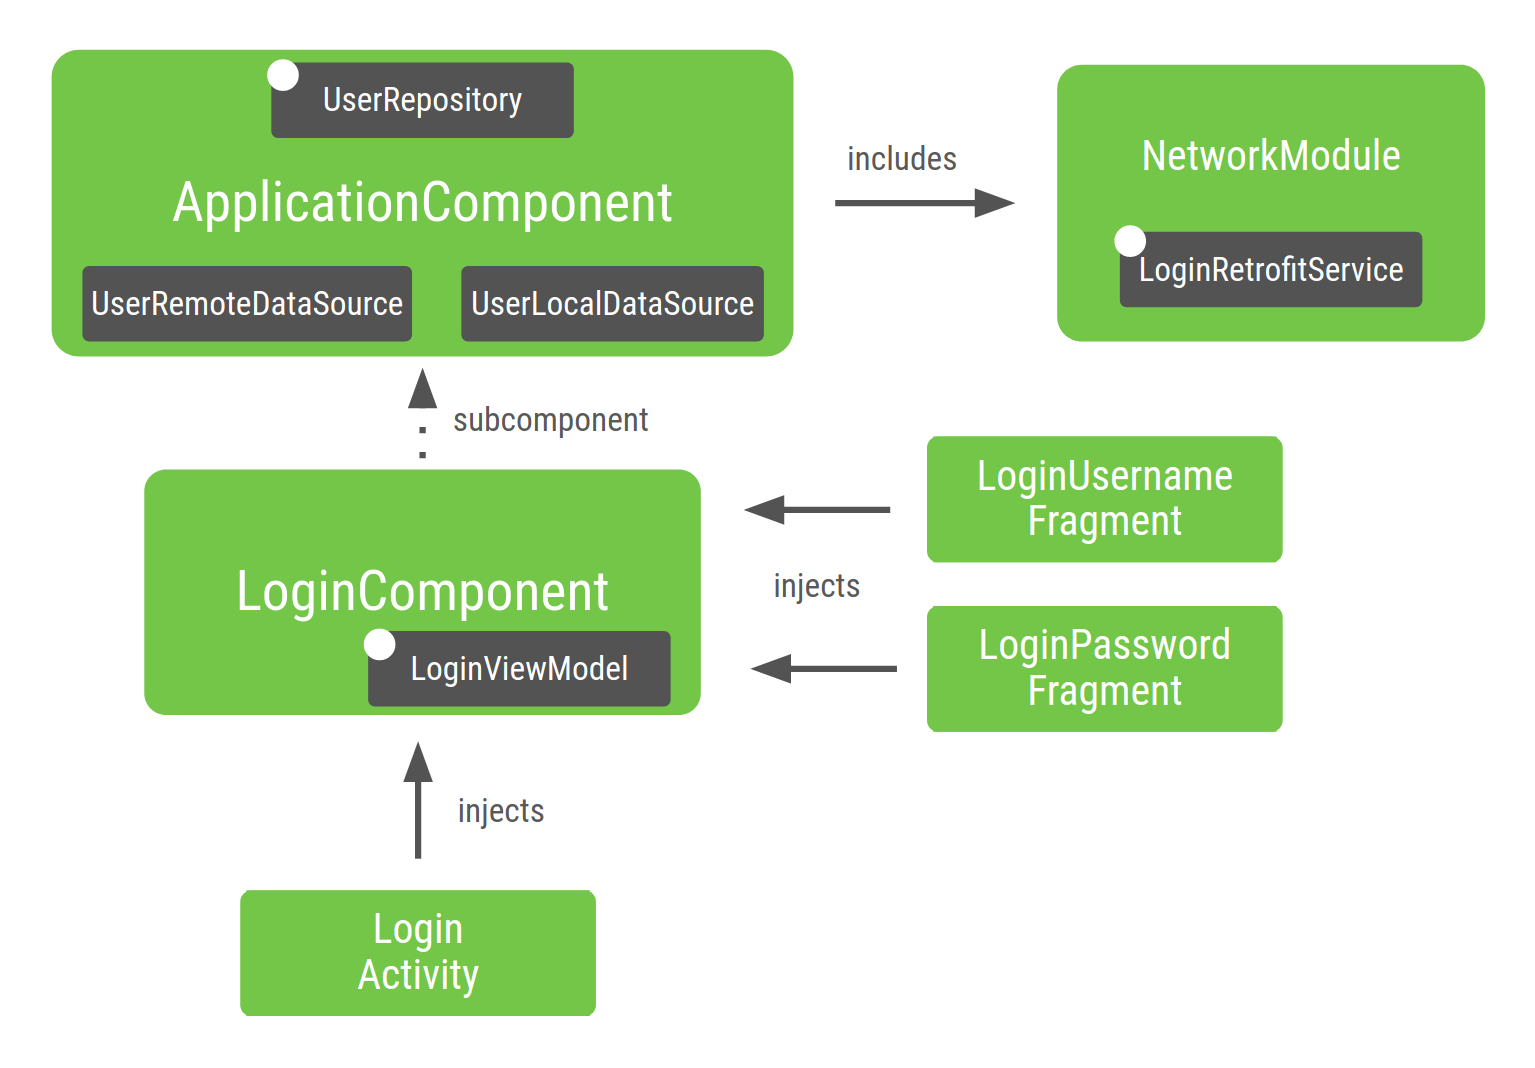
איור 3. ייצוג של התרשים שיצרתם לדוגמה של האפליקציה ל-Android
כדי להציג פירוט של חלקי הגרף:
NetworkModule(ולכןLoginRetrofitService) כלולים ב-ApplicationComponentכי ציינת אותו ברכיב.UserRepositoryנשאר בApplicationComponentכי הוא בהיקף שלApplicationComponent. אם הפרויקט גדל, כדאי לשתף את למשל בתכונות שונות (למשל 'רישום').UserRepositoryהוא חלק מ-ApplicationComponent, לכן יחסי התלות שלו (למשל,UserLocalDataSourceו-UserRemoteDataSource) צריכים להיכלל כאן של רכיב מסוים גם כן, כדי שהוא יוכל לספק מופעים שלUserRepository.LoginViewModelכלול בLoginComponentמפני שהוא רק נדרש על ידי המחלקות שהוחדרו על ידיLoginComponent.LoginViewModelלא כלול ב:ApplicationComponentכי אין תלות בצרכים שלApplicationComponentLoginViewModelבאופן דומה, אם לא הגדרתם את
UserRepositoryההיקף ל-ApplicationComponent, צלבון היה כולל באופן אוטומטי אתUserRepositoryואת יחסי התלות שלו כחלק מLoginComponentכי זה המקום היחיד כרגע נעשה שימוש ב-UserRepository.
מלבד הגדרת היקף לאובייקטים במחזור חיים אחר, יצירת רכיבי משנה היא דוגמה טובה להכללת חלקים שונים של האפליקציה שתי רשתות נוירונים זו מול זו.
בניית האפליקציה כדי ליצור תת-תרשימים שונים של Dagger בהתאם לזרימה של האפליקציה שלכם להשגת אפליקציה עם ביצועים טובים יותר ויכולת התאמה לסדרי גודל שונים מבחינת הזיכרון וזמן ההפעלה.
שיטות מומלצות ליצירת תרשים של צלבון
במהלך בניית תרשים Dagger לאפליקציה שלכם:
כשיוצרים רכיב, צריך לקחת בחשבון איזה רכיב אחראי לכל משך החיים של הרכיב הזה. במקרה הזה, המחלקה
Applicationנמצאת אחראי עלApplicationComponentועלLoginActivityLoginComponentיש להשתמש בהיקף רק כאשר הדבר הגיוני. שימוש יתר בהיקפים עלול להכיל ערך שלילי השפעה על הביצועים של האפליקציה בזמן הריצה: האובייקט נמצא בזיכרון כל עוד כי הרכיב נמצא בזיכרון וקבלת אובייקט בהיקף יקרה יותר. כש-Dagger מספק את האובייקט, הוא משתמש בנעילה של
DoubleCheckבמקום ספק מסוג מפעל.
בדיקת פרויקט שמשתמש ב-Dagger
אחד היתרונות של שימוש במסגרות החדרת תלות כמו Dagger הוא מאפשר לבדוק את הקוד בקלות רבה יותר.
בדיקות יחידה (unit testing)
לא חובה להשתמש בקערה לבדיקות יחידה. כשבודקים מחלקה שמשתמשת החדרת constructor, אין צורך להשתמש ב-Dagger כדי ליצור את המחלקה הזו. אפשר לקרוא ל-constructor שלו באופן ישיר להעביר יחסי תלות מזויפים או לדוגמה באופן ישיר, בדיוק כמו שהייתם עושים אם לא היו מוסיפים להם הערות.
לדוגמה, כשבודקים את LoginViewModel:
Kotlin
@ActivityScope
class LoginViewModel @Inject constructor(
    private val userRepository: UserRepository
) { ... }

class LoginViewModelTest {

    @Test
    fun `Happy path`() {
        // You don't need Dagger to create an instance of LoginViewModel
        // You can pass a fake or mock UserRepository
        val viewModel = LoginViewModel(fakeUserRepository)
        assertEquals(...)
    }
}
Java
@ActivityScope
public class LoginViewModel {

    private final UserRepository userRepository;

    @Inject
    public LoginViewModel(UserRepository userRepository) {
        this.userRepository = userRepository;
    }
}

public class LoginViewModelTest {

    @Test
    public void happyPath() {
        // You don't need Dagger to create an instance of LoginViewModel
        // You can pass a fake or mock UserRepository
        LoginViewModel viewModel = new LoginViewModel(fakeUserRepository);
        assertEquals(...);
    }
}
בדיקות מקצה לקצה
בבדיקות שילוב, שיטה טובה היא ליצור
TestApplicationComponent מיועדת לבדיקה.
בייצור ובבדיקה נעשה שימוש בהגדרה שונה של רכיב.
לשם כך נדרש תכנון מראש יותר של המודולים את האפליקציה שלך. רכיב הבדיקה מרחיב את רכיב הייצור מתקין קבוצה אחרת של מודולים.
Kotlin
// TestApplicationComponent extends from ApplicationComponent to have them both
// with the same interface methods. You need to include the modules of the
// component here as well, and you can replace the ones you want to override.
// This sample uses FakeNetworkModule instead of NetworkModule
@Singleton
@Component(modules = [FakeNetworkModule::class, SubcomponentsModule::class])
interface TestApplicationComponent : ApplicationComponent {
}
Java
// TestApplicationComponent extends from ApplicationComponent to have them both
// with the same interface methods. You need to include the modules of the
// Component here as well, and you can replace the ones you want to override.
// This sample uses FakeNetworkModule instead of NetworkModule
@Singleton
@Component(modules = {FakeNetworkModule.class, SubcomponentsModule.class})
public interface TestApplicationComponent extends ApplicationComponent {
}
ב-FakeNetworkModule יש יישום מזויף של NetworkModule המקורי.
שם תוכלו לספק מופעים או דוגמאות מזויפים של מה שרוצים להחליף.
Kotlin
// In the FakeNetworkModule, pass a fake implementation of LoginRetrofitService
// that you can use in your tests.
@Module
class FakeNetworkModule {
    @Provides
    fun provideLoginRetrofitService(): LoginRetrofitService {
        return FakeLoginService()
    }
}
Java
// In the FakeNetworkModule, pass a fake implementation of LoginRetrofitService
// that you can use in your tests.
@Module
public class FakeNetworkModule {

    @Provides
    public LoginRetrofitService provideLoginRetrofitService() {
        return new FakeLoginService();
    }
}
בבדיקות השילוב או בבדיקות מקצה לקצה, צריך להשתמש ב-TestApplication
הפונקציה יוצרת את TestApplicationComponent במקום ApplicationComponent.
Kotlin
// Your test application needs an instance of the test graph
class MyTestApplication: MyApplication() {
    override val appComponent = DaggerTestApplicationComponent.create()
}
Java
// Your test application needs an instance of the test graph
public class MyTestApplication extends MyApplication {
    ApplicationComponent appComponent = DaggerTestApplicationComponent.create();
}
לאחר מכן, אפליקציית הבדיקה הזו תשמש ב-TestRunner בהתאמה אישית שישמש אותך כדי
להריץ בדיקות אינסטרומנטציה. למידע נוסף בנושא זה, עיינו ב
Dagger ב-Codelab של האפליקציה ל-Android.
עבודה עם מודולים של Dagger
מודולי הפגיונות הם דרך שמבהירה איך לספק אובייקטים בדרך הזו. אפשר לכלול מודולים ברכיבים, אבל אפשר גם לכלול מודולים בתוך מודולים אחרים. זוהי שיטה יעילה, אך ניתן לעשות בה שימוש לרעה.
אחרי שמוסיפים מודול לרכיב או למודול אחר, כבר בתרשים Dagger; צלבון יכול לספק את האובייקטים ברכיב הזה. לפני שמוסיפים מודול, בדקו אם המודול הזה כבר חלק מתרשים Dagger על ידי בדיקה אם הוא כבר נוסף לרכיב או על ידי הידור של הפרויקט ולראות אם Dagger יכול למצוא את יחסי התלות הנדרשים לאותו מודול.
לפי השיטה המומלצת, צריך להצהיר על מודולים רק פעם אחת בכל רכיב (מחוץ לתרחישים לדוגמה מתקדמים של Dagger).
נניח שהגדרתם את התרשים בדרך הזו. ApplicationComponent
כולל Module1 ו-Module2 ו-Module1 כולל ModuleX.
Kotlin
@Component(modules = [Module1::class, Module2::class])
interface ApplicationComponent { ... }

@Module(includes = [ModuleX::class])
class Module1 { ... }

@Module
class Module2 { ... }
Java
@Component(modules = {Module1.class, Module2.class})
public interface ApplicationComponent { ... }

@Module(includes = {ModuleX.class})
public class Module1 { ... }

@Module
public class Module2 { ... }
אם עכשיו Module2 תלוי בכיתות שסופקו על ידי ModuleX. שיטה גרועה
כולל את ModuleX ב-Module2 כי ModuleX נכלל פעמיים ב-
את התרשים כפי שמוצג בקטע הקוד הבא:
Kotlin
// Bad practice: ModuleX is declared multiple times in this Dagger graph
@Component(modules = [Module1::class, Module2::class])
interface ApplicationComponent { ... }

@Module(includes = [ModuleX::class])
class Module1 { ... }

@Module(includes = [ModuleX::class])
class Module2 { ... }
Java
// Bad practice: ModuleX is declared multiple times in this Dagger graph.
@Component(modules = {Module1.class, Module2.class})
public interface ApplicationComponent { ... }

@Module(includes = ModuleX.class)
public class Module1 { ... }

@Module(includes = ModuleX.class)
public class Module2 { ... }
במקום זאת, צריך לבצע אחת מהפעולות הבאות:
- ארגון מחדש של המודולים ומחלצים את המודול המשותף לרכיב הזה.
- יצירת מודול חדש עם האובייקטים ששני המודולים משתפים ומחלצים אותו לרכיב.
אי-ארגון מחדש בדרך הזו גורם להרבה מודולים שכוללים זה את זה ללא תחושה ברורה של ארגון, וכך קשה יותר לראות היכן שכל תלות מגיעה ממנה.
שיטה טובה (אפשרות 1): מוצהר על ModuleX פעם אחת בתרשים Dagger.
Kotlin
@Component(modules = [Module1::class, Module2::class, ModuleX::class])
interface ApplicationComponent { ... }

@Module
class Module1 { ... }

@Module
class Module2 { ... }
Java
@Component(modules = {Module1.class, Module2.class, ModuleX.class})
public interface ApplicationComponent { ... }

@Module
public class Module1 { ... }

@Module
public class Module2 { ... }
שיטה מומלצת (אפשרות 2): יחסי תלות נפוצים בין Module1 לבין Module2
ב-ModuleX נשלפים למודול חדש בשם ModuleXCommon
שכלול ברכיב. לאחר מכן שני מודולים נוספים שנקראים
ModuleXWithModule1Dependencies ו-ModuleXWithModule2Dependencies הם
שנוצרו באמצעות יחסי התלות שספציפיים לכל מודול. כל המודולים
מוצהרים פעם אחת בתרשים Dagger.
Kotlin
@Component(modules = [Module1::class, Module2::class, ModuleXCommon::class])
interface ApplicationComponent { ... }

@Module
class ModuleXCommon { ... }

@Module
class ModuleXWithModule1SpecificDependencies { ... }

@Module
class ModuleXWithModule2SpecificDependencies { ... }

@Module(includes = [ModuleXWithModule1SpecificDependencies::class])
class Module1 { ... }

@Module(includes = [ModuleXWithModule2SpecificDependencies::class])
class Module2 { ... }
Java
@Component(modules = {Module1.class, Module2.class, ModuleXCommon.class})
public interface ApplicationComponent { ... }

@Module
public class ModuleXCommon { ... }

@Module
public class ModuleXWithModule1SpecificDependencies { ... }

@Module
public class ModuleXWithModule2SpecificDependencies { ... }

@Module(includes = ModuleXWithModule1SpecificDependencies.class)
public class Module1 { ... }

@Module(includes = ModuleXWithModule2SpecificDependencies.class)
public class Module2 { ... }
הזרקה בסיוע
החדרה בסיוע היא דפוס DI שמשמש לבניית אובייקט כאשר ייתכן שפרמטרים מסוימים יסופקו על ידי framework ה-DI, ואחרים חייבים לעבור בזמן היצירה על ידי המשתמש.
ב-Android, הדפוס הזה נפוץ במסכי פרטים שבהם המזהה של שיוצג רק בזמן הריצה, לא בזמן הקומפילציה שבו Dagger יוצרת את תרשים ה-DI. כדי לקבל מידע נוסף על הזרקה בסיוע באמצעות צלבון, ניתן לעיין במסמכי התיעוד של Dagger.
סיכום
אם עדיין לא עשיתם זאת, עיינו בקטע 'שיטות מומלצות'. שפת תרגום כדי ללמוד איך להשתמש ב-Dagger באפליקציה ל-Android, כדאי לעיין במאמר שימוש ב-Dagger באפליקציה ל-Android Codelab.