認証情報マネージャーは Android 14 で導入された API で、ユーザー名とパスワード、パスキー、フェデレーション ログイン ソリューション(Google でログインなど)といった複数のログイン方法をサポートしています。Credential Manager API が呼び出されると、Android システムは、デバイスにインストールされているすべての認証情報プロバイダから認証情報を集約します。このドキュメントでは、これらの認証情報プロバイダに統合エンドポイントを提供する一連の API について説明します。
設定
認証情報プロバイダに機能を実装する前に、次のセクションで説明するセットアップ手順を完了します。
依存関係の宣言
Credential Manager ライブラリの最新バージョンを使用するには、アプリ モジュールのビルド スクリプトに次の依存関係を追加します。
Kotlin
dependencies {
    implementation("androidx.credentials:credentials:1.6.0-rc01")
}
Groovy
dependencies {
    implementation "androidx.credentials:credentials:1.6.0-rc01"
}
マニフェスト ファイルでサービス要素を宣言する
アプリのマニフェスト ファイル AndroidManifest.xml で、以下の例のような androidx.credentials ライブラリから、CredentialProviderService クラスを拡張するサービスクラスの <service> 宣言を追加します。
<service android:name=".MyCredentialProviderService"
    android:enabled="true"
    android:exported="true"
    android:label="My Credential Provider"
    android:icon="@mipmap/ic_launcher"
    android:permission="android.permission.BIND_CREDENTIAL_PROVIDER_SERVICE"
    tools:targetApi="upside_down_cake">
    <intent-filter>
        <action android:name="android.service.credentials.CredentialProviderService"/>
    </intent-filter>
    <meta-data
        android:name="android.credentials.provider"
        android:resource="@xml/provider"/>
</service>
認証情報マネージャーのフローが想定どおりに機能するには、前の例の権限とインテント フィルタが不可欠です。このサービスに Android システムのみをバインドするためには、この権限が必要です。インテント フィルタは、認証情報マネージャーが使用する認証情報プロバイダとして、このサービスを検出するために使用されます。
サポートされている認証情報タイプを宣言する
res/xml ディレクトリに provider.xml という名前の新しいファイルを作成します。このファイルでは、ライブラリの各認証情報タイプに対して定義された定数を使用して、サービスがサポートする認証情報タイプを宣言します。次の例では、サービスは従来のパスワードとパスキーをサポートしており、その定数は、TYPE_PASSWORD_CREDENTIAL、TYPE_PUBLIC_KEY_CREDENTIAL として定義されています。
<credential-provider xmlns:android="http://schemas.android.com/apk/res/android">
    <capabilities>
        <capability name="android.credentials.TYPE_PASSWORD_CREDENTIAL" />
        <capability name="androidx.credentials.TYPE_PUBLIC_KEY_CREDENTIAL" />
    </capabilities>
</credential-provider>
以前の API レベルでは、認証情報プロバイダはパスワードやその他データの自動入力などの API と統合されています。これらのプロバイダは、同じ内部インフラストラクチャを使用して既存の認証情報タイプを保存し、それを拡張してパスキーなど他の認証情報をサポートできます。
プロバイダとのやり取りに対する 2 段階のアプローチ
認証情報マネージャーは、次の 2 つのフェーズで認証情報プロバイダとやり取りします。
- 最初のフェーズは開始 / クエリフェーズです。このフェーズでは、システムが認証情報プロバイダのサービスにバインドされ、
onBeginGetCredentialRequest()メソッド、onBeginCreateCredentialRequest()メソッド、またはBegin…リクエストを持つonClearCredentialStateRequest()メソッドを呼び出します。プロバイダは、これらのリクエストを処理し、Begin…レスポンスで応答する必要があります。その結果、アカウント セレクタに表示されるビジュアル オプションを表すエントリが入力されます。各エントリにはPendingIntentを設定する必要があります。 - ユーザーがエントリを選択すると、選択フェーズが開始され、エントリに関連付けられた
PendingIntentとともに対応するプロバイダのアクティビティが起動します。ユーザーがこのアクティビティの操作を完了したら、認証情報プロバイダは、アクティビティを終了する前に、操作の結果に対するレスポンスを設定する必要があります。このレスポンスは、認証情報マネージャーを呼び出したクライアント アプリに送信されます。
パスキーの作成を処理する
パスキー作成のクエリを処理する
クライアント アプリがパスキーを作成して認証情報プロバイダに保存する場合は、createCredential API を呼び出します。パスキーが実際にストレージに保存されるように、認証情報プロバイダのサービスでこのリクエストを処理するには、次のセクションの手順を実施します。
CredentialProviderServiceから拡張されたサービスのonBeginCreateCredentialRequest()メソッドをオーバーライドします。BeginCreateCredentialRequestを処理するには、対応するBeginCreateCredentialResponseを作成し、コールバックを介してそれを渡します。BeginCreateCredentialResponseを作成する際に、必要なCreateEntriesを追加します。各CreateEntryは、認証情報を保存できるアカウントに対応しており、PendingIntentが他の必須のメタデータとともに設定されている必要があります。
次の例は、この手順を実行する方法を示しています。
override fun onBeginCreateCredentialRequest(
    request: BeginCreateCredentialRequest,
    cancellationSignal: CancellationSignal,
    callback: OutcomeReceiver<BeginCreateCredentialResponse, CreateCredentialException>,
) {
    val response: BeginCreateCredentialResponse? = processCreateCredentialRequest(request)
    if (response != null) {
        callback.onResult(response)
    } else {
        callback.onError(CreateCredentialUnknownException())
    }
}

fun processCreateCredentialRequest(request: BeginCreateCredentialRequest): BeginCreateCredentialResponse? {
    when (request) {
        is BeginCreatePublicKeyCredentialRequest -> {
            // Request is passkey type
            return handleCreatePasskeyQuery(request)
        }
    }
    // Request not supported
    return null
}

private fun handleCreatePasskeyQuery(
    request: BeginCreatePublicKeyCredentialRequest
): BeginCreateCredentialResponse {

    // Adding two create entries - one for storing credentials to the 'Personal'
    // account, and one for storing them to the 'Family' account. These
    // accounts are local to this sample app only.
    val createEntries: MutableList<CreateEntry> = mutableListOf()
    createEntries.add(
        CreateEntry(
            PERSONAL_ACCOUNT_ID,
            createNewPendingIntent(PERSONAL_ACCOUNT_ID, CREATE_PASSKEY_INTENT)
        )
    )

    createEntries.add(
        CreateEntry(
            FAMILY_ACCOUNT_ID,
            createNewPendingIntent(FAMILY_ACCOUNT_ID, CREATE_PASSKEY_INTENT)
        )
    )

    return BeginCreateCredentialResponse(createEntries)
}

private fun createNewPendingIntent(accountId: String, action: String): PendingIntent {
    val intent = Intent(action).setPackage(PACKAGE_NAME)

    // Add your local account ID as an extra to the intent, so that when
    // user selects this entry, the credential can be saved to this
    // account
    intent.putExtra(EXTRA_KEY_ACCOUNT_ID, accountId)

    return PendingIntent.getActivity(
        applicationContext, UNIQUE_REQ_CODE,
        intent,
        (
            PendingIntent.FLAG_MUTABLE
                or PendingIntent.FLAG_UPDATE_CURRENT
            )
    )
}
PendingIntent の構造は、次のことを遵守する必要があります。
- 必要な生体認証プロンプト、確認、選択を表示するために、対応するアクティビティを設定する。
- 対応するアクティビティが呼び出されたときにプロバイダが必要とするデータは、作成フローの
accountIdなど、PendingIntentの作成に使用するインテントでエクストラとして設定する。 - システムが最終リクエストをインテント エクストラに追加できるように、
PendingIntentをPendingIntent.FLAG_MUTABLEフラグで作成する。 - ユーザーがエントリを選択し、戻って再度選択すると
PendingIntentが 2 回呼び出される可能性があるため、PendingIntent.FLAG_ONE_SHOTフラグでPendingIntentを作成しない。 - 各エントリが対応する
PendingIntentを持つことができるように、PendingIntentは一意のリクエスト コードで構築する。
パスキー作成リクエストのエントリ選択を処理する
- ユーザーが以前に入力された
CreateEntryを選択すると、対応するPendingIntentが呼び出され、関連するプロバイダActivityが作成されます。 - アクティビティの
onCreateメソッドが呼び出されたら、関連するインテントにアクセスし、それをPendingIntentHanderクラスに渡してProviderCreateCredentialRequestを取得します。 - リクエストから
requestJson、callingAppInfo、clientDataHashを抽出します。 - インテント エクストラからローカルの
accountIdを抽出します。これはサンプルアプリ固有の実装であり、必須ではありません。このアカウント ID は、この特定のアカウント ID の認証情報を保存するのに使用できます。 requestJsonを検証します。次の例では、PublicKeyCredentialCreationOptionsなどのローカル データクラスを使用して、入力 JSON を WebAuthn の仕様に即した構造化クラスに変換します。認証情報プロバイダは、これを独自のパーサーに置き換えることができます。- 呼び出しがネイティブな Android アプリからのものである場合、呼び出し元アプリのアセットリンクを確認します。
- 認証プロンプトを表示します。以下の例では、Android Biometric API を使用しています。
- 認証が成功したら、
credentialIdと鍵ペアを生成します。 callingAppInfo.packageNameに対する秘密鍵をローカル データベースに保存します。- 公開鍵と、
credentialIdで構成される Web Authentication API JSON レスポンスを作成します。以下の例では、AuthenticatorAttestationResponseやFidoPublicKeyCredentialといったローカルのユーティリティ クラスを使用しており、これは前述の仕様に基づいて JSON を構築するのに役立ちます。認証情報プロバイダは、これらのクラスを独自のビルダーに置き換えることができます。 - 上記で生成した JSON を使用して
CreatePublicKeyCredentialResponseを作成します。 PendingIntentHander.setCreateCredentialResponse()からのCreatePublicKeyCredentialResponseを エクストラとしてIntentに設定し、そのインテントをアクティビティの結果に設定します。- アクティビティを終了します。
以下のコード例は、これらのステップを示しています。onCreate() が呼び出されたら、このコードをアクティビティ クラスで処理する必要があります。
override fun onCreate(savedInstanceState: Bundle?, persistentState: PersistableBundle?) {
    super.onCreate(savedInstanceState, persistentState)
    // ...

    val request =
        PendingIntentHandler.retrieveProviderCreateCredentialRequest(intent)

    val accountId = intent.getStringExtra(CredentialsRepo.EXTRA_KEY_ACCOUNT_ID)
    if (request != null && request.callingRequest is CreatePublicKeyCredentialRequest) {
        val publicKeyRequest: CreatePublicKeyCredentialRequest =
            request.callingRequest as CreatePublicKeyCredentialRequest
        createPasskey(
            publicKeyRequest.requestJson,
            request.callingAppInfo,
            publicKeyRequest.clientDataHash,
            accountId
        )
    }
}

@SuppressLint("RestrictedApi")
fun createPasskey(
    requestJson: String,
    callingAppInfo: CallingAppInfo?,
    clientDataHash: ByteArray?,
    accountId: String?
) {
    val request = PublicKeyCredentialCreationOptions(requestJson)

    val biometricPrompt = BiometricPrompt(
        this,
        { }, // Pass in your own executor
        object : AuthenticationCallback() {
            override fun onAuthenticationError(errorCode: Int, errString: CharSequence) {
                super.onAuthenticationError(errorCode, errString)
                finish()
            }

            override fun onAuthenticationFailed() {
                super.onAuthenticationFailed()
                finish()
            }

            @RequiresApi(VERSION_CODES.P)
            override fun onAuthenticationSucceeded(
                result: AuthenticationResult
            ) {
                super.onAuthenticationSucceeded(result)

                // Generate a credentialId
                val credentialId = ByteArray(32)
                SecureRandom().nextBytes(credentialId)

                // Generate a credential key pair
                val spec = ECGenParameterSpec("secp256r1")
                val keyPairGen = KeyPairGenerator.getInstance("EC")
                keyPairGen.initialize(spec)
                val keyPair = keyPairGen.genKeyPair()

                // Save passkey in your database as per your own implementation

                // Create AuthenticatorAttestationResponse object to pass to
                // FidoPublicKeyCredential

                val response = AuthenticatorAttestationResponse(
                    requestOptions = request,
                    credentialId = credentialId,
                    credentialPublicKey = getPublicKeyFromKeyPair(keyPair),
                    origin = appInfoToOrigin(callingAppInfo!!),
                    up = true,
                    uv = true,
                    be = true,
                    bs = true,
                    packageName = callingAppInfo.packageName
                )

                val credential = FidoPublicKeyCredential(
                    rawId = credentialId,
                    response = response,
                    authenticatorAttachment = "", // Add your authenticator attachment
                )
                val result = Intent()

                val createPublicKeyCredResponse =
                    CreatePublicKeyCredentialResponse(credential.json())

                // Set the CreateCredentialResponse as the result of the Activity
                PendingIntentHandler.setCreateCredentialResponse(
                    result,
                    createPublicKeyCredResponse
                )
                setResult(RESULT_OK, result)
                finish()
            }
        }
    )

    val promptInfo = BiometricPrompt.PromptInfo.Builder()
        .setTitle("Use your screen lock")
        .setSubtitle("Create passkey for ${request.rp.name}")
        .setAllowedAuthenticators(
            BiometricManager.Authenticators.BIOMETRIC_STRONG
            /* or BiometricManager.Authenticators.DEVICE_CREDENTIAL */
        )
        .build()
    biometricPrompt.authenticate(promptInfo)
}

@RequiresApi(VERSION_CODES.P)
fun appInfoToOrigin(info: CallingAppInfo): String {
    val cert = info.signingInfo.apkContentsSigners[0].toByteArray()
    val md = MessageDigest.getInstance("SHA-256")
    val certHash = md.digest(cert)
    // This is the format for origin
    return "android:apk-key-hash:${b64Encode(certHash)}"
}
パスワード作成リクエストのクエリを処理する
パスワード作成リクエストのクエリを処理する手順は次のとおりです。
- 前のセクションで説明した
processCreateCredentialRequest()メソッド内で、パスワード リクエストを処理するためのスイッチ ブロック内に別のケースを追加します。 BeginCreateCredentialResponseを作成する際に、必要なCreateEntriesを追加します。- 各
CreateEntryは、認証情報を保存できるアカウントに対応しており、他のメタデータとともにPendingIntentが設定されている必要があります。
次の例は、この手順を実行する方法を示しています。
fun processCreateCredentialRequest(
    request: BeginCreateCredentialRequest
): BeginCreateCredentialResponse? {
    when (request) {
        is BeginCreatePublicKeyCredentialRequest -> {
            // Request is passkey type
            return handleCreatePasskeyQuery(request)
        }

        is BeginCreatePasswordCredentialRequest -> {
            // Request is password type
            return handleCreatePasswordQuery(request)
        }
    }
    return null
}

@RequiresApi(VERSION_CODES.M)
private fun handleCreatePasswordQuery(
    request: BeginCreatePasswordCredentialRequest
): BeginCreateCredentialResponse {
    val createEntries: MutableList<CreateEntry> = mutableListOf()

    // Adding two create entries - one for storing credentials to the 'Personal'
    // account, and one for storing them to the 'Family' account. These
    // accounts are local to this sample app only.
    createEntries.add(
        CreateEntry(
            PERSONAL_ACCOUNT_ID,
            createNewPendingIntent(PERSONAL_ACCOUNT_ID, CREATE_PASSWORD_INTENT)
        )
    )
    createEntries.add(
        CreateEntry(
            FAMILY_ACCOUNT_ID,
            createNewPendingIntent(FAMILY_ACCOUNT_ID, CREATE_PASSWORD_INTENT)
        )
    )

    return BeginCreateCredentialResponse(createEntries)
}
パスワード作成リクエストのエントリ選択を処理する
入力された CreateEntry をユーザーが選択すると、対応する PendingIntent が実行され、関連するアクティビティが表示されます。onCreate で渡された関連インテントにアクセスし、それを PendingIntentHander クラスに渡して ProviderCreateCredentialRequest メソッドを取得します。
以下に、このプロセスを実装する例を示します。このコードはアクティビティの onCreate() メソッドで処理する必要があります。
val createRequest = PendingIntentHandler.retrieveProviderCreateCredentialRequest(intent)
val accountId = intent.getStringExtra(CredentialsRepo.EXTRA_KEY_ACCOUNT_ID)

if (createRequest == null) {
    return
}

val request: CreatePasswordRequest = createRequest.callingRequest as CreatePasswordRequest

// Fetch the ID and password from the request and save it in your database
mDatabase.addNewPassword(
    PasswordInfo(
        request.id,
        request.password,
        createRequest.callingAppInfo.packageName
    )
)

// Set the final response back
val result = Intent()
val response = CreatePasswordResponse()
PendingIntentHandler.setCreateCredentialResponse(result, response)
setResult(Activity.RESULT_OK, result)
finish()
ユーザーのログインを処理する
ユーザーのログインは次の手順で処理されます。
- クライアント アプリがユーザーのログインを試みると、
GetCredentialRequestインスタンスが作成されます。 - Android フレームワークは、これらのサービスにバインドすることで、該当するすべての認証情報プロバイダにこのリクエストを伝えます。
- その後、プロバイダ サービスは、
BeginGetCredentialOptionのリストを含むBeginGetCredentialRequestを受け取ります。それぞれに一致する認証情報の取得に使用できるパラメータが含まれます。
このリクエストを認証情報プロバイダ サービスで処理する手順は次のとおりです。
onBeginGetCredentialRequest()メソッドをオーバーライドして、リクエストを処理します。認証情報がロックされている場合は、すぐにレスポンスにAuthenticationActionを設定してコールバックを呼び出すことができます。private val unlockEntryTitle = "Authenticate to continue" override fun onBeginGetCredentialRequest( request: BeginGetCredentialRequest, cancellationSignal: CancellationSignal, callback: OutcomeReceiver<BeginGetCredentialResponse, GetCredentialException>, ) { if (isAppLocked()) { callback.onResult( BeginGetCredentialResponse( authenticationActions = mutableListOf( AuthenticationAction( unlockEntryTitle, createUnlockPendingIntent() ) ) ) ) return } try { response = processGetCredentialRequest(request) callback.onResult(response) } catch (e: GetCredentialException) { callback.onError(GetCredentialUnknownException()) } }credentialEntriesを返す前に認証情報のロック解除が必要なプロバイダは、ユーザーをアプリのロック解除フローに誘導するペンディング インテントを設定する必要があります。private fun createUnlockPendingIntent(): PendingIntent { val intent = Intent(UNLOCK_INTENT).setPackage(PACKAGE_NAME) return PendingIntent.getActivity( applicationContext, UNIQUE_REQUEST_CODE, intent, ( PendingIntent.FLAG_MUTABLE or PendingIntent.FLAG_UPDATE_CURRENT ) ) }ローカル データベースから認証情報を取得し、
CredentialEntriesを使用してセレクタに表示されるように設定します。パスキーの場合、credentialIdをエクストラとしてインテントに設定することで、ユーザーがこのエントリを選択したときにどの認証情報にマッピングされるかを把握できます。companion object { // These intent actions are specified for corresponding activities // that are to be invoked through the PendingIntent(s) private const val GET_PASSKEY_INTENT_ACTION = "PACKAGE_NAME.GET_PASSKEY" private const val GET_PASSWORD_INTENT_ACTION = "PACKAGE_NAME.GET_PASSWORD" } fun processGetCredentialRequest( request: BeginGetCredentialRequest ): BeginGetCredentialResponse { val callingPackageInfo = request.callingAppInfo val callingPackageName = callingPackageInfo?.packageName.orEmpty() val credentialEntries: MutableList<CredentialEntry> = mutableListOf() for (option in request.beginGetCredentialOptions) { when (option) { is BeginGetPasswordOption -> { credentialEntries.addAll( populatePasswordData( callingPackageName, option ) ) } is BeginGetPublicKeyCredentialOption -> { credentialEntries.addAll( populatePasskeyData( callingPackageInfo, option ) ) } else -> { Log.i(TAG, "Request not supported") } } } return BeginGetCredentialResponse(credentialEntries) }データベースから認証情報をクエリし、パスキーとパスワード エントリを作成して入力します。
private fun populatePasskeyData(
    callingAppInfo: CallingAppInfo?,
    option: BeginGetPublicKeyCredentialOption
): List<CredentialEntry> {
    val passkeyEntries: MutableList<CredentialEntry> = mutableListOf()
    val request = PublicKeyCredentialRequestOptions(option.requestJson)
    // Get your credentials from database where you saved during creation flow
    val creds = getCredentialsFromInternalDb(request.rpId)
    val passkeys = creds.passkeys
    for (passkey in passkeys) {
        val data = Bundle()
        data.putString("credId", passkey.credId)
        passkeyEntries.add(
            PublicKeyCredentialEntry(
                context = applicationContext,
                username = passkey.username,
                pendingIntent = createNewPendingIntent(
                    GET_PASSKEY_INTENT_ACTION,
                    data
                ),
                beginGetPublicKeyCredentialOption = option,
                displayName = passkey.displayName,
                icon = passkey.icon
            )
        )
    }
    return passkeyEntries
}

// Fetch password credentials and create password entries to populate to the user
private fun populatePasswordData(
    callingPackage: String,
    option: BeginGetPasswordOption
): List<CredentialEntry> {
    val passwordEntries: MutableList<CredentialEntry> = mutableListOf()

    // Get your password credentials from database where you saved during
    // creation flow
    val creds = getCredentialsFromInternalDb(callingPackage)
    val passwords = creds.passwords
    for (password in passwords) {
        passwordEntries.add(
            PasswordCredentialEntry(
                context = applicationContext,
                username = password.username,
                pendingIntent = createNewPendingIntent(
                    GET_PASSWORD_INTENT
                ),
                beginGetPasswordOption = option,
                displayName = password.username,
                icon = password.icon
            )
        )
    }
    return passwordEntries
}

private fun createNewPendingIntent(
    action: String,
    extra: Bundle? = null
): PendingIntent {
    val intent = Intent(action).setPackage(PACKAGE_NAME)
    if (extra != null) {
        intent.putExtra("CREDENTIAL_DATA", extra)
    }

    return PendingIntent.getActivity(
        applicationContext, UNIQUE_REQUEST_CODE, intent,
        (PendingIntent.FLAG_MUTABLE or PendingIntent.FLAG_UPDATE_CURRENT)
    )
}
認証情報をクエリして入力したら、ユーザーが選択した認証情報の選択フェーズ(パスキーかパスワードか)を処理する必要があります。
パスキーのユーザー選択の処理
- 対応するアクティビティの
onCreateメソッドで、関連するインテントを取得して、PendingIntentHandler.retrieveProviderGetCredentialRequest()に渡します。 - 上記で取得したリクエストから
GetPublicKeyCredentialOptionを抽出します。次に、このオプションからrequestJsonとclientDataHashを抽出します。 - 対応する
PendingIntentの設定時に認証情報プロバイダによって入力されたインテント エクストラから、credentialIdを抽出します。 - 上記でアクセスしたリクエスト パラメータを使用して、ローカル データベースからパスキーを抽出します。
抽出されたメタデータとユーザー検証で、パスキーが有効であることをアサートします。
val getRequest = PendingIntentHandler.retrieveProviderGetCredentialRequest(intent)
val publicKeyRequest = getRequest?.credentialOptions?.first() as GetPublicKeyCredentialOption

val requestInfo = intent.getBundleExtra("CREDENTIAL_DATA")
val credIdEnc = requestInfo?.getString("credId").orEmpty()

// Get the saved passkey from your database based on the credential ID from the PublicKeyRequest
val passkey = mDatabase.getPasskey(credIdEnc)

// Decode the credential ID, private key and user ID
val credId = b64Decode(credIdEnc)
val privateKey = b64Decode(passkey.credPrivateKey)
val uid = b64Decode(passkey.uid)

val origin = appInfoToOrigin(getRequest.callingAppInfo)
val packageName = getRequest.callingAppInfo.packageName

validatePasskey(
    publicKeyRequest.requestJson,
    origin,
    packageName,
    uid,
    passkey.username,
    credId,
    privateKey
)
ユーザーを検証するには、生体認証プロンプト(または他のアサーション メソッド)を表示します。以下のコード スニペットでは、Android Biometric API を使用しています。
認証が成功したら、W3 Web Authentication Assertion 仕様に基づいて JSON レスポンスを作成します。以下のコード スニペットでは、
AuthenticatorAssertionResponseなどのヘルパーデータ クラスを使用して、構造化パラメータを取得し、必要な JSON 形式に変換しています。レスポンスには、WebAuthn 認証情報の秘密鍵からのデジタル署名が含まれます。リライング パーティのサーバーは、この署名を検証してログイン前にユーザーを認証できます。上で生成した JSON を使用して
PublicKeyCredentialを作成し、最終的なGetCredentialResponseに設定します。このアクティビティの結果に対して、この最終レスポンスを設定します。
次の例は、これらのステップを実行する方法を示しています。
val request = PublicKeyCredentialRequestOptions(requestJson)
val privateKey: ECPrivateKey = convertPrivateKey(privateKeyBytes)

val biometricPrompt = BiometricPrompt(
    this,
    { }, // Pass in your own executor
    object : BiometricPrompt.AuthenticationCallback() {
        override fun onAuthenticationError(
            errorCode: Int,
            errString: CharSequence
        ) {
            super.onAuthenticationError(errorCode, errString)
            finish()
        }

        override fun onAuthenticationFailed() {
            super.onAuthenticationFailed()
            finish()
        }

        override fun onAuthenticationSucceeded(
            result: BiometricPrompt.AuthenticationResult
        ) {
            super.onAuthenticationSucceeded(result)
            val response = AuthenticatorAssertionResponse(
                requestOptions = request,
                credentialId = credId,
                origin = origin,
                up = true,
                uv = true,
                be = true,
                bs = true,
                userHandle = uid,
                packageName = packageName
            )

            val sig = Signature.getInstance("SHA256withECDSA")
            sig.initSign(privateKey)
            sig.update(response.dataToSign())
            response.signature = sig.sign()

            val credential = FidoPublicKeyCredential(
                rawId = credId,
                response = response,
                authenticatorAttachment = "", // Add your authenticator attachment
            )
            val result = Intent()
            val passkeyCredential = PublicKeyCredential(credential.json())
            PendingIntentHandler.setGetCredentialResponse(
                result, GetCredentialResponse(passkeyCredential)
            )
            setResult(RESULT_OK, result)
            finish()
        }
    }
)

val promptInfo = BiometricPrompt.PromptInfo.Builder()
    .setTitle("Use your screen lock")
    .setSubtitle("Use passkey for ${request.rpId}")
    .setAllowedAuthenticators(
        BiometricManager.Authenticators.BIOMETRIC_STRONG
        /* or BiometricManager.Authenticators.DEVICE_CREDENTIAL */
    )
    .build()
biometricPrompt.authenticate(promptInfo)
パスワード認証のユーザー選択の処理
- 対応するアクティビティで、
onCreateに渡されたインテントにアクセスし、PendingIntentHandlerを使用してProviderGetCredentialRequestを抽出します。 受信パッケージ名のパスワード認証情報を取得するには、リクエストで
GetPasswordOptionを使用します。val getRequest = PendingIntentHandler.retrieveProviderGetCredentialRequest(intent) val passwordOption = getRequest?.credentialOptions?.first() as GetPasswordOption val username = passwordOption.allowedUserIds.first() // Fetch the credentials for the calling app package name val creds = mDatabase.getCredentials(callingAppInfo.packageName) val passwords = creds.passwords val it = passwords.iterator() var password = "" while (it.hasNext()) { val passwordItemCurrent = it.next() if (passwordItemCurrent.username == username) { password = passwordItemCurrent.password break } }取得したら、選択したパスワード認証情報のレスポンスを設定します。
// Set the response back
val result = Intent()
val passwordCredential = PasswordCredential(username, password)
PendingIntentHandler.setGetCredentialResponse(
    result, GetCredentialResponse(passwordCredential)
)
setResult(Activity.RESULT_OK, result)
finish()
認証アクション エントリの選択を処理する
前述のように、認証情報プロバイダがロックされている場合、認証情報プロバイダで AuthenticationAction を設定できます。ユーザーがこのエントリを選択すると、PendingIntent に設定されたインテント アクションに対応するアクティビティが呼び出されます。認証情報プロバイダは、生体認証フローまたは同様のメカニズムを表示して、認証情報のロックを解除できます。認証情報のロックが解除されると、認証情報プロバイダは、上記のユーザー ログイン処理と同様に、BeginGetCredentialResponse を作成する必要があります。PendingIntentHandler.setBeginGetCredentialResponse() メソッドでこのレスポンスを設定してから、準備済みのインテントを結果として設定し、アクティビティを終了します。
認証情報リクエストを消去する
クライアント アプリは、認証情報の選択のために維持している状態をクリアするようリクエストできます。たとえば、認証情報プロバイダは以前に選択された認証情報を記憶していて、次回にその状態のみを返すことがあります。クライアント アプリは、この API を呼び出して、固定されている選択がクリアされることを想定しています。認証情報プロバイダのサービスは、onClearCredentialStateRequest() メソッドをオーバーライドすることで、このリクエストを処理できます。
override fun onClearCredentialStateRequest(
    request: ProviderClearCredentialStateRequest,
    cancellationSignal: CancellationSignal,
    callback: OutcomeReceiver<Void?, ClearCredentialException>
) {
    // Delete any maintained state as appropriate.
}
プロバイダの設定ページにリンクする機能を追加
ユーザーが [パスワード、パスキー、自動入力] 画面からプロバイダの設定を開けるようにするには、認証情報プロバイダ アプリで res/xml/provider.xml の credential-provider settingsActivity マニフェスト属性を実装する必要があります。この属性を使用すると、ユーザーが [パスワード、パスキー、自動入力] のサービスリストでプロバイダ名をクリックした場合に、インテントを使用してアプリ独自の [設定] 画面を開くことができます。この属性の値を、設定画面から起動するアクティビティの名前に設定します。
<credential-provider
    xmlns:android="http://schemas.android.com/apk/res/android"
    android:settingsSubtitle="Example settings provider name"
    android:settingsActivity="com.example.SettingsActivity">
    <capabilities>
        <capability name="android.credentials.TYPE_PUBLIC_KEY_CREDENTIAL" />
    </capabilities>
</credential-provider>

設定インテント
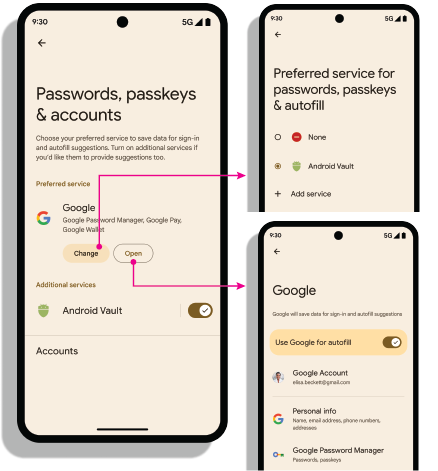
設定を開く: android.settings.CREDENTIAL_PROVIDER インテントにより、ユーザーが優先する認証情報プロバイダと追加の認証情報プロバイダを選択できる設定画面が表示されます。
![[パスワード、パスキー、自動入力] の設定画面](https://developer.android.com/static/identity/sign-in/images/passwords-passkeys-autofill.png?hl=ja)
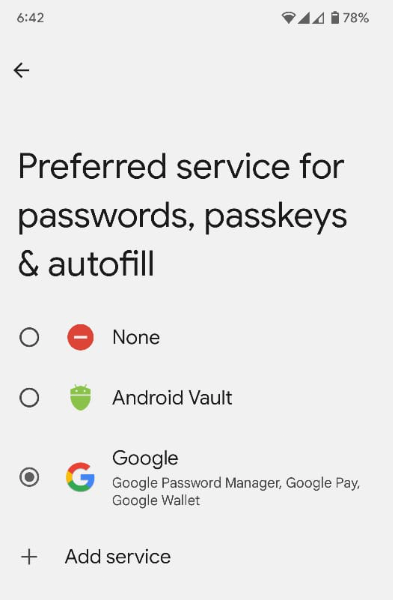
優先される認証情報サービス: ACTION_REQUEST_SET_AUTOFILL_SERVICE インテントは、優先されるプロバイダ選択画面にユーザーをリダイレクトします。この画面で選択したプロバイダが、優先認証情報プロバイダと自動入力プロバイダになります。

特権アプリの許可リストを取得する
ウェブブラウザなどの特権アプリは、認証情報マネージャーの GetCredentialRequest() メソッドと CreatePublicKeyCredentialRequest() メソッドで origin パラメータを設定することで、代理で認証情報マネージャーの呼び出しを行うことができます。これらのリクエストを処理するために、認証情報プロバイダは getOrigin() API を使用して origin を取得します。
origin を取得するには、認証情報プロバイダ アプリは、権限のある信頼できる呼び出し元のリストを androidx.credentials.provider.CallingAppInfo's getOrigin() API に渡す必要があります。この許可リストは、有効な JSON オブジェクトである必要があります。packageName と signingInfo から取得した証明書フィンガープリントが、getOrigin() API に渡された privilegedAllowlist にあるアプリのフィンガープリントと一致する場合、origin が返されます。この origin 値を取得すると、プロバイダ アプリはこれを特権呼び出しと見なし、呼び出しアプリの署名を使って origin を計算する代わりに、AuthenticatorResponse のクライアント データに origin を設定する必要があります。
origin を取得する場合は、署名リクエスト中に clientDataJSON を組み立ててハッシュ化する代わりに、CreatePublicKeyCredentialRequest() または GetPublicKeyCredentialOption() で直接提供される clientDataHash を使用します。JSON 解析の問題を回避するには、構成証明とアサーションのレスポンスに clientDataJSON のプレースホルダ値を設定します。Google パスワード マネージャーは、getOrigin() の呼び出しに、一般公開されている許可リストを使用します。認証情報プロバイダとして、このリストを使用するか、API で記述された JSON 形式で独自のリストを指定できます。使用するリストの選択はプロバイダが行います。サードパーティの認証情報プロバイダで特権アクセスを取得するには、サードパーティが提供するドキュメントをご覧ください。
デバイスでプロバイダを有効にする
ユーザーは、[デバイス設定] > [パスワードとアカウント] > [プロバイダ] > [有効にする] または [無効にする] でプロバイダを有効にする必要があります。
fun createSettingsPendingIntent(): PendingIntent
