
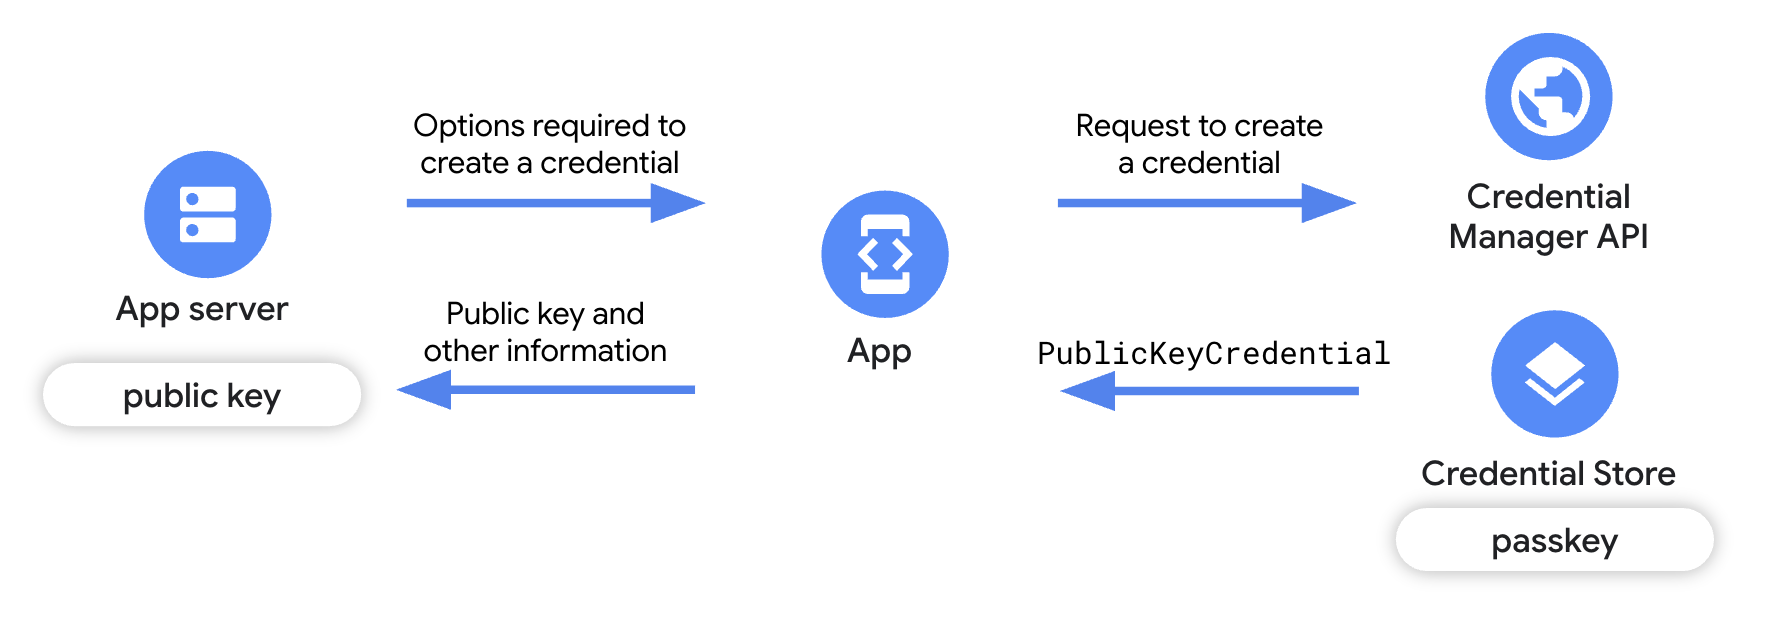
Before your users can authenticate with passkeys, your app must first register or create the passkey for their account.
To create the passkey, obtain details required to create the passkey from your app server, and then call the Credential Manager API, which returns a public and private key pair. The returned private key is stored in a credential provider, such as Google Password Manager, as a passkey. The public key is stored on your app server.
Prerequisites
Make sure that you have set up Digital Asset Links and that you target devices running Android 9 (API level 28) or higher.
Overview
This guide focuses on the changes required in your relying party client app to create a passkey, and gives a brief overview of the relying party app server implementation. To learn more about the server-side integration, see Server-side passkey registration.
- Add dependencies to your app: Add the required Credential Manager libraries.
- Instantiate Credential Manager: Create a Credential Manager instance.
- Get credential creation options from the app server: From your app
server, send the client app the details required to create the passkey, such
as information about the app, the user, as well as a
challengeand other fields. - Request a passkey: In your app, use the details received from the
app server to create a
GetPublicKeyCredentialOptionobject and use this object to invoke thecredentialManager.getCredential()method to create a passkey. - Handle the passkey creation response: When you receive the credentials on your client app, you must encode, serialize and then send the public key to the app server. You must also handle each of the exceptions that can occur in case of passkey creation.
- Verify and save the public key on the server: Complete the server-side steps to verify the origin of the credential and then save the public key.
- Notify the user: Notify the user that their passkey has been created.
Add dependencies to your app
Add the following dependencies to your app module's build.gradle file:
Kotlin
dependencies {
    implementation("androidx.credentials:credentials:1.7.0-alpha02")
    implementation("androidx.credentials:credentials-play-services-auth:1.7.0-alpha02")
}
Groovy
dependencies {
    implementation "androidx.credentials:credentials:1.7.0-alpha02"
    implementation "androidx.credentials:credentials-play-services-auth:1.7.0-alpha02"
}
Instantiate Credential Manager
Use your app or activity context to create a CredentialManager object.
// Use your app or activity context to instantiate a client instance of
// CredentialManager.
private val credentialManager = CredentialManager.create(context)
Get credential creation options from your app server
When the user clicks a "Create Passkey" button or when a new user signs up, make a request from your app to your app server to obtain the information required to start the passkey registration process.
Use a FIDO-compliant library in your app server to send your client app the information required to create a passkey, such as information about the user, the app, and additional configuration properties. To learn more, see Server side passkey registration.
In the client app, decode the public key creation options sent by the app server. These are usually represented in JSON format. To learn more about how this decoding is done for web clients, see Encoding and Decoding. For Android client apps, you must handle the decoding separately.
The following snippet shows the structure the public key creation options sent by the app server:
{
  "challenge": "<base64url-encoded challenge>",
  "rp": {
    "name": "<relying party name>",
    "id": "<relying party host name>"
  },
  "user": {
    "id": "<base64url-encoded user ID>",
    "name": "<user name>",
    "displayName": "<user display name>"
  },
  "pubKeyCredParams": [
    {
      "type": "public-key",
      "alg": -7
    }
  ],
  "attestation": "none",
  "excludeCredentials": [
    {
        "id": "<base64url-encoded credential ID to exclude>",
        "type": "public-key"
    }
  ],
  "authenticatorSelection": {
    "requireResidentKey": true,
    "residentKey": "required",
    "userVerification": "required"
  }
}
Key fields in the public key creation options include:
challenge: A server-generated random string that is used to prevent replay attacks.rp: Details about the app.rp.name: The app's name.rp.id: The app's domain or subdomain.
user: Details about the user.id: The user's unique ID. This value must not include personally identifying information, for example, email addresses or usernames. You can use a random, 16-byte value.name: A unique identifier for the account that the user will recognise, such as their email address or username. This will be displayed in the account selector. If using a username, use the same value as in password authentication.displayName: An optional, user-friendly name for the account intended for display in the account selector.
authenticatorSelection: Details about the device that will be used for authentication.authenticatorAttachment: Indicates the preferred authenticator. The possible values are as follows:platform: This value is used for an authenticator built into the user's device, such as a fingerprint sensor.cross-platform: This value is used for roaming devices such as security keys. It is not typically used in the passkey context.- Unspecified (recommended): Leaving this value unspecified provides users with the flexibility to create passkeys on their preferred devices. In most cases, leaving the parameter unspecified is the best option.
requireResidentKey: To create a passkey, set the value of thisBooleanfield totrue.residentKey: To create a passkey, set the value torequired.userVerification: Used to specify the requirements for user verification during a passkey registration. The possible values are as follows:preferred: Use this value if you prioritize user experience over protection, such as in environments where user verification causes more friction than protection.required: Use this value if invoking a user verification method available on the device is required.discouraged: Use this value if using a user verification method is discouraged.
To learn more aboutuserVerification, see userVerification deep dive.
excludeCredentials: List credential IDs in an array to prevent the creation of a duplicate passkey if one already exists with the same credential provider.
Create a passkey
After you have parsed the server-side public key creation options, create a
passkey by wrapping these options in a CreatePublicKeyCredentialRequest object
and calling createCredential().
The createPublicKeyCredentialRequest includes the following:
requestJson: The credential creation options sent by the app server.preferImmediatelyAvailableCredentials: This is an optional Boolean field that defines whether to only use locally-available or credential provider-synced credentials to fulfill the request, instead of credentials from security keys or hybrid key flows. The possible usages are as follows:false(default): Use this value if the call to Credential Manager was triggered by an explicit user action.true: Use this value if Credential Manager is opportunistically called, such as when first opening the app.
If you set the value totrueand there are no immediately available credentials, Credential Manager won't show any UI and the request will fail immediately, returning NoCredentialException for get requests andCreateCredentialNoCreateOptionExceptionfor create requests.
origin: This field is automatically set for Android apps. For browsers and similarly privileged apps that need to setorigin, see Make Credential Manager calls on behalf of other parties for privileged apps.isConditional: This is an optional field that defaults tofalse. For more information, see Automatically create a passkey.
Calling the createCredential() function launches Credential Manager's built-in
bottom sheet UI that prompts the user to use a passkey and to select a
credential provider and account for storage. However, if isConditional is set
to true, the bottom sheet UI does not display, and the passkey is
automatically created.
Automatically create a passkey
You can automatically create a passkey for a user after a successful password
login by setting the isConditional parameter to true in your
CreatePublicKeyCredentialRequest while creating a passkey. If the user doesn't
already have a passkey, your app will automatically attempt to create one in the
background and store it in the user's credential provider, such as Google
Password Manager. For an example of how this is implemented, see the public
sample.

Handle the response
After the user is verified using the device's screen lock, a passkey is created and stored in the user's selected credential provider.
The response after you successfully call createCredential() is a
PublicKeyCredential object.
The PublicKeyCredential looks as follows:
{
  "id": "<identifier>",
  "type": "public-key",
  "rawId": "<identifier>",
  "response": {
    "clientDataJSON": "<ArrayBuffer encoded object with the origin and signed challenge>",
    "attestationObject": "<ArrayBuffer encoded object with the public key and other information.>"
  },
  "authenticatorAttachment": "platform"
}
In the client app, serialize the object and send it to the app server.
Add code to handle failures as shown in the following snippet:
fun handleFailure(e: CreateCredentialException) {
    when (e) {
        is CreatePublicKeyCredentialDomException -> {
            // Handle the passkey DOM errors thrown according to the
            // WebAuthn spec.
        }
        is CreateCredentialCancellationException -> {
            // The user intentionally canceled the operation and chose not
            // to register the credential.
        }
        is CreateCredentialInterruptedException -> {
            // Retry-able error. Consider retrying the call.
        }
        is CreateCredentialProviderConfigurationException -> {
            // Your app is missing the provider configuration dependency.
            // Most likely, you're missing the
            // "credentials-play-services-auth" module.
        }
        is CreateCredentialCustomException -> {
            // You have encountered an error from a 3rd-party SDK. If you
            // make the API call with a request object that's a subclass of
            // CreateCustomCredentialRequest using a 3rd-party SDK, then you
            // should check for any custom exception type constants within
            // that SDK to match with e.type. Otherwise, drop or log the
            // exception.
        }
        else -> Log.w(TAG, "Unexpected exception type ${e::class.java.name}")
    }
}
Verify and save the public key on the app server
On the app server, you must verify the public key credential and then save the public key.
To verify the public key credential's origin, compare it against an allow list of approved apps. If a key has an unrecognized origin, reject it.
To obtain the app's SHA 256 fingerprint:
Print your release app's signing certificate by running the following command in a terminal:
keytool -list -keystore <path-to-apk-signing-keystore>In the response, identify the signing certificate's SHA 256 fingerprint, mentioned as
Certificate fingerprints block:SHA256.Encode the SHA256 fingerprint with base64url encoding. This Python example demonstrates how to properly encode the fingerprint:
import binascii
import base64
fingerprint = '<SHA256 finerprint>' # your app's SHA256 fingerprint
print(base64.urlsafe_b64encode(binascii.a2b_hex(fingerprint.replace(':', ''))).decode('utf8').replace('=', ''))
Append
android:apk-key-hash: to the start of the output from the previous step so that you get something that is similar to the following:android:apk-key-hash:<encoded SHA 256 fingerprint>The result should match with an allowed origin on your app server. If you have multiple signing certificates, such as certificates for debugging and release, or multiple apps, then repeat the process and accept all the origins as valid on the app server.
Notify the user
After the passkey is successfully created, notify your users about the passkey and inform them that they can manage their passkeys from their credential provider app or from within the app settings. Notify users by using a custom dialog, notification, or snackbar. Since an unexpected passkey creation by a malicious entity requires an immediate security alert, consider supplementing these in-app methods with external communication, such as an email.
Enhance the user experience
To enhance the user experience while implementing sign up with Credential Manager, consider adding functionality for restore credentials and suppress autofill dialogs.
Add functionality to restore credentials on a new device
To allow users to seamlessly log into their accounts on a new device, implement
the Restore Credentials functionality. Adding restore credentials with
BackupAgent logs users in when they open your restored app on a new device,
letting them use your app right away.
Suppress autofill on credential fields (optional)
For app screens where users are expected to use Credential Manager's bottom
sheet UI for authentication, add the isCredential attribute to the username
and password fields. This suppresses autofill dialogs (FillDialog and
SaveDialog) from overlapping with Credential Manager's bottom sheet UI.
The isCredential attribute is supported on Android 14 and higher.
The following example demonstrates how you can add the isCredential attribute
to the relevant username and password fields in the relevant views for your app:
<TextView
    android:layout_width="match_parent"
    android:layout_height="wrap_content"
    android:isCredential="true" />