


یک پنجرهی محاورهای ، پنجرهی کوچکی است که کاربر را به تصمیمگیری یا وارد کردن اطلاعات اضافی ترغیب میکند. یک پنجرهی محاورهای تمام صفحه را پر نمیکند و معمولاً برای رویدادهای modal استفاده میشود که کاربران را ملزم به انجام عملی قبل از ادامهی کار میکنند.

کلاس Dialog کلاس پایه برای دیالوگها است، اما مستقیماً Dialog نمونهسازی نکنید. در عوض، از یکی از زیرکلاسهای زیر استفاده کنید:
-
AlertDialog - یک کادر محاورهای که میتواند یک عنوان، حداکثر سه دکمه، لیستی از موارد قابل انتخاب یا یک طرحبندی سفارشی را نشان دهد.
-
DatePickerDialogیاTimePickerDialog - یک پنجره گفتگو با رابط کاربری از پیش تعریف شده که به کاربر اجازه میدهد تاریخ یا زمان را انتخاب کند.
این کلاسها سبک و ساختار دیالوگ شما را تعریف میکنند. همچنین به یک DialogFragment به عنوان ظرفی برای دیالوگ خود نیاز دارید. کلاس DialogFragment تمام کنترلهای مورد نیاز برای ایجاد دیالوگ و مدیریت ظاهر آن را فراهم میکند، به جای اینکه متدهایی را روی شیء Dialog فراخوانی کند.
استفاده از DialogFragment برای مدیریت دیالوگ باعث میشود که به درستی رویدادهای چرخه عمر مانند زمانی که کاربر دکمه بازگشت را لمس میکند یا صفحه را میچرخاند، مدیریت شود. کلاس DialogFragment همچنین به شما امکان میدهد از رابط کاربری دیالوگ به عنوان یک جزء قابل جاسازی در یک رابط کاربری بزرگتر - درست مانند یک Fragment سنتی - استفاده مجدد کنید، مانند زمانی که میخواهید رابط کاربری دیالوگ در صفحههای نمایش بزرگ و کوچک متفاوت ظاهر شود.
بخشهای بعدی این سند نحوه استفاده از DialogFragment را در ترکیب با یک شیء AlertDialog شرح میدهند. اگر میخواهید یک انتخابگر تاریخ یا زمان ایجاد کنید، بخش «افزودن انتخابگرها به برنامه خود» را مطالعه کنید.
ایجاد یک قطعه دیالوگ
شما میتوانید با بسط دادن DialogFragment و ایجاد یک AlertDialog در متد فراخوانی onCreateDialog() ، طیف گستردهای از طرحهای دیالوگ - از جمله طرحبندیهای سفارشی و مواردی که در Material Design Dialogs توضیح داده شده است - را ایجاد کنید.
برای مثال، در اینجا یک AlertDialog ساده وجود دارد که درون یک DialogFragment مدیریت میشود:
کاتلین
class StartGameDialogFragment : DialogFragment() {
    override fun onCreateDialog(savedInstanceState: Bundle?): Dialog {
        return activity?.let {
            // Use the Builder class for convenient dialog construction.
            val builder = AlertDialog.Builder(it)
            builder.setMessage("Start game")
                .setPositiveButton("Start") { dialog, id ->
                    // START THE GAME!
                }
                .setNegativeButton("Cancel") { dialog, id ->
                    // User cancelled the dialog.
                }
            // Create the AlertDialog object and return it.
            builder.create()
        } ?: throw IllegalStateException("Activity cannot be null")
    }
}

class OldXmlActivity : AppCompatActivity() {
    override fun onCreate(savedInstanceState: Bundle?) {
        super.onCreate(savedInstanceState)
        setContentView(R.layout.activity_old_xml)

        StartGameDialogFragment().show(supportFragmentManager, "GAME_DIALOG")
    }
}
جاوا
public class StartGameDialogFragment extends DialogFragment {
    @Override
    public Dialog onCreateDialog(Bundle savedInstanceState) {
        // Use the Builder class for convenient dialog construction.
        AlertDialog.Builder builder = new AlertDialog.Builder(getActivity());
        builder.setMessage(R.string.dialog_start_game)
               .setPositiveButton(R.string.start, new DialogInterface.OnClickListener() {
                   public void onClick(DialogInterface dialog, int id) {
                       // START THE GAME!
                   }
               })
               .setNegativeButton(R.string.cancel, new DialogInterface.OnClickListener() {
                   public void onClick(DialogInterface dialog, int id) {
                       // User cancels the dialog.
                   }
               });
        // Create the AlertDialog object and return it.
        return builder.create();
    }
}
// ...

StartGameDialogFragment().show(supportFragmentManager, "GAME_DIALOG");
وقتی نمونهای از این کلاس ایجاد میکنید و تابع show() روی آن شیء فراخوانی میکنید، کادر محاورهای مطابق شکل زیر ظاهر میشود.
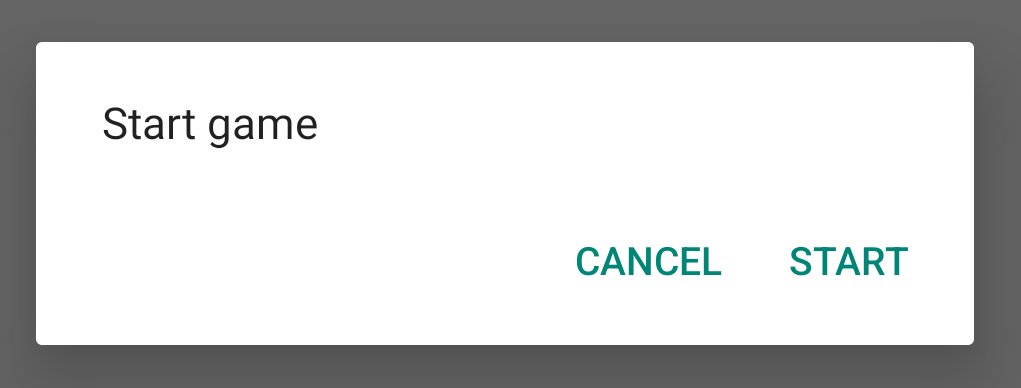
بخش بعدی جزئیات بیشتری در مورد استفاده از APIهای AlertDialog.Builder برای ایجاد کادر محاورهای ارائه میدهد.
بسته به اینکه دیالوگ شما چقدر پیچیده است، میتوانید انواع متدهای فراخوانی دیگر را در DialogFragment پیادهسازی کنید، از جمله تمام متدهای چرخه حیات اولیهی فرگمنت .
ساخت یک پنجره هشدار
کلاس AlertDialog به شما امکان میدهد انواع طرحهای دیالوگ را بسازید و اغلب تنها کلاس دیالوگی است که به آن نیاز دارید. همانطور که در شکل زیر نشان داده شده است، سه ناحیه در یک دیالوگ هشدار وجود دارد:
- عنوان: این اختیاری است و فقط زمانی استفاده میشود که قسمت محتوا توسط یک پیام، فهرست یا طرحبندی سفارشی با جزئیات اشغال شده باشد. اگر نیاز به بیان یک پیام یا سوال ساده دارید، نیازی به عنوان ندارید.
- ناحیه محتوا: این میتواند یک پیام، لیست یا طرحبندی سفارشی دیگر را نمایش دهد.
- دکمههای عملیاتی: در یک کادر محاورهای میتوان تا سه دکمه عملیاتی داشت.
کلاس AlertDialog.Builder رابطهای برنامهنویسی کاربردی (API) ارائه میدهد که به شما امکان میدهد یک AlertDialog با این نوع محتوا، از جمله یک طرحبندی سفارشی، ایجاد کنید.
برای ساخت یک AlertDialog ، مراحل زیر را انجام دهید:
کاتلین
val builder: AlertDialog.Builder = AlertDialog.Builder(context)
builder
    .setMessage("I am the message")
    .setTitle("I am the title")

val dialog: AlertDialog = builder.create()
dialog.show()
جاوا
// 1. Instantiate an AlertDialog.Builder with its constructor.
AlertDialog.Builder builder = new AlertDialog.Builder(getActivity());

// 2. Chain together various setter methods to set the dialog characteristics.
builder.setMessage(R.string.dialog_message)
       .setTitle(R.string.dialog_title);

// 3. Get the AlertDialog.
AlertDialog dialog = builder.create();
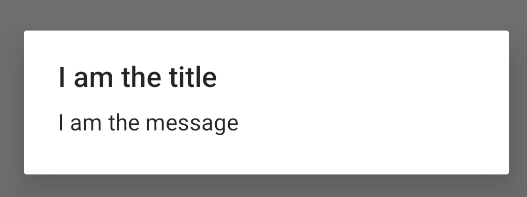
قطعه کد قبلی این کادر محاورهای را تولید میکند:
دکمهها را اضافه کنید
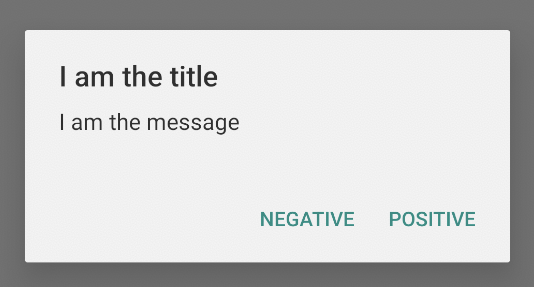
برای افزودن دکمههای عملیاتی مانند دکمههای نشان داده شده در شکل ۲، متدهای setPositiveButton() و setNegativeButton() را فراخوانی کنید:
کاتلین
val builder: AlertDialog.Builder = AlertDialog.Builder(context)
builder
    .setMessage("I am the message")
    .setTitle("I am the title")
    .setPositiveButton("Positive") { dialog, which ->
        // Do something.
    }
    .setNegativeButton("Negative") { dialog, which ->
        // Do something else.
    }

val dialog: AlertDialog = builder.create()
dialog.show()
جاوا
AlertDialog.Builder builder = new AlertDialog.Builder(getActivity());
// Add the buttons.
builder.setPositiveButton(R.string.ok, new DialogInterface.OnClickListener() {
           public void onClick(DialogInterface dialog, int id) {
               // User taps OK button.
           }
       });
builder.setNegativeButton(R.string.cancel, new DialogInterface.OnClickListener() {
           public void onClick(DialogInterface dialog, int id) {
               // User cancels the dialog.
           }
       });
// Set other dialog properties.
...

// Create the AlertDialog.
AlertDialog dialog = builder.create();
متدهای set...Button() به یک عنوان برای دکمه - که توسط یک منبع رشتهای ارائه میشود - و یک DialogInterface.OnClickListener نیاز دارند که عملی را که هنگام ضربه زدن کاربر روی دکمه انجام میشود، تعریف میکند.
سه دکمه عملیاتی وجود دارد که میتوانید اضافه کنید:
- مثبت: از این برای پذیرش و ادامه عمل (عمل "تایید") استفاده کنید.
- منفی: از این برای لغو عمل استفاده کنید.
- خنثی: از این گزینه زمانی استفاده کنید که کاربر ممکن است نخواهد کاری را ادامه دهد اما لزوماً نمیخواهد آن را لغو کند. این گزینه بین دکمههای مثبت و منفی ظاهر میشود. برای مثال، ممکن است این عمل «بعداً به من یادآوری شود» باشد.
شما میتوانید از هر نوع دکمه فقط یکی را به AlertDialog اضافه کنید. برای مثال، نمیتوانید بیش از یک دکمه "مثبت" داشته باشید.
قطعه کد قبلی یک کادر محاورهای هشدار مانند زیر به شما میدهد:
اضافه کردن لیست
سه نوع لیست با API های AlertDialog در دسترس است:
- یک لیست تک گزینهای سنتی.
- یک لیست تک گزینهای ثابت (دکمههای رادیویی).
- یک لیست چند گزینهای مداوم (چکباکسها).
برای ایجاد یک لیست تک گزینهای مانند آنچه در شکل 5 نشان داده شده است، از متد setItems() استفاده کنید:
کاتلین
val builder: AlertDialog.Builder = AlertDialog.Builder(context)
builder
    .setTitle("I am the title")
    .setPositiveButton("Positive") { dialog, which ->
        // Do something.
    }
    .setNegativeButton("Negative") { dialog, which ->
        // Do something else.
    }
    .setItems(arrayOf("Item One", "Item Two", "Item Three")) { dialog, which ->
        // Do something on item tapped.
    }

val dialog: AlertDialog = builder.create()
dialog.show()
جاوا
@Override
public Dialog onCreateDialog(Bundle savedInstanceState) {
    AlertDialog.Builder builder = new AlertDialog.Builder(getActivity());
    builder.setTitle(R.string.pick_color)
           .setItems(R.array.colors_array, new DialogInterface.OnClickListener() {
               public void onClick(DialogInterface dialog, int which) {
               // The 'which' argument contains the index position of the selected item.
           }
    });
    return builder.create();
}
این قطعه کد، دیالوگی مانند زیر ایجاد میکند:
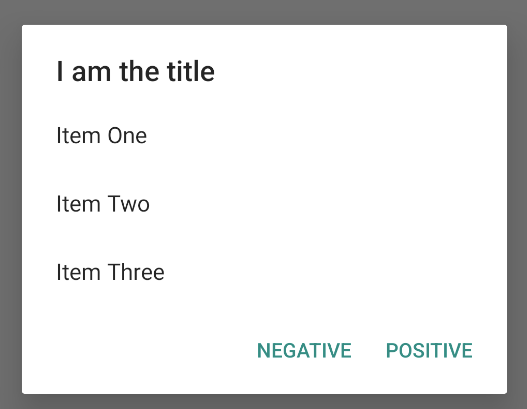
از آنجا که لیست در قسمت محتوای کادر محاورهای ظاهر میشود، کادر محاورهای نمیتواند هم پیام و هم لیست را نشان دهد. با استفاده از setTitle() یک عنوان برای کادر محاورهای تعیین کنید. برای مشخص کردن آیتمهای لیست، تابع setItems() را فراخوانی کنید و یک آرایه به آن ارسال کنید. به طور جایگزین، میتوانید با استفاده از setAdapter() یک لیست مشخص کنید. این به شما امکان میدهد لیست را با دادههای پویا - مانند دادههای پایگاه داده - با استفاده از ListAdapter بازگردانی کنید.
اگر لیست خود را با ListAdapter پشتیبانگیری میکنید، همیشه از Loader استفاده کنید تا محتوا به صورت ناهمگام بارگیری شود. این موضوع در بخش «ساخت طرحبندیها با آداپتور» و «بارگذارها» بیشتر توضیح داده شده است.
یک لیست چند گزینهای یا تک گزینهای مداوم اضافه کنید
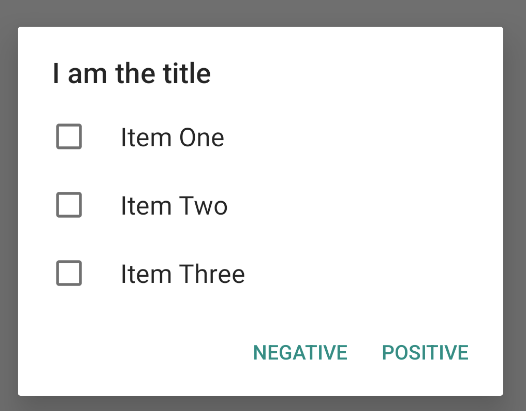
برای اضافه کردن لیستی از آیتمهای چند گزینهای (چکباکسها) یا آیتمهای تک گزینهای (دکمههای رادیویی)، به ترتیب از متدهای setMultiChoiceItems() یا setSingleChoiceItems() استفاده کنید.
برای مثال، در اینجا نحوه ایجاد یک لیست چند گزینهای مانند آنچه در شکل 6 نشان داده شده است، آورده شده است که موارد انتخاب شده را در یک ArrayList ذخیره میکند:
کاتلین
val builder: AlertDialog.Builder = AlertDialog.Builder(context)
builder
    .setTitle("I am the title")
    .setPositiveButton("Positive") { dialog, which ->
        // Do something.
    }
    .setNegativeButton("Negative") { dialog, which ->
        // Do something else.
    }
    .setMultiChoiceItems(
        arrayOf("Item One", "Item Two", "Item Three"), null) { dialog, which, isChecked ->
        // Do something.
    }

val dialog: AlertDialog = builder.create()
dialog.show()
جاوا
@Override
public Dialog onCreateDialog(Bundle savedInstanceState) {
    selectedItems = new ArrayList();  // Where we track the selected items
    AlertDialog.Builder builder = new AlertDialog.Builder(getActivity());
    // Set the dialog title.
    builder.setTitle(R.string.pick_toppings)
    // Specify the list array, the items to be selected by default (null for
    // none), and the listener through which to receive callbacks when items
    // are selected.
           .setMultiChoiceItems(R.array.toppings, null,
                      new DialogInterface.OnMultiChoiceClickListener() {
               @Override
               public void onClick(DialogInterface dialog, int which,
                       boolean isChecked) {
                   if (isChecked) {
                       // If the user checks the item, add it to the selected
                       // items.
                       selectedItems.add(which);
                   } else if (selectedItems.contains(which)) {
                       // If the item is already in the array, remove it.
                       selectedItems.remove(which);
                   }
               }
           })
    // Set the action buttons
           .setPositiveButton(R.string.ok, new DialogInterface.OnClickListener() {
               @Override
               public void onClick(DialogInterface dialog, int id) {
                   // User taps OK, so save the selectedItems results
                   // somewhere or return them to the component that opens the
                   // dialog.
                   ...
               }
           })
           .setNegativeButton(R.string.cancel, new DialogInterface.OnClickListener() {
               @Override
               public void onClick(DialogInterface dialog, int id) {
                   ...
               }
           });

    return builder.create();
}
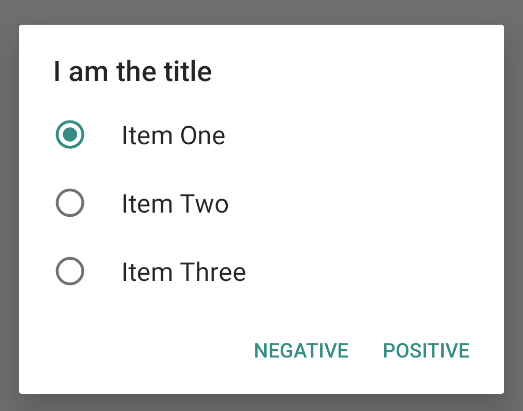
یک پنجره هشدار تک گزینهای را میتوان به این صورت دریافت کرد:
کاتلین
val builder: AlertDialog.Builder = AlertDialog.Builder(context)
builder
    .setTitle("I am the title")
    .setPositiveButton("Positive") { dialog, which ->
        // Do something.
    }
    .setNegativeButton("Negative") { dialog, which ->
        // Do something else.
    }
    .setSingleChoiceItems(
        arrayOf("Item One", "Item Two", "Item Three"), 0
    ) { dialog, which ->
        // Do something.
    }

val dialog: AlertDialog = builder.create()
dialog.show()
جاوا
        String[] choices = {"Item One", "Item Two", "Item Three"};

        AlertDialog.Builder builder = AlertDialog.Builder(context);
        builder
                .setTitle("I am the title")
                .setPositiveButton("Positive", (dialog, which) -> {

                })
                .setNegativeButton("Negative", (dialog, which) -> {

                })
                .setSingleChoiceItems(choices, 0, (dialog, which) -> {

                });

        AlertDialog dialog = builder.create();
        dialog.show();
این منجر به مثال زیر میشود:
ایجاد طرحبندی سفارشی
اگر میخواهید یک طرحبندی سفارشی در یک کادر محاورهای داشته باشید، یک طرحبندی ایجاد کنید و با فراخوانی setView() در شیء AlertDialog.Builder خود، آن را به AlertDialog اضافه کنید.
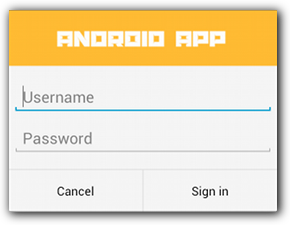
به طور پیشفرض، طرحبندی سفارشی پنجرهی محاورهای را پر میکند، اما شما همچنان میتوانید از متدهای AlertDialog.Builder برای اضافه کردن دکمهها و عنوان استفاده کنید.
برای مثال، در اینجا فایل طرحبندی برای طرحبندی گفتگوی سفارشی قبلی آمده است:
res/layout/dialog_signin.xml
<LinearLayout xmlns:android="http://schemas.android.com/apk/res/android"
    android:orientation="vertical"
    android:layout_width="wrap_content"
    android:layout_height="wrap_content">
    <ImageView
        android:src="@drawable/header_logo"
        android:layout_width="match_parent"
        android:layout_height="64dp"
        android:scaleType="center"
        android:background="#FFFFBB33"
        android:contentDescription="@string/app_name" />
    <EditText
        android:id="@+id/username"
        android:inputType="textEmailAddress"
        android:layout_width="match_parent"
        android:layout_height="wrap_content"
        android:layout_marginTop="16dp"
        android:layout_marginLeft="4dp"
        android:layout_marginRight="4dp"
        android:layout_marginBottom="4dp"
        android:hint="@string/username" />
    <EditText
        android:id="@+id/password"
        android:inputType="textPassword"
        android:layout_width="match_parent"
        android:layout_height="wrap_content"
        android:layout_marginTop="4dp"
        android:layout_marginLeft="4dp"
        android:layout_marginRight="4dp"
        android:layout_marginBottom="16dp"
        android:fontFamily="sans-serif"
        android:hint="@string/password"/>
</LinearLayout>
برای inflate کردن طرحبندی در DialogFragment خود، با getLayoutInflater() یک LayoutInflater دریافت کنید و inflate() را فراخوانی کنید. پارامتر اول، شناسه منبع طرحبندی و پارامتر دوم، نمای والد برای طرحبندی است. سپس میتوانید setView() برای قرار دادن طرحبندی در کادر محاورهای فراخوانی کنید. این در مثال زیر نشان داده شده است.
کاتلین
override fun onCreateDialog(savedInstanceState: Bundle?): Dialog {
    return activity?.let {
        val builder = AlertDialog.Builder(it)
        // Get the layout inflater.
        val inflater = requireActivity().layoutInflater;

        // Inflate and set the layout for the dialog.
        // Pass null as the parent view because it's going in the dialog
        // layout.
        builder.setView(inflater.inflate(R.layout.dialog_signin, null))
                // Add action buttons.
                .setPositiveButton(R.string.signin,
                        DialogInterface.OnClickListener { dialog, id ->
                            // Sign in the user.
                        })
                .setNegativeButton(R.string.cancel,
                        DialogInterface.OnClickListener { dialog, id ->
                            getDialog().cancel()
                        })
        builder.create()
    } ?: throw IllegalStateException("Activity cannot be null")
}
جاوا
@Override
public Dialog onCreateDialog(Bundle savedInstanceState) {
    AlertDialog.Builder builder = new AlertDialog.Builder(getActivity());
    // Get the layout inflater.
    LayoutInflater inflater = requireActivity().getLayoutInflater();

    // Inflate and set the layout for the dialog.
    // Pass null as the parent view because it's going in the dialog layout.
    builder.setView(inflater.inflate(R.layout.dialog_signin, null))
    // Add action buttons
           .setPositiveButton(R.string.signin, new DialogInterface.OnClickListener() {
               @Override
               public void onClick(DialogInterface dialog, int id) {
                   // Sign in the user.
               }
           })
           .setNegativeButton(R.string.cancel, new DialogInterface.OnClickListener() {
               public void onClick(DialogInterface dialog, int id) {
                   LoginDialogFragment.this.getDialog().cancel();
               }
           });
    return builder.create();
}
اگر میخواهید یک دیالوگ سفارشی داشته باشید، میتوانید به جای استفاده از APIهای Dialog ، یک Activity به عنوان یک دیالوگ نمایش دهید. یک activity ایجاد کنید و تم آن را در عنصر <activity> manifest روی Theme.Holo.Dialog تنظیم کنید:
<activity android:theme="@android:style/Theme.Holo.Dialog" >
اکنون فعالیت به جای تمام صفحه، در یک پنجره محاورهای نمایش داده میشود.
رویدادها را به میزبان دیالوگ ارسال کنید
وقتی کاربر روی یکی از دکمههای اکشن دیالوگ ضربه میزند یا موردی را از لیست آن انتخاب میکند، ممکن است DialogFragment شما خودش عمل لازم را انجام دهد، اما اغلب میخواهید رویداد را به activity یا fragmentی که دیالوگ را باز میکند، تحویل دهید. برای انجام این کار، یک رابط با یک متد برای هر نوع رویداد کلیک تعریف کنید. سپس، آن رابط را در کامپوننت میزبان که رویدادهای اکشن را از دیالوگ دریافت میکند، پیادهسازی کنید.
برای مثال، در اینجا یک DialogFragment مشاهده میکنید که رابطی را تعریف میکند که از طریق آن رویدادها را به اکتیویتی میزبان بازمیگرداند:
کاتلین
class NoticeDialogFragment : DialogFragment() {
    // Use this instance of the interface to deliver action events.
    internal lateinit var listener: NoticeDialogListener

    // The activity that creates an instance of this dialog fragment must
    // implement this interface to receive event callbacks. Each method passes
    // the DialogFragment in case the host needs to query it.
    interface NoticeDialogListener {
        fun onDialogPositiveClick(dialog: DialogFragment)
        fun onDialogNegativeClick(dialog: DialogFragment)
    }

    // Override the Fragment.onAttach() method to instantiate the
    // NoticeDialogListener.
    override fun onAttach(context: Context) {
        super.onAttach(context)
        // Verify that the host activity implements the callback interface.
        try {
            // Instantiate the NoticeDialogListener so you can send events to
            // the host.
            listener = context as NoticeDialogListener
        } catch (e: ClassCastException) {
            // The activity doesn't implement the interface. Throw exception.
            throw ClassCastException((context.toString() +
                    " must implement NoticeDialogListener"))
        }
    }
}
جاوا
public class NoticeDialogFragment extends DialogFragment {

    // The activity that creates an instance of this dialog fragment must
    // implement this interface to receive event callbacks. Each method passes
    // the DialogFragment in case the host needs to query it.
    public interface NoticeDialogListener {
        public void onDialogPositiveClick(DialogFragment dialog);
        public void onDialogNegativeClick(DialogFragment dialog);
    }

    // Use this instance of the interface to deliver action events.
    NoticeDialogListener listener;

    // Override the Fragment.onAttach() method to instantiate the
    // NoticeDialogListener.
    @Override
    public void onAttach(Context context) {
        super.onAttach(context);
        // Verify that the host activity implements the callback interface.
        try {
            // Instantiate the NoticeDialogListener so you can send events to
            // the host.
            listener = (NoticeDialogListener) context;
        } catch (ClassCastException e) {
            // The activity doesn't implement the interface. Throw exception.
            throw new ClassCastException(activity.toString()
                    + " must implement NoticeDialogListener");
        }
    }
    ...
}
اکتیویتی میزبان دیالوگ، نمونهای از دیالوگ را با سازندهی قطعه دیالوگ ایجاد میکند و رویدادهای دیالوگ را از طریق پیادهسازی رابط NoticeDialogListener دریافت میکند:
کاتلین
class MainActivity : FragmentActivity(),
        NoticeDialogFragment.NoticeDialogListener {

    fun showNoticeDialog() {
        // Create an instance of the dialog fragment and show it.
        val dialog = NoticeDialogFragment()
        dialog.show(supportFragmentManager, "NoticeDialogFragment")
    }

    // The dialog fragment receives a reference to this Activity through the
    // Fragment.onAttach() callback, which it uses to call the following
    // methods defined by the NoticeDialogFragment.NoticeDialogListener
    // interface.
    override fun onDialogPositiveClick(dialog: DialogFragment) {
        // User taps the dialog's positive button.
    }

    override fun onDialogNegativeClick(dialog: DialogFragment) {
        // User taps the dialog's negative button.
    }
}
جاوا
public class MainActivity extends FragmentActivity
                          implements NoticeDialogFragment.NoticeDialogListener{
    ...
    public void showNoticeDialog() {
        // Create an instance of the dialog fragment and show it.
        DialogFragment dialog = new NoticeDialogFragment();
        dialog.show(getSupportFragmentManager(), "NoticeDialogFragment");
    }

    // The dialog fragment receives a reference to this Activity through the
    // Fragment.onAttach() callback, which it uses to call the following
    // methods defined by the NoticeDialogFragment.NoticeDialogListener
    // interface.
    @Override
    public void onDialogPositiveClick(DialogFragment dialog) {
        // User taps the dialog's positive button.
        ...
    }

    @Override
    public void onDialogNegativeClick(DialogFragment dialog) {
        // User taps the dialog's negative button.
        ...
    }
}
از آنجا که اکتیویتی میزبان NoticeDialogListener پیادهسازی میکند - که توسط متد فراخوانی onAttach() که در مثال قبلی نشان داده شده است، اعمال میشود - قطعه دیالوگ میتواند از متدهای فراخوانی رابط برای ارسال رویدادهای کلیک به اکتیویتی استفاده کند:
کاتلین
    override fun onCreateDialog(savedInstanceState: Bundle): Dialog {
        return activity?.let {
            // Build the dialog and set up the button click handlers.
            val builder = AlertDialog.Builder(it)

            builder.setMessage(R.string.dialog_start_game)
                    .setPositiveButton(R.string.start,
                            DialogInterface.OnClickListener { dialog, id ->
                                // Send the positive button event back to the
                                // host activity.
                                listener.onDialogPositiveClick(this)
                            })
                    .setNegativeButton(R.string.cancel,
                            DialogInterface.OnClickListener { dialog, id ->
                                // Send the negative button event back to the
                                // host activity.
                                listener.onDialogNegativeClick(this)
                            })

            builder.create()
        } ?: throw IllegalStateException("Activity cannot be null")
    }
جاوا
public class NoticeDialogFragment extends DialogFragment {
    ...
    @Override
    public Dialog onCreateDialog(Bundle savedInstanceState) {
        // Build the dialog and set up the button click handlers.
        AlertDialog.Builder builder = new AlertDialog.Builder(getActivity());
        builder.setMessage(R.string.dialog_start_game)
               .setPositiveButton(R.string.start, new DialogInterface.OnClickListener() {
                   public void onClick(DialogInterface dialog, int id) {
                       // Send the positive button event back to the host activity.
                       listener.onDialogPositiveClick(NoticeDialogFragment.this);
                   }
               })
               .setNegativeButton(R.string.cancel, new DialogInterface.OnClickListener() {
                   public void onClick(DialogInterface dialog, int id) {
                       // Send the negative button event back to the host activity.
                       listener.onDialogNegativeClick(NoticeDialogFragment.this);
                   }
               });
        return builder.create();
    }
}
نمایش یک دیالوگ
وقتی میخواهید دیالوگ خود را نمایش دهید، یک نمونه از DialogFragment خود ایجاد کنید و show() را فراخوانی کنید، و FragmentManager و یک نام تگ برای قطعه دیالوگ ارسال کنید.
شما میتوانید FragmentManager با فراخوانی getSupportFragmentManager() از FragmentActivity یا با فراخوانی getParentFragmentManager() از یک Fragment دریافت کنید. برای مثال به مثال زیر توجه کنید:
کاتلین
fun confirmStartGame() {
    val newFragment = StartGameDialogFragment()
    newFragment.show(supportFragmentManager, "game")
}
جاوا
public void confirmStartGame() {
    DialogFragment newFragment = new StartGameDialogFragment();
    newFragment.show(getSupportFragmentManager(), "game");
}
آرگومان دوم، "game" ، یک نام تگ منحصر به فرد است که سیستم در صورت لزوم برای ذخیره و بازیابی وضعیت قطعه از آن استفاده میکند. این تگ همچنین به شما امکان میدهد با فراخوانی findFragmentByTag() یک هندل (دسته) برای قطعه دریافت کنید.
نمایش یک کادر محاورهای به صورت تمام صفحه یا به عنوان یک قطعه جاسازی شده
ممکن است بخواهید بخشی از طراحی رابط کاربری شما در برخی موقعیتها به صورت یک دیالوگ و در برخی دیگر به صورت یک قطعه تمام صفحه یا قطعه جاسازی شده ظاهر شود. همچنین ممکن است بخواهید بسته به اندازه صفحه نمایش دستگاه، ظاهر متفاوتی داشته باشد. کلاس DialogFragment انعطافپذیری لازم را برای انجام این کار ارائه میدهد، زیرا میتواند به عنوان یک Fragment جاسازی شده عمل کند.
با این حال، در این مورد نمیتوانید AlertDialog.Builder یا سایر اشیاء Dialog برای ساخت دیالوگ استفاده کنید. اگر میخواهید DialogFragment قابل جاسازی باشد، رابط کاربری دیالوگ را در یک طرحبندی تعریف کنید، سپس طرحبندی را در فراخوانی onCreateView() بارگذاری کنید.
در اینجا یک مثال از DialogFragment آورده شده است که میتواند به صورت یک دیالوگ یا یک قطعه قابل جاسازی، با استفاده از یک طرحبندی به نام purchase_items.xml ، ظاهر شود:
کاتلین
class CustomDialogFragment : DialogFragment() {

    // The system calls this to get the DialogFragment's layout, regardless of
    // whether it's being displayed as a dialog or an embedded fragment.
    override fun onCreateView(
            inflater: LayoutInflater,
            container: ViewGroup?,
            savedInstanceState: Bundle?
    ): View {
        // Inflate the layout to use as a dialog or embedded fragment.
        return inflater.inflate(R.layout.purchase_items, container, false)
    }

    // The system calls this only when creating the layout in a dialog.
    override fun onCreateDialog(savedInstanceState: Bundle): Dialog {
        // The only reason you might override this method when using
        // onCreateView() is to modify the dialog characteristics. For example,
        // the dialog includes a title by default, but your custom layout might
        // not need it. Here, you can remove the dialog title, but you must
        // call the superclass to get the Dialog.
        val dialog = super.onCreateDialog(savedInstanceState)
        dialog.requestWindowFeature(Window.FEATURE_NO_TITLE)
        return dialog
    }
}
جاوا
public class CustomDialogFragment extends DialogFragment {
    // The system calls this to get the DialogFragment's layout, regardless of
    // whether it's being displayed as a dialog or an embedded fragment.
    @Override
    public View onCreateView(LayoutInflater inflater, ViewGroup container,
            Bundle savedInstanceState) {
        // Inflate the layout to use as a dialog or embedded fragment.
        return inflater.inflate(R.layout.purchase_items, container, false);
    }

    // The system calls this only when creating the layout in a dialog.
    @Override
    public Dialog onCreateDialog(Bundle savedInstanceState) {
        // The only reason you might override this method when using
        // onCreateView() is to modify the dialog characteristics. For example,
        // the dialog includes a title by default, but your custom layout might
        // not need it. Here, you can remove the dialog title, but you must
        // call the superclass to get the Dialog.
        Dialog dialog = super.onCreateDialog(savedInstanceState);
        dialog.requestWindowFeature(Window.FEATURE_NO_TITLE);
        return dialog;
    }
}
مثال زیر بر اساس اندازه صفحه نمایش، تعیین میکند که آیا فرگمنت را به صورت یک کادر محاورهای یا یک رابط کاربری تمام صفحه نمایش دهد:
کاتلین
fun showDialog() {
    val fragmentManager = supportFragmentManager
    val newFragment = CustomDialogFragment()
    if (isLargeLayout) {
        // The device is using a large layout, so show the fragment as a
        // dialog.
        newFragment.show(fragmentManager, "dialog")
    } else {
        // The device is smaller, so show the fragment fullscreen.
        val transaction = fragmentManager.beginTransaction()
        // For a polished look, specify a transition animation.
        transaction.setTransition(FragmentTransaction.TRANSIT_FRAGMENT_OPEN)
        // To make it fullscreen, use the 'content' root view as the container
        // for the fragment, which is always the root view for the activity.
        transaction
                .add(android.R.id.content, newFragment)
                .addToBackStack(null)
                .commit()
    }
}
جاوا
public void showDialog() {
    FragmentManager fragmentManager = getSupportFragmentManager();
    CustomDialogFragment newFragment = new CustomDialogFragment();

    if (isLargeLayout) {
        // The device is using a large layout, so show the fragment as a
        // dialog.
        newFragment.show(fragmentManager, "dialog");
    } else {
        // The device is smaller, so show the fragment fullscreen.
        FragmentTransaction transaction = fragmentManager.beginTransaction();
        // For a polished look, specify a transition animation.
        transaction.setTransition(FragmentTransaction.TRANSIT_FRAGMENT_OPEN);
        // To make it fullscreen, use the 'content' root view as the container
        // for the fragment, which is always the root view for the activity.
        transaction.add(android.R.id.content, newFragment)
                   .addToBackStack(null).commit();
    }
}
برای اطلاعات بیشتر در مورد انجام تراکنشهای قطعهای، به بخش قطعات مراجعه کنید.
در این مثال، مقدار بولی mIsLargeLayout مشخص میکند که آیا دستگاه فعلی باید از طرحبندی بزرگ برنامه استفاده کند و بنابراین این قطعه را به عنوان یک کادر محاورهای به جای تمام صفحه نشان دهد یا خیر. بهترین راه برای تنظیم این نوع مقدار بولی، اعلام یک مقدار منبع bool با یک مقدار منبع جایگزین برای اندازههای مختلف صفحه نمایش است. به عنوان مثال، در اینجا دو نسخه از منبع bool برای اندازههای مختلف صفحه نمایش آورده شده است:
res/values/bools.xml
<!-- Default boolean values -->
<resources>
    <bool name="large_layout">false</bool>
</resources>
res/values-large/bools.xml
<!-- Large screen boolean values -->
<resources>
    <bool name="large_layout">true</bool>
</resources>
سپس میتوانید مقدار mIsLargeLayout را در طول متد onCreate() اکتیویتی، همانطور که در مثال زیر نشان داده شده است، مقداردهی اولیه کنید:
کاتلین
override fun onCreate(savedInstanceState: Bundle?) {
    super.onCreate(savedInstanceState)
    setContentView(R.layout.activity_main)

    isLargeLayout = resources.getBoolean(R.bool.large_layout)
}
جاوا
boolean isLargeLayout;

@Override
public void onCreate(Bundle savedInstanceState) {
    super.onCreate(savedInstanceState);
    setContentView(R.layout.activity_main);

    isLargeLayout = getResources().getBoolean(R.bool.large_layout);
}
نمایش یک فعالیت به عنوان یک دیالوگ در صفحه نمایشهای بزرگ
به جای نمایش یک دیالوگ به عنوان یک رابط کاربری تمام صفحه در صفحه نمایشهای کوچک، میتوانید با نمایش یک Activity به عنوان یک دیالوگ در صفحه نمایشهای بزرگ، به همان نتیجه برسید. رویکردی که انتخاب میکنید به طراحی برنامه شما بستگی دارد، اما نمایش یک Activity به عنوان یک دیالوگ اغلب زمانی مفید است که برنامه شما برای صفحه نمایشهای کوچک طراحی شده باشد و شما بخواهید با نمایش یک Activity کوتاه مدت به عنوان یک دیالوگ، تجربه را در تبلتها بهبود بخشید.
برای نمایش یک فعالیت به عنوان یک کادر محاورهای فقط در صفحه نمایشهای بزرگ، تم Theme.Holo.DialogWhenLarge را به عنصر <activity> manifest اعمال کنید:
<activity android:theme="@android:style/Theme.Holo.DialogWhenLarge" >
برای اطلاعات بیشتر در مورد استایلدهی به فعالیتها با استفاده از تمها، به بخش «سبکها و تمها» مراجعه کنید.
رد کردن یک کادر محاورهای
وقتی کاربر روی یک دکمهی عملیاتی که با AlertDialog.Builder ایجاد شده است، ضربه میزند، سیستم دیالوگ را برای شما رد میکند.
همچنین سیستم وقتی کاربر روی یک آیتم در لیست دیالوگ ضربه میزند، دیالوگ را رد میکند، مگر زمانی که لیست از دکمههای رادیویی یا چکباکسها استفاده کند. در غیر این صورت، میتوانید با فراخوانی dismiss() در DialogFragment خود، دیالوگ خود را به صورت دستی رد کنید.
اگر نیاز دارید که هنگام بسته شدن کادر محاورهای، اقدامات خاصی انجام دهید، میتوانید متد onDismiss() را در DialogFragment خود پیادهسازی کنید.
همچنین میتوانید یک دیالوگ را لغو کنید . این یک رویداد ویژه است که نشان میدهد کاربر بدون تکمیل وظیفه، دیالوگ را ترک میکند. این اتفاق زمانی رخ میدهد که کاربر دکمه بازگشت را لمس کند یا روی صفحه نمایش خارج از ناحیه دیالوگ ضربه بزند یا اگر شما به طور صریح تابع cancel() را در Dialog فراخوانی کنید، مثلاً در پاسخ به دکمه "لغو" در دیالوگ.
همانطور که در مثال قبلی نشان داده شد، میتوانید با پیادهسازی onCancel() در کلاس DialogFragment خود، به رویداد cancel پاسخ دهید.