Mit Sammlungen den Überblick behalten
Sie können Inhalte basierend auf Ihren Einstellungen speichern und kategorisieren.
Mit der Komponente „Navigation“ können Sie Animations- und Ansichtsanimationen zu
Aktionen. Um eigene Animationen zu erstellen,
Animationsressourcen
Die Navigation umfasst außerdem mehrere Standardanimationen, die Ihnen den Einstieg erleichtern. Hinzufügen
zu einer Aktion hinzufügen, gehen Sie so vor:
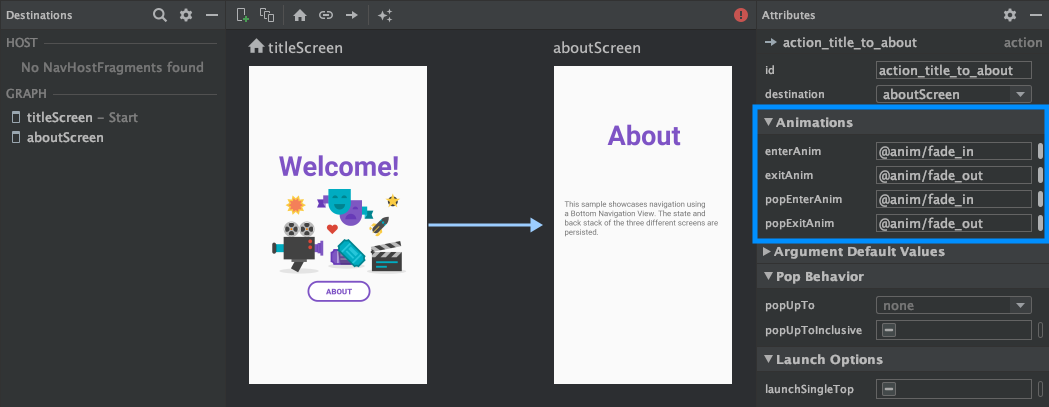
Klicken Sie im Navigationseditor auf die Aktion, an der sich die Animation befinden soll.
auftreten.
Klicken Sie im Bereich Attribute unter Animationen auf das Drop-down-Menü.
auf den Pfeil neben der Animation, die Sie hinzufügen möchten. Sie können zwischen den
folgenden Typen:
<ph type="x-smartling-placeholder">
</ph>
Ziel wird eingegeben
Ziel verlassen
Die Eingabe eines Ziels über ein
pop action, eine Aktion
bei der Navigation zusätzliche Ziele aus dem Back Stack hervorhebt.
Verlassen eines Ziels über eine Pop-up-Aktion
Wählen Sie eine Animation aus der angezeigten Liste der Projektanimationen aus.
<ph type="x-smartling-placeholder"></ph>
Abbildung 1. Im Bereich Animationen des
Bereich Attribute
Nachdem Sie Animationen hinzugefügt haben, klicken Sie auf den Tab Text, um zum XML-Text zu wechseln.
Ansicht. Der XML-Code für die Animationen erscheint nun in der entsprechenden
<action>-Element. Im folgenden Beispiel ist specifyAmountFragment der Wert
Quellziel für die Aktion confirmationAction:
Übergänge mit gemeinsam genutzten Elementen zwischen Zielen hinzufügen
Wird eine Ansicht von zwei Zielen geteilt, können Sie mithilfe eines
Übergang mit gemeinsam genutzten Elementen, um zu definieren, wie die Ansicht beim
von einem Ziel zum anderen navigieren. Übergänge gemeinsam genutzter Elemente
sind Teil des Frameworks für Umstellungen.
Gemeinsam genutzte Elemente werden programmatisch bereitgestellt und nicht über Ihr
Navigations-XML-Datei. Aktivitäts- und Fragmentziele haben jeweils eine Unterklasse
von Navigator.Extras
die zusätzliche Navigationsoptionen bietet, z. B.
Elemente. Sie können diese Extras übergeben, wenn Sie
navigate()
Freigegebenes Element geht in ein Fragmentziel über
Die FragmentNavigator.Extras
können Sie gemeinsam genutzte Elemente von einem Ziel zum nächsten
nach dem Übergangsnamen, ähnlich wie bei
FragmentTransaction.addSharedElement()
Sie können die Extras an navigate() übergeben, wie im Folgenden gezeigt:
Beispiel:
Kotlin
valextras=FragmentNavigatorExtras(view1to"hero_image")view.findNavController().navigate(R.id.confirmationAction,null,// Bundle of argsnull,// NavOptionsextras)
Java
FragmentNavigator.Extrasextras=newFragmentNavigator.Extras.Builder().addSharedElement(view1,"hero_image").build();Navigation.findNavController(view).navigate(R.id.details,null,// Bundle of argsnull,// NavOptionsextras);
Freigegebenes Element geht zu einem Aktivitätsziel über
// Rename the Pair class from the Android framework to avoid a name clashimportandroid.util.PairasUtilPair...valoptions=ActivityOptionsCompat.makeSceneTransitionAnimation(activity,UtilPair.create(view1,"hero_image"))valextras=ActivityNavigatorExtras(options)view.findNavController().navigate(R.id.details,null,// Bundle of argsnull,// NavOptionsextras)
Java
ActivityOptionsoptions=ActivityOptions.makeSceneTransitionAnimation(this,Pair.create(view1,"hero_image"));ActivityNavigatorExtrasextras=newActivityNavigatorExtras.Builder().setActivityOptions(options).build();Navigation.findNavController(view).navigate(R.id.details,null,// Bundle of argsnull,// NavOptionsextras);
Pop-Animationen auf Aktivitätsübergänge anwenden
Wenn Sie zu oder von einem Activity navigieren, werden keine Pop-Animationen angewendet.
automatisch. Stattdessen müssen Sie
ActivityNavigator.applyPopAnimationsToPendingTransition()
vom Ziel-Activity-Ziel, an dem die Animation abgespielt werden soll:
Alle Inhalte und Codebeispiele auf dieser Seite unterliegen den Lizenzen wie im Abschnitt Inhaltslizenz beschrieben. Java und OpenJDK sind Marken oder eingetragene Marken von Oracle und/oder seinen Tochtergesellschaften.
Zuletzt aktualisiert: 2025-07-27 (UTC).
[[["Leicht verständlich","easyToUnderstand","thumb-up"],["Mein Problem wurde gelöst","solvedMyProblem","thumb-up"],["Sonstiges","otherUp","thumb-up"]],[["Benötigte Informationen nicht gefunden","missingTheInformationINeed","thumb-down"],["Zu umständlich/zu viele Schritte","tooComplicatedTooManySteps","thumb-down"],["Nicht mehr aktuell","outOfDate","thumb-down"],["Problem mit der Übersetzung","translationIssue","thumb-down"],["Problem mit Beispielen/Code","samplesCodeIssue","thumb-down"],["Sonstiges","otherDown","thumb-down"]],["Zuletzt aktualisiert: 2025-07-27 (UTC)."],[],[],null,["# Animate transitions between destinations\n\nThe Navigation component lets you add both property and view animations to\nactions. To create your own animations, check out\n[Animation resources](/guide/topics/resources/animation-resource).\n\nNavigation also includes several default animations to get you started. To add\nanimations to an action, do the following:\n\n1. In the Navigation editor, click on the action where the animation should occur.\n2. In the **Animations** section of the **Attributes** panel, click the dropdown arrow next to the animation you'd like to add. You can choose between the following types:\n - Entering a destination\n - Exiting a destination\n - Entering a destination via a [*pop action*](/guide/navigation/navigation-navigate#pop), an action that pops additional destinations off of the back stack when navigating.\n - Exiting a destination via a pop action\n3. Choose an animation from the list of project animations that appears.\n\n**Figure 1.** The **Animations** section of the **Attributes** panel.\n\nOnce you've added animations, click the **Text** tab to toggle to the XML text\nview. The XML for the animations now appears in the corresponding\n`\u003caction\u003e` element. In the following example, `specifyAmountFragment` is the\nsource destination for the `confirmationAction` action: \n\n```xml\n\u003cfragment\n android:id=\"@+id/specifyAmountFragment\"\n android:name=\"com.example.buybuddy.buybuddy.SpecifyAmountFragment\"\n android:label=\"fragment_specify_amount\"\n tools:layout=\"@layout/fragment_specify_amount\"\u003e\n \u003caction\n android:id=\"@+id/confirmationAction\"\n app:destination=\"@id/confirmationFragment\"\n app:enterAnim=\"@anim/slide_in_right\"\n app:exitAnim=\"@anim/slide_out_left\"\n app:popEnterAnim=\"@anim/slide_in_left\"\n app:popExitAnim=\"@anim/slide_out_right\" /\u003e\n\u003c/fragment\u003e\n```\n\nAdd shared element transitions between destinations\n---------------------------------------------------\n\nWhen a view is shared between two destinations, you can use a\n*shared element transition* to define how the view transitions when\nnavigating from one destination to the other. Shared element transitions\nare part of the Transition Framework.\n| **Note:** When using shared elements transitions, you should **not** use the Animation Framework (`enterAnim`, `exitAnim`, and so on from the previous section). Instead, you should be using only the Transition Framework for setting your enter and exit transitions.\n\nShared elements are supplied programmatically rather than through your\nnavigation XML file. Activity and fragment destinations each have a subclass\nof the [`Navigator.Extras`](/reference/androidx/navigation/Navigator.Extras)\ninterface that accepts additional options for navigation, including shared\nelements. You can pass these `Extras` when calling\n[`navigate()`](/reference/androidx/navigation/NavController#navigate(int,%20android.os.Bundle,%20androidx.navigation.NavOptions,%20androidx.navigation.Navigator.Extras)).\n| **Note:** Be sure to familiarize yourself with shared element transitions before continuing. For fragment shared element transitions, see [Navigate between fragments using animations](/training/basics/fragments/animate). For activity shared element transitions, see [Start an activity using an animation](/training/transitions/start-activity#start-with-element).\n\n### Shared element transitions to a fragment destination\n\nThe [`FragmentNavigator.Extras`](/reference/androidx/navigation/fragment/FragmentNavigator.Extras)\nclass allows you to map shared elements from one destination to the next\nby their transition name, similar to using\n[`FragmentTransaction.addSharedElement()`](/reference/androidx/fragment/app/FragmentTransaction#addSharedElement(android.view.View,%20java.lang.String)).\nYou can then pass the extras to `navigate()`, as shown in the following\nexample: \n\n### Kotlin\n\n```kotlin\nval extras = FragmentNavigatorExtras(view1 to \"hero_image\")\n\nview.findNavController().navigate(\n R.id.confirmationAction,\n null, // Bundle of args\n null, // NavOptions\n extras)\n```\n\n### Java\n\n```java\nFragmentNavigator.Extras extras = new FragmentNavigator.Extras.Builder()\n .addSharedElement(view1, \"hero_image\")\n .build();\n\nNavigation.findNavController(view).navigate(\n R.id.details,\n null, // Bundle of args\n null, // NavOptions\n extras);\n```\n\n### Shared element transitions to an activity destination\n\nActivities rely on [ActivityOptionsCompat](https://developer.android.com/reference/androidx/core/app/ActivityOptionsCompat) to control Shared Element Transitions as detailed in the [Start an activity with a shared element](https://developer.android.com/training/transitions/start-activity#start-transition) documentation and as shown in the example below: \n\n### Kotlin\n\n```kotlin\n// Rename the Pair class from the Android framework to avoid a name clash\nimport android.util.Pair as UtilPair\n...\nval options = ActivityOptionsCompat.makeSceneTransitionAnimation(activity,\n UtilPair.create(view1, \"hero_image\"))\nval extras = ActivityNavigatorExtras(options)\nview.findNavController().navigate(\n R.id.details,\n null, // Bundle of args\n null, // NavOptions\n extras)\n```\n\n### Java\n\n```java\nActivityOptions options = ActivityOptions.makeSceneTransitionAnimation(this,\n Pair.create(view1, \"hero_image\"));\n\nActivityNavigatorExtras extras = new ActivityNavigatorExtras.Builder()\n .setActivityOptions(options)\n .build();\n\n\nNavigation.findNavController(view).navigate(\n R.id.details,\n null, // Bundle of args\n null, // NavOptions\n extras);\n```\n\nApply pop animations to activity transitions\n--------------------------------------------\n\nWhen you navigate to or from an `Activity`, pop animations are not applied\nautomatically. Instead, you must call\n[`ActivityNavigator.applyPopAnimationsToPendingTransition()`](/reference/androidx/navigation/ActivityNavigator#applyPopAnimationsToPendingTransition(android.app.Activity))\nfrom the target `Activity` destination where the animation should occur: \n\n### Kotlin\n\n```kotlin\noverride fun finish() {\n super.finish()\n ActivityNavigator.applyPopAnimationsToPendingTransition(this)\n}\n```\n\n### Java\n\n```java\n@Override\npublic void finish() {\n super.finish();\n ActivityNavigator.applyPopAnimationsToPendingTransition(this);\n}\n```"]]