

VibrationEffect.Builder를 사용한 타임라인 고정 컴포지션, 맞춤 진동 패턴, 고급 파형 엔벨로프 등 Android에서 맞춤 햅틱 효과를 만드는 방법에 관한 예와 안내를 제공합니다. keywords_public: > Android, 햅틱, 맞춤 효과, 진동, 햅틱 API, 진동 패턴, VibrationEffect.Builder, 컴포지션, 햅틱 기본 요소, 파형 엔벨로프, UI
이 페이지에서는 다양한 햅틱 API를 사용하여 Android 앱에서 표준 진동 파형을 넘어 맞춤 효과를 만드는 방법을 보여주는 예를 다룹니다.
이 페이지에는 다음 예시가 포함되어 있습니다.
VibrationEffect.Builder를 사용한 타임라인 고정 컴포지션- 미리 설정으로 구성: 미리 정의된 햅틱 감각을 시퀀스합니다.
- 엔벨로프 및 프리셋으로 구성: 타임라인을 따라 엔벨로프와 프리셋을 결합합니다.
- 이벤트 재사용 및 이동: 기존 컴포지션 이벤트를 이동하고 재사용합니다.
- 반복되는 컴포지션: 반복되는 타임라인 효과를 만듭니다.
- 맞춤 진동 패턴
- 진동 프리미티브 구성
- 엔벨로프가 있는 진동 파형
추가 예는 이벤트에 햅틱 반응 추가를 참고하고 항상 햅틱 디자인 원칙을 따르세요.
대체 항목을 사용하여 기기 호환성 처리
맞춤 햅틱 효과를 구현할 때 기기 호환성과 대체 동작은 선택한 API에 따라 달라집니다.
VibrationEffect.Builder(권장): Android 16(26Q4)부터VibrationEffect.Builder를 사용하여 생성된 효과에는 자동 프레임워크 수준 대체가 포함됩니다. 기기에서 요청된Preset또는 기본Envelope을 기본적으로 지원하지 않으면 프레임워크는 재생 시간에 최선을 다해 적절한 대안으로 자동 변환합니다.VibrationEffect.Builder로 구성된 효과를 재생하기 전에 기본 요소별 기기 기능을 수동으로 확인할 필요가 없습니다.- 예외:
WaveformEnvelopeBuilder로 생성된 고급 파형 엔벨로프는 특정 하드웨어 주파수 매핑(FOAM)에 따라 달라지므로 자동 대체가 지원되지 않습니다. 지원되지 않는 경우 재생되지 않습니다.
- 예외:
VibrationEffect.Composition:startComposition()API로 생성된 컴포지션에는 자동 대체가 없습니다. 지원되지 않는 기본 요소가 하나라도 구성에 포함되면 전체 진동이 재생되지 않습니다.vibrator.arePrimitivesSupported()를 사용하여 기능을 수동으로 확인해야 합니다.- 진폭 제어가 있는 파형: 진폭 제어가 없는 기기에서는 0이 아닌 진폭이 100% 로 반올림됩니다.
vibrator.hasAmplitudeControl()을 확인하고 필요한 경우 명시적으로 설계된 ON/OFF 패턴으로 대체합니다.
햅틱 프리미티브 사용
Android에는 진폭과 주파수가 모두 다양한 여러 햅틱 원시 요소가 포함되어 있습니다. 하나의 기본 요소를 단독으로 사용하거나 여러 기본 요소를 조합하여 풍부한 햅틱 효과를 구현할 수 있습니다.
- 두 프리미티브 간에 구분 가능한 간격을 두려면 50ms 이상의 지연 시간을 사용하고 가능한 경우 프리미티브 지속 시간도 고려합니다.
- 강도 차이가 더 잘 인식되도록 1.4 이상의 비율로 다른 스케일을 사용하세요.
0.5, 0.7, 1.0 스케일을 사용하여 기본 요소의 낮은, 중간, 높은 강도 버전을 만듭니다.
맞춤 진동 패턴 만들기
진동 패턴은 알림 및 벨소리와 같은 주의력 햅틱에 자주 사용됩니다. Vibrator 서비스는 시간이 지남에 따라 진동 폭을 변경하는 긴 진동 패턴을 재생할 수 있습니다. 이러한 효과를 파형이라고 합니다.
파형 효과는 일반적으로 인지할 수 있지만 조용한 환경에서 재생하면 갑작스러운 긴 진동이 사용자를 놀라게 할 수 있습니다. 타겟 진폭으로 너무 빠르게 램핑하면 청각적으로 윙윙거리는 노이즈가 발생할 수도 있습니다. 진폭 전환을 부드럽게 하여 증가 및 감소 효과를 만들도록 파형 패턴을 설계합니다.
진동 패턴의 예
다음 섹션에서는 여러 진동 패턴의 예를 제공합니다.
단계적 확대 패턴
파형은 세 가지 매개변수와 함께 VibrationEffect로 표시됩니다.
- 타이밍: 각 파형 세그먼트의 지속 시간(밀리초) 배열입니다.
- 진폭: 첫 번째 인수에 지정된 각 지속 시간의 원하는 진동 진폭입니다. 0~255의 정수 값으로 표시되며, 0은 진동기 '오프 상태'를 나타내고 255는 기기의 최대 진폭을 나타냅니다.
- 반복 색인: 파형 반복을 시작할 첫 번째 인수에 지정된 배열의 색인입니다. 패턴을 한 번만 재생해야 하는 경우 -1입니다.
다음은 펄스 사이에 350ms의 일시중지가 있는 두 번의 펄스를 보여주는 파형의 예입니다. 첫 번째 펄스는 최대 진폭까지 부드럽게 증가하고 두 번째 펄스는 최대 진폭을 유지하기 위해 빠르게 증가합니다. 끝에서 중지하는 것은 음수 반복 색인 값으로 정의됩니다.
Kotlin
val timings: LongArray = longArrayOf(
    50, 50, 50, 50, 50, 100, 350, 25, 25, 25, 25, 200)
val amplitudes: IntArray = intArrayOf(
    33, 51, 75, 113, 170, 255, 0, 38, 62, 100, 160, 255)
val repeatIndex = -1 // Don't repeat.

vibrator.vibrate(VibrationEffect.createWaveform(
    timings, amplitudes, repeatIndex))
자바
long[] timings = new long[] {
    50, 50, 50, 50, 50, 100, 350, 25, 25, 25, 25, 200 };
int[] amplitudes = new int[] {
    33, 51, 75, 113, 170, 255, 0, 38, 62, 100, 160, 255 };
int repeatIndex = -1; // Don't repeat.

vibrator.vibrate(VibrationEffect.createWaveform(
    timings, amplitudes, repeatIndex));
반복 패턴
파형은 취소될 때까지 반복해서 재생할 수도 있습니다. 반복 파형을 만드는 방법은 음수가 아닌 repeat 매개변수를 설정하는 것입니다. 반복되는 파형을 재생하면 서비스에서 명시적으로 취소될 때까지 진동이 계속됩니다.
Kotlin
void startVibrating() {
val timings: LongArray = longArrayOf(50, 50, 100, 50, 50)
val amplitudes: IntArray = intArrayOf(64, 128, 255, 128, 64)
val repeat = 1 // Repeat from the second entry, index = 1.
VibrationEffect repeatingEffect = VibrationEffect.createWaveform(
    timings, amplitudes, repeat)
// repeatingEffect can be used in multiple places.

vibrator.vibrate(repeatingEffect)
}

void stopVibrating() {
vibrator.cancel()
}
자바
void startVibrating() {
long[] timings = new long[] { 50, 50, 100, 50, 50 };
int[] amplitudes = new int[] { 64, 128, 255, 128, 64 };
int repeat = 1; // Repeat from the second entry, index = 1.
VibrationEffect repeatingEffect = VibrationEffect.createWaveform(
    timings, amplitudes, repeat);
// repeatingEffect can be used in multiple places.

vibrator.vibrate(repeatingEffect);
}

void stopVibrating() {
vibrator.cancel();
}
이는 사용자 작업이 필요한 간헐적 이벤트를 확인하는 데 매우 유용합니다. 이러한 이벤트의 예로는 수신 전화 및 트리거된 알람이 있습니다.
대체가 있는 패턴
진동의 진폭을 제어하는 것은 하드웨어 종속 기능입니다. 이 기능이 없는 저사양 기기에서 파형을 재생하면 기기가 진폭 배열의 각 양수 항목에 대해 최대 진폭으로 진동합니다. 앱에서 이러한 기기를 수용해야 하는 경우 해당 조건에서 재생할 때 버즈 효과를 생성하지 않는 패턴을 사용하거나 대신 대체로 재생할 수 있는 더 간단한 ON/OFF 패턴을 설계하세요.
Kotlin
if (vibrator.hasAmplitudeControl()) {
  vibrator.vibrate(VibrationEffect.createWaveform(
    smoothTimings, amplitudes, smoothRepeatIdx))
} else {
  vibrator.vibrate(VibrationEffect.createWaveform(
    onOffTimings, onOffRepeatIdx))
}
자바
if (vibrator.hasAmplitudeControl()) {
  vibrator.vibrate(VibrationEffect.createWaveform(
    smoothTimings, amplitudes, smoothRepeatIdx));
} else {
  vibrator.vibrate(VibrationEffect.createWaveform(
    onOffTimings, onOffRepeatIdx));
}
VibrationEffect.Builder로 타임라인에 고정된 컴포지션
Android 16 (26Q4)부터 VibrationEffect.Builder은 복잡한 진동 효과와 컴포지션을 만드는 데 선호되는 API입니다. startTimeMillis을 사용하면 절대 타임라인을 따라 개별 햅틱 요소를 시퀀싱하여 표현력이 풍부한 햅틱 감각을 구성할 수 있습니다.
VibrationEffect.Builder는 여러 진동 유형의 조합을 지원합니다.
- 사전 설정: 클릭, 틱과 같은 사전 정의된 햅틱 펄스 (
VibrationEffect.Preset)입니다. - 엔벨로프: 하드웨어에 구애받지 않는 기본 엔벨로프 (
BasicEnvelopeBuilder) 및 고급 주파수 변조 엔벨로프 (WaveformEnvelopeBuilder)를 비롯한 동적 연속 파형입니다. - 기존 VibrationEffect:
addEvents()또는 생성자 복사를 사용하여 가져온 기본 구성(VibrationEffect.Composition), 단계 파형(VibrationEffect.createWaveform), 사전 정의된 효과(VibrationEffect.createPredefined), 원샷(VibrationEffect.createOneShot) - 반복되는 시퀀스:
setRepeatingEffect()로 구성된 연속 패턴입니다.
VibrationEffect.Builder로 빌드된 진동에는 사전 설정, 기본 엔벨로프, 결합된 진동 효과를 비롯한 요소 전반에 프레임워크 수준의 자동 대체가 내장되어 있어 수동 기능 확인 없이도 다양한 기기에서 일관된 사용자 환경을 보장합니다. (WaveformEnvelopeBuilder로 생성된 고급 파형 엔벨로프는 하드웨어 지원이 필요하며 자동 대체 지원이 없습니다.)
사전 설정으로 작성
VibrationEffect.Preset를 사용하여 일반적인 사전 정의된 짧은 햅틱 펄스(예: PRESET_CLICK, PRESET_TICK, PRESET_LOW_TICK)를 컴포지션에 추가합니다.
사전 설정은 명확한 햅틱을 위한 햅틱 원칙에 부합하는 선명하고 짧고 쾌적한 진동을 제공하기 위해 기기 제조업체에서 구현합니다. 이러한 기능과 작동 방식에 관한 자세한 내용은 진동 액추에이터 기본사항을 참고하세요.
사전 설정은 VibrationEffect.Composition API의 짧은 기본 요소를 대체합니다.
램프업 및 램프다운과 같이 더 길거나 연속적인 햅틱 감각의 경우 엔벨로프 파형 (PWLE)을 대신 사용하세요.
각 사전 설정에는 0.0f~1.0f 사이의 선택적 스케일을 할당할 수 있으며, 컴포지션 시작부터 명시적 시작 시간 (밀리초)에 배치됩니다.
Kotlin
val clickPreset = VibrationEffect.Preset.create(
    VibrationEffect.Preset.PRESET_CLICK, /* scale= */ 0.8f
)
val tickPreset = VibrationEffect.Preset.create(
    VibrationEffect.Preset.PRESET_TICK, /* scale= */ 0.5f
)

val effect = VibrationEffect.Builder()
    .addPreset(/* startTimeMillis= */ 0L, clickPreset)
    .addPreset(/* startTimeMillis= */ 100L, tickPreset)
    .build()

vibrator.vibrate(effect)
자바
VibrationEffect.Preset clickPreset = VibrationEffect.Preset.create(
    VibrationEffect.Preset.PRESET_CLICK, /* scale= */ 0.8f
);
VibrationEffect.Preset tickPreset = VibrationEffect.Preset.create(
    VibrationEffect.Preset.PRESET_TICK, /* scale= */ 0.5f
);

VibrationEffect effect = new VibrationEffect.Builder()
    .addPreset(/* startTimeMillis= */ 0L, clickPreset)
    .addPreset(/* startTimeMillis= */ 100L, tickPreset)
    .build();

vibrator.vibrate(effect);
엔벨로프 및 프리셋으로 작곡
VibrationEffect.Envelope 인스턴스 (BasicEnvelopeBuilder 또는 WaveformEnvelopeBuilder를 사용하여 생성됨)를 사전 설정과 원활하게 결합하여 풍부한 다중 세그먼트 햅틱 패턴을 만들 수 있습니다.
다음은 부드러운 램프업 및 페이드아웃 엔벨로프를 재생한 후 날카로운 클릭 사전 설정을 재생하는 예입니다.
Kotlin
val basicEnvelope = VibrationEffect.Envelope.create(
    VibrationEffect.BasicEnvelopeBuilder()
        .setInitialSharpness(0.0f)
        .addControlPoint(1.0f, 1.0f, 300L)
        .addControlPoint(0.0f, 0.5f, 100L)
)
val clickPreset = VibrationEffect.Preset.create(
    VibrationEffect.Preset.PRESET_CLICK, 0.9f
)

val mixedEffect = VibrationEffect.Builder()
    .addEnvelope(/* startTimeMillis= */ 0L, basicEnvelope)
    .addPreset(/* startTimeMillis= */ 450L, clickPreset)
    .build()

vibrator.vibrate(mixedEffect)
자바
VibrationEffect.Envelope basicEnvelope = VibrationEffect.Envelope.create(
    new VibrationEffect.BasicEnvelopeBuilder()
        .setInitialSharpness(0.0f)
        .addControlPoint(1.0f, 1.0f, 300L)
        .addControlPoint(0.0f, 0.5f, 100L)
);
VibrationEffect.Preset clickPreset = VibrationEffect.Preset.create(
    VibrationEffect.Preset.PRESET_CLICK, 0.9f
);

VibrationEffect mixedEffect = new VibrationEffect.Builder()
    .addEnvelope(/* startTimeMillis= */ 0L, basicEnvelope)
    .addPreset(/* startTimeMillis= */ 450L, clickPreset)
    .build();

vibrator.vibrate(mixedEffect);
기존 이벤트 재사용 및 이동
기존 VibrationEffect (VibrationEffect.Composition 포함)를 재사용하거나 연결하려면 getEvents()를 사용하여 VibrationEffect.Event 객체 목록을 검색하고 addEvents(startTimeShiftMillis, events)를 사용하여 오프셋과 함께 추가합니다 (또는 효과를 VibrationEffect.Builder(effect) 생성자에 직접 전달). 이 방식으로 VibrationEffect.Composition 인스턴스를 가져오면 프레임워크가 기본 요소를 사전 설정으로 자동 변환하여 런타임 대체 지원을 사용 설정합니다.
Kotlin
val existingEffect = VibrationEffect.Builder()
    .addPreset(
        0L,
        VibrationEffect.Preset.create(VibrationEffect.Preset.PRESET_CLICK)
    )
    .addPreset(
        80L,
        VibrationEffect.Preset.create(VibrationEffect.Preset.PRESET_TICK)
    )
    .build()

// Shift and append the existing events 200ms into the new composition.
val combinedEffect = VibrationEffect.Builder()
    .addEvents(/* startTimeShiftMillis= */ 200L, existingEffect.events)
    .build()

vibrator.vibrate(combinedEffect)
자바
VibrationEffect existingEffect = new VibrationEffect.Builder()
    .addPreset(
        0L,
        VibrationEffect.Preset.create(VibrationEffect.Preset.PRESET_CLICK)
    )
    .addPreset(
        80L,
        VibrationEffect.Preset.create(VibrationEffect.Preset.PRESET_TICK)
    )
    .build();

// Shift and append the existing events 200ms into the new composition.
VibrationEffect combinedEffect = new VibrationEffect.Builder()
    .addEvents(/* startTimeShiftMillis= */ 200L, existingEffect.getEvents())
    .build();

vibrator.vibrate(combinedEffect);
반복되는 음악 만들기
setRepeatingEffect(startTimeMillis, repeatingEffect, durationMillis)를 사용하여 컴포지션에 반복 패턴을 추가합니다.
Kotlin
val repeatingPattern = VibrationEffect.Builder()
    .addPreset(
        0L,
        VibrationEffect.Preset.create(
            VibrationEffect.Preset.PRESET_CLICK, 1.0f
        )
    )
    .addPreset(
        150L,
        VibrationEffect.Preset.create(
            VibrationEffect.Preset.PRESET_LOW_TICK, 0.6f
        )
    )
    .build()

val repeatingEffect = VibrationEffect.Builder()
    .setRepeatingEffect(
        /* startTimeMillis= */ 0L,
        /* effect= */ repeatingPattern,
        /* durationMillis= */ 300L
    )
    .build()

vibrator.vibrate(repeatingEffect)
자바
VibrationEffect repeatingPattern = new VibrationEffect.Builder()
    .addPreset(
        0L,
        VibrationEffect.Preset.create(
            VibrationEffect.Preset.PRESET_CLICK, 1.0f
        )
    )
    .addPreset(
        150L,
        VibrationEffect.Preset.create(
            VibrationEffect.Preset.PRESET_LOW_TICK, 0.6f
        )
    )
    .build();

VibrationEffect repeatingEffect = new VibrationEffect.Builder()
    .setRepeatingEffect(
        /* startTimeMillis= */ 0L,
        /* effect= */ repeatingPattern,
        /* durationMillis= */ 300L
    )
    .build();

vibrator.vibrate(repeatingEffect);
타이밍, 검증, 드리프트 관리
VibrationEffect.Builder로 컴포지션을 설계할 때는 다음 타이밍 및 유효성 검사 규칙에 유의하세요.
- 엄격하게 증가하는 시작 시간: 빌더에 추가된 모든 요소의
startTimeMillis는 이전 요소의 시작 시간보다 크거나 같아야 합니다. - 빌드 시간 검증: 빌더는 알려진 요소 지속 시간 (또는 사전 설정의 경우 최소 1ms)을 사용하여
build()시간에 최선의 검증을 실행합니다. 불가능한 중복이 감지되면IllegalArgumentException가 발생합니다. - 재생 순차적 이동: 다음 요소의 시작 시간이 도달했을 때 이전 진동 요소가 아직 물리적으로 재생되고 있으면 프레임워크는 다음 요소를 사용 가능한 가장 빠른 시간 슬롯으로 자동 이동합니다. 이렇게 하면 이벤트가 겹치지 않고 진동이 누락되지 않지만 이벤트가 너무 가까이 예약된 경우 약간의 타이밍 드리프트가 발생할 수 있습니다. 드리프트를 최소화하려면 연속 햅틱 이벤트 사이에 충분한 시간 (예: 50ms 이상)을 허용하세요.
진동 프리미티브 컴포지션 만들기
이 섹션에서는 VibrationEffect.Composition를 사용하여 진동을 구성하는 방법을 설명합니다. 이 페이지 앞부분에 설명된 구성 기본 요소는 기기 제조업체에서 구현합니다. 명확한 햅틱을 위한 햅틱 원칙에 부합하는 선명하고 짧고 쾌적한 진동을 제공합니다. 이러한 기능과 작동 방식에 관한 자세한 내용은 진동 액추에이터 기본사항을 참고하세요.
VibrationEffect.Builder와 달리 VibrationEffect.Composition API에는 지원되지 않는 기본 요소에 대한 자동 대체가 없습니다. 다음과 같습니다.
고급 햅틱을 활성화하기 전에 특정 기기가 사용 중인 모든 기본 요소를 지원하는지 확인하세요.
기본 요소가 누락된 효과뿐만 아니라 지원되지 않는 일관된 환경 세트를 사용 중지합니다.
- Kotlin:
val fallbackEffect = VibrationEffect.Builder(compositionEffect).build()(또는.addEvents(0L, compositionEffect.events)) - Java:
VibrationEffect fallbackEffect =new VibrationEffect.Builder(compositionEffect).build();(또는.addEvents(0L, compositionEffect.getEvents()))
VibrationEffect.Builder로 구성하면 프레임워크는 컴포지션 기본 요소를 사전 설정으로 변환하고 사용자의 기기에서 지원되지 않는 기본 요소가 있으면 런타임 대체 항목을 자동으로 제공합니다.
구성된 진동 효과
VibrationEffect.Composition을 사용하여 구성된 진동 효과를 만들 수 있습니다. 다음은 천천히 상승하는 효과와 날카로운 클릭 효과가 이어지는 예입니다.
Kotlin
vibrator.vibrate(
    VibrationEffect.startComposition().addPrimitive(
    VibrationEffect.Composition.PRIMITIVE_SLOW_RISE
    ).addPrimitive(
    VibrationEffect.Composition.PRIMITIVE_CLICK
    ).compose()
)
자바
vibrator.vibrate(
    VibrationEffect.startComposition()
        .addPrimitive(VibrationEffect.Composition.PRIMITIVE_SLOW_RISE)
        .addPrimitive(VibrationEffect.Composition.PRIMITIVE_CLICK)
        .compose());
컴포지션은 순서대로 재생할 기본 요소를 추가하여 생성됩니다. 각 기본 요소는 확장 가능하므로 각 요소에서 생성되는 진동의 진폭을 제어할 수 있습니다. 스케일은 0과 1 사이의 값으로 정의되며, 여기서 0은 실제로 이 기본 요소가 사용자가 (거의) 느낄 수 있는 최소 진폭에 매핑됩니다.
진동 기본 요소에서 변형 만들기
동일한 기본 요소의 약한 버전과 강한 버전을 만들려면 강도 비율을 1.4 이상으로 만들어 강도 차이를 쉽게 인식할 수 있도록 하세요. 지각적으로 구별되지 않으므로 동일한 기본 요소의 강도 수준을 3개 이상 만들지 마세요. 예를 들어 0.5, 0.7, 1.0 스케일을 사용하여 기본 요소의 저강도, 중강도, 고강도 버전을 만듭니다.
진동 프리미티브 사이에 간격 추가
컴포지션은 연속된 기본 요소 사이에 추가할 지연 시간을 지정할 수도 있습니다. 이 지연 시간은 이전 기본 요소가 끝난 후 경과한 시간(밀리초)으로 표시됩니다. 일반적으로 두 기본 요소 사이의 5~10ms 간격은 감지하기에 너무 짧습니다. 두 기본 요소 사이에 눈에 띄는 간격을 만들려면 50ms 이상의 간격을 사용하세요. 다음은 지연이 있는 컴포지션의 예입니다.
Kotlin
val delayMs = 100
vibrator.vibrate(
    VibrationEffect.startComposition().addPrimitive(
    VibrationEffect.Composition.PRIMITIVE_SPIN, 0.8f
    ).addPrimitive(
    VibrationEffect.Composition.PRIMITIVE_SPIN, 0.6f
    ).addPrimitive(
    VibrationEffect.Composition.PRIMITIVE_THUD, 1.0f, delayMs
    ).compose()
)
자바
int delayMs = 100;
vibrator.vibrate(
    VibrationEffect.startComposition()
        .addPrimitive(VibrationEffect.Composition.PRIMITIVE_SPIN, 0.8f)
        .addPrimitive(VibrationEffect.Composition.PRIMITIVE_SPIN, 0.6f)
        .addPrimitive(
            VibrationEffect.Composition.PRIMITIVE_THUD, 1.0f, delayMs)
        .compose());
지원되는 기본 요소 확인
다음 API를 사용하여 특정 기본 요소에 대한 기기 지원을 확인할 수 있습니다.
Kotlin
val primitive = VibrationEffect.Composition.PRIMITIVE_LOW_TICK

if (vibrator.areAllPrimitivesSupported(primitive)) {
  vibrator.vibrate(VibrationEffect.startComposition()
        .addPrimitive(primitive).compose())
} else {
  // Play a predefined effect or custom pattern as a fallback.
}
자바
int primitive = VibrationEffect.Composition.PRIMITIVE_LOW_TICK;

if (vibrator.areAllPrimitivesSupported(primitive)) {
  vibrator.vibrate(VibrationEffect.startComposition()
        .addPrimitive(primitive).compose());
} else {
  // Play a predefined effect or custom pattern as a fallback.
}
여러 기본 요소를 확인한 다음 기기 지원 수준에 따라 어떤 요소를 구성할지 결정할 수도 있습니다.
Kotlin
val effects: IntArray = intArrayOf(
VibrationEffect.Composition.PRIMITIVE_LOW_TICK,
VibrationEffect.Composition.PRIMITIVE_TICK,
VibrationEffect.Composition.PRIMITIVE_CLICK
)
val supported: BooleanArray = vibrator.arePrimitivesSupported(primitives)
자바
int[] primitives = new int[] {
VibrationEffect.Composition.PRIMITIVE_LOW_TICK,
VibrationEffect.Composition.PRIMITIVE_TICK,
VibrationEffect.Composition.PRIMITIVE_CLICK
};
boolean[] supported = vibrator.arePrimitivesSupported(effects);
진동 컴포지션 예시
다음 섹션에서는 GitHub의 햅틱 샘플 앱에서 가져온 진동 구성의 여러 예를 제공합니다.
저항 (틱 낮음)
원시 진동의 진폭을 제어하여 진행 중인 작업에 유용한 피드백을 전달할 수 있습니다. 간격이 좁은 스케일 값을 사용하여 기본 도형의 부드러운 크레센도 효과를 만들 수 있습니다. 연속된 원시 요소 간의 지연 시간도 사용자 상호작용에 따라 동적으로 설정할 수 있습니다. 이는 드래그 동작으로 제어되고 햅틱으로 보강된 뷰 애니메이션의 다음 예에서 확인할 수 있습니다.


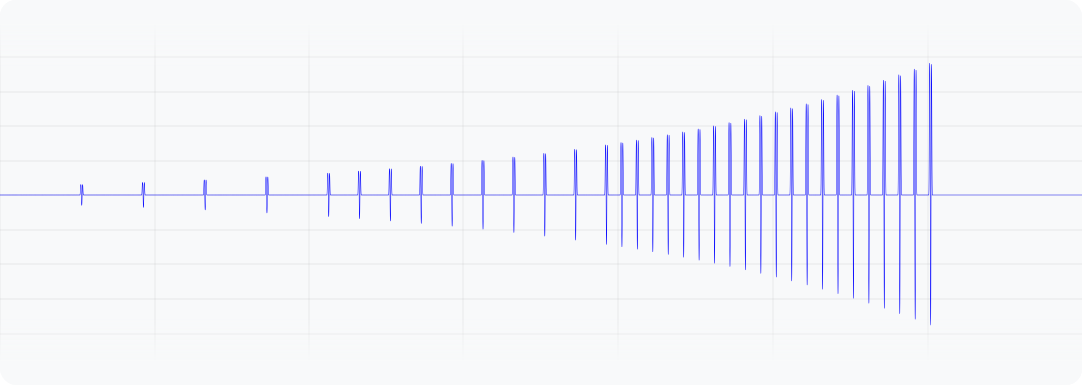
그림 1. 이 파형은 기기에서 진동의 출력 가속도를 나타냅니다.
Kotlin
@Composable
fun ResistScreen() {
    // Control variables for the dragging of the indicator.
    var isDragging by remember { mutableStateOf(false) }
    var dragOffset by remember { mutableStateOf(0f) }

    // Only vibrates while the user is dragging
    if (isDragging) {
        LaunchedEffect(Unit) {
        // Continuously run the effect for vibration to occur even when the view
        // is not being drawn, when user stops dragging midway through gesture.
        while (true) {
            // Calculate the interval inversely proportional to the drag offset.
            val vibrationInterval = calculateVibrationInterval(dragOffset)
            // Calculate the scale directly proportional to the drag offset.
            val vibrationScale = calculateVibrationScale(dragOffset)

            delay(vibrationInterval)
            vibrator.vibrate(
            VibrationEffect.startComposition().addPrimitive(
                VibrationEffect.Composition.PRIMITIVE_LOW_TICK,
                vibrationScale
            ).compose()
            )
        }
        }
    }

    Screen() {
        Column(
        Modifier
            .draggable(
            orientation = Orientation.Vertical,
            onDragStarted = {
                isDragging = true
            },
            onDragStopped = {
                isDragging = false
            },
            state = rememberDraggableState { delta ->
                dragOffset += delta
            }
            )
        ) {
        // Build the indicator UI based on how much the user has dragged it.
        ResistIndicator(dragOffset)
        }
    }
}
자바
class DragListener implements View.OnTouchListener {
    // Control variables for the dragging of the indicator.
    private int startY;
    private int vibrationInterval;
    private float vibrationScale;

    @Override
    public boolean onTouch(View view, MotionEvent event) {
        switch (event.getAction()) {
        case MotionEvent.ACTION_DOWN:
            startY = event.getRawY();
            vibrationInterval = calculateVibrationInterval(0);
            vibrationScale = calculateVibrationScale(0);
            startVibration();
            break;
        case MotionEvent.ACTION_MOVE:
            float dragOffset = event.getRawY() - startY;
            // Calculate the interval inversely proportional to the drag offset.
            vibrationInterval = calculateVibrationInterval(dragOffset);
            // Calculate the scale directly proportional to the drag offset.
            vibrationScale = calculateVibrationScale(dragOffset);
            // Build the indicator UI based on how much the user has dragged it.
            updateIndicator(dragOffset);
            break;
        case MotionEvent.ACTION_CANCEL:
        case MotionEvent.ACTION_UP:
            // Only vibrates while the user is dragging
            cancelVibration();
            break;
        }
        return true;
    }

    private void startVibration() {
        vibrator.vibrate(
            VibrationEffect.startComposition()
                .addPrimitive(VibrationEffect.Composition.PRIMITIVE_LOW_TICK,
                        vibrationScale)
                .compose());

        // Continuously run the effect for vibration to occur even when the view
        // is not being drawn, when user stops dragging midway through gesture.
        handler.postDelayed(this::startVibration, vibrationInterval);
    }

    private void cancelVibration() {
        handler.removeCallbacksAndMessages(null);
    }
}
확장 (상승 및 하강 포함)
지각된 진동 강도를 높이는 데는 두 가지 기본 요소가 있습니다. PRIMITIVE_QUICK_RISE 및 PRIMITIVE_SLOW_RISE입니다. 두 가지 모두 동일한 타겟에 도달하지만 기간은 다릅니다. 램프 다운에는 PRIMITIVE_QUICK_FALL이라는 기본 요소 하나만 있습니다. 이러한 프리미티브는 함께 작동하여 강도가 증가한 후 사라지는 파형 세그먼트를 만드는 데 더 적합합니다. 스케일링된 프리미티브를 정렬하여 프리미티브 간의 진폭이 갑자기 점프하는 것을 방지할 수 있으며, 이는 전체 효과 지속 시간을 연장하는 데도 효과적입니다.
사람들은 항상 하강하는 부분보다 상승하는 부분을 더 잘 인식하므로 상승하는 부분을 하강하는 부분보다 짧게 만들면 하강하는 부분에 더 중점을 둘 수 있습니다.
다음은 원을 확장하고 축소하기 위한 이 컴포지션의 적용 예입니다. 상승 효과는 애니메이션 중에 확장되는 느낌을 강화할 수 있습니다. 상승 및 하강 효과를 결합하면 애니메이션이 끝날 때 축소되는 것을 강조할 수 있습니다.


그림 2. 이 파형은 기기에서 진동의 출력 가속도를 나타냅니다.
Kotlin
enum class ExpandShapeState {
    Collapsed,
    Expanded
}

@Composable
fun ExpandScreen() {
    // Control variable for the state of the indicator.
    var currentState by remember { mutableStateOf(ExpandShapeState.Collapsed) }

    // Animation between expanded and collapsed states.
    val transitionData = updateTransitionData(currentState)

    Screen() {
        Column(
        Modifier
            .clickable(
            {
                if (currentState == ExpandShapeState.Collapsed) {
                currentState = ExpandShapeState.Expanded
                vibrator.vibrate(
                    VibrationEffect.startComposition().addPrimitive(
                    VibrationEffect.Composition.PRIMITIVE_SLOW_RISE,
                    0.3f
                    ).addPrimitive(
                    VibrationEffect.Composition.PRIMITIVE_QUICK_FALL,
                    0.3f
                    ).compose()
                )
                } else {
                currentState = ExpandShapeState.Collapsed
                vibrator.vibrate(
                    VibrationEffect.startComposition().addPrimitive(
                    VibrationEffect.Composition.PRIMITIVE_SLOW_RISE
                    ).compose()
                )
            }
            )
        ) {
        // Build the indicator UI based on the current state.
        ExpandIndicator(transitionData)
        }
    }
}
자바
class ClickListener implements View.OnClickListener {
    private final Animation expandAnimation;
    private final Animation collapseAnimation;
    private boolean isExpanded;

    ClickListener(Context context) {
        expandAnimation = AnimationUtils.loadAnimation(context, R.anim.expand);
        expandAnimation.setAnimationListener(new Animation.AnimationListener() {

        @Override
        public void onAnimationStart(Animation animation) {
            vibrator.vibrate(
            VibrationEffect.startComposition()
                .addPrimitive(
                    VibrationEffect.Composition.PRIMITIVE_SLOW_RISE, 0.3f)
                .addPrimitive(
                    VibrationEffect.Composition.PRIMITIVE_QUICK_FALL, 0.3f)
                .compose());
        }
        });

        collapseAnimation = AnimationUtils
                .loadAnimation(context, R.anim.collapse);
        collapseAnimation.setAnimationListener(new Animation.AnimationListener() {

            @Override
            public void onAnimationStart(Animation animation) {
                vibrator.vibrate(
                VibrationEffect.startComposition()
                    .addPrimitive(
                        VibrationEffect.Composition.PRIMITIVE_SLOW_RISE)
                    .compose());
            }
        });
    }

    @Override
    public void onClick(View view) {
        view.startAnimation(isExpanded ? collapseAnimation : expandAnimation);
        isExpanded = !isExpanded;
    }
}
흔들기 (회전 포함)
햅틱 원칙의 핵심 중 하나는 사용자를 즐겁게 하는 것입니다. PRIMITIVE_SPIN를 사용하면 즐겁고 예상치 못한 진동 효과를 도입할 수 있습니다. 이 기본 요소는 두 번 이상 호출될 때 가장 효과적입니다. 연속된 여러 회전은 흔들리고 불안정한 효과를 만들 수 있으며, 각 기본 도형에 다소 무작위적인 크기 조정을 적용하여 효과를 더욱 향상할 수 있습니다. 연속 스핀 원시 요소 간의 간격을 실험해 볼 수도 있습니다. 두 번의 회전 사이에 간격이 없으면 (0ms) 회전이 멈추지 않는 느낌을 줍니다. 회전 간 간격을 10에서 50밀리초로 늘리면 회전 감각이 더 느슨해지며 동영상이나 애니메이션의 지속 시간에 맞출 수 있습니다.
연속 회전이 더 이상 잘 통합되지 않고 개별 효과처럼 느껴지기 때문에 100ms보다 긴 간격을 사용하지 마세요.
다음은 아래로 드래그한 후 놓으면 다시 튀어 오르는 탄력적인 모양의 예입니다. 애니메이션은 바운스 변위에 비례하는 다양한 강도로 재생되는 두 개의 회전 효과로 향상됩니다.

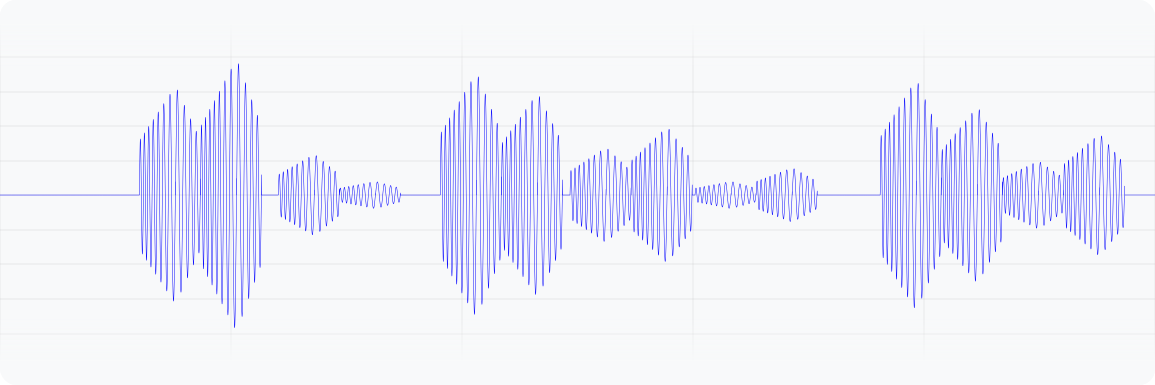
그림 3. 이 파형은 기기에서 진동의 출력 가속도를 나타냅니다.
Kotlin
@Composable
fun WobbleScreen() {
    // Control variables for the dragging and animating state of the elastic.
    var dragDistance by remember { mutableStateOf(0f) }
    var isWobbling by remember { mutableStateOf(false) }

    // Use drag distance to create an animated float value behaving like a spring.
    val dragDistanceAnimated by animateFloatAsState(
        targetValue = if (dragDistance > 0f) dragDistance else 0f,
        animationSpec = spring(
            dampingRatio = Spring.DampingRatioHighBouncy,
            stiffness = Spring.StiffnessMedium
        ),
    )

    if (isWobbling) {
        LaunchedEffect(Unit) {
            while (true) {
                val displacement = dragDistanceAnimated / MAX_DRAG_DISTANCE
                // Use some sort of minimum displacement so the final few frames
                // of animation don't generate a vibration.
                if (displacement > SPIN_MIN_DISPLACEMENT) {
                    vibrator.vibrate(
                        VibrationEffect.startComposition().addPrimitive(
                            VibrationEffect.Composition.PRIMITIVE_SPIN,
                            nextSpinScale(displacement)
                        ).addPrimitive(
                        VibrationEffect.Composition.PRIMITIVE_SPIN,
                        nextSpinScale(displacement)
                        ).compose()
                    )
                }
                // Delay the next check for a sufficient duration until the
                // current composition finishes. Note that you can use
                // Vibrator.getPrimitiveDurations API to calculcate the delay.
                delay(VIBRATION_DURATION)
            }
        }
    }

    Box(
        Modifier
            .fillMaxSize()
            .draggable(
                onDragStopped = {
                    isWobbling = true
                    dragDistance = 0f
                },
                orientation = Orientation.Vertical,
                state = rememberDraggableState { delta ->
                    isWobbling = false
                    dragDistance += delta
                }
            )
    ) {
        // Draw the wobbling shape using the animated spring-like value.
        WobbleShape(dragDistanceAnimated)
    }
}

// Calculate a random scale for each spin to vary the full effect.
fun nextSpinScale(displacement: Float): Float {
    // Generate a random offset in the range [-0.1, +0.1] to be added to the
    // vibration scale so the spin effects have slightly different values.
    val randomOffset: Float = Random.Default.nextFloat() * 0.2f - 0.1f
    return (displacement + randomOffset).absoluteValue.coerceIn(0f, 1f)
}
자바
class AnimationListener implements DynamicAnimation.OnAnimationUpdateListener {
    private final Random vibrationRandom = new Random(seed);
    private final long lastVibrationUptime;

    @Override
    public void onAnimationUpdate(
        DynamicAnimation animation, float value, float velocity) {
        // Delay the next check for a sufficient duration until the current
        // composition finishes. Note that you can use
        // Vibrator.getPrimitiveDurations API to calculcate the delay.
        if (SystemClock.uptimeMillis() - lastVibrationUptime < VIBRATION_DURATION) {
            return;
        }

        float displacement = calculateRelativeDisplacement(value);

        // Use some sort of minimum displacement so the final few frames
        // of animation don't generate a vibration.
        if (displacement < SPIN_MIN_DISPLACEMENT) {
            return;
        }

        lastVibrationUptime = SystemClock.uptimeMillis();
        vibrator.vibrate(
        VibrationEffect.startComposition()
            .addPrimitive(VibrationEffect.Composition.PRIMITIVE_SPIN,
            nextSpinScale(displacement))
            .addPrimitive(VibrationEffect.Composition.PRIMITIVE_SPIN,
            nextSpinScale(displacement))
            .compose());
    }

    // Calculate a random scale for each spin to vary the full effect.
    float nextSpinScale(float displacement) {
        // Generate a random offset in the range [-0.1,+0.1] to be added to
        // the vibration scale so the spin effects have slightly different
        // values.
        float randomOffset = vibrationRandom.nextFloat() * 0.2f - 0.1f
        return MathUtils.clamp(displacement + randomOffset, 0f, 1f)
    }
}
바운스 (쿵 소리)
진동 효과의 또 다른 고급 적용은 실제 상호작용을 시뮬레이션하는 것입니다. PRIMITIVE_THUD은 강력하고 울림이 있는 효과를 만들어낼 수 있으며, 예를 들어 동영상이나 애니메이션에서 충격 시각화와 결합하여 전반적인 경험을 강화할 수 있습니다.
다음은 공이 화면 하단에서 튕길 때마다 재생되는 쿵 소리 효과로 강화된 공 떨어뜨리기 애니메이션의 예입니다.


그림 4. 이 파형은 기기에서 진동의 출력 가속도를 나타냅니다.
Kotlin
enum class BallPosition {
    Start,
    End
}

@Composable
fun BounceScreen() {
    // Control variable for the state of the ball.
    var ballPosition by remember { mutableStateOf(BallPosition.Start) }
    var bounceCount by remember { mutableStateOf(0) }

    // Animation for the bouncing ball.
    var transitionData = updateTransitionData(ballPosition)
    val collisionData = updateCollisionData(transitionData)

    // Ball is about to contact floor, only vibrating once per collision.
    var hasVibratedForBallContact by remember { mutableStateOf(false) }
    if (collisionData.collisionWithFloor) {
        if (!hasVibratedForBallContact) {
        val vibrationScale = 0.7.pow(bounceCount++).toFloat()
        vibrator.vibrate(
            VibrationEffect.startComposition().addPrimitive(
            VibrationEffect.Composition.PRIMITIVE_THUD,
            vibrationScale
            ).compose()
        )
        hasVibratedForBallContact = true
        }
    } else {
        // Reset for next contact with floor.
        hasVibratedForBallContact = false
    }

    Screen() {
        Box(
        Modifier
            .fillMaxSize()
            .clickable {
            if (transitionData.isAtStart) {
                ballPosition = BallPosition.End
            } else {
                ballPosition = BallPosition.Start
                bounceCount = 0
            }
            },
        ) {
        // Build the ball UI based on the current state.
        BouncingBall(transitionData)
        }
    }
}
자바
class ClickListener implements View.OnClickListener {
    @Override
    public void onClick(View view) {
        view.animate()
        .translationY(targetY)
        .setDuration(3000)
        .setInterpolator(new BounceInterpolator())
        .setUpdateListener(new AnimatorUpdateListener() {

            boolean hasVibratedForBallContact = false;
            int bounceCount = 0;

            @Override
            public void onAnimationUpdate(ValueAnimator animator) {
            boolean valueBeyondThreshold = (float) animator.getAnimatedValue() > 0.98;
            if (valueBeyondThreshold) {
                if (!hasVibratedForBallContact) {
                float vibrationScale = (float) Math.pow(0.7, bounceCount++);
                vibrator.vibrate(
                    VibrationEffect.startComposition()
                    .addPrimitive(
                        VibrationEffect.Composition.PRIMITIVE_THUD,
                        vibrationScale)
                    .compose());
                hasVibratedForBallContact = true;
                }
            } else {
                // Reset for next contact with floor.
                hasVibratedForBallContact = false;
            }
            }
        });
    }
}
엔벨로프가 있는 진동 파형
맞춤 진동 패턴 만들기 프로세스를 사용하면 진동 진폭을 제어하여 부드러운 증감 효과를 만들 수 있습니다. 이 섹션에서는 시간 경과에 따른 진동 진폭과 주파수를 정밀하게 제어할 수 있는 파형 엔벨로프를 사용하여 동적 햅틱 효과를 만드는 방법을 설명합니다. 이를 통해 더 풍부하고 미묘한 햅틱 환경을 만들 수 있습니다.
Android 16 (API 수준 36)부터 시스템은 제어점 시퀀스를 정의하여 진동 파형 엔벨로프를 생성하는 다음 API를 제공합니다.
BasicEnvelopeBuilder: 하드웨어에 구애받지 않는 햅틱 효과를 만드는 접근성 높은 방법입니다.WaveformEnvelopeBuilder: 햅틱 효과를 만드는 고급 접근 방식입니다. 햅틱 하드웨어에 익숙해야 합니다.
Android는 엔벨로프 효과의 대체를 제공하지 않습니다. 이 지원이 필요한 경우 다음 단계를 완료하세요.
Vibrator.areEnvelopeEffectsSupported()를 사용하여 특정 기기가 엔벨로프 효과를 지원하는지 확인합니다.- 지원되지 않는 일관된 환경 세트를 사용 중지하거나 맞춤 진동 패턴 또는 컴포지션을 대체 옵션으로 사용합니다.
더 많은 기본 엔벨로프 효과를 만들려면 다음 매개변수와 함께 BasicEnvelopeBuilder를 사용하세요.
- \( [0, 1] \)범위의 intensity 값으로, 감지된 진동 강도를 나타냅니다. 예를 들어 \( 0.5 \)값은 기기에서 달성할 수 있는 전역 최대 강도의 절반으로 인식됩니다.
진동의 선명도를 나타내는 \( [0, 1] \)범위의 선명도 값입니다. 값이 낮을수록 진동이 부드러워지고 값이 높을수록 더 날카로운 느낌이 듭니다.
duration 값입니다. 이는 마지막 제어점(즉, 강도 및 선명도 쌍)에서 새 제어점으로 전환하는 데 걸린 시간을 밀리초 단위로 나타냅니다.
다음은 500ms에 걸쳐 낮은 음조에서 높은 음조, 최대 강도 진동으로 강도를 높인 다음 100ms에 걸쳐\( 0 \) (꺼짐)으로 다시 낮추는 파형의 예입니다.
vibrator.vibrate(VibrationEffect.BasicEnvelopeBuilder()
    .setInitialSharpness(0.0f)
    .addControlPoint(1.0f, 1.0f, 500)
    .addControlPoint(0.0f, 1.0f, 100)
    .build()
)
햅틱에 대한 고급 지식이 있는 경우 WaveformEnvelopeBuilder를 사용하여 엔벨로프 효과를 정의할 수 있습니다. 이 객체를 사용하면 VibratorFrequencyProfile을 통해 주파수-출력 가속 매핑 (FOAM)에 액세스할 수 있습니다.
- \( [0, 1] \)범위의 진폭 값으로, 기기 FOAM에 의해 결정된 특정 주파수에서 달성 가능한 진동 강도를 나타냅니다. 예를 들어 \( 0.5 \) 값은 지정된 주파수에서 달성할 수 있는 최대 출력 가속도의 절반을 생성합니다.
헤르츠로 지정된 주파수 값입니다.
duration 값으로, 마지막 제어 지점에서 새 제어 지점으로 전환하는 데 걸린 시간을 밀리초 단위로 나타냅니다.
다음 코드는 400ms 진동 효과를 정의하는 파형의 예를 보여줍니다. 60Hz의 일정한 주파수에서 꺼짐에서 최대로 50ms 진폭 램프로 시작합니다. 그런 다음 주파수가 다음 100ms에 걸쳐 120Hz로 램프업되고 200ms 동안 해당 수준으로 유지됩니다. 마지막으로 진폭이 \( 0 \)로 램프다운되고 주파수가 마지막 50ms에 걸쳐 60Hz로 돌아갑니다.
vibrator.vibrate(VibrationEffect.WaveformEnvelopeBuilder()
    .addControlPoint(1.0f, 60f, 50)
    .addControlPoint(1.0f, 120f, 100)
    .addControlPoint(1.0f, 120f, 200)
    .addControlPoint(0.0f, 60f, 50)
    .build()
)
다음 섹션에서는 엔벨로프가 있는 진동 파형의 몇 가지 예를 제공합니다.
통통 튀는 스프링
이전 샘플에서는 PRIMITIVE_THUD를 사용하여 물리적 바운스 상호작용을 시뮬레이션합니다. 기본 엔벨로프 API는 훨씬 더 세밀한 제어를 제공하여 진동 강도와 선명도를 정확하게 조정할 수 있습니다.
이렇게 하면 애니메이션 이벤트를 더 정확하게 따르는 햅틱 반응이 생성됩니다.
다음은 화면 하단에서 스프링이 튕길 때마다 기본 엔벨로프 효과로 애니메이션이 강화된 자유 낙하 스프링의 예입니다.


그림 5. 튀는 스프링을 시뮬레이션하는 진동의 출력 가속 파형 그래프
@Composable
fun BouncingSpringAnimation() {
  var springX by remember { mutableStateOf(SPRING_WIDTH) }
  var springY by remember { mutableStateOf(SPRING_HEIGHT) }
  var velocityX by remember { mutableFloatStateOf(INITIAL_VELOCITY) }
  var velocityY by remember { mutableFloatStateOf(INITIAL_VELOCITY) }
  var sharpness by remember { mutableFloatStateOf(INITIAL_SHARPNESS) }
  var intensity by remember { mutableFloatStateOf(INITIAL_INTENSITY) }
  var multiplier by remember { mutableFloatStateOf(INITIAL_MULTIPLIER) }
  var bottomBounceCount by remember { mutableIntStateOf(0) }
  var animationStartTime by remember { mutableLongStateOf(0L) }
  var isAnimating by remember { mutableStateOf(false) }

  val (screenHeight, screenWidth) = getScreenDimensions(context)

  LaunchedEffect(isAnimating) {
    animationStartTime = System.currentTimeMillis()
    isAnimating = true

    while (isAnimating) {
      velocityY += GRAVITY
      springX += velocityX.dp
      springY += velocityY.dp

      // Handle bottom collision
      if (springY > screenHeight - FLOOR_HEIGHT - SPRING_HEIGHT / 2) {
        // Set the spring's y-position to the bottom bounce point, to keep it
        // above the floor.
        springY = screenHeight - FLOOR_HEIGHT - SPRING_HEIGHT / 2

        // Reverse the vertical velocity and apply damping to simulate a bounce.
        velocityY *= -BOUNCE_DAMPING
        bottomBounceCount++

        // Calculate the fade-out duration of the vibration based on the
        // vertical velocity.
        val fadeOutDuration =
            ((abs(velocityY) / GRAVITY) * FRAME_DELAY_MS).toLong()

        // Create a "boing" envelope vibration effect that fades out.
        vibrator.vibrate(
            VibrationEffect.BasicEnvelopeBuilder()
                // Starting from zero sharpness here, will simulate a smoother
                // "boing" effect.
                .setInitialSharpness(0f)

                // Add a control point to reach the target intensity and
                // sharpness very quickly.
                .addControlPoint(intensity, sharpness, 20L)

                // Add a control point to fade out the vibration intensity while
                // maintaining sharpness.
                .addControlPoint(0f, sharpness, fadeOutDuration)
                .build()
        )

        // Decrease the intensity and sharpness of the vibration for subsequent
        // bounces, and reduce the multiplier to create a fading effect.
        intensity *= multiplier
        sharpness *= multiplier
        multiplier -= 0.1f
      }

      if (springX > screenWidth - SPRING_WIDTH / 2) {
        // Prevent the spring from moving beyond the right edge of the screen.
        springX = screenWidth - SPRING_WIDTH / 2
      }

      // Check for 3 bottom bounces and then slow down.
      if (bottomBounceCount >= MAX_BOTTOM_BOUNCE &&
            System.currentTimeMillis() - animationStartTime > 1000) {
        velocityX *= 0.9f
        velocityY *= 0.9f
      }

      delay(FRAME_DELAY_MS) // Control animation speed.

      // Determine if the animation should continue based on the spring's
      // position and velocity.
      isAnimating = (springY < screenHeight + SPRING_HEIGHT ||
            springX < screenWidth + SPRING_WIDTH)
        && (velocityX >= 0.1f || velocityY >= 0.1f)
    }
  }

  Box(
    modifier = Modifier
      .fillMaxSize()
      .noRippleClickable {
        if (!isAnimating) {
          resetAnimation()
        }
      }
      .width(screenWidth)
      .height(screenHeight)
  ) {
    DrawSpring(mutableStateOf(springX), mutableStateOf(springY))
    DrawFloor()
    if (!isAnimating) {
      DrawText("Tap to restart")
    }
  }
}
로켓 발사
이전 샘플에서는 기본 엔벨로프 API를 사용하여 탄력 있는 스프링 반응을 시뮬레이션하는 방법을 보여줍니다. WaveformEnvelopeBuilder는 기기의 전체 주파수 범위를 정밀하게 제어할 수 있도록 지원하여 고도로 맞춤설정된 햅틱 효과를 지원합니다. 이를 FOAM 데이터와 결합하면 진동을 특정 주파수 기능에 맞게 조정할 수 있습니다.
다음은 동적 진동 패턴을 사용하여 로켓 발사 시뮬레이션을 보여주는 예입니다. 효과는 지원되는 최소 주파수 가속도 출력인 0.1G에서 공진 주파수까지 이동하며 항상 10% 진폭 입력을 유지합니다. 이렇게 하면 구동 진폭이 동일하더라도 효과가 적당히 강한 출력으로 시작하고 인지된 강도와 선명도를 높일 수 있습니다. 공명에 도달하면 효과 주파수가 최소값으로 다시 내려가며, 이는 강도와 선명도가 내려가는 것으로 인식됩니다. 이렇게 하면 우주로 발사되는 것을 모방하여 초기 저항 후 해제되는 느낌이 생성됩니다.
기본 엔벨로프 API는 공진 주파수와 출력 가속도 곡선에 관한 기기별 정보를 추상화하므로 이러한 효과를 낼 수 없습니다. 선명도를 높이면 등가 주파수가 공진을 넘어설 수 있어 의도하지 않은 가속도 감소가 발생할 수 있습니다.


그림 6. 로켓 발사를 시뮬레이션하는 진동의 출력 가속 파형 그래프
@Composable
fun RocketLaunchAnimation() {
  val context = LocalContext.current
  val screenHeight = remember { mutableFloatStateOf(0f) }
  var rocketPositionY by remember { mutableFloatStateOf(0f) }
  var isLaunched by remember { mutableStateOf(false) }
  val animation = remember { Animatable(0f) }

  val animationDuration = 3000
  LaunchedEffect(isLaunched) {
    if (isLaunched) {
      animation.animateTo(
        1.2f, // Overshoot so that the rocket goes off the screen.
        animationSpec = tween(
          durationMillis = animationDuration,
          // Applies an easing curve with a slow start and rapid acceleration
          // towards the end.
          easing = CubicBezierEasing(1f, 0f, 0.75f, 1f)
        )
      ) {
        rocketPositionY = screenHeight.floatValue * value
      }
      animation.snapTo(0f)
      rocketPositionY = 0f;
      isLaunched = false;
    }
  }

  Box(
    modifier = Modifier
      .fillMaxSize()
      .noRippleClickable {
        if (!isLaunched) {
          // Play vibration with same duration as the animation, using 70% of
          // the time for the rise of the vibration, to match the easing curve
          // defined previously.
          playVibration(vibrator, animationDuration, 0.7f)
          isLaunched = true
        }
      }
      .background(Color(context.getColor(R.color.background)))
      .onSizeChanged { screenHeight.floatValue = it.height.toFloat() }
  ) {
    drawRocket(rocketPositionY)
  }
}

private fun playVibration(
  vibrator: Vibrator,
  totalDurationMs: Long,
  riseBias: Float,
  minOutputAccelerationGs: Float = 0.1f,
) {
  require(riseBias in 0f..1f) { "Rise bias must be between 0 and 1." }

  if (!vibrator.areEnvelopeEffectsSupported()) {
    return
  }

  val resonantFrequency = vibrator.resonantFrequency
  if (resonantFrequency.isNaN()) {
    // Device doesn't have or expose a resonant frequency.
    return
  }

  val startFrequency = vibrator.frequencyProfile?.getFrequencyRange(minOutputAccelerationGs)?.lower ?: return

  if (startFrequency >= resonantFrequency) {
    // Vibrator can't generate the minimum required output at lower frequencies.
    return
  }

  val minDurationMs = vibrator.envelopeEffectInfo.minControlPointDurationMillis
  val rampUpDurationMs = (riseBias * totalDurationMs).toLong() - minDurationMs
  val rampDownDurationMs = totalDurationMs - rampUpDuration - minDurationMs

  vibrator.vibrate(
    VibrationEffect.WaveformEnvelopeBuilder()
      // Quickly reach the target output at the start frequency
      .addControlPoint(0.1f, startFrequency, minDurationMs)
      .addControlPoint(0.1f, resonantFrequency, rampUpDurationMs)
      .addControlPoint(0.1f, startFrequency, rampDownDurationMs)

      // Controlled ramp down to zero to avoid ringing after the vibration.
      .addControlPoint(0.0f, startFrequency, minDurationMs)
      .build()
  )
}
LavaBeats
로켓 발사 예와 마찬가지로 WaveformEnvelopeBuilder API를 사용하면 진동에서 진폭 및 주파수 세그먼트를 제어할 수 있으므로 복잡한 햅틱 효과를 많이 설계할 수 있습니다. 이러한 설계의 또 다른 예는 '생동감'과 같은 더 추상적인 물리적 감각의 에뮬레이션입니다.
이는 특정 진폭과 주파수의 진동 세그먼트로 일반적인 심전도 (ECG) 신호의 생체 지표를 나타냄으로써 달성할 수 있습니다. LavaBeats는 ECG 기록의 두 가지 특징적인 세그먼트가 시간 지연으로 구분된 두 개의 펄스로 표현되는 예입니다. 첫 번째 특징적인 맥박은 QRS 복합체로, 진폭이 크고 지속 시간이 짧은 날카로운 피크로 표시됩니다. 두 번째 맥박은 T파로, 진폭이 낮고 지속 시간이 길며 모양이 더 부드럽습니다 (그림 7 참고).
WaveformEnvelopeBuilder를 사용하여 고정된 첫 번째-두 번째 펄스 지연으로 분리된 이 두 펄스의 다양한 반복을 구성합니다. 첫 번째 펄스는 짧은 시간 동안 낮은 주파수에서 시작하여 높은 주파수로 끝나는 처프 신호일 수 있습니다. 두 번째 펄스는 저주파 사인파의 단일 기간으로 표현할 수 있습니다. 두 개의 펄스를 비트로 구성하고, 비트 사이의 지연을 사용하여 구성을 여러 번 반복할 수 있습니다. 이는 일반적인 분당 비트 수 (bpm)를 따릅니다. 그 결과 심장이 뛰는 것과 유사한 햅틱 효과가 나타납니다.
GitHub의 햅틱 샘플 앱에서 LavaBeats을 사용해 보세요. 햅틱 효과와 동일한 리듬으로 움직이는 용암 램프 시각화와 함께 효과를 느낄 수 있습니다. 두 펄스의 진폭, 주파수, 지속 시간, 지연을 수정하여 다양한 비트 감각을 만들도록 효과 설정을 변경할 수도 있습니다.


그림 7. QRS 복합체와 T파가 있는 ECG 녹화 세그먼트
@RequiresApi(Build.VERSION_CODES.BAKLAVA)
private fun createEnvelopeEffect(
beatParameters: List<BeatParameter>
):VibrationEffect =
    VibrationEffect.WaveformEnvelopeBuilder()
        .apply {
            repeat(beatParameters.getNumBeats()) {
                // First pulse chirp
                addControlPoint(
                    beatParameters.getFirstPulseAmplitude(),
                    beatParameters.getFirstPulseStartFreq(),
                    ENVELOPE_RAMP_DURATION_MILLIS,
                )
                addControlPoint(
                    beatParameters.getFirstPulseAmplitude(),
                    beatParameters.getFirstPulseEndFreq(),
                    beatParameters.getFirstPulseDurationMillis().toLong(),
                )
                addControlPoint(
                    0f,
                    beatParameters.getFirstPulseEndFreq(),
                    ENVELOPE_RAMP_DURATION_MILLIS,
                )

                // Delay between first and second pulse
                addControlPoint(
                    0f,
                    beatParameters.getFirstPulseEndFreq(),
                    beatParameters.getFirstToSecondPulseDelayMillis().toLong(),
                )

                // Second pulse
                addControlPoint(
                    beatParameters.getSecondPulseAmplitude(),
                    beatParameters.getSecondPulseFreq(),
                    ENVELOPE_RAMP_DURATION_MILLIS,
                )
                addControlPoint(
                    beatParameters.getSecondPulseAmplitude(),
                    beatParameters.getSecondPulseFreq(),
                    (1_000 / (2f * beatParameters.getSecondPulseFreq())).toLong(),
                )
                addControlPoint(
                    0f,
                    beatParameters.getSecondPulseFreq(),
                    ENVELOPE_RAMP_DURATION_MILLIS,
                )
                addControlPoint(
                    0f,
                    beatParameters.getSecondPulseFreq(),
                    beatParameters.getBeatDelayMillis().toLong(),
                )
            }
        }
        .build()

/** A parameter of a haptic beat effect that represents an ECG signal parameter */
@Stable
data class BeatParameter(
    val description: String = "",
    val value: Float = 0f,
    val range: ClosedFloatingPointRange<Float> = 0f..1f,
    val steps: Int = 0,
    val isFrequencyType: Boolean = false,
)