
A dialog is a small window that prompts the user to make a decision or enter additional information. A dialog doesn't fill the screen and is normally used for modal events that require users to take an action before they can proceed.

The Dialog
class is the base class for dialogs, but don't instantiate Dialog
directly. Instead, use one of the following subclasses:
AlertDialog- A dialog that can show a title, up to three buttons, a list of selectable items, or a custom layout.
DatePickerDialogorTimePickerDialog- A dialog with a predefined UI that lets the user select a date or time.
These classes define the style and structure for your dialog. You also need
a
DialogFragment
as a container for your dialog. The DialogFragment class provides
all the controls you need to create your dialog and manage its appearance,
instead of calling methods on the Dialog object.
Using DialogFragment to manage the dialog makes it correctly
handle lifecycle events such as when the user taps the Back button or rotates
the screen. The DialogFragment class also lets you reuse the
dialog's UI as an embeddable component in a larger UI—just like a
traditional
Fragment—such
as when you want the dialog UI to appear differently on large and small
screens.
The following sections in this document describe how to use a
DialogFragment in combination with an AlertDialog
object. If you want to create a date or time picker, read
Add pickers to your
app.
Create a dialog fragment
You can accomplish a wide variety of dialog designs—including custom
layouts and those described in
Material Design
Dialogs—by extending DialogFragment and creating an
AlertDialog in the
onCreateDialog()
callback method.
For example, here's a basic AlertDialog that's managed within a
DialogFragment:
Kotlin
class StartGameDialogFragment : DialogFragment() {
    override fun onCreateDialog(savedInstanceState: Bundle?): Dialog {
        return activity?.let {
            // Use the Builder class for convenient dialog construction.
            val builder = AlertDialog.Builder(it)
            builder.setMessage("Start game")
                .setPositiveButton("Start") { dialog, id ->
                    // START THE GAME!
                }
                .setNegativeButton("Cancel") { dialog, id ->
                    // User cancelled the dialog.
                }
            // Create the AlertDialog object and return it.
            builder.create()
        } ?: throw IllegalStateException("Activity cannot be null")
    }
}

class OldXmlActivity : AppCompatActivity() {
    override fun onCreate(savedInstanceState: Bundle?) {
        super.onCreate(savedInstanceState)
        setContentView(R.layout.activity_old_xml)

        StartGameDialogFragment().show(supportFragmentManager, "GAME_DIALOG")
    }
}
Java
public class StartGameDialogFragment extends DialogFragment {
    @Override
    public Dialog onCreateDialog(Bundle savedInstanceState) {
        // Use the Builder class for convenient dialog construction.
        AlertDialog.Builder builder = new AlertDialog.Builder(getActivity());
        builder.setMessage(R.string.dialog_start_game)
               .setPositiveButton(R.string.start, new DialogInterface.OnClickListener() {
                   public void onClick(DialogInterface dialog, int id) {
                       // START THE GAME!
                   }
               })
               .setNegativeButton(R.string.cancel, new DialogInterface.OnClickListener() {
                   public void onClick(DialogInterface dialog, int id) {
                       // User cancels the dialog.
                   }
               });
        // Create the AlertDialog object and return it.
        return builder.create();
    }
}
// ...

StartGameDialogFragment().show(supportFragmentManager, "GAME_DIALOG");
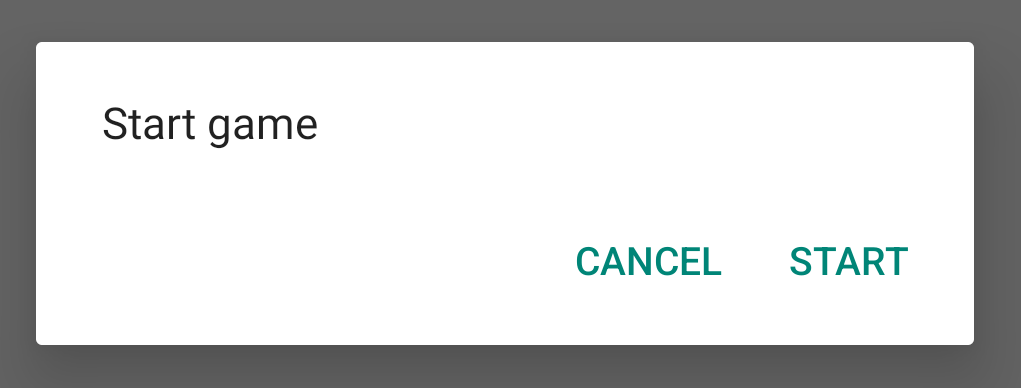
When you create an instance of this class and call
show()
on that object, the dialog appears as shown in the following figure.
The next section provides more detail about using the
AlertDialog.Builder
APIs to create the dialog.
Depending on how complex your dialog is, you can implement a variety of
other callback methods in the DialogFragment, including all the
basic fragment lifecycle methods.
Build an alert dialog
The AlertDialog class lets you build a variety of dialog
designs and is often the only dialog class you need. As shown in the following
figure, there are three regions of an alert dialog:
- Title: this is optional and only used when the content area is occupied by a detailed message, list, or custom layout. If you need to state a simple message or question, you don't need a title.
- Content area: this can display a message, list, or other custom layout.
- Action buttons: there can be up to three action buttons in a dialog.
The AlertDialog.Builder class provides APIs that let you create
an AlertDialog with these kinds of content, including a custom
layout.
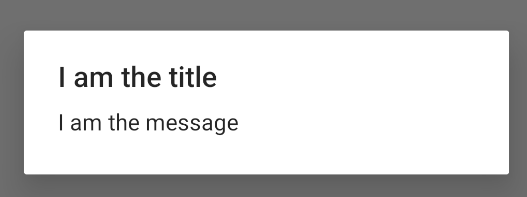
To build an AlertDialog, do the following:
Kotlin
val builder: AlertDialog.Builder = AlertDialog.Builder(context)
builder
    .setMessage("I am the message")
    .setTitle("I am the title")

val dialog: AlertDialog = builder.create()
dialog.show()
Java
// 1. Instantiate an AlertDialog.Builder with its constructor.
AlertDialog.Builder builder = new AlertDialog.Builder(getActivity());

// 2. Chain together various setter methods to set the dialog characteristics.
builder.setMessage(R.string.dialog_message)
       .setTitle(R.string.dialog_title);

// 3. Get the AlertDialog.
AlertDialog dialog = builder.create();
The previous code snippet generates this dialog:
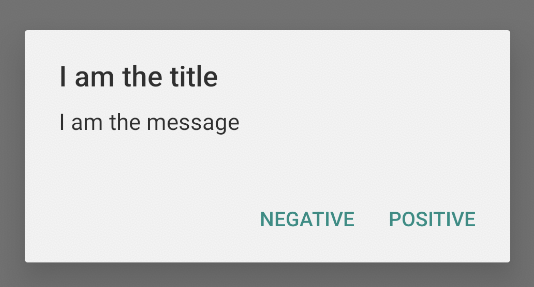
Add buttons
To add action buttons like those in figure 2, call the
setPositiveButton()
and
setNegativeButton()
methods:
Kotlin
val builder: AlertDialog.Builder = AlertDialog.Builder(context)
builder
    .setMessage("I am the message")
    .setTitle("I am the title")
    .setPositiveButton("Positive") { dialog, which ->
        // Do something.
    }
    .setNegativeButton("Negative") { dialog, which ->
        // Do something else.
    }

val dialog: AlertDialog = builder.create()
dialog.show()
Java
AlertDialog.Builder builder = new AlertDialog.Builder(getActivity());
// Add the buttons.
builder.setPositiveButton(R.string.ok, new DialogInterface.OnClickListener() {
           public void onClick(DialogInterface dialog, int id) {
               // User taps OK button.
           }
       });
builder.setNegativeButton(R.string.cancel, new DialogInterface.OnClickListener() {
           public void onClick(DialogInterface dialog, int id) {
               // User cancels the dialog.
           }
       });
// Set other dialog properties.
...

// Create the AlertDialog.
AlertDialog dialog = builder.create();
The set...Button() methods require a title for the
button—supplied by a
string resource—and
a
DialogInterface.OnClickListener
that defines the action to take when the user taps the button.
There are three action buttons you can add:
- Positive: use this to accept and continue with the action (the "OK" action).
- Negative: use this to cancel the action.
- Neutral: use this when the user might not want to proceed with the action but doesn't necessarily want to cancel. It appears between the positive and negative buttons. For example, the action might be "Remind me later."
You can add only one of each button type to an AlertDialog. For
example, you can't have more than one "positive" button.
The previous code snippet gives you an alert dialog like the following:
Add a list
There are three kinds of lists available with the AlertDialog
APIs:
- A traditional single-choice list.
- A persistent single-choice list (radio buttons).
- A persistent multiple-choice list (checkboxes).
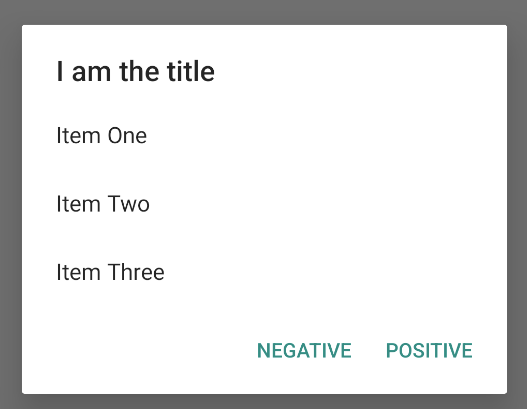
To create a single-choice list like the one in figure 5, use the
setItems()
method:
Kotlin
val builder: AlertDialog.Builder = AlertDialog.Builder(context)
builder
    .setTitle("I am the title")
    .setPositiveButton("Positive") { dialog, which ->
        // Do something.
    }
    .setNegativeButton("Negative") { dialog, which ->
        // Do something else.
    }
    .setItems(arrayOf("Item One", "Item Two", "Item Three")) { dialog, which ->
        // Do something on item tapped.
    }

val dialog: AlertDialog = builder.create()
dialog.show()
Java
@Override
public Dialog onCreateDialog(Bundle savedInstanceState) {
    AlertDialog.Builder builder = new AlertDialog.Builder(getActivity());
    builder.setTitle(R.string.pick_color)
           .setItems(R.array.colors_array, new DialogInterface.OnClickListener() {
               public void onClick(DialogInterface dialog, int which) {
               // The 'which' argument contains the index position of the selected item.
           }
    });
    return builder.create();
}
This code snippet generates a dialog like the following:
Because the list appears in the dialog's content area, the dialog can't show
both a message and a list. Set a title for the dialog with
setTitle().
To specify the items for the list, call setItems(), passing an
array. Alternatively, you can specify a list using
setAdapter().
This lets you back the list with dynamic data—such as from a
database—using a
ListAdapter.
If you back your list with a ListAdapter, always use a
Loader
so that the content loads asynchronously. This is described further in
Build layouts
with an adapter and
Loaders.
Add a persistent multiple-choice or single-choice list
To add a list of multiple-choice items (checkboxes) or single-choice items
(radio buttons), use the
setMultiChoiceItems()
or
setSingleChoiceItems()
methods, respectively.
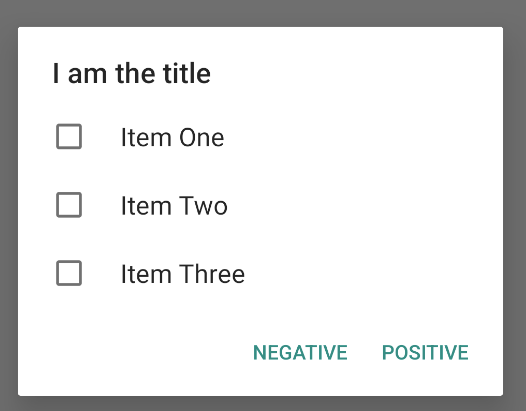
For example, here's how you can create a multiple-choice list like the one
shown in figure 6 that saves the selected items in an
ArrayList:
Kotlin
val builder: AlertDialog.Builder = AlertDialog.Builder(context)
builder
    .setTitle("I am the title")
    .setPositiveButton("Positive") { dialog, which ->
        // Do something.
    }
    .setNegativeButton("Negative") { dialog, which ->
        // Do something else.
    }
    .setMultiChoiceItems(
        arrayOf("Item One", "Item Two", "Item Three"), null) { dialog, which, isChecked ->
        // Do something.
    }

val dialog: AlertDialog = builder.create()
dialog.show()
Java
@Override
public Dialog onCreateDialog(Bundle savedInstanceState) {
    selectedItems = new ArrayList();  // Where we track the selected items
    AlertDialog.Builder builder = new AlertDialog.Builder(getActivity());
    // Set the dialog title.
    builder.setTitle(R.string.pick_toppings)
    // Specify the list array, the items to be selected by default (null for
    // none), and the listener through which to receive callbacks when items
    // are selected.
           .setMultiChoiceItems(R.array.toppings, null,
                      new DialogInterface.OnMultiChoiceClickListener() {
               @Override
               public void onClick(DialogInterface dialog, int which,
                       boolean isChecked) {
                   if (isChecked) {
                       // If the user checks the item, add it to the selected
                       // items.
                       selectedItems.add(which);
                   } else if (selectedItems.contains(which)) {
                       // If the item is already in the array, remove it.
                       selectedItems.remove(which);
                   }
               }
           })
    // Set the action buttons
           .setPositiveButton(R.string.ok, new DialogInterface.OnClickListener() {
               @Override
               public void onClick(DialogInterface dialog, int id) {
                   // User taps OK, so save the selectedItems results
                   // somewhere or return them to the component that opens the
                   // dialog.
                   ...
               }
           })
           .setNegativeButton(R.string.cancel, new DialogInterface.OnClickListener() {
               @Override
               public void onClick(DialogInterface dialog, int id) {
                   ...
               }
           });

    return builder.create();
}
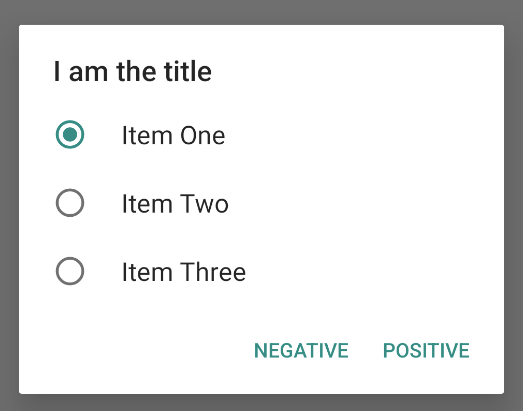
A single-choice alert dialog can be obtained like this:
Kotlin
val builder: AlertDialog.Builder = AlertDialog.Builder(context)
builder
    .setTitle("I am the title")
    .setPositiveButton("Positive") { dialog, which ->
        // Do something.
    }
    .setNegativeButton("Negative") { dialog, which ->
        // Do something else.
    }
    .setSingleChoiceItems(
        arrayOf("Item One", "Item Two", "Item Three"), 0
    ) { dialog, which ->
        // Do something.
    }

val dialog: AlertDialog = builder.create()
dialog.show()
Java
        String[] choices = {"Item One", "Item Two", "Item Three"};

        AlertDialog.Builder builder = AlertDialog.Builder(context);
        builder
                .setTitle("I am the title")
                .setPositiveButton("Positive", (dialog, which) -> {

                })
                .setNegativeButton("Negative", (dialog, which) -> {

                })
                .setSingleChoiceItems(choices, 0, (dialog, which) -> {

                });

        AlertDialog dialog = builder.create();
        dialog.show();
This results in the following example:
Create a custom layout
If you want a custom layout in a dialog, create a layout and add it to an
AlertDialog by calling
setView()
on your AlertDialog.Builder object.
By default, the custom layout fills the dialog window, but you can still use
AlertDialog.Builder methods to add buttons and a title.
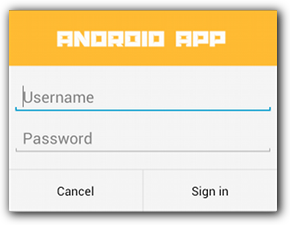
For example, here's the layout file for the preceding custom dialog layout:
res/layout/dialog_signin.xml
<LinearLayout xmlns:android="http://schemas.android.com/apk/res/android"
    android:orientation="vertical"
    android:layout_width="wrap_content"
    android:layout_height="wrap_content">
    <ImageView
        android:src="@drawable/header_logo"
        android:layout_width="match_parent"
        android:layout_height="64dp"
        android:scaleType="center"
        android:background="#FFFFBB33"
        android:contentDescription="@string/app_name" />
    <EditText
        android:id="@+id/username"
        android:inputType="textEmailAddress"
        android:layout_width="match_parent"
        android:layout_height="wrap_content"
        android:layout_marginTop="16dp"
        android:layout_marginLeft="4dp"
        android:layout_marginRight="4dp"
        android:layout_marginBottom="4dp"
        android:hint="@string/username" />
    <EditText
        android:id="@+id/password"
        android:inputType="textPassword"
        android:layout_width="match_parent"
        android:layout_height="wrap_content"
        android:layout_marginTop="4dp"
        android:layout_marginLeft="4dp"
        android:layout_marginRight="4dp"
        android:layout_marginBottom="16dp"
        android:fontFamily="sans-serif"
        android:hint="@string/password"/>
</LinearLayout>
To inflate the layout in your DialogFragment, get a
LayoutInflater
with
getLayoutInflater()
and call
inflate().
The first parameter is the layout resource ID, and the second parameter is a
parent view for the layout. You can then call
setView()
to place the layout in the dialog. This is shown in the following example.
Kotlin
override fun onCreateDialog(savedInstanceState: Bundle?): Dialog {
    return activity?.let {
        val builder = AlertDialog.Builder(it)
        // Get the layout inflater.
        val inflater = requireActivity().layoutInflater;

        // Inflate and set the layout for the dialog.
        // Pass null as the parent view because it's going in the dialog
        // layout.
        builder.setView(inflater.inflate(R.layout.dialog_signin, null))
                // Add action buttons.
                .setPositiveButton(R.string.signin,
                        DialogInterface.OnClickListener { dialog, id ->
                            // Sign in the user.
                        })
                .setNegativeButton(R.string.cancel,
                        DialogInterface.OnClickListener { dialog, id ->
                            getDialog().cancel()
                        })
        builder.create()
    } ?: throw IllegalStateException("Activity cannot be null")
}
Java
@Override
public Dialog onCreateDialog(Bundle savedInstanceState) {
    AlertDialog.Builder builder = new AlertDialog.Builder(getActivity());
    // Get the layout inflater.
    LayoutInflater inflater = requireActivity().getLayoutInflater();

    // Inflate and set the layout for the dialog.
    // Pass null as the parent view because it's going in the dialog layout.
    builder.setView(inflater.inflate(R.layout.dialog_signin, null))
    // Add action buttons
           .setPositiveButton(R.string.signin, new DialogInterface.OnClickListener() {
               @Override
               public void onClick(DialogInterface dialog, int id) {
                   // Sign in the user.
               }
           })
           .setNegativeButton(R.string.cancel, new DialogInterface.OnClickListener() {
               public void onClick(DialogInterface dialog, int id) {
                   LoginDialogFragment.this.getDialog().cancel();
               }
           });
    return builder.create();
}
If you want a custom dialog, you can instead display an
Activity as a
dialog instead of using the Dialog APIs. Create an activity and
set its theme to
Theme.Holo.Dialog
in the
<activity>
manifest element:
<activity android:theme="@android:style/Theme.Holo.Dialog" >
The activity now displays in a dialog window instead of fullscreen.
Pass events back to the dialog's host
When the user taps one of the dialog's action buttons or selects an item
from its list, your DialogFragment might perform the necessary
action itself, but often you want to deliver the event to the activity or
fragment that opens the dialog. To do this, define an interface with a method
for each type of click event. Then, implement that interface in the host
component that receives the action events from the dialog.
For example, here's a DialogFragment that defines an interface
through which it delivers the events back to the host activity:
Kotlin
class NoticeDialogFragment : DialogFragment() {
    // Use this instance of the interface to deliver action events.
    internal lateinit var listener: NoticeDialogListener

    // The activity that creates an instance of this dialog fragment must
    // implement this interface to receive event callbacks. Each method passes
    // the DialogFragment in case the host needs to query it.
    interface NoticeDialogListener {
        fun onDialogPositiveClick(dialog: DialogFragment)
        fun onDialogNegativeClick(dialog: DialogFragment)
    }

    // Override the Fragment.onAttach() method to instantiate the
    // NoticeDialogListener.
    override fun onAttach(context: Context) {
        super.onAttach(context)
        // Verify that the host activity implements the callback interface.
        try {
            // Instantiate the NoticeDialogListener so you can send events to
            // the host.
            listener = context as NoticeDialogListener
        } catch (e: ClassCastException) {
            // The activity doesn't implement the interface. Throw exception.
            throw ClassCastException((context.toString() +
                    " must implement NoticeDialogListener"))
        }
    }
}
Java
public class NoticeDialogFragment extends DialogFragment {

    // The activity that creates an instance of this dialog fragment must
    // implement this interface to receive event callbacks. Each method passes
    // the DialogFragment in case the host needs to query it.
    public interface NoticeDialogListener {
        public void onDialogPositiveClick(DialogFragment dialog);
        public void onDialogNegativeClick(DialogFragment dialog);
    }

    // Use this instance of the interface to deliver action events.
    NoticeDialogListener listener;

    // Override the Fragment.onAttach() method to instantiate the
    // NoticeDialogListener.
    @Override
    public void onAttach(Context context) {
        super.onAttach(context);
        // Verify that the host activity implements the callback interface.
        try {
            // Instantiate the NoticeDialogListener so you can send events to
            // the host.
            listener = (NoticeDialogListener) context;
        } catch (ClassCastException e) {
            // The activity doesn't implement the interface. Throw exception.
            throw new ClassCastException(activity.toString()
                    + " must implement NoticeDialogListener");
        }
    }
    ...
}
The activity hosting the dialog creates an instance of the dialog with the
dialog fragment's constructor and receives the dialog's events through an
implementation of the NoticeDialogListener interface:
Kotlin
class MainActivity : FragmentActivity(),
        NoticeDialogFragment.NoticeDialogListener {

    fun showNoticeDialog() {
        // Create an instance of the dialog fragment and show it.
        val dialog = NoticeDialogFragment()
        dialog.show(supportFragmentManager, "NoticeDialogFragment")
    }

    // The dialog fragment receives a reference to this Activity through the
    // Fragment.onAttach() callback, which it uses to call the following
    // methods defined by the NoticeDialogFragment.NoticeDialogListener
    // interface.
    override fun onDialogPositiveClick(dialog: DialogFragment) {
        // User taps the dialog's positive button.
    }

    override fun onDialogNegativeClick(dialog: DialogFragment) {
        // User taps the dialog's negative button.
    }
}
Java
public class MainActivity extends FragmentActivity
                          implements NoticeDialogFragment.NoticeDialogListener{
    ...
    public void showNoticeDialog() {
        // Create an instance of the dialog fragment and show it.
        DialogFragment dialog = new NoticeDialogFragment();
        dialog.show(getSupportFragmentManager(), "NoticeDialogFragment");
    }

    // The dialog fragment receives a reference to this Activity through the
    // Fragment.onAttach() callback, which it uses to call the following
    // methods defined by the NoticeDialogFragment.NoticeDialogListener
    // interface.
    @Override
    public void onDialogPositiveClick(DialogFragment dialog) {
        // User taps the dialog's positive button.
        ...
    }

    @Override
    public void onDialogNegativeClick(DialogFragment dialog) {
        // User taps the dialog's negative button.
        ...
    }
}
Because the host activity implements the
NoticeDialogListener—which is enforced by the
onAttach()
callback method shown in the preceding example—the dialog fragment can
use the interface callback methods to deliver click events to the activity:
Kotlin
    override fun onCreateDialog(savedInstanceState: Bundle): Dialog {
        return activity?.let {
            // Build the dialog and set up the button click handlers.
            val builder = AlertDialog.Builder(it)

            builder.setMessage(R.string.dialog_start_game)
                    .setPositiveButton(R.string.start,
                            DialogInterface.OnClickListener { dialog, id ->
                                // Send the positive button event back to the
                                // host activity.
                                listener.onDialogPositiveClick(this)
                            })
                    .setNegativeButton(R.string.cancel,
                            DialogInterface.OnClickListener { dialog, id ->
                                // Send the negative button event back to the
                                // host activity.
                                listener.onDialogNegativeClick(this)
                            })

            builder.create()
        } ?: throw IllegalStateException("Activity cannot be null")
    }
Java
public class NoticeDialogFragment extends DialogFragment {
    ...
    @Override
    public Dialog onCreateDialog(Bundle savedInstanceState) {
        // Build the dialog and set up the button click handlers.
        AlertDialog.Builder builder = new AlertDialog.Builder(getActivity());
        builder.setMessage(R.string.dialog_start_game)
               .setPositiveButton(R.string.start, new DialogInterface.OnClickListener() {
                   public void onClick(DialogInterface dialog, int id) {
                       // Send the positive button event back to the host activity.
                       listener.onDialogPositiveClick(NoticeDialogFragment.this);
                   }
               })
               .setNegativeButton(R.string.cancel, new DialogInterface.OnClickListener() {
                   public void onClick(DialogInterface dialog, int id) {
                       // Send the negative button event back to the host activity.
                       listener.onDialogNegativeClick(NoticeDialogFragment.this);
                   }
               });
        return builder.create();
    }
}
Show a dialog
When you want to show your dialog, create an instance of your
DialogFragment and call
show(),
passing the
FragmentManager
and a tag name for the dialog fragment.
You can get the FragmentManager by calling
getSupportFragmentManager()
from the
FragmentActivity
or by calling
getParentFragmentManager()
from a Fragment. See the following for an example:
Kotlin
fun confirmStartGame() {
    val newFragment = StartGameDialogFragment()
    newFragment.show(supportFragmentManager, "game")
}
Java
public void confirmStartGame() {
    DialogFragment newFragment = new StartGameDialogFragment();
    newFragment.show(getSupportFragmentManager(), "game");
}
The second argument, "game", is a unique tag name that the
system uses to save and restore the fragment state when necessary. The tag also
lets you get a handle to the fragment by calling
findFragmentByTag().
Show a dialog fullscreen or as an embedded fragment
You might want a piece of your UI design to appear as a dialog in some
situations and as a fullscreen or embedded fragment in others. You might also
want it to appear differently depending on the device's screen size. The
DialogFragment class offers flexibility to accomplish this,
because it can behave as an embeddable Fragment.
However, you can't use AlertDialog.Builder or other
Dialog objects to build the dialog in this case. If you want the
DialogFragment to be embeddable, define the dialog's UI in a
layout, then load the layout in the
onCreateView()
callback.
Here's an example DialogFragment that can appear as a dialog or
an embeddable fragment, using a layout named
purchase_items.xml:
Kotlin
class CustomDialogFragment : DialogFragment() {

    // The system calls this to get the DialogFragment's layout, regardless of
    // whether it's being displayed as a dialog or an embedded fragment.
    override fun onCreateView(
            inflater: LayoutInflater,
            container: ViewGroup?,
            savedInstanceState: Bundle?
    ): View {
        // Inflate the layout to use as a dialog or embedded fragment.
        return inflater.inflate(R.layout.purchase_items, container, false)
    }

    // The system calls this only when creating the layout in a dialog.
    override fun onCreateDialog(savedInstanceState: Bundle): Dialog {
        // The only reason you might override this method when using
        // onCreateView() is to modify the dialog characteristics. For example,
        // the dialog includes a title by default, but your custom layout might
        // not need it. Here, you can remove the dialog title, but you must
        // call the superclass to get the Dialog.
        val dialog = super.onCreateDialog(savedInstanceState)
        dialog.requestWindowFeature(Window.FEATURE_NO_TITLE)
        return dialog
    }
}
Java
public class CustomDialogFragment extends DialogFragment {
    // The system calls this to get the DialogFragment's layout, regardless of
    // whether it's being displayed as a dialog or an embedded fragment.
    @Override
    public View onCreateView(LayoutInflater inflater, ViewGroup container,
            Bundle savedInstanceState) {
        // Inflate the layout to use as a dialog or embedded fragment.
        return inflater.inflate(R.layout.purchase_items, container, false);
    }

    // The system calls this only when creating the layout in a dialog.
    @Override
    public Dialog onCreateDialog(Bundle savedInstanceState) {
        // The only reason you might override this method when using
        // onCreateView() is to modify the dialog characteristics. For example,
        // the dialog includes a title by default, but your custom layout might
        // not need it. Here, you can remove the dialog title, but you must
        // call the superclass to get the Dialog.
        Dialog dialog = super.onCreateDialog(savedInstanceState);
        dialog.requestWindowFeature(Window.FEATURE_NO_TITLE);
        return dialog;
    }
}
The following example determines whether to show the fragment as a dialog or a fullscreen UI, based on the screen size:
Kotlin
fun showDialog() {
    val fragmentManager = supportFragmentManager
    val newFragment = CustomDialogFragment()
    if (isLargeLayout) {
        // The device is using a large layout, so show the fragment as a
        // dialog.
        newFragment.show(fragmentManager, "dialog")
    } else {
        // The device is smaller, so show the fragment fullscreen.
        val transaction = fragmentManager.beginTransaction()
        // For a polished look, specify a transition animation.
        transaction.setTransition(FragmentTransaction.TRANSIT_FRAGMENT_OPEN)
        // To make it fullscreen, use the 'content' root view as the container
        // for the fragment, which is always the root view for the activity.
        transaction
                .add(android.R.id.content, newFragment)
                .addToBackStack(null)
                .commit()
    }
}
Java
public void showDialog() {
    FragmentManager fragmentManager = getSupportFragmentManager();
    CustomDialogFragment newFragment = new CustomDialogFragment();

    if (isLargeLayout) {
        // The device is using a large layout, so show the fragment as a
        // dialog.
        newFragment.show(fragmentManager, "dialog");
    } else {
        // The device is smaller, so show the fragment fullscreen.
        FragmentTransaction transaction = fragmentManager.beginTransaction();
        // For a polished look, specify a transition animation.
        transaction.setTransition(FragmentTransaction.TRANSIT_FRAGMENT_OPEN);
        // To make it fullscreen, use the 'content' root view as the container
        // for the fragment, which is always the root view for the activity.
        transaction.add(android.R.id.content, newFragment)
                   .addToBackStack(null).commit();
    }
}
For more information about performing fragment transactions, see Fragments.
In this example, the mIsLargeLayout boolean specifies whether
the current device must use the app's large layout design and thus show this
fragment as a dialog rather than fullscreen. The best way to set this kind of
boolean is to declare a
bool resource
value with an
alternative
resource value for different screen sizes. For example, here are two
versions of the bool resource for different screen sizes:
res/values/bools.xml
<!-- Default boolean values -->
<resources>
    <bool name="large_layout">false</bool>
</resources>
res/values-large/bools.xml
<!-- Large screen boolean values -->
<resources>
    <bool name="large_layout">true</bool>
</resources>
Then you can initialize the mIsLargeLayout value during the
activity's
onCreate()
method, as shown in the following example:
Kotlin
override fun onCreate(savedInstanceState: Bundle?) {
    super.onCreate(savedInstanceState)
    setContentView(R.layout.activity_main)

    isLargeLayout = resources.getBoolean(R.bool.large_layout)
}
Java
boolean isLargeLayout;

@Override
public void onCreate(Bundle savedInstanceState) {
    super.onCreate(savedInstanceState);
    setContentView(R.layout.activity_main);

    isLargeLayout = getResources().getBoolean(R.bool.large_layout);
}
Show an activity as a dialog on large screens
Instead of showing a dialog as a fullscreen UI on small screens, you can get
the same result by showing an Activity as a dialog on large
screens. The approach you choose depends on your app design, but showing an
activity as a dialog is often useful when your app is designed for small
screens and you want to improve the experience on tablets by showing a
short-lived activity as a dialog.
To show an activity as a dialog only on large screens, apply the
Theme.Holo.DialogWhenLarge
theme to the <activity> manifest element:
<activity android:theme="@android:style/Theme.Holo.DialogWhenLarge" >
For more information about styling your activities with themes, see Styles and themes.
Dismiss a dialog
When the user taps an action button created with an
AlertDialog.Builder, the system dismisses the dialog for you.
The system also dismisses the dialog when the user taps an item in a dialog
list, except when the list uses radio buttons or checkboxes. Otherwise, you can
manually dismiss your dialog by calling
dismiss()
on your DialogFragment.
If you need to perform certain actions when the dialog goes away, you can
implement the
onDismiss()
method in your DialogFragment.
You can also cancel a dialog. This is a special event that
indicates that the user is leaving the dialog without completing the task. This
occurs if the user taps the Back button or taps the screen outside the dialog
area or if you explicitly call
cancel()
on the Dialog, such as in response to a "Cancel" button in the
dialog.
As shown in the preceding example, you can respond to the cancel event by
implementing
onCancel()
in your DialogFragment class.