
指定裝置可讓您更精確地控管要將應用程式套件的哪些部分提供給特定裝置。舉例來說,您可以確保大型素材資源只會傳送至 RAM 較高的裝置,或是為不同裝置提供不同版本的素材資源。
您可以指定裝置屬性,例如:
- 裝置型號
- 裝置 RAM
- 系統功能
- 晶片系統 (適用於 API 級別至少為 31 的裝置)
必要步驟總覽
如要啟用裝置指定功能,請按照下列步驟操作:
- 在裝置指定設定檔中定義裝置群組。
- 指定套件的哪些部分應提供給哪些裝置群組。
- 選用:在本機測試設定。
- 將套件 (包含設定檔) 上傳至 Google Play。
Android Gradle 外掛程式與 Play Unity 外掛程式
您使用 Android Gradle 外掛程式還是 Play Unity 外掛程式建構應用程式,會影響所需的確切步驟。繼續操作前,請選取建構設定:
檢查 Android Gradle 外掛程式版本
如要使用裝置指定目標,請確認 Android Gradle 外掛程式 (AGP) 版本至少為 8.10.0-alpha01。這項功能已與 Android Studio Meerkat 2 以上版本一起封裝。
在 Android Gradle 外掛程式中啟用裝置指定功能
您必須在 gradle.properties 檔案中明確啟用裝置指定功能:
android.experimental.enableDeviceTargetingConfigApi=true
建立裝置指定目標設定 XML 檔案
裝置指定設定檔是 XML 檔案,用於定義自訂裝置群組。舉例來說,您可以定義名為 high_ram 的裝置群組,其中包含至少有 8 GB RAM 的所有裝置:
<config:device-targeting-config
    xmlns:config="http://schemas.android.com/apk/config">

    <config:device-group name="high_ram">
        <config:device-selector ram-min-bytes="8000000000"/>
    </config:device-group>

</config:device-targeting-config>
裝置群組最多可包含 5 個裝置選取條件。如果裝置符合任何裝置選取條件,就會納入裝置群組。
裝置選取器可包含一或多項裝置屬性。如果裝置符合選取條件的所有裝置屬性,就會被選取。
可用的裝置屬性
- device_ram:裝置 RAM 需求
- min_bytes (含下限):RAM 需求下限 (以位元組為單位)
- max_bytes (不含上限):RAM 需求上限 (以位元組為單位)
- included_device_ids:要納入這個選取條件的裝置型號(每個群組最多 10000 個 device_ids)。如果裝置與清單中的任何 device_id 相符,就會符合此屬性。
- build_brand:裝置製造商
- build_device:裝置型號代碼
- excluded_device_ids:要從這個選取條件中排除的裝置型號(每個群組最多 10000 個 device_ids)。如果裝置不符合清單中的任何 device_id,就會符合這個屬性。
- build_brand:裝置製造商
- build_device:裝置型號代碼
required_system_features:裝置必須具有的功能(每個群組最多 100 個功能)。裝置必須具有這個清單中的所有系統功能,才能符合這項屬性。
系統功能參考資料
- name:系統功能
forbidden_system_features:裝置不得具有指定的功能(每個群組最多 100 項功能),才能納入此選取條件中。如果裝置具有清單中的任何系統功能,就會視為不符合此屬性。
系統功能參考資料
- name:系統功能
system-on-chip:這個選取器要納入的晶片系統。裝置必須具備清單中的任何晶片,才能符合這項屬性。晶片上的系統只能指定 API 級別至少為 31 的裝置。
- manufacturer:System on chip manufacturer
- model:System on chip model
如果在單一選取器中加入多個屬性,就會產生 AND 邏輯,例如:
  <config:device-selector ram-min-bytes="7000000000">
      <config:included-device-id brand="google" device="flame"/>
  </config:device-selector>
以上程式碼會產生 AND 條件,也就是所有裝置都必須具有大於 7 GB 的 RAM「且」機型為 Pixel 4。這也能以下列方式表示:

如要使用 OR 條件,請在單一裝置群組中建立個別的選取器,例如:
  <config:device-selector ram-min-bytes="7000000000"/>
  <config:device-selector>
        <config:included-device-id brand="google" device="flame"/>
  </config:device-selector>
以上程式碼會產生 OR 條件,也就是所有裝置都必須具有大於 7 GB 的 RAM「或」機型為 Pixel 4。這也能以下列方式表示:

以下範例顯示所有可能的裝置屬性:
<config:device-targeting-config
    xmlns:config="http://schemas.android.com/apk/config">

    <config:device-group name="myCustomGroup1">
      <config:device-selector ram-min-bytes="8000000000">
        <config:included-device-id brand="google" device="redfin"/>
        <config:included-device-id brand="google" device="sailfish"/>
        <config:included-device-id brand="good-brand"/>
        <config:excluded-device-id brand="google" device="caiman"/>
        <config:system-on-chip manufacturer="Sinclair" model="ZX80"/>
        <config:system-on-chip manufacturer="Commodore" model="C64"/>
      </config:device-selector>
      <config:device-selector ram-min-bytes="16000000000"/>
    </config:device-group>

    <config:device-group name="myCustomGroup2">
      <config:device-selector ram-min-bytes="4000000000" ram-max-bytes="8000000000">
        <config:required-system-feature name="android.hardware.bluetooth"/>
        <config:required-system-feature name="android.hardware.location"/>
        <config:forbidden-system-feature name="android.hardware.camera"/>
        <config:forbidden-system-feature name="mindcontrol.laser"/>
      </config:device-selector>
    </config:device-group>

</config:device-targeting-config>
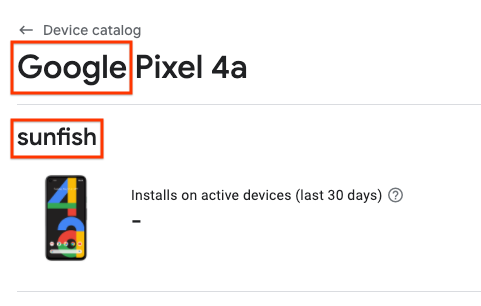
官方裝置製造商和裝置型號代碼
您可以使用 Google Play 管理中心的裝置目錄,以下列任一方式找出裝置製造商和型號代碼的正確格式:
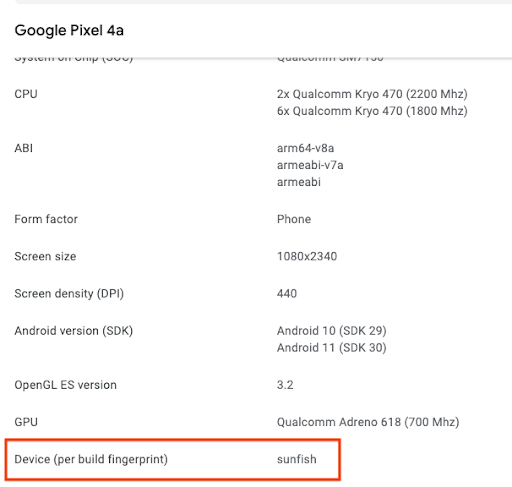
使用「裝置目錄」檢查個別裝置,在下方範例所示的位置找出製造商和型號代碼 (Google Pixel 4a 的製造商為「Google」,型號代碼為「sunfish」)。
下載支援裝置的 CSV 檔案,並將「製造商」和「型號代碼」資訊分別用於「build_brand」和「build_device」欄位。
在應用程式套件中加入裝置指定設定檔
在主要模組的build.gradle 檔案中新增以下內容:
android {
  ...
  bundle {
    deviceTargetingConfig = file('device_targeting_config.xml')
    deviceGroup {
      enableSplit = true   // split bundle by #group
      defaultGroup = "other"  // group used for standalone APKs
    }
  }
  ...
}
device_targeting_config.xml 是相對於主要模組的設定檔路徑。這可確保設定檔與應用程式套件一併封裝。
deviceGroup 子句可確保從套件產生的 APK 會依裝置群組分割。
Play Feature Delivery 的裝置指定功能
如要使用裝置指定功能搭配 Play Feature Delivery,請參閱條件式提交的說明文件。
Play Asset Delivery 的裝置指定目標
如要使用 Play Asset Delivery 的裝置指定功能,請參閱 資產包相關文件。
裝置端 AI 模型提交作業的裝置指定
如要使用裝置指定功能搭配 Play for On-device AI,請參閱 AI 套件說明文件。
回報問題
在公開的 Issue Tracker 中回報任何錯誤。