Wear OS 應用程式可在沒有隨附應用程式的情況下獨立執行,這表示 Wear OS 應用程式在存取來自網際網路的資料時,需要自行管理驗證程序。但是手錶的小螢幕尺寸和不完整的輸入功能,使得 Wear OS 應用程式只能使用有限的驗證選項。
本指南說明 Wear OS 應用程式的建議驗證方式,以及這些方式不適合應用程式用途時的替代做法。
如要進一步瞭解如何設計良好的登入體驗,請參閱登入使用者體驗指南。
訪客模式
請勿採用一律要求驗證的做法,而是要在使用者不須登入的情況下,盡可能提供最多功能。
使用者可能會發現並安裝您的 Wear 應用程式,但未使用相關行動應用程式,因此可能沒有帳戶,也不知道其中提供哪些功能。請確保訪客模式功能可正確展示應用程式的各項功能。
部分裝置可能會維持解鎖狀態較久
在搭載 Wear OS 5 以上版本的支援裝置上,系統會偵測使用者是否將裝置戴在手腕上。如果使用者關閉手腕偵測功能,然後將裝置從手腕上取下,系統會將裝置解鎖的時間延長。
如果您的應用程式需要更高層級的安全性 (例如顯示可能屬於機密或私人資料時),請先檢查是否已啟用手腕偵測功能:
val wristDetectionEnabled =
        isWristDetectionAutoLockingEnabled(applicationContext)
如果這個方法的傳回值為 false,請先提示使用者在應用程式中登入帳戶,再顯示特定使用者內容。
建議的驗證方式
請用以下的驗證方法,讓 Wear OS 應用程式得以獨立取得使用者的驗證憑證。
使用資料層傳遞權杖
透過 Wearable Data Layer,手機隨附應用程式可以安全將驗證資料傳送到 Wear OS 應用程式。以訊息或資料項目形式傳送憑證。
這類驗證通常不需使用者採取任何動作,不過請您避免在不通知使用者要登入的情況下進行驗證。您可以使用簡潔且可關閉的畫面告知使用者,行動裝置正在轉移他們的帳戶。
重要事項:這種驗證方式僅限和 Android 配對的手錶使用,且須安裝對應的手機應用程式,因此您的 Wear 應用程式必須另外提供至少一種驗證方式。請為沒有對應手機應用程式的使用者,或是與 iOS 裝置配對的 Wear OS 裝置使用者,提供替代驗證方式。
透過手機應用程式使用資料層傳遞權杖,如以下範例所示:
val token = "..." // Auth token to transmit to the wearable device.
val dataClient: DataClient = Wearable.getDataClient(context)
val putDataReq: PutDataRequest = PutDataMapRequest.create("/auth").run {
    dataMap.putString("token", token)
    asPutDataRequest()
}
val putDataTask: Task<DataItem> = dataClient.putDataItem(putDataReq)
監聽手錶應用程式的資料變更事件,如以下範例所示:
val dataClient: DataClient = Wearable.getDataClient(context)
dataClient.addListener{ dataEvents ->
    dataEvents.forEach { event ->
        if (event.type == DataEvent.TYPE_CHANGED) {
            val dataItemPath = event.dataItem.uri.path ?: ""
            if (dataItemPath.startsWith("/auth")) {
                val token = DataMapItem.fromDataItem(event.dataItem).dataMap.getString("token")
                // Display interstitial screen to notify the user they are being signed in.
                // Then, store the token and use it in network requests.
            }
        }
    }
}
如果想進一步瞭解如何使用 Wearable Data Layer,請參閱「在 Wear OS 上傳送資料和進行同步處理」。
使用 OAuth 2.0
Wear OS 支援兩種 OAuth 2.0 流程,如後續章節所述:
- 搭配 Proof Key for Code Exchange (PKCE) 使用 Authorization Code Grant (授權碼許可),如 RFC 7636 中定義
- Device Authorization Grant (裝置授權許可),如 RFC 8628 中定義
注意:為確保應用程式不會在手錶進入微光模式時關閉,請在執行驗證程序的活動中,使用 AmbientModeSupport.attach 啟用「螢幕長亮」功能。如要進一步瞭解微光模式的最佳做法,請參閱「在 Wear 上讓應用程式持續顯示」。
Proof Key for Code Exchange (PKCE)
如果想有效利用 PKCE,請用 RemoteAuthClient。
如要透過 Wear OS 應用程式對 OAuth 提供者執行驗證要求,請建立 OAuthRequest 物件。這個物件包含用於取得權杖的 OAuth 端點網址和 CodeChallenge 物件。下列程式碼範例說明如何建立驗證要求:
val request = OAuthRequest.Builder(this.applicationContext)
    .setAuthProviderUrl(Uri.parse("https://...."))
    .setClientId(clientId)
    .setCodeChallenge(codeChallenge)
    .build()
建構驗證要求後,使用 sendAuthorizationRequest() 方法將要求傳送至隨附應用程式︰
val client = RemoteAuthClient.create(this)
client.sendAuthorizationRequest(request,
    { command -> command?.run() },
    object : RemoteAuthClient.Callback() {
        override fun onAuthorizationResponse(
            request: OAuthRequest,
            response: OAuthResponse
        ) {
            // Extract the token from the response, store it and use it in network requests.
        }

        override fun onAuthorizationError(errorCode: Int) {
            // Handle error
        }
    }
)
這項要求會觸發對隨附應用程式的呼叫,在使用者的手機網路瀏覽器中顯示驗證 UI。Auth 2.0 提供者可以驗證使用者身分,並徵求使用者同意授予要求的權限。回應會傳送到自動產生的重新導向網址。
授權成功或失敗後,OAuth 2.0 伺服器會重新導向到要求中的指定網址。如果使用者核准了存取要求,回應內便會提供授權碼。如果使用者未核准要求,回應會包含錯誤訊息。
回應會以查詢字串的形式呈現,其範例如下:
  https://wear.googleapis.com/3p_auth/com.your.package.name?code=xyz
  https://wear.googleapis-cn.com/3p_auth/com.your.package.name?code=xyz
這個項目會載入頁面,將使用者導向至隨附應用程式,隨附應用程式會驗證回應網址,然後使用 onAuthorizationResponse API 將回應轉發給第三方手錶應用程式。
隨後,手錶應用程式即可使用授權碼交換存取權杖。
注意:建構 OAuthRequest 之後,存取 redirectUrl 即可找到重新導向網址。
裝置授權許可
使用「裝置授權許可」時,使用者會在另一台裝置上開啟驗證 URI。接著,驗證伺服器會要求使用者核准或拒絕要求。
如要簡化這項程序,可以使用 RemoteActivityHelper 在使用者的配對行動裝置上開啟網頁,如以下範例所示:
// Request access from the authorization server and receive Device Authorization Response.
val verificationUri = "..." // Extracted from the Device Authorization Response.
RemoteActivityHelper.startRemoteActivity(
    this,
    Intent(Intent.ACTION_VIEW)
        .addCategory(Intent.CATEGORY_BROWSABLE)
        .setData(Uri.parse(verificationUri)),
    null
)
// Poll the authorization server to find out if the user completed the user authorization
// step on their mobile device.
如果您使用 iOS 應用程式,請利用通用連結攔截應用程式意圖,不要使用瀏覽器驗證權杖。
其他驗證方式
Wear OS 支援其他登入方式,如下列章節所述。
Google 登入
Google 登入可讓使用者以現有 Google 帳戶登入。 以下章節將說明如何完成基本的 Google 登入整合作業。
必要條件
您必須先設定 Google API 控制台專案,並建立 Android Studio 專案,才能開始在 Wear OS 應用程式中整合 Google 登入。詳情請參閱「 開始將 Google 登入整合至 Android 應用程式」。
如果您使用 Google 登入的應用程式或網站會與後端伺服器通訊,則需要另外兩項必要條件:
- 為後端伺服器建立 OAuth 2.0 網頁應用程式用戶端 ID。這個用戶端 ID 和應用程式用戶端 ID 不同。詳情請參閱「 啟用伺服器端存取權」。
- 使用 HTTPS 傳送使用者的 ID 權杖,在伺服器上安全識別目前登入的使用者身分。如要瞭解如何在後端伺服器上驗證使用者身分,請參閱「 透過後端伺服器驗證」。
將 Google 登入整合至應用程式
如要將 Google 登入功能整合至 Wear OS 應用程式,請詳閱並實作下列各節中所述的詳細步驟:
設定 Google 登入及建構 GoogleApiClient 物件
在登入活動的 onCreate() 方法中設定 Google 登入,要求應用程式所需的使用者資料。接下來,使用 Google Sign-In API 存取權和指定的選項建立 GoogleApiClient 物件。相關步驟如以下範例所示:
public class MyNewActivity extends AppCompatActivity {

    private static final int RC_SIGN_IN = 9001;

    private GoogleSignInClient mSignInClient;

    @Override
    protected void onCreate(@Nullable Bundle savedInstanceState) {
        super.onCreate(savedInstanceState);

        GoogleSignInOptions options =
                new GoogleSignInOptions.Builder(GoogleSignInOptions.DEFAULT_SIGN_IN)
                        .build();

        mSignInClient = GoogleSignIn.getClient(this, options);
    }
}
在應用程式中新增 Google 登入按鈕
如要新增 Google 登入按鈕,請完成下列步驟:
-
將
SignInButton新增至應用程式的版面配置: -
在應用程式的
onCreate()方法中註冊按鈕的OnClickListener,使用者輕觸後即可登入:
 <com.google.android.gms.common.SignInButton
 android:id="@+id/sign_in_button"
 android:layout_width="wrap_content"
 android:layout_height="wrap_content" />
Kotlin
findViewById<View>(R.id.sign_in_button).setOnClickListener(this)
Java
findViewById(R.id.sign_in_button).setOnClickListener(this);
建立登入意圖及啟動登入流程
使用
getSignInIntent() 方法建立登入意圖,在 onCLick() 方法中處理登入按鈕輕觸動作。接著,使用
startActivityForResult() 方法啟動意圖。
Intent intent = mSignInClient.getSignInIntent();
startActivityForResult(intent, RC_SIGN_IN);
系統會提示使用者選取想登入的 Google 帳戶。如果您要求個人資料、電子郵件和 OpenID 以外的範圍,系統也會提示使用者授予相關資源的存取權。
最後,在活動的
onActivityResult 方法中,使用
getSignInResultFromIntent 擷取登入結果。擷取登入結果後,您可以使用
isSuccess 方法檢查登入是否成功。如果登入成功,您可以呼叫
getSignInAccount 方法取得
GoogleSignInAccount 物件,其中含有登入使用者的相關資訊 (例如使用者名稱)。如以下範例所示:
Kotlin
override fun onActivityResult(requestCode: Int, resultCode: Int, data: Intent) {
    super.onActivityResult(requestCode, resultCode, data)

    // Result returned from launching the Intent from GoogleSignInApi.getSignInIntent(...).
    if (requestCode == RC_SIGN_IN) {
        Auth.GoogleSignInApi.getSignInResultFromIntent(data)?.apply {
            if (isSuccess) {
                // Get account information.
                fullName = signInAccount?.displayName
                mGivenName = signInAccount?.givenName
                mFamilyName = signInAccount?.familyName
                mEmail = signInAccount?.email
            }
        }
    }
}
Java
@Override
protected void onActivityResult(int requestCode, int resultCode, Intent data) {
    super.onActivityResult(requestCode, resultCode, data);

    // Result returned from launching the Intent from GoogleSignInApi.getSignInIntent(...).
    if (requestCode == RC_SIGN_IN) {
        GoogleSignInResult signInResult = Auth.GoogleSignInApi.getSignInResultFromIntent(data);
        if (signInResult.isSuccess()) {
            GoogleSignInAccount acct = signInResult.getSignInAccount();

            // Get account information.
            fullName = acct.getDisplayName();
            givenName = acct.getGivenName();
            familyName = acct.getFamilyName();
            email = acct.getEmail();
        }
    }
}
如要查看 Google 登入功能的實作範例,請參閱 GitHub 上的 Horologist Google 登入範例。
自訂程式碼驗證
除了前述驗證方法之外,您還可以要求使用者透過其他裝置 (例如手機或平板電腦) 進行驗證,並取得時效短暫的數字代碼。之後,使用者只要在 Wear OS 裝置上輸入該組代碼,即可確認自己的身分並收到驗證權杖。
這個驗證流程可以使用應用程式的登入模組,或者手動將第三方驗證服務供應商的登入方式整合至應用程式的程式碼。雖然這種驗證方法必須手動操作和多花一番心力,但是也因此更加安全,如果您的獨立 Wear OS 應用程式需要提早進行驗證便可使用此方法。
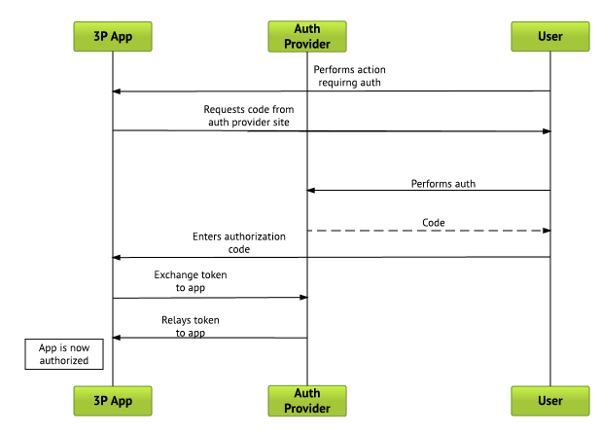
這項設定的驗證流程如下:
- 使用者在需要授權的 Wear OS 應用程式中執行某個動作。
- Wear OS 應用程式會顯示驗證畫面,並指示使用者輸入特定網址提供的代碼。
- 使用者切換到行動裝置、平板電腦或電腦,開啟瀏覽器並前往 Wear OS 應用程式指定的網址進行登入。
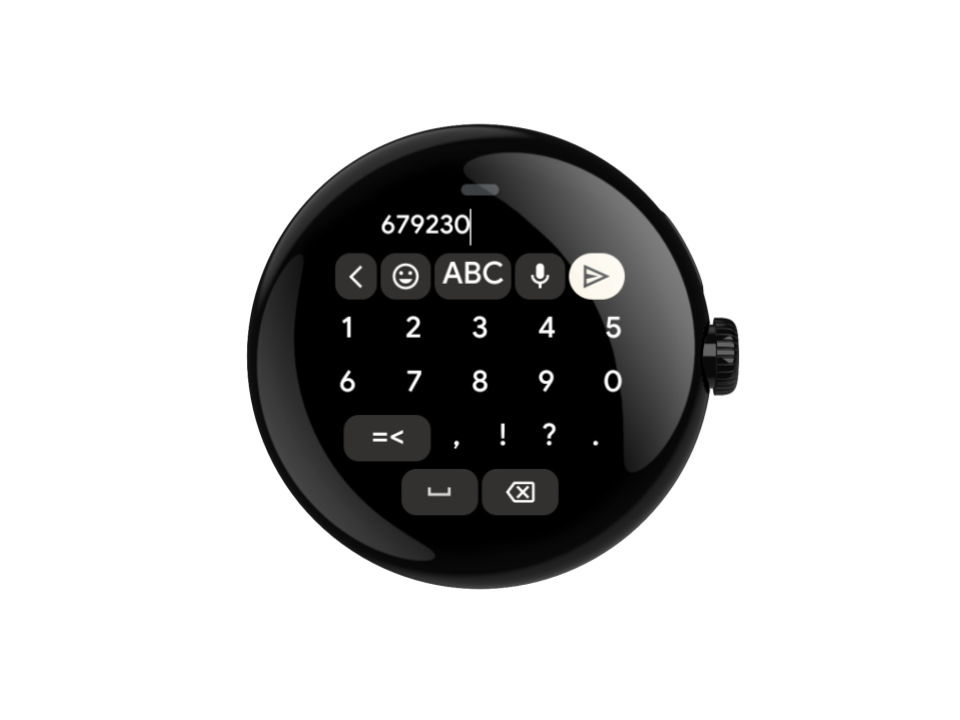
- 使用者會收到一組效期短暫的數字代碼,然後前往 Wear OS 應用程式驗證畫面,使用 Wear OS 內建鍵盤輸入此代碼:

- 之後,您便可以用這組輸入的代碼證明使用者身分無誤,然後用這組代碼交換儲存於 Wear OS 裝置上且受到保護的驗證權杖,用於後續的驗證呼叫。
注意:使用者產生的代碼必須為純數字,不得包含任何字母字元。
這個驗證流程如下圖所示:


