تنظيم صفحاتك في مجموعات
يمكنك حفظ المحتوى وتصنيفه حسب إعداداتك المفضّلة.
يتيح لك تطبيق Transformer التجريبي تجربة إمكانات واجهة برمجة التطبيقات وتحويل
ملفات الوسائط، بما في ذلك تحويل الوسائط بين التنسيقات والقطع
وتطبيق تأثيرات الفيديو.
تصف هذه الصفحة كيفية الحصول على التطبيق التجريبي وتجميعه وتشغيله. يتضمن هذا الدليل أيضًا
طريقة استخدام التطبيق التجريبي لتحويل الوسائط الخاصة بك.
حصول على الرمز
يمكن العثور على رمز المصدر للتطبيق التجريبي الرئيسي في demos/transformer
مجلد مشروع GitHub. إذا كنت
استنساخ المشروع إلى دليل محلي:
git clone https://github.com/androidx/media.git
بعد ذلك، افتح المشروع في "استوديو Android". من المفترض أن يظهر لك ما يلي في
عرض مشروع Android (تم توسيع المجلدات ذات الصلة بالتطبيق التجريبي):
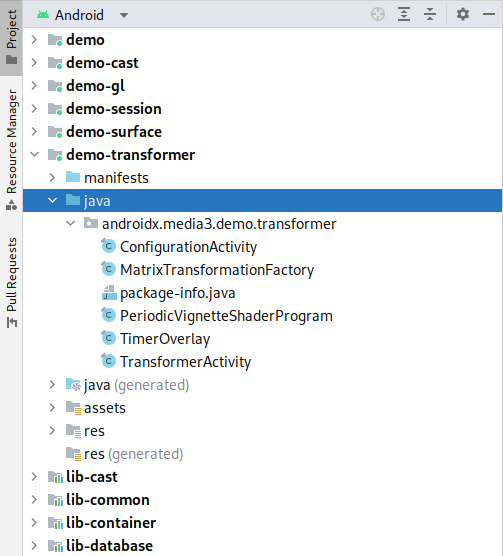
المشروع في "استوديو Android"
تجميع العرض التوضيحي وتشغيله
لتجميع التطبيق التجريبي وتشغيله، اختَر "demo-transformer" وشغِّله.
الإعدادات في "استوديو Android" سيتم تثبيت التطبيق التجريبي وتشغيله على
جهاز Android متصل. ننصح باستخدام جهاز مادي في حال
لأن تطبيق المحاكي عادةً لوسائط Android
لدى حزمة stack إمكانات وأخطاء مختلفة مقارنةً بأي جهاز حقيقي.
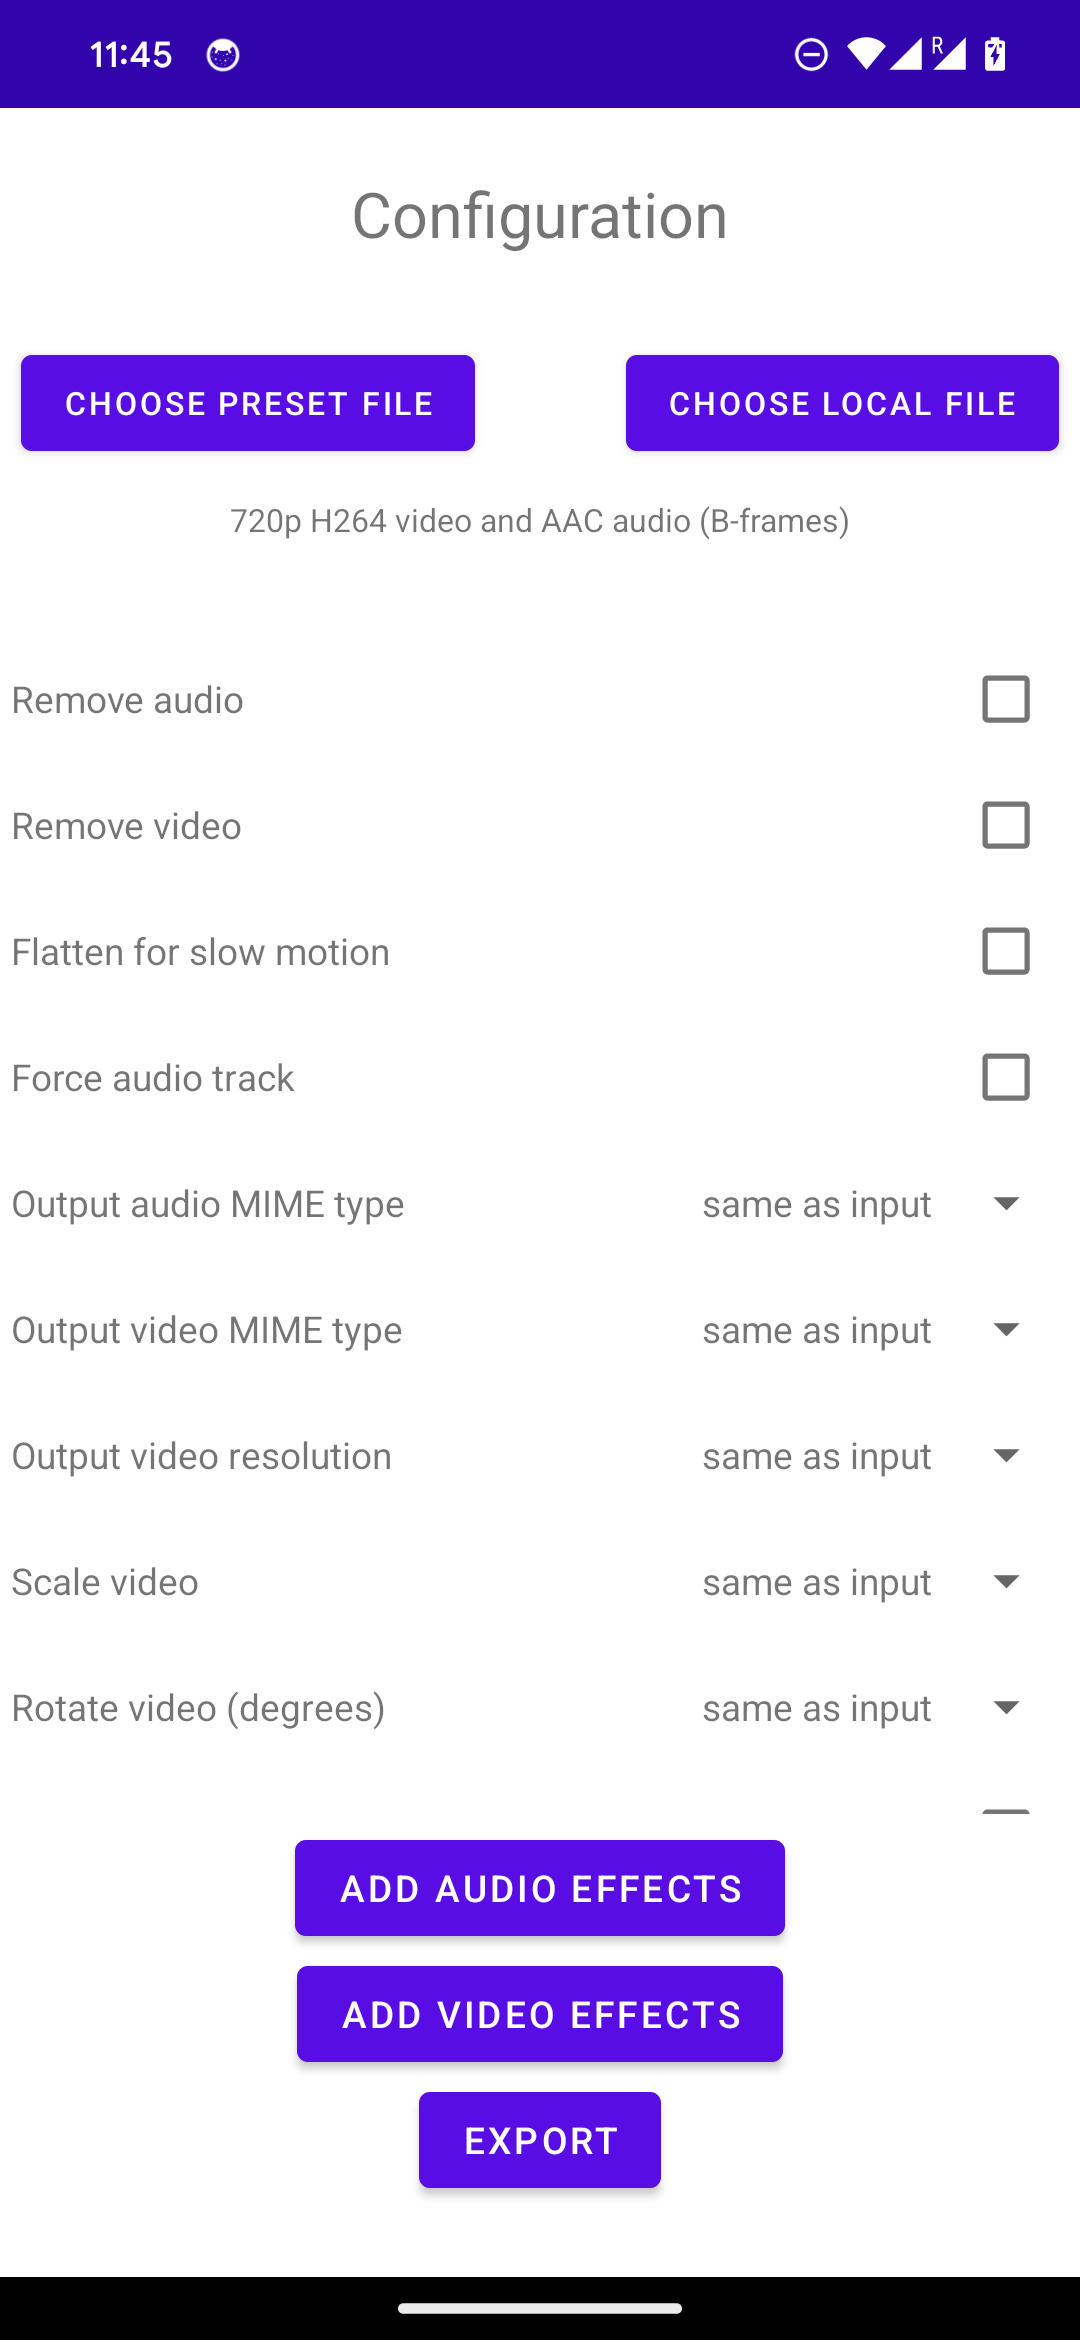
نشاط تجريبي لإعداد التطبيق
يبدأ التطبيق التجريبي بـ ConfigurationActivity، وهو نشاط يمكنك من خلاله
لإعداد عنصر وسائط الإدخال والتحويل الذي تريد إجراؤه. الاثنين
في أعلى الشاشة، يمكنكم الاختيار من قائمة وسائط معدّة مسبقًا
من الملفات أو اختر ملفًا محليًا. بعد ذلك، تتيح لك قائمة الخيارات القابلة للتمرير
وتهيئة تنسيق الإخراج والتحويل، كما يمكنك تحديد التأثيرات
تطبيقها على وسائل الإعلام. يؤدي النقر على انتقالات الزر الأخير إلى
TransformerActivity، نشاط يعرض مستوى التقدّم الحالي ومعاينة
من الإطارات أثناء مرورها عبر المحوّل. بعد التحويل
يتم عرض مقاطع الفيديو المدخلة والإخراج معًا في قائمتي ExoPlayer
PlayerView أمثلة.
تحويل المحتوى الخاص بك
يدعم تطبيق العرض التوضيحي تحديد الوسائط للتحويل باستخدام الأزرار في
الجزء العلوي من شاشة التهيئة. يمكنك أيضًا تمرير عنوان URL مباشرةً في
سطر الأوامر:
adb shell am start -a androidx.media3.demo.transformer.action.VIEW \
-d https://yourdomain.com/sample.mp4
دمج MediaPipe
يتضمن التطبيق التجريبي مثالاً للتكامل مع
MediaPipe: ستحتاج إلى إنشاء
الاعتمادية يدويًا، ثم حدِّد صيغة الإصدار withMediaPipe لتفعيلها
إنشاء التطبيق باستخدام معالج إطار أنبوب الوسائط. يمكنك الاطّلاع على
قراءة
للحصول على التعليمات الكاملة. أداة اختيار التأثيرات في نشاط الضبط
مثالاً لتأثير قائم على MediaPipe لتجربة ذلك.
تاريخ التعديل الأخير: 2025-07-27 (حسب التوقيت العالمي المتفَّق عليه)
[[["يسهُل فهم المحتوى.","easyToUnderstand","thumb-up"],["ساعَدني المحتوى في حلّ مشكلتي.","solvedMyProblem","thumb-up"],["غير ذلك","otherUp","thumb-up"]],[["لا يحتوي على المعلومات التي أحتاج إليها.","missingTheInformationINeed","thumb-down"],["الخطوات معقدة للغاية / كثيرة جدًا.","tooComplicatedTooManySteps","thumb-down"],["المحتوى قديم.","outOfDate","thumb-down"],["ثمة مشكلة في الترجمة.","translationIssue","thumb-down"],["مشكلة في العيّنات / التعليمات البرمجية","samplesCodeIssue","thumb-down"],["غير ذلك","otherDown","thumb-down"]],["تاريخ التعديل الأخير: 2025-07-27 (حسب التوقيت العالمي المتفَّق عليه)"],[],[],null,["# Transformer demo application\n\nThe Transformer demo app lets you try out the API's capabilities and transform\nyour own media, including converting media between formats, trimming, and\napplying video effects.\n\nThis page describes how to get, compile, and run the demo app. This guide also\ndescribes how to use the demo app to transform your own media.\n\nGet the code\n------------\n\nThe source code for the main demo app can be found in the `demos/transformer`\nfolder of the [GitHub project](https://github.com/androidx/media). If you\nhaven't already done so, clone the project into a local directory: \n\n```\ngit clone https://github.com/androidx/media.git\n```\n\nNext, open the project in Android Studio. You should see the following in the\nAndroid Project view (the relevant folders of the demo app have been expanded):\nThe project in Android Studio\n\nCompile and run the demo\n------------------------\n\nTo compile and run the demo app, select and run the `demo-transformer`\nconfiguration in Android Studio. The demo app will install and run on a\nconnected Android-powered device. We recommend using a physical device if\npossible, because typically an emulator's implementation of Android's media\nstack has different capabilities and bugs compared to a real device.\nDemo app configuration activity\n\nThe demo app begins with the `ConfigurationActivity`, an activity where you can\nset up the input media item and the transformation you want to perform. The two\nbuttons at the top of the screen let you choose from a list of preset media\nfiles or pick a local file. Next, the scrollable list of options lets you\nconfigure the output format and transformations, and you can select effects to\napply to the media. Tapping the last button transitions to\n`TransformerActivity`, an activity that shows the current progress and a preview\nof frames as they are passing through Transformer. Once transformation\ncompletes, the input and output videos are shown together in two ExoPlayer\n`PlayerView` instances.\n\nTransform your own content\n--------------------------\n\nThe demo app supports selecting media for transformation using the buttons at\nthe top of the configuration screen. You can also pass a URL directly on the\ncommand line: \n\n```\nadb shell am start -a androidx.media3.demo.transformer.action.VIEW \\\n -d https://yourdomain.com/sample.mp4\n```\n| **Tip:** If you see errors when selecting local media using this feature, check the [troubleshooting page](/media/media3/transformer/troubleshooting#local-files).\n\nMediaPipe integration\n---------------------\n\nThe demo app includes an example integration with\n[MediaPipe](https://developers.google.com/mediapipe). You will need to build the\ndependency manually, then select the `withMediaPipe` build variant to enable\nbuilding the app with the media pipe frame processor. See the\n[README](https://github.com/androidx/media/tree/release/demos/transformer#mediapipe-frame-processing-demo)\nfor full instructions. The effects selector in the configuration activity\nincludes an example MediaPipe-based effect to try this out."]]