
Wear OS 提供多種擷取 Wear OS UI 的方式:
- Android Studio:使用 Logcat 擷取螢幕截圖。
- 隨附應用程式:在 Google Pixel Watch 裝置上,使用「擷取穿戴式裝置的螢幕畫面」選項擷取螢幕截圖。
- Wear OS 的螢幕錄影功能:錄製螢幕畫面。
在 Android Studio 中擷取螢幕截圖和錄製螢幕畫面
直接從 Android Studio 擷取穿戴式應用程式 UI 的螢幕截圖及錄製影片。這個程序與其他板型規格相同,可在 IDE 內的多個位置完成。
- 在 Android Studio 中開啟應用程式。
- 在裝置或模擬器上執行應用程式。
- 前往要擷取的畫面。
- 從下列任一工具視窗啟動螢幕擷取功能:
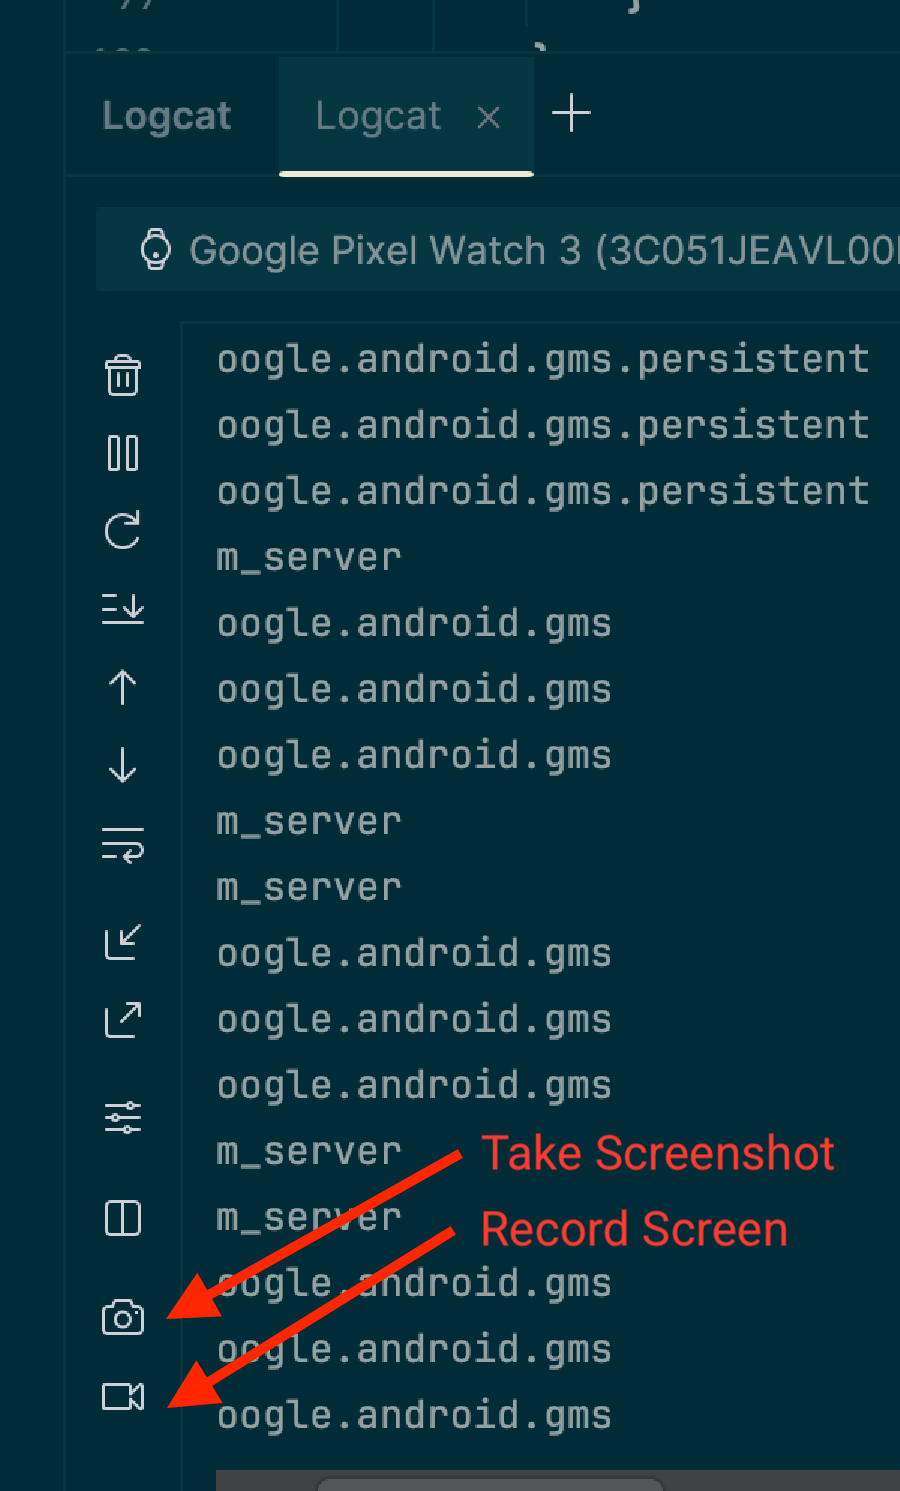
- 「Logcat」視窗:在工具列中,按一下「擷取螢幕截圖」圖示即可擷取螢幕截圖,或按一下「錄製螢幕畫面」圖示即可錄製影片。這些圖示可能位於溢位選單下方。
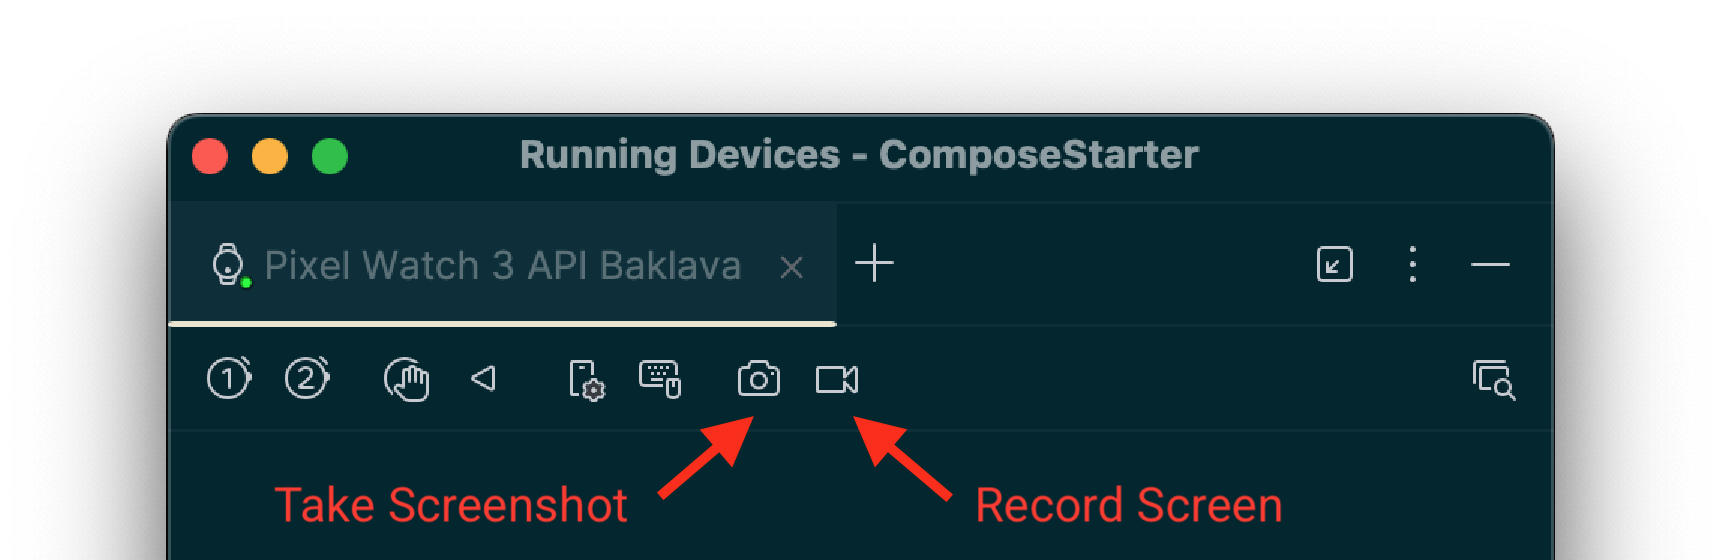
- 「執行中的裝置」視窗:裝置的工具列也會提供「擷取螢幕截圖」和「錄製螢幕」圖示。注意:
只有在使用裝置螢幕鏡像
將裝置畫面串流至這個視窗時,才能使用這些控制選項。
- 「Logcat」視窗:在工具列中,按一下「擷取螢幕截圖」圖示即可擷取螢幕截圖,或按一下「錄製螢幕畫面」圖示即可錄製影片。這些圖示可能位於溢位選單下方。
- 完成擷取:
- 螢幕截圖:擷取後會顯示編輯器視窗。按一下「儲存」前,你可以進行調整,例如新增裝置外框。
- 錄製螢幕畫面:按一下「錄製」按鈕後,選取影片選項,然後按一下「開始錄製」。與應用程式互動,然後在結束時按一下「停止錄製」。系統會顯示對話方塊,讓您儲存結果檔案。
使用 adb 擷取螢幕截圖和錄製螢幕畫面
您可以使用 Android Debug Bridge (adb) 從指令列擷取螢幕內容。
螢幕截圖
使用 screencap 指令擷取 Wear OS 裝置螢幕截圖。使用方式與行動裝置相同。
# Use 'exec-out' instead of 'shell' to get raw data
$ adb exec-out screencap -p > screen.png
Wear OS 的一項具體考量是,這項指令會擷取原始的方形緩衝區,不含圓形遮罩。如要製作精美的螢幕截圖,可以使用圖片編輯工具套用圓形遮罩。舉例來說,使用 ImageMagick:
# Use ImageMagick to apply a circular mask
$ adb exec-out screencap -p | magick - \
    -alpha set -background none -fill white \
      \( +clone -channel A -evaluate set 0 +channel -draw "circle %[fx:(w-1)/2],%[fx:(h-1)/2] %[fx:(w-1)/2],0.5" \) \
    -compose dstin -composite \
    png:screen.png
螢幕錄影
與行動裝置不同,Wear OS 不支援標準 adb screenrecord 指令。
建議改用開放原始碼的 scrcpy 工具。如要錄製裝置螢幕畫面並儲存為影片檔,請執行下列基本指令:
# Record the screen to a file named video.mp4. Use Ctrl+C to stop.
scrcpy --no-audio --no-window --record video.mp4
如要將錄製時間設為 30 秒,請使用 --time-limit 選項:
# Record the screen to a file named video.mp4, stopping after 30 seconds.
scrcpy --no-audio --no-window --record video.mp4 --time-limit=30
使用隨附應用程式擷取螢幕截圖
如要擷取 Google Pixel Watch 裝置的螢幕截圖,可以使用 Google Pixel Watch 隨附應用程式,步驟如下:
- 在 UI 中找出要擷取的畫面。
- 在 Android 手機上啟用「開發人員選項」,方法是依序前往「設定」>「關於手機」,然後輕觸「版本號碼」「七次」。
- 在手機上開啟 Wear 隨附應用程式。
- 輕觸右上角的三點溢位按鈕以開啟選單。
- 輕觸「拍攝穿戴式裝置螢幕截圖」。系統隨即會顯示下列訊息:「已傳送螢幕截圖要求」。接著,你會收到以下通知:「已可傳送手錶螢幕截圖」和「輕觸即可傳送」。
- 輕觸通知即可透過藍牙、Gmail 或其他選項,接收「傳送」或「分享螢幕截圖」的選項。