
アプリケーション コードに変更を加えて Microbenchmark ライブラリを使用する方法については、クイックスタートセクションをご覧ください。コードベースにより複雑な変更を加えてフル セットアップを行う方法については、フル プロジェクト セットアップをご覧ください。
クイックスタート
このセクションでは、コードをモジュールに移動する手間をかけずに、ベンチマークを試して一度限りの測定を実行する方法を説明します。正確なパフォーマンス結果を得るため、以下の手順にはアプリ内のデバッグを無効にする作業が含まれています。そのため、変更内容をソース管理システムにコミットせず、ローカル作業コピーで保持してください。
単発ベンチマークを実行する手順は次のとおりです。
モジュールの
build.gradleファイルまたはbuild.gradle.ktsファイルにライブラリを追加します。Kotlin
dependencies {
    implementation("androidx.benchmark:benchmark-junit4:1.2.4")
}
Groovy
dependencies {
    implementation 'androidx.benchmark:benchmark-junit4:1.2.4'
}
androidTestImplementation依存関係ではなくimplementation依存関係を使用します。androidTestImplementationを使用すると、ライブラリ マニフェスト がアプリ マニフェストに統合されないため、ベンチマークを実行できません。debugビルドタイプをデバッグ不可になるように更新します。Kotlin
android {
    ...
    buildTypes {
        debug {
            isDebuggable = false
        }
    }
}
Groovy
android {
    ...
    buildTypes {
        debug {
            debuggable false
        }
    }
}
testInstrumentationRunnerをAndroidBenchmarkRunnerに変更します。Kotlin
android {
    ...
    defaultConfig {
        testInstrumentationRunner = "androidx.benchmark.junit4.AndroidBenchmarkRunner"
    }
}
Groovy
android {
    ...
    defaultConfig {
        testInstrumentationRunner "androidx.benchmark.junit4.AndroidBenchmarkRunner"
    }
}
BenchmarkRuleのインスタンスをandroidTestディレクトリ内のテストファイルに追加して、ベンチマークを追加します。ベンチマークの作成方法について詳しくは、Microbenchmark クラスを作成するをご覧ください。次のコード スニペットは、ベンチマークをインストルメンテーション テストに追加する方法を示しています。
Kotlin
@RunWith(AndroidJUnit4::class) class SampleBenchmark { @get:Rule val benchmarkRule = BenchmarkRule() @Test fun benchmarkSomeWork() { benchmarkRule.measureRepeated { doSomeWork() } } }
Java
@RunWith(AndroidJUnit4.class)
class SampleBenchmark {
    @Rule
    public BenchmarkRule benchmarkRule = new BenchmarkRule();

    @Test
    public void benchmarkSomeWork() {
            BenchmarkRuleKt.measureRepeated(
                (Function1<BenchmarkRule.Scope, Unit>) scope -> doSomeWork()
            );
       }
    }
}
ベンチマークの作成方法については、Microbenchmark クラスを作成するをご覧ください。
フル プロジェクト セットアップ
単発のベンチマークではなく定期的なベンチマークをセットアップするには、ベンチマークを固有のモジュールに分離します。これにより、debuggable を false に設定するなどの構成を、定期的なテストから分離できます。
Microbenchmark はコードを直接実行するため、図 1 のとおり、ベンチマーク対象のコードを別個の Gradle モジュールに配置して、そのモジュールへの依存関係を設定する必要があります。
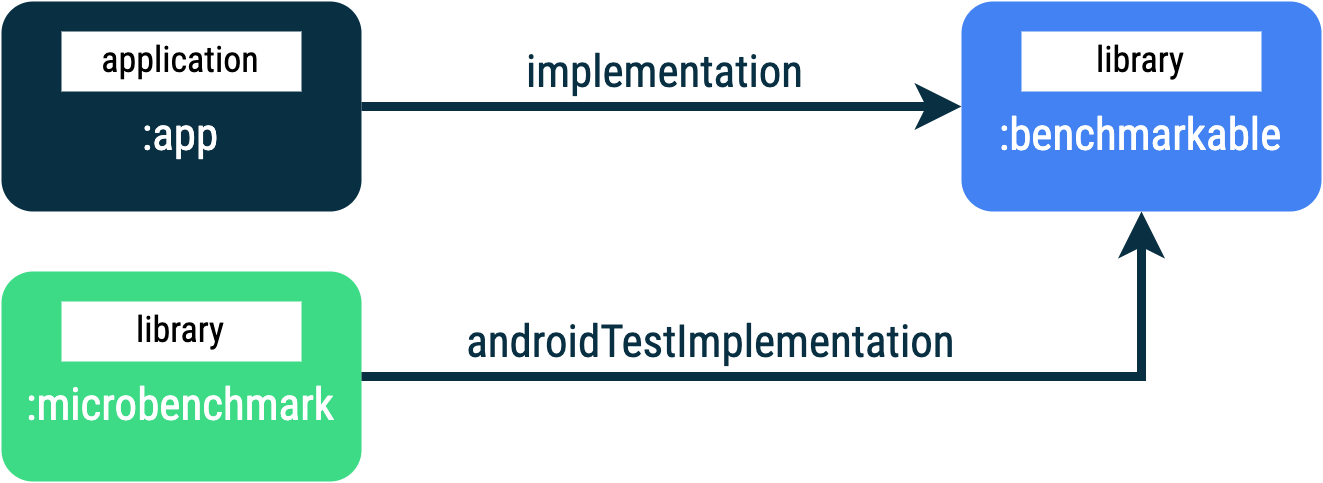
:app、:microbenchmark、:benchmarkable の Gradle モジュールを含むアプリ構造により Microbenchmark による :benchmarkable モジュール内のコードのベンチマークが可能新しい Gradle モジュールを追加する場合は、Android Studio のモジュール ウィザードを使用できます。ウィザードにより、ベンチマーク用の事前構成済みモジュールが作成され、ベンチマーク ディレクトリが追加され、debuggable が false に設定されます。
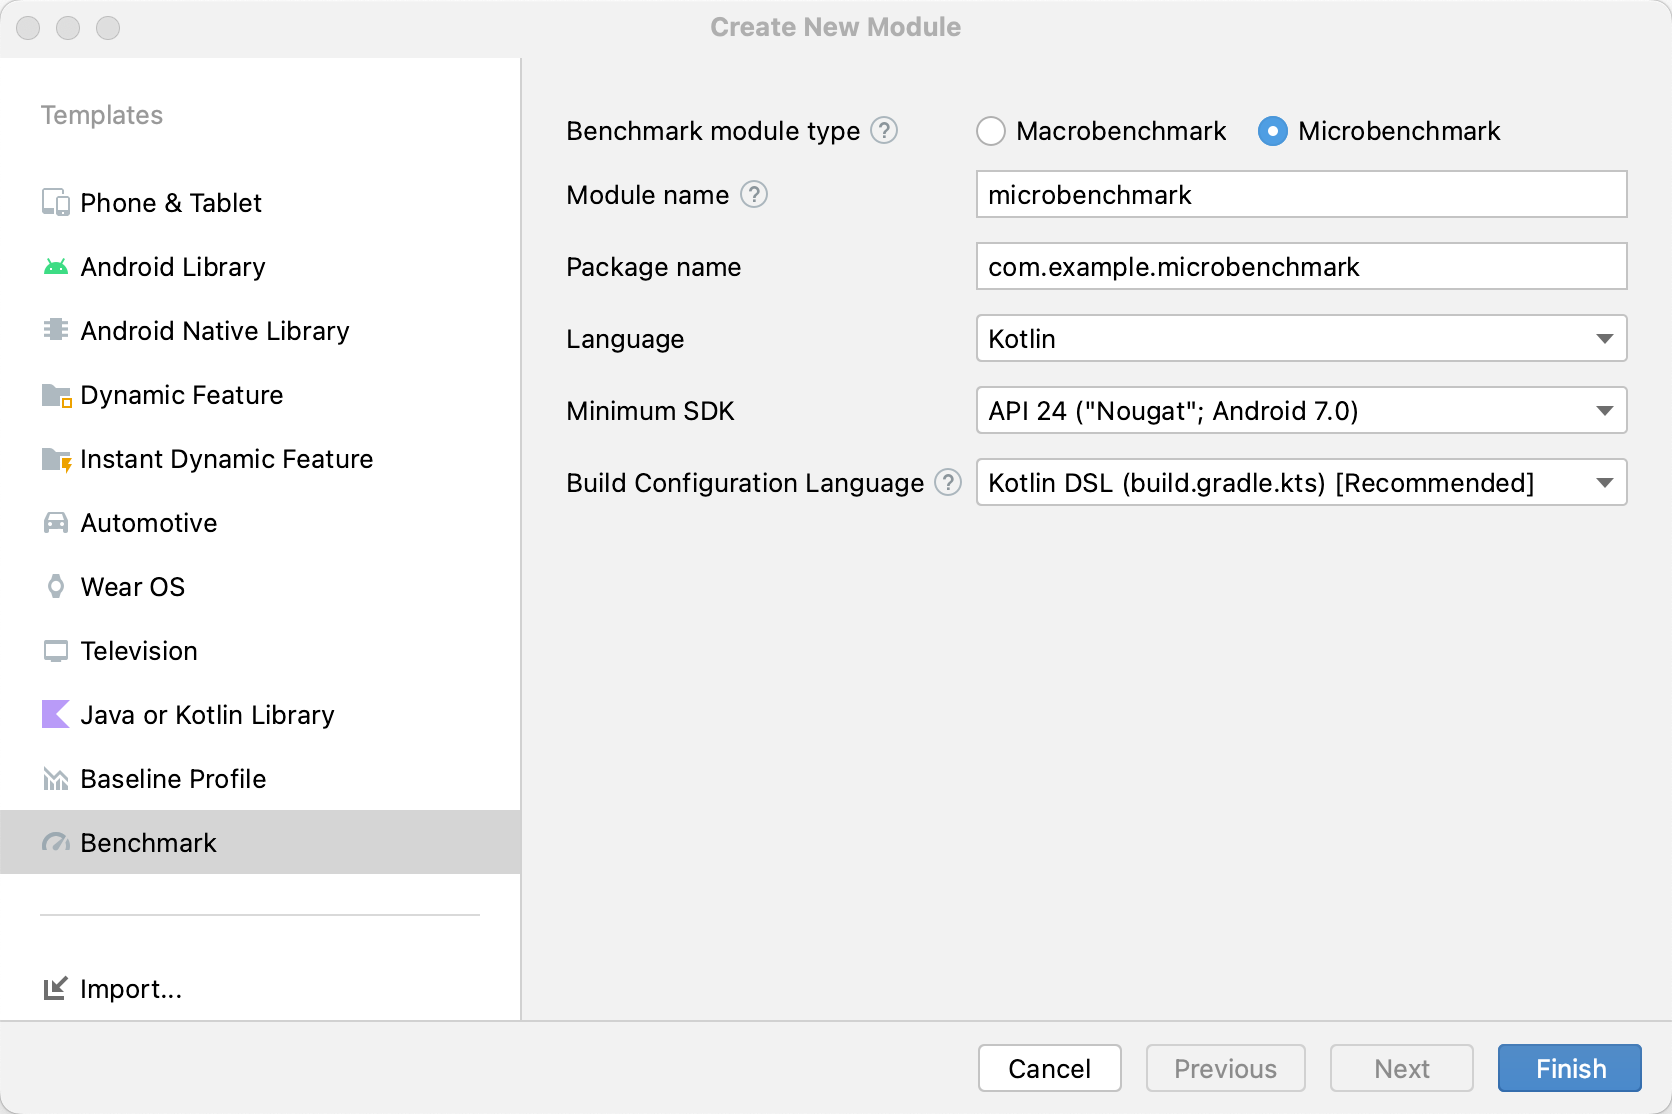
Android Studio の [Project] パネルでプロジェクトまたはモジュールを右クリックして、[New] > [Module] をクリックします。
[Templates] ペインで [Benchmark] を選択します。
ベンチマーク モジュール タイプとして [Microbenchmark] を選択します。
モジュール名として「macrobenchmark」と入力します。
[Finish] をクリックします。
モジュールが作成されたら、その build.gradle または build.gradle.kts ファイルを変更して、ベンチマーク対象のコードを含むモジュールに androidTestImplementation を追加します。
Kotlin
dependencies {
    // The module name might be different.
    androidTestImplementation(project(":benchmarkable"))
}
Groovy
dependencies {
    // The module name might be different.
    androidTestImplementation project(':benchmarkable')
}
Microbenchmark クラスを作成する
ベンチマークは、標準的なインストルメンテーション テストです。ベンチマークを作成するには、ライブラリが提供する BenchmarkRule クラスを使用します。アクティビティのベンチマークを行うには、ActivityScenario または ActivityScenarioRule を使用します。UI コードのベンチマークを行うには、@UiThreadTest を使用します。
ベンチマークのサンプルを以下のコードに示します。
Kotlin
@RunWith(AndroidJUnit4::class) class SampleBenchmark { @get:Rule val benchmarkRule = BenchmarkRule() @Test fun benchmarkSomeWork() { benchmarkRule.measureRepeated { doSomeWork() } } }
Java
@RunWith(AndroidJUnit4.class)
class SampleBenchmark {
    @Rule
    public BenchmarkRule benchmarkRule = new BenchmarkRule();

    @Test
    public void benchmarkSomeWork() {
        final BenchmarkState state = benchmarkRule.getState();
        while (state.keepRunning()) {
            doSomeWork();
        }
    }
}
セットアップで時間測定を無効にする
runWithTimingDisabled{} ブロックを使用して、測定が不要なコード セクションの時間測定を無効にできます。通常、こうしたセクションはベンチマークの反復処理ごとに実行する必要があるコードを表します。
Kotlin
// using random with the same seed, so that it generates the same data every run private val random = Random(0) // create the array once and just copy it in benchmarks private val unsorted = IntArray(10_000) { random.nextInt() } @Test fun benchmark_quickSort() { // ... benchmarkRule.measureRepeated { // copy the array with timing disabled to measure only the algorithm itself listToSort = runWithTimingDisabled { unsorted.copyOf() } // sort the array in place and measure how long it takes SortingAlgorithms.quickSort(listToSort) } // assert only once not to add overhead to the benchmarks assertTrue(listToSort.isSorted) }
Java
private final int[] unsorted = new int[10000];

public SampleBenchmark() {
    // Use random with the same seed, so that it generates the same data every
    // run.
    Random random = new Random(0);

    // Create the array once and copy it in benchmarks.
    Arrays.setAll(unsorted, (index) -> random.nextInt());
}

@Test
public void benchmark_quickSort() {
    final BenchmarkState state = benchmarkRule.getState();

    int[] listToSort = new int[0];

    while (state.keepRunning()) {

        // Copy the array with timing disabled to measure only the algorithm
        // itself.
        state.pauseTiming();
        listToSort = Arrays.copyOf(unsorted, 10000);
        state.resumeTiming();

        // Sort the array in place and measure how long it takes.
        SortingAlgorithms.quickSort(listToSort);
    }

    // Assert only once, not to add overhead to the benchmarks.
    assertTrue(SortingAlgorithmsKt.isSorted(listToSort));
}
measureRepeated ブロック内と runWithTimingDisabled 内で実行される作業量を最小限に抑えるようしてください。measureRepeated ブロックは複数回実行されるため、ベンチマークの実行に必要な時間全体に影響する可能性があります。ベンチマークのいくつかの結果を確認する必要がある場合は、ベンチマークの反復処理ごとに結果をアサートする代わりに、最後の結果をアサートできます。
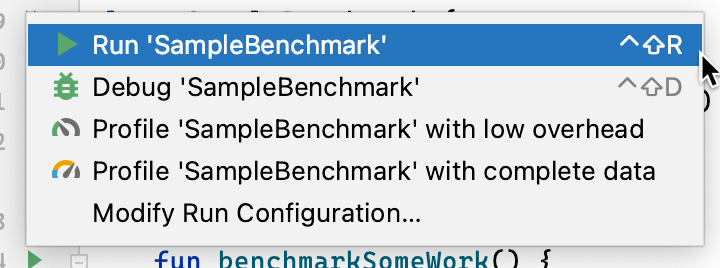
ベンチマークを実行する
図 3 のとおり、Android Studio 内でテストクラスまたはテストメソッドの横にあるガター アクションを使用して、@Test と同じようにベンチマークを実行します。
または、コマンドラインから connectedCheck を実行して、指定した Gradle モジュール内のすべてのテストを実行することもできます。
./gradlew benchmark:connectedCheck単一のテストを実行する場合は以下のとおりです。
./gradlew benchmark:connectedCheck -P android.testInstrumentationRunnerArguments.class=com.example.benchmark.SampleBenchmark#benchmarkSomeWorkベンチマークの結果
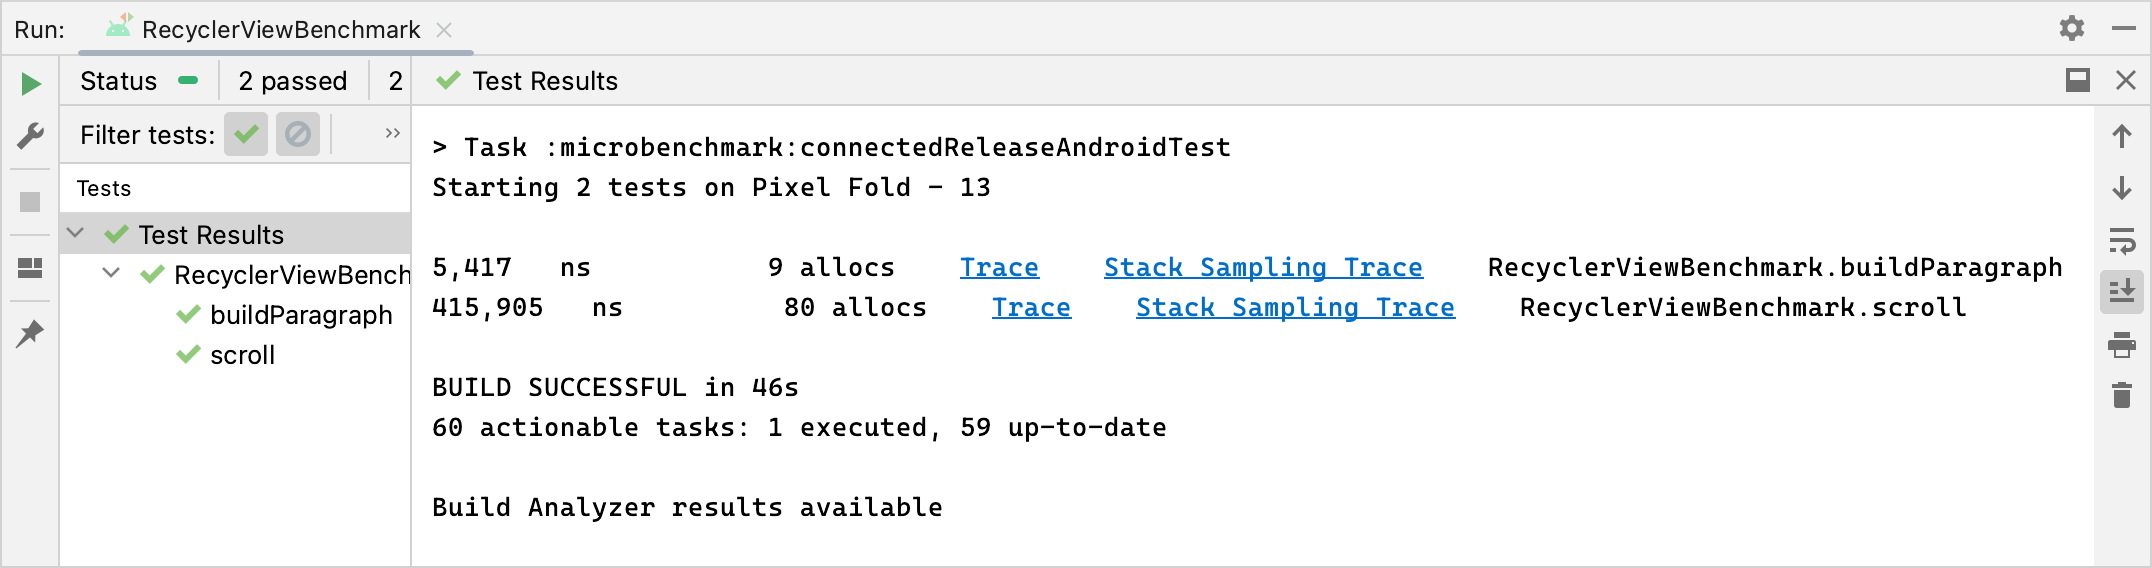
Microbenchmark の実行が成功すると、指標は Android Studio 内に直接表示されます。また、追加の指標とデバイス情報を含む完全なベンチマーク レポートが JSON 形式で出力されます。
JSON レポートとプロファイリング トレースも、デバイスからホストに自動的にコピーされます。これらはホストマシンの次の場所に書き込まれます。
project_root/module/build/outputs/connected_android_test_additional_output/debugAndroidTest/connected/device_id/
デフォルトでは、JSON レポートはデバイス ディスク内にあるテスト APK 用の外部共有メディア フォルダに書き込まれます。このフォルダは通常 /storage/emulated/0/Android/media/**app_id**/**app_id**-benchmarkData.json にあります。
構成エラー
ライブラリは、リリース精度のパフォーマンスを実現するようにプロジェクトと環境をセットアップする際、以下の条件を検出します。
- Debuggable が
falseに設定されている。 - 物理デバイスが使用されている(エミュレータはサポートされません)。
- ルート権限取得済みのデバイスの場合、クロックがロックされている。
- デバイスのバッテリー残量が 25% 以上ある。
上記のチェックのいずれかが失敗した場合、ベンチマークは不正確な測定を回避するためにエラーを報告します。
特定のエラータイプを警告として表示せず、ベンチマークが停止しないようにするには、インストルメンテーション引数 androidx.benchmark.suppressErrors にカンマ区切りのリストでエラータイプを渡します。
次の例のように、Gradle スクリプトから設定できます。
Kotlin
android {
    defaultConfig {
       …
      testInstrumentationRunnerArguments["androidx.benchmark.suppressErrors"] = "DEBUGGABLE,LOW-BATTERY"
    }
}
Groovy
android {
    defaultConfig {
       …
      testInstrumentationRunnerArguments["androidx.benchmark.suppressErrors"] = "DEBUGGABLE,LOW-BATTERY"
    }
}
コマンドラインからもエラーの出力を抑制できます。
$ ./gradlew :benchmark:connectedCheck -P andoidtestInstrumentationRunnerArguments.androidx.benchmark.supperssErrors=DEBUGGABLE,LOW-BATTERY
エラーを抑制すると、不適切に設定された状態でもベンチマークを実行できます。ただし、そのベンチマーク出力は名前が意図的に変更され、テスト名の先頭にエラー名が付加されます。たとえば、上記のスニペットで抑制を使用してデバッグ可能な状態でベンチマークを実行すると、テスト名の先頭に DEBUGGABLE_ が付加されます。
あなたへのおすすめ
- 注: JavaScript がオフになっている場合はリンクテキストが表示されます
- Macrobenchmark を作成する
- Gradle を使用せずに Microbenchmark をビルドする
- ベースライン プロファイルを作成する {:#creating-profile-rules}