
To learn how to use the Microbenchmark library by adding changes to your application code, see the Quickstart section. To learn how to complete a full setup with more complicated changes to your codebase, see the Full project setup section.
Quickstart
This section shows how to try out benchmarking and run one-off measurements without needing to move code into modules. For accurate performance results, these steps involve disabling debugging in your app, so keep this in a local working copy without committing the changes to your source control system.
To perform one-off benchmarking, do the following:
Add the library to your module's
build.gradleorbuild.gradle.ktsfile:Kotlin
dependencies {
    implementation("androidx.benchmark:benchmark-junit4:1.2.4")
}
Groovy
dependencies {
    implementation 'androidx.benchmark:benchmark-junit4:1.2.4'
}
Use an
implementationdependency instead of anandroidTestImplementationdependency. If you useandroidTestImplementation, the benchmarks fail to run because the library manifest isn't merged into the app manifest.Update the
debugbuild type so that it isn't debuggable:Kotlin
android {
    ...
    buildTypes {
        debug {
            isDebuggable = false
        }
    }
}
Groovy
android {
    ...
    buildTypes {
        debug {
            debuggable false
        }
    }
}
Change the
testInstrumentationRunnerto beAndroidBenchmarkRunner:Kotlin
android {
    ...
    defaultConfig {
        testInstrumentationRunner = "androidx.benchmark.junit4.AndroidBenchmarkRunner"
    }
}
Groovy
android {
    ...
    defaultConfig {
        testInstrumentationRunner "androidx.benchmark.junit4.AndroidBenchmarkRunner"
    }
}
Add an instance of
BenchmarkRulein a test file in theandroidTestdirectory to add your benchmark. For more information about writing benchmarks, see Create a Microbenchmark class.The following code snippet shows how to add a benchmark to an Instrumented test:
Kotlin
@RunWith(AndroidJUnit4::class) class SampleBenchmark { @get:Rule val benchmarkRule = BenchmarkRule() @Test fun benchmarkSomeWork() { benchmarkRule.measureRepeated { doSomeWork() } } }
Java
@RunWith(AndroidJUnit4.class)
class SampleBenchmark {
    @Rule
    public BenchmarkRule benchmarkRule = new BenchmarkRule();

    @Test
    public void benchmarkSomeWork() {
            BenchmarkRuleKt.measureRepeated(
                (Function1<BenchmarkRule.Scope, Unit>) scope -> doSomeWork()
            );
       }
    }
}
To learn how to write a benchmark, skip to Create a Microbenchmark class.
Full project setup
To set up regular benchmarking rather than one-off benchmarking, isolate
benchmarks into their own module. This helps ensure that their configuration,
such as setting debuggable to false, is separate from regular tests.
Because Microbenchmark runs your code directly, place the code you want to benchmark into a separate Gradle module and set dependency on that module as shown in figure 1.
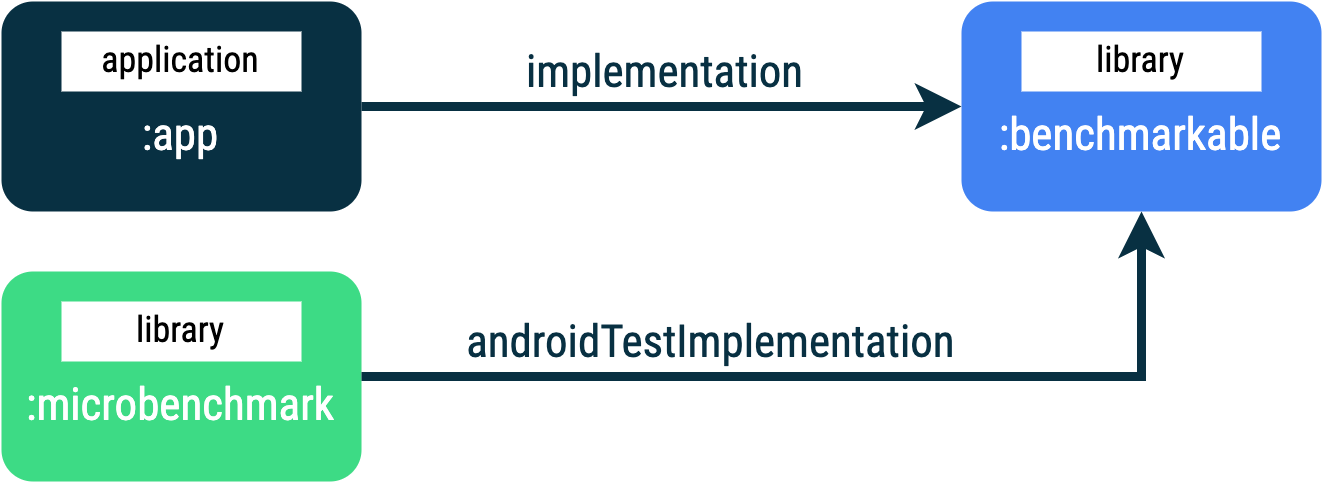
:app,
:microbenchmark, and :benchmarkable Gradle
modules, which lets Microbenchmarks benchmark code in the
:benchmarkable module.To add a new Gradle module, you can use the module wizard in Android Studio. The
wizard creates a module that is pre-configured for benchmarking, with a
benchmark directory added and debuggable set to false.
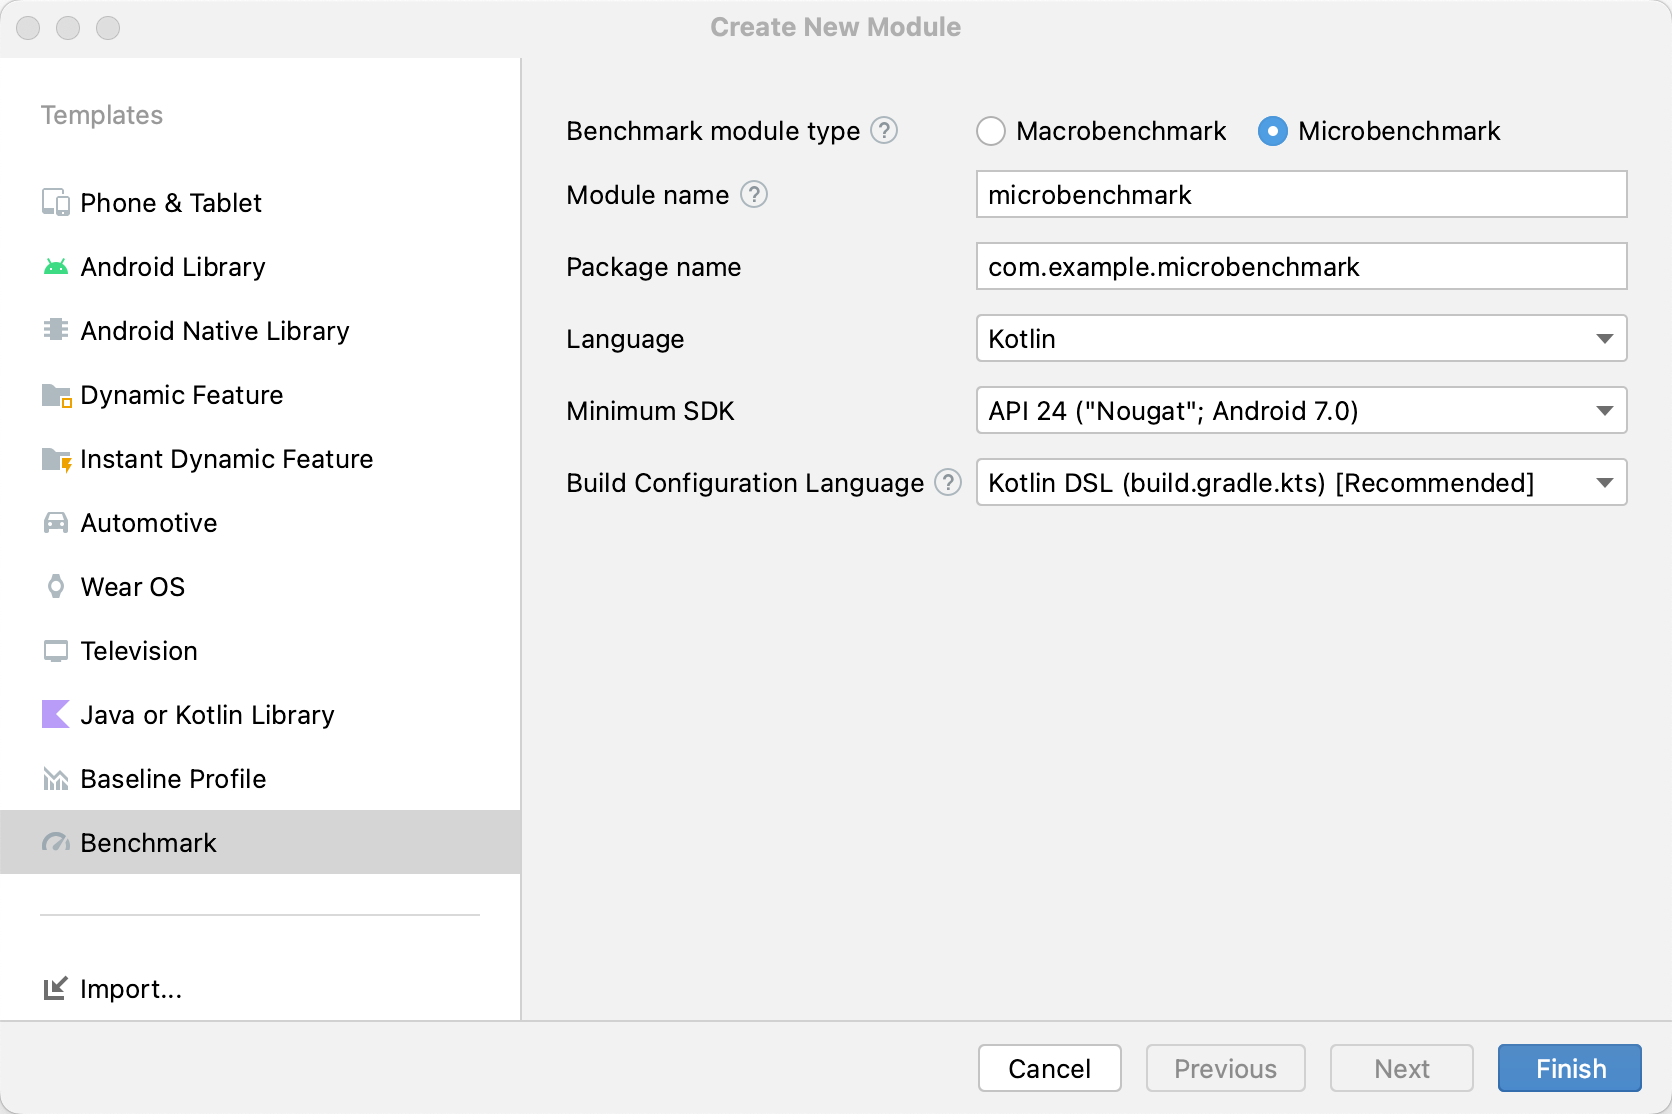
Right-click your project or module in the Project panel in Android Studio and click New > Module.
Select Benchmark in the Templates pane.
Select Microbenchmark as the benchmark module type.
Type "microbenchmark" for the module name.
Click Finish.
After the module is created, change its build.gradle or build.gradle.kts
file and add androidTestImplementation to the module containing code to
benchmark:
Kotlin
dependencies {
    // The module name might be different.
    androidTestImplementation(project(":benchmarkable"))
}
Groovy
dependencies {
    // The module name might be different.
    androidTestImplementation project(':benchmarkable')
}
Create a Microbenchmark class
Benchmarks are standard instrumentation tests. To create a benchmark, use the
BenchmarkRule class provided by the library. To benchmark activities, use
ActivityScenario or ActivityScenarioRule. To benchmark UI code,
use @UiThreadTest.
The following code shows a sample benchmark:
Kotlin
@RunWith(AndroidJUnit4::class) class SampleBenchmark { @get:Rule val benchmarkRule = BenchmarkRule() @Test fun benchmarkSomeWork() { benchmarkRule.measureRepeated { doSomeWork() } } }
Java
@RunWith(AndroidJUnit4.class)
class SampleBenchmark {
    @Rule
    public BenchmarkRule benchmarkRule = new BenchmarkRule();

    @Test
    public void benchmarkSomeWork() {
        final BenchmarkState state = benchmarkRule.getState();
        while (state.keepRunning()) {
            doSomeWork();
        }
    }
}
Disable timing for setup
You can disable timing for sections of code you don't want to measure with the
runWithTimingDisabled{} block. These sections usually represent some
code which you need to run on each iteration of the benchmark.
Kotlin
// using random with the same seed, so that it generates the same data every run private val random = Random(0) // create the array once and just copy it in benchmarks private val unsorted = IntArray(10_000) { random.nextInt() } @Test fun benchmark_quickSort() { // ... benchmarkRule.measureRepeated { // copy the array with timing disabled to measure only the algorithm itself listToSort = runWithTimingDisabled { unsorted.copyOf() } // sort the array in place and measure how long it takes SortingAlgorithms.quickSort(listToSort) } // assert only once not to add overhead to the benchmarks assertTrue(listToSort.isSorted) }
Java
private final int[] unsorted = new int[10000];

public SampleBenchmark() {
    // Use random with the same seed, so that it generates the same data every
    // run.
    Random random = new Random(0);

    // Create the array once and copy it in benchmarks.
    Arrays.setAll(unsorted, (index) -> random.nextInt());
}

@Test
public void benchmark_quickSort() {
    final BenchmarkState state = benchmarkRule.getState();

    int[] listToSort = new int[0];

    while (state.keepRunning()) {

        // Copy the array with timing disabled to measure only the algorithm
        // itself.
        state.pauseTiming();
        listToSort = Arrays.copyOf(unsorted, 10000);
        state.resumeTiming();

        // Sort the array in place and measure how long it takes.
        SortingAlgorithms.quickSort(listToSort);
    }

    // Assert only once, not to add overhead to the benchmarks.
    assertTrue(SortingAlgorithmsKt.isSorted(listToSort));
}
Try to minimize the amount of work done inside the measureRepeated block
and inside runWithTimingDisabled. The measureRepeated block is run multiple
times and it can affect the overall time needed to run the benchmark. If you
need to verify some results of a benchmark, you can assert the last result
instead of doing it every iteration of the benchmark.
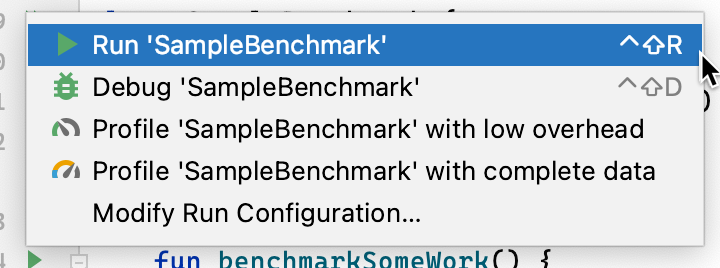
Run the benchmark
In Android Studio, run your benchmark as you do with any @Test using the
gutter action next to your test class or method, as shown in figure 3.
Alternatively, from the command line, run the connectedCheck to run all
of the tests from specified Gradle module:
./gradlew benchmark:connectedCheckOr a single test:
./gradlew benchmark:connectedCheck -P android.testInstrumentationRunnerArguments.class=com.example.benchmark.SampleBenchmark#benchmarkSomeWorkBenchmark results
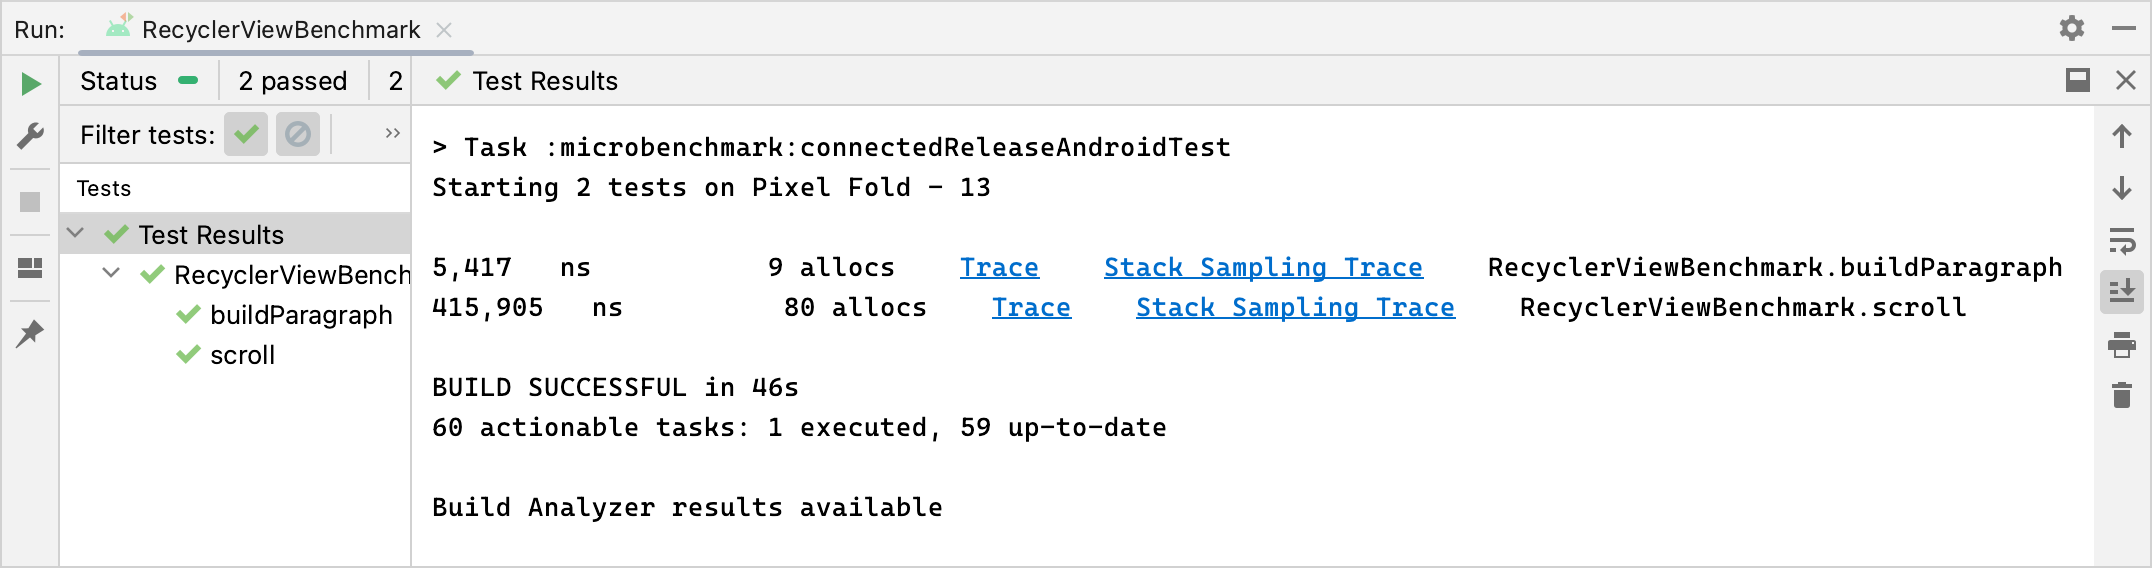
After a successful Microbenchmark run, metrics are displayed directly in Android Studio and a full benchmark report with additional metrics and device information is available in JSON format.
JSON reports and any profiling traces are also automatically copied from device to host. These are written on the host machine in the following location:
project_root/module/build/outputs/connected_android_test_additional_output/debugAndroidTest/connected/device_id/
By default, the JSON report is written to disk on-device in the test APK's
external shared media folder, which is typically located in
/storage/emulated/0/Android/media/**app_id**/**app_id**-benchmarkData.json.
Configuration errors
The library detects the following conditions to ensure your project and environment are set up for release-accurate performance:
- Debuggable is set to
false. - A physical device is being used—emulators aren't supported.
- Clocks are locked if the device is rooted.
- Sufficient battery level on device of at least 25%.
If any of the preceding checks fail, the benchmark reports an error to discourage inaccurate measurements.
To suppress specific error types as warnings and prevent them from halting the
benchmark, pass the error type in a comma-separated list to the instrumentation
argument androidx.benchmark.suppressErrors.
You can set this from your Gradle script, as shown in the following example:
Kotlin
android {
    defaultConfig {
       …
      testInstrumentationRunnerArguments["androidx.benchmark.suppressErrors"] = "DEBUGGABLE,LOW-BATTERY"
    }
}
Groovy
android {
    defaultConfig {
       …
      testInstrumentationRunnerArguments["androidx.benchmark.suppressErrors"] = "DEBUGGABLE,LOW-BATTERY"
    }
}
You can also suppress errors from the command line:
$ ./gradlew :benchmark:connectedCheck -P andoidtestInstrumentationRunnerArguments.androidx.benchmark.supperssErrors=DEBUGGABLE,LOW-BATTERY
Suppressing errors lets the benchmark run in an incorrectly configured state,
and the output of the benchmark is intentionally renamed by prepending test
names with the error. For example, running a debuggable benchmark with the
suppression in the preceding snippet prepends test names with DEBUGGABLE_.
Recommended for you
- Note: link text is displayed when JavaScript is off
- Write a Macrobenchmark
- Build Microbenchmarks without Gradle
- Create Baseline Profiles {:#creating-profile-rules}