Cómo generar perfiles del uso de la batería con Batterystats y Battery Historian
Organiza tus páginas con colecciones
Guarda y categoriza el contenido según tus preferencias.
En este documento, se muestran los pasos de configuración básicos y el flujo de trabajo de la herramienta Batterystats y la secuencia de comandos de Battery Historian. Si quieres obtener información sobre cómo usar Battery Historian para inspeccionar los patrones de consumo de batería, consulta Cómo analizar el consumo con Battery Historian.
Batterystats es una herramienta del framework de Android que recopila datos sobre la batería en tu dispositivo. Puedes usar adb para volcar los datos sobre la batería recopilados en tu máquina de desarrollo y crear un informe que puedas analizar con Battery Historian. Esta herramienta convierte el informe de Batterystats en una visualización HTML que puedes ver en tu navegador.
Batterystats y Battery Historian son útiles para lo siguiente:
Mostrarte cómo y en qué lugar usan corriente de la batería los procesos
Identificar las tareas de tu app que puedas aplazar o quitar para mejorar la duración de batería.
Cómo instalar Battery Historian
Puedes instalar Battery Historian con Docker. Si deseas conocer métodos de instalación alternativos, incluido el desarrollo a partir del código fuente, consulta el archivo README en la página de GitHub del proyecto. Para completar la instalación con Docker, sigue estos pasos:
Para instalar Docker, sigue las instrucciones que se indican en el sitio web de Docker. Funciona con cualquier tipo de suscripción, incluida una suscripción Personal gratuita.
Para confirmar que Docker esté instalado correctamente, abre la línea de comandos y escribe el siguiente comando:
docker run hello-world
Si Docker está instalado correctamente, muestra un resultado similar al siguiente:
Unable to find image 'hello-world:latest' locally
latest: Pulling from library/hello-world
78445dd45222: Pull complete
Digest:
sha256:c5515758d4c5e1e838e9cd307f6c6a0d620b5e07e6f927b07d05f6d12a1ac8d7
Status: Downloaded newer image for hello-world:latest
Hello from Docker!
This message shows that your installation appears to be working correctly.
To generate this message, Docker took the following steps:
1. The Docker client contacted the Docker daemon.
2. The Docker daemon pulled the "hello-world" image from the Docker Hub.
3. The Docker daemon created a new container from that image which runs the
executable that produces the output you are currently reading.
4. The Docker daemon streamed that output to the Docker client, which sent it to your terminal
Inicia la app de Docker Desktop, que es un frontend de la GUI para Docker, antes de ejecutar la imagen de Battery Historian. Cuando lo ejecutas, se inicializan las herramientas de Docker. Battery Historian no se ejecutará hasta que lo hagas al menos una vez.
Ejecuta Battery Historian desde la línea de comandos cuando lo ejecutes por primera vez. La app de Docker Desktop no te permite especificar el puerto en el que se ejecutará el servidor web. Puedes hacer esto desde la línea de comandos: Sin embargo, después de ejecutar con éxito el contenedor desde la línea de comandos, se crea una entrada en Docker Desktop, y luego puedes iniciarla con el mismo puerto de objeto de escucha desde Docker Desktop.
Usa el siguiente comando para ejecutar la imagen de Battery Historian:
docker run -p port_number:9999 gcr.io/android-battery-historian/stable:3.1 --port 9999
Battery Historian usa el puerto que elijas, como se especifica en port_number.
Navega a Battery Historian en tu navegador para confirmar que se esté ejecutando. La dirección varía según tu sistema operativo:
Para Linux y Mac
Battery Historian está disponible en http://localhost:port_number.
Para Windows
Una vez que abres Docker, te indica la dirección IP de la máquina que lo está usando. Por ejemplo, si la dirección IP es 123.456.78.90, Battery Historian está disponible en http://123.456.78.90:port_number.
Luego, se mostrará la página de inicio de Battery Historian, en la que podrás subir y ver estadísticas de la batería.
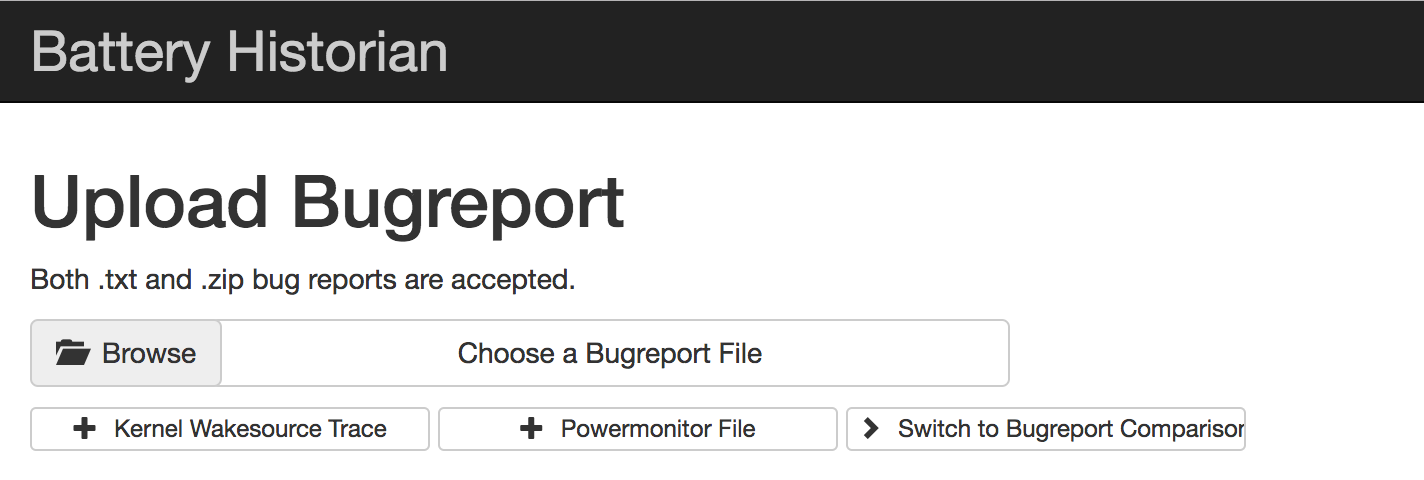
Figura 1: Página de inicio de Battery Historian
Cómo recopilar datos con Batterystats
Si deseas recopilar datos de tu dispositivo con Batterystats y abrirlos en Battery Historian, haz lo siguiente:
Conecta el dispositivo móvil a la computadora.
Desde una ventana de terminal, cierra el servidor adb en ejecución con el siguiente comando:
adb kill-server
Ejecuta el siguiente comando para reiniciar adb y verificar si hay dispositivos conectados.
adb devices
Muestra tu dispositivo, de manera similar al siguiente resultado de ejemplo.
Figura 2: Resultado de adb devices, que muestra un dispositivo conectado
Si no aparece ningún dispositivo, asegúrate de que el teléfono esté conectado y de que la depuración por USB esté habilitada. Luego, detén y reinicia adb.
Ejecuta el siguiente comando para restablecer la recopilación de datos sobre la batería:
adb shell dumpsys batterystats --reset
El dispositivo siempre recopila Batterystats y demás información de depuración en segundo plano. El restablecimiento borra los datos anteriores recopilados sobre la batería. Si no lo restableces, el resultado puede ser muy grande.
Desconecta el dispositivo de la computadora de manera que solo use corriente de la batería del dispositivo.
Usa tu app y realiza acciones para las que quieras recopilar datos. Por ejemplo, desconéctate de la red Wi-Fi y envía datos a la nube.
Vuelve a conectar el teléfono.
Asegúrate de que se reconozca tu teléfono y ejecuta el siguiente comando:
adb devices
Ejecuta el siguiente comando para volcar todos los datos de la batería. Es posible que esta acción tarde unos minutos:
Se creará el archivo batterystats.txt en el directorio que especifiques con el argumento de ruta de acceso opcional. Si no especificas una ruta de acceso, se creará el archivo en el directorio principal.
Crea un informe a partir de datos sin procesar.
Para dispositivos con Android 7.0 y versiones posteriores:
adb bugreport [path/]bugreport.zip
Para dispositivos con Android 6.0 y versiones inferiores:
adb bugreport [path/]bugreport.txt
El informe de errores puede tardar varios minutos en completarse. No desconectes el dispositivo ni canceles el proceso hasta que se complete.
Al igual que con batterystats.txt, se crearán estos archivos en el directorio que especifiques con el argumento path opcional. Si no especificas una ruta de acceso, se crearán en el directorio principal.
Si todavía no se está ejecutando Battery Historian, usa el siguiente comando:
docker run -p port_number:9999 gcr.io/android-battery-historian/stable:3.1 --port 9999
Si quieres ver tus datos en Battery Historian, ábrelo en tu navegador. En Mac y Linux, Battery Historian se ejecuta en http://localhost:port_number. En Windows, lo hace en http://your_IP_address:port_number.
Haz clic en Browse y luego selecciona el archivo de informe de errores que creaste anteriormente.
Haz clic en Enviar. Battery Historian abrirá un gráfico creado a partir de los datos de Batterystats.
Cómo ver datos con los gráficos de Battery Historian
En el gráfico de Battery Historian se muestran eventos relacionados con la batería a lo largo del tiempo.
En cada fila, se muestra un segmento de barra de color cuando un componente del sistema está activo y, por lo tanto, usa corriente de la batería. En el gráfico, no se muestra cuánta batería usa el componente (solo se muestra si la app está activa). Los gráficos están organizados por categoría, y se muestra una barra por cada categoría a lo largo del tiempo, como se puede apreciar en el eje X del gráfico.
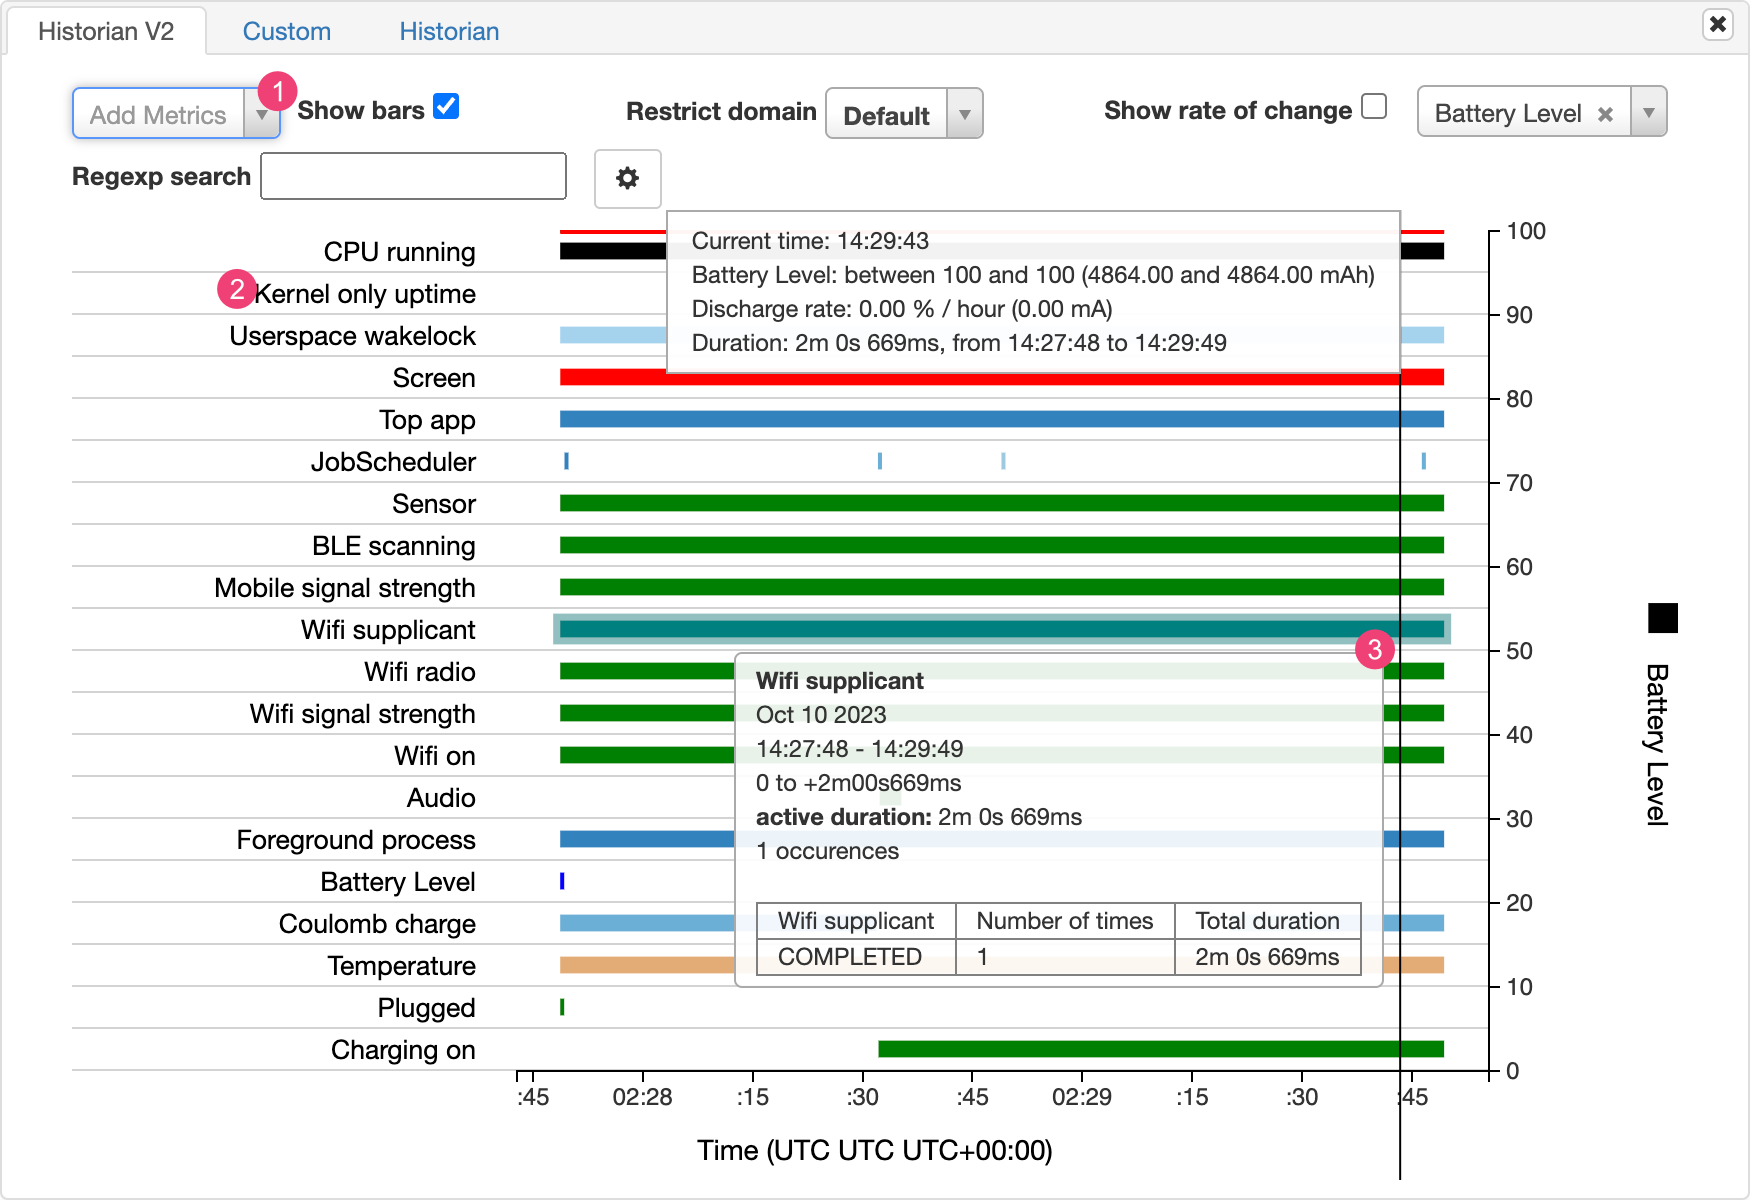
Figura 3: Ejemplo de un gráfico de Battery Historian
Agrega métricas adicionales de la lista desplegable.
Mantén el puntero sobre el nombre de la métrica para ver más información sobre cada métrica, incluida una clave de los colores que se usan en el gráfico.
Mantén el puntero sobre una barra para ver información más detallada sobre esa métrica y las estadísticas de la batería en un punto específico del cronograma.
Resultados adicionales de Batterystats
Puedes ver información adicional del archivo batterystats.txt en la sección de estadísticas ubicada debajo del gráfico de Battery Historian.
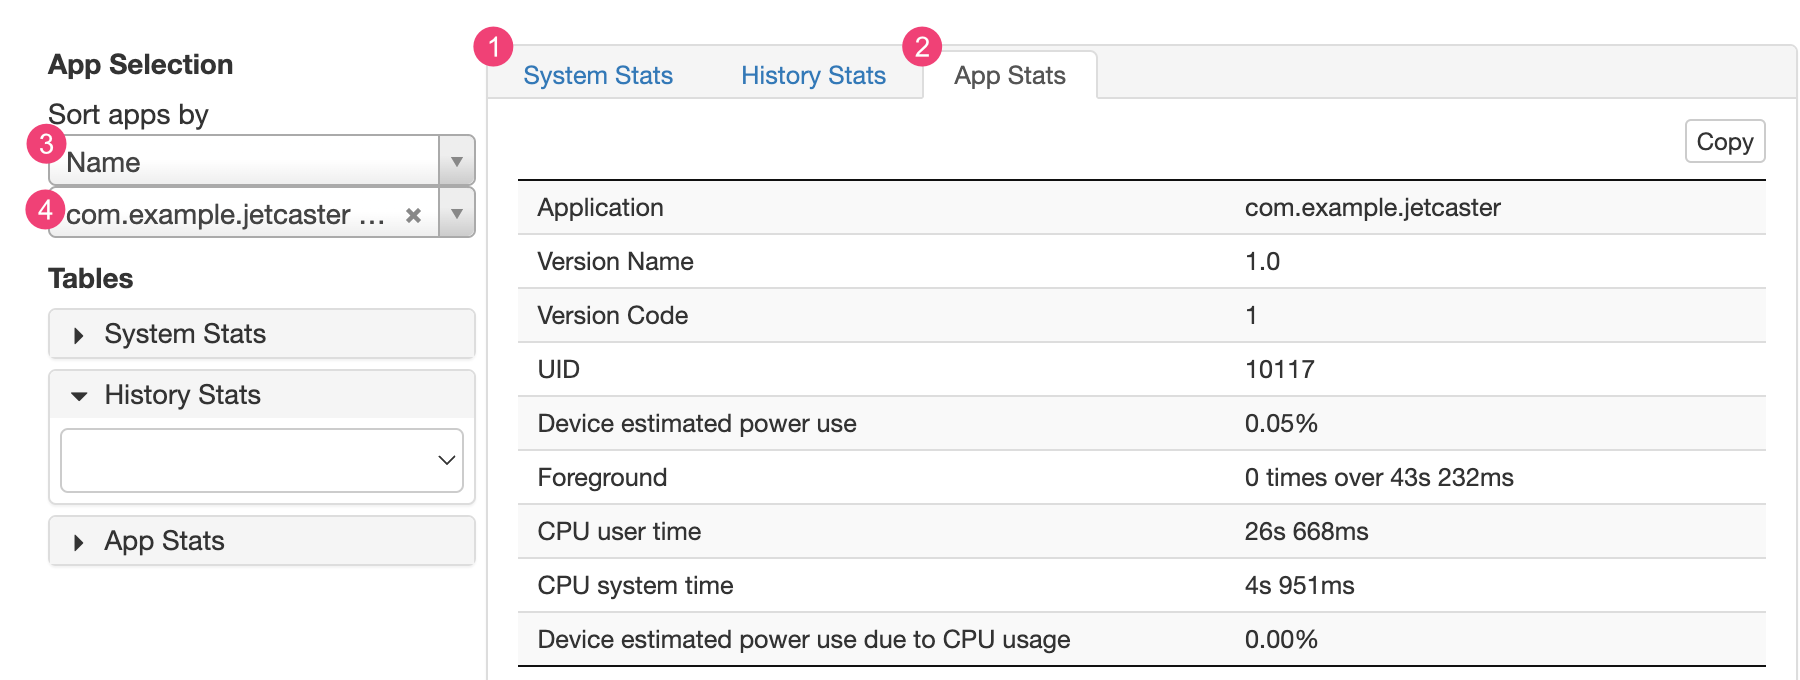
Figura 4: Sección de estadísticas de Battery Historian
En la pestaña 1System Stats, se incluyen estadísticas de todo el sistema, como los niveles de señal de telefonía celular y el brillo de la pantalla. Esta información ofrece un panorama general de lo que sucede con el dispositivo. Esta sección es particularmente útil para asegurarte de que ningún evento externo afecte tu prueba.
En la pestaña 2App Stats, se incluye información sobre apps específicas. Ordena la lista de apps con la lista desplegable 3Sort apps by del panel App Selection. Puedes seleccionar una app específica para ver las estadísticas mediante la lista desplegable de apps 4.
El contenido y las muestras de código que aparecen en esta página están sujetas a las licencias que se describen en la Licencia de Contenido. Java y OpenJDK son marcas registradas de Oracle o sus afiliados.
Última actualización: 2025-07-27 (UTC)
[[["Fácil de comprender","easyToUnderstand","thumb-up"],["Resolvió mi problema","solvedMyProblem","thumb-up"],["Otro","otherUp","thumb-up"]],[["Falta la información que necesito","missingTheInformationINeed","thumb-down"],["Muy complicado o demasiados pasos","tooComplicatedTooManySteps","thumb-down"],["Desactualizado","outOfDate","thumb-down"],["Problema de traducción","translationIssue","thumb-down"],["Problema con las muestras o los códigos","samplesCodeIssue","thumb-down"],["Otro","otherDown","thumb-down"]],["Última actualización: 2025-07-27 (UTC)"],[],[],null,["# Profile battery usage with Batterystats and Battery Historian\n\n| **Warning:** Battery Historian is no longer actively maintained; if possible, consider using [system tracing](/topic/performance/tracing), the [Macrobenchmark power metric](/topic/performance/benchmarking/macrobenchmark-metrics#power), or the [Power Profiler](/studio/profile/power-profiler) to get insights into battery performance.\n\nThis document shows the basic setup steps and workflow for the Batterystats tool\nand the Battery Historian script. To learn how to use Battery Historian to\ninspect battery consumption patterns, see [Analyze power use with Battery\nHistorian](/topic/performance/power/battery-historian).\n\nBatterystats is a tool included in the Android framework that collects battery\ndata on your device. You can use [`adb`](/studio/command-line/adb) to dump the\ncollected battery data to your development machine and create a report you can\nanalyze using Battery Historian. Battery Historian converts the report from\nBatterystats into an HTML visualization that you can view in your browser.\n\nBatterystats and Battery Historian are useful for the following:\n\n- Showing you where and how processes are drawing current from the battery.\n- Identifying tasks in your app that can be deferred or removed to improve battery life.\n\n| **Note:** To use Batterystats and Battery Historian, you need a mobile device with [USB debugging](/studio/debug/dev-options) enabled.\n\nInstall Battery Historian\n-------------------------\n\nYou can use Docker to install Battery Historian. For alternative installation\nmethods, including building from source, see the\n[README](https://github.com/google/battery-historian) on the\nproject's GitHub page. To install using Docker, do the following:\n\n1. Install Docker by following the instructions on the\n [Docker website](https://docs.docker.com/desktop). Any\n [subscription](https://docker.com/pricing) type works,\n including a free Personal subscription.\n\n2. To confirm Docker is correctly installed, open the command line and\n enter the following command:\n\n docker run hello-world\n\n If Docker is correctly installed, it displays an output like this: \n\n Unable to find image 'hello-world:latest' locally\n latest: Pulling from library/hello-world\n 78445dd45222: Pull complete\n Digest:\n sha256:c5515758d4c5e1e838e9cd307f6c6a0d620b5e07e6f927b07d05f6d12a1ac8d7\n Status: Downloaded newer image for hello-world:latest\n\n Hello from Docker!\n This message shows that your installation appears to be working correctly.\n\n To generate this message, Docker took the following steps:\n 1. The Docker client contacted the Docker daemon.\n 2. The Docker daemon pulled the \"hello-world\" image from the Docker Hub.\n 3. The Docker daemon created a new container from that image which runs the\n executable that produces the output you are currently reading.\n 4. The Docker daemon streamed that output to the Docker client, which sent it to your terminal\n\n3. Launch the Docker Desktop app---which is a GUI frontend for Docker---before\n you run the Battery Historian image. Running this initializes the Docker\n tools. Battery Historian doesn't run until you do this at least once.\n\n4. Run Battery Historian from the command line when running it for the first\n time. The Docker Desktop app doesn't let you specify the port to run the web\n server on. You can only do this from the command line. However, after you\n successfully run the container from the command line, an entry is created in\n Docker Desktop, and then you can launch it using the same listener port\n from Docker Desktop.\n\n5. Run the Battery Historian image using the following command:\n\n ```\n docker run -p port_number:9999 gcr.io/android-battery-historian/stable:3.1 --port 9999\n ```\n\n Battery Historian uses the port of your choice, as specified using\n \u003cvar translate=\"no\"\u003eport_number\u003c/var\u003e.\n | **Note:** If you're using a Windows machine, you might need to enable virtualization in your BIOS. Check the documentation for your motherboard for more information about how to enable virtualization. If you can run the [Android Emulator](/studio/run/emulator), then virtualization is already enabled.\n6. Navigate to Battery Historian in your browser to confirm it's running. The\n address varies depending on your operating system:\n\n For Linux and Mac\n : Battery Historian is available at\n `http://localhost:`\u003cvar translate=\"no\"\u003eport_number\u003c/var\u003e.\n\n For Windows\n : After you start Docker, it tells you the IP address of the machine it\n is using. For example, if the IP address is 123.456.78.90, Battery\n Historian is available at\n `http://123.456.78.90:`\u003cvar translate=\"no\"\u003eport_number\u003c/var\u003e.\n\n \u003cbr /\u003e\n\n It then displays the Battery Historian start page, where you can upload and\n view battery statistics.\n **Figure 1.** The start page for Battery Historian.\n\nGather data with Batterystats\n-----------------------------\n\nTo collect data from your device using Batterystats and open it in Battery\nHistorian, do the following:\n\n1. Connect your mobile device to your computer.\n\n2. From a Terminal window, shut down your running `adb` server by running the\n following command:\n\n adb kill-server\n\n3. Restart `adb` and check for connected devices by running the following\n command.\n\n adb devices\n\n It lists your device, similar to the following example output.\n **Figure 2.** The output of `adb devices`, showing one connected device\n\n If it doesn't list any devices, make sure your phone is connected and [USB\n debugging](/studio/debug/dev-options#Enable-debugging) is enabled, and then\n stop and restart `adb`.\n4. Reset battery data gathering by running the following command:\n\n adb shell dumpsys batterystats --reset\n\n The device is always collecting Batterystats and other debugging information\n in the background. Resetting erases previous battery collection data. If you\n don't reset, the output can be very large.\n5. Disconnect your device from your computer so that you are only drawing\n current from the device's battery.\n\n6. Use your app and perform actions for which you want to collect data for. For\n example, disconnect from Wi-Fi and send data to the cloud.\n\n7. Reconnect your phone.\n\n8. Make sure your phone is recognized and run the following command:\n\n adb devices\n\n9. Dump all battery data by running the following command. This can take a\n while.\n\n ```\n adb shell dumpsys batterystats \u003e [path/]batterystats.txt\n ```\n\n The `batterystats.txt` file is created in the directory you specify using\n the optional path argument. If you don't specify a path, the file is\n created in your home directory.\n10. Create a report from raw data.\n\n For devices running Android 7.0 and higher:\n :\n\n ```\n adb bugreport [path/]bugreport.zip\n ```\n\n For devices running Android 6.0 and lower:\n :\n\n ```\n adb bugreport [path/]bugreport.txt\n ```\n\n \u003cbr /\u003e\n\n Bugreport can take several minutes to complete. Don't disconnect your\n device or cancel the process until it's complete.\n\n As with `batterystats.txt`, these files are created in the directory you\n specify using the optional \u003cvar translate=\"no\"\u003epath\u003c/var\u003e argument. If you\n don't specify a path, they are created in your home directory.\n\n If it's not already running, run Battery Historian using the following\n command: \n\n ```\n docker run -p port_number:9999 gcr.io/android-battery-historian/stable:3.1 --port 9999\n ```\n11. To view your data in Battery Historian, open the Battery Historian in your\n browser. For Mac and Linux, Battery Historian runs at\n `http://localhost:`\u003cvar translate=\"no\"\u003eport_number\u003c/var\u003e. For Windows, Battery\n Historian runs at\n `http://`\u003cvar translate=\"no\"\u003eyour_IP_address\u003c/var\u003e`:`\u003cvar translate=\"no\"\u003eport_number\u003c/var\u003e.\n\n12. Click **Browse** and then choose the bugreport file you created.\n\n13. Click **Submit**. Battery Historian opens a chart created from your\n Batterystats data.\n\nView data with Battery Historian charts\n---------------------------------------\n\nThe Battery Historian chart graphs power-relevant events over time.\n\nEach row shows a colored bar segment when a system component is active and thus\ndrawing current from the battery. The chart doesn't show how much battery is\nused by the component---only whether the app is active. Charts are organized by\ncategory, showing a bar for each category over time, as displayed on the\n*x*-axis of the chart.\n**Figure 3.** Example of a Battery Historian chart.\n\n1. Add additional metrics from the drop-down list.\n2. Hold the pointer over the metric name to see more information about each metric, including a key for the colors used in the chart.\n3. Hold the pointer over a bar to see more detailed information about that metric and the battery stats at a specific point on the timeline.\n\nAdditional Batterystats output\n------------------------------\n\nYou can view additional information from the `batterystats.txt` file in the\nstats section after the Battery Historian chart.\n**Figure 4.** The stats section of Battery Historian.\n\nThe 1 **System Stats** tab includes system-wide\nstatistics, such as cell signal levels and screen brightness. This information\nprovides an overall picture of what's happening with the device. This is\nespecially useful to make sure no external events are affecting your test.\n\nThe 2 **App Stats** tab includes information about\nspecific apps. Sort the list of apps using the 3\n**Sort apps by** drop-down list in the **App Selection** pane. You\ncan select a specific app to view stats for using the\n4 apps drop-down list."]]