
このページでは、ビルド バリアントを設定して単一のプロジェクトからさまざまなバージョンのアプリを作成する方法と、依存関係と署名設定を適切に管理する方法について説明します。
各ビルド バリアントは、ビルド可能なさまざまなバージョンのアプリを表しています。たとえば、コンテンツが制限された無料版のアプリと、多くのコンテンツが含まれた有料版のアプリを作成できます。API レベルまたは他のデバイスのバリエーションに基づいて、異なるデバイスをターゲットとするアプリの異なるバージョンをビルドすることもできます。
Gradle で特定のルールセットを使用して、ビルドタイプとプロダクト フレーバー内に構成されている設定、コード、リソースを組み合わせた結果がビルド バリアントです。ビルド バリアントは直接構成するものではなく、ビルド バリアントを形成するビルドタイプとプロダクト フレーバーを構成します。
たとえば、「demo」プロダクト フレーバーでは、カスタム ソースコード、リソース、最小 API レベルなどの特定の機能とデバイス要件を指定できます。一方、「debug」ビルドタイプでは、デバッグ オプションや署名鍵などの異なるビルド設定とパッケージ設定を適用できます。この 2 つを組み合わせたビルド バリアントはアプリの「demoDebug」バージョンになり、このバージョンには「demo」プロダクト フレーバー、「debug」ビルドタイプ、main/ ソースセットに含まれている設定とリソースの組み合わせが含まれます。
ビルドタイプの設定
モジュール レベルの build.gradle.kts ファイルの android ブロック内で、ビルドタイプを作成して設定できます。新しいモジュールを作成すると、Android Studio は debug ビルドタイプとリリースビルドタイプを自動的に作成します。debug ビルドタイプはビルド構成ファイルに表示されませんが、Android Studio では debuggable
true で debug ビルドタイプが設定されます。これにより、安全な Android デバイスでアプリをデバッグし、汎用デバッグ キーストアでアプリ署名を設定できるようになります。
特定の設定を追加または変更する場合、debug ビルドタイプを設定に追加することができます。次のサンプルでは、デバッグビルドタイプ向けに
applicationIdSuffix を指定し、デバッグビルドタイプの設定を使用して初期化される「staging」ビルドタイプを設定しています。
Kotlin
android {
    defaultConfig {
        manifestPlaceholders["hostName"] = "www.example.com"
        ...
    }
    buildTypes {
        getByName("release") {
            isMinifyEnabled = true
            proguardFiles(getDefaultProguardFile("proguard-android.txt"), "proguard-rules.pro")
        }

        getByName("debug") {
            applicationIdSuffix = ".debug"
            isDebuggable = true
        }

        /**
         * The `initWith` property lets you copy configurations from other build types,
         * then configure only the settings you want to change. This one copies the debug build
         * type, and then changes the manifest placeholder and application ID.
         */
        create("staging") {
            initWith(getByName("debug"))
            manifestPlaceholders["hostName"] = "internal.example.com"
            applicationIdSuffix = ".debugStaging"
        }
    }
}
Groovy
android {
    defaultConfig {
        manifestPlaceholders = [hostName:"www.example.com"]
        ...
    }
    buildTypes {
        release {
            minifyEnabled true
            proguardFiles getDefaultProguardFile('proguard-android.txt'), 'proguard-rules.pro'
        }

        debug {
            applicationIdSuffix ".debug"
            debuggable true
        }

        /**
         * The `initWith` property lets you copy configurations from other build types,
         * then configure only the settings you want to change. This one copies the debug build
         * type, and then changes the manifest placeholder and application ID.
         */
        staging {
            initWith debug
            manifestPlaceholders = [hostName:"internal.example.com"]
            applicationIdSuffix ".debugStaging"
        }
    }
}
注: ビルド構成ファイルに変更を加えると、Android Studio は新しい設定のプロジェクトを同期するよう要求します。プロジェクトを同期するには、変更を加えたときに表示される通知バーの [Sync Now] をクリックするか、ツールバーの [Sync Project]  をクリックします。Android Studio が設定のエラーを通知する場合は、問題の説明が記載された [Messages] ウィンドウが表示されます。
ビルドタイプで設定できるすべてのプロパティについて詳しくは、
BuildType リファレンスをご覧ください。
プロダクト フレーバーの設定
プロダクト フレーバーの作成方法はビルドタイプと同じです。ビルド構成の productFlavors ブロックにプロダクト フレーバーを追加して、必要な設定を含めます。defaultConfig が実際には
ProductFlavor クラスに属しているため、プロダクト フレーバーでは defaultConfig と同じプロパティがサポートされます。つまり、defaultConfig ブロックですべてのフレーバーの基本設定を提供でき、各フレーバーによって applicationId などのデフォルト値が変更される場合があります。アプリケーション ID について詳しくは、アプリケーション ID の設定をご覧ください。
注: main/ マニフェスト ファイルの package 属性を使用してパッケージ名を指定する必要もあります。また、ソースコードでそのパッケージ名を使用して R クラスを参照したり、関連するアクティビティやサービスの登録を解決したりする必要があります。これにより、ソースコードを変更せずに applicationId を使用してパッケージ化および配布用の一意の ID を各プロダクト フレーバーに提供できるようになります。
すべてのフレーバーは、名前の付いたフレーバー ディメンションに属していなければなりません。フレーバー ディメンションとは、プロダクト フレーバーのグループです。すべてのフレーバーをフレーバー ディメンションに割り当てる必要があります。割り当てない場合、次のようなビルドエラーが発生します。
  Error: All flavors must now belong to a named flavor dimension.
  The flavor 'flavor_name' is not assigned to a flavor dimension.
特定のモジュールで 1 つのフレーバー ディメンションのみが指定されている場合、Android Gradle プラグインはモジュールのすべてのフレーバーをそのディメンションに自動的に割り当てます。
次のサンプルコードでは、「version」という名前のフレーバー ディメンションを作成し、「demo」と「full」というプロダクト フレーバーを追加しています。これらのフレーバーでは、
applicationIdSuffix と versionNameSuffix という独自のフレーバーを提供しています。
Kotlin
android {
    ...
    defaultConfig {...}
    buildTypes {
        getByName("debug"){...}
        getByName("release"){...}
    }
    // Specifies one flavor dimension.
    flavorDimensions += "version"
    productFlavors {
        create("demo") {
            // Assigns this product flavor to the "version" flavor dimension.
            // If you are using only one dimension, this property is optional,
            // and the plugin automatically assigns all the module's flavors to
            // that dimension.
            dimension = "version"
            applicationIdSuffix = ".demo"
            versionNameSuffix = "-demo"
        }
        create("full") {
            dimension = "version"
            applicationIdSuffix = ".full"
            versionNameSuffix = "-full"
        }
    }
}
Groovy
android {
    ...
    defaultConfig {...}
    buildTypes {
        debug{...}
        release{...}
    }
    // Specifies one flavor dimension.
    flavorDimensions "version"
    productFlavors {
        demo {
            // Assigns this product flavor to the "version" flavor dimension.
            // If you are using only one dimension, this property is optional,
            // and the plugin automatically assigns all the module's flavors to
            // that dimension.
            dimension "version"
            applicationIdSuffix ".demo"
            versionNameSuffix "-demo"
        }
        full {
            dimension "version"
            applicationIdSuffix ".full"
            versionNameSuffix "-full"
        }
    }
}
注: Google Play で APK を使用して配信している旧式アプリ(2021 年 8 月より前に作成)の場合、Google Play でマルチ APK サポートを使用してアプリを配信するには、すべてのバリアントに同じ applicationId 値を割り当てて、バリアントごとに異なる versionCode を付与します。Google Play でさまざまなバリアントのアプリを個別のアプリとして配布するには、各バリアントに異なる applicationId を割り当てる必要があります。
プロダクト フレーバーを作成して設定した後、通知バーで [Sync Now] をクリックします。同期が完了すると、Gradle はビルドタイプとプロダクト フレーバーに基づいてビルド バリアントを自動的に作成し、<product-flavor><Build-Type> の名前を付けます。たとえば、「demo」と「full」のプロダクト フレーバーを作成し、ビルドタイプをデフォルトの「debug」と「release」のままにした場合、Gradle は次のビルド バリアントを作成します。
-
demoDebug -
demoRelease -
fullDebug -
fullRelease
ビルドして実行するビルド バリアントを選択するには、[Build] > [Select Build Variant] に移動し、メニューからビルド バリアントを選択します。独自の機能とリソースで各ビルド バリアントをカスタマイズするには、このページで説明するように、ソースセットを作成および管理する必要があります。
ビルド バリアント向けにアプリケーション ID を変更する
アプリの APK または AAB をビルドすると、ビルドツールは、次の例に示すように build.gradle.kts ファイルの defaultConfig ブロックで定義されたアプリケーション ID をアプリにタグ付けします。ただし、アプリのさまざまなバージョン(無料版の「free」やプロフェッショナル版の「pro」など)を作成し、Google Play ストアで別々の掲載情報として表示したい場合は、アプリケーション ID がそれぞれ異なるビルド バリアントを作成する必要があります。
この場合、ビルド バリアントはそれぞれ別のプロダクト フレーバーとして定義します。productFlavors ブロック内のフレーバーごとに、applicationId プロパティを再定義するか、以下の例に示すように applicationIdSuffix を使用してデフォルトのアプリケーション ID の末尾にセグメントを付加することができます。
Kotlin
android {
    defaultConfig {
        applicationId = "com.example.myapp"
    }
    productFlavors {
        create("free") {
            applicationIdSuffix = ".free"
        }
        create("pro") {
            applicationIdSuffix = ".pro"
        }
    }
}
Groovy
android {
    defaultConfig {
        applicationId "com.example.myapp"
    }
    productFlavors {
        free {
            applicationIdSuffix ".free"
        }
        pro {
            applicationIdSuffix ".pro"
        }
    }
}
これにより、「free」プロダクト フレーバーのアプリケーション ID は「com.example.myapp.free」となります。
また、以下の例に示すように、applicationIdSuffix を使用し、ビルドタイプに基づいてセグメントを末尾に付加することもできます。
Kotlin
android {
    ...
    buildTypes {
        getByName("debug") {
            applicationIdSuffix = ".debug"
        }
    }
}
Groovy
android {
    ...
    buildTypes {
        debug {
            applicationIdSuffix ".debug"
        }
    }
}
Gradle ではプロダクト フレーバーの後にビルドタイプ設定を適用するため、「free debug」ビルド バリアントのアプリケーション ID は「com.example.myapp.free.debug」となります。2 つのアプリで同じアプリケーション ID を使用することはできないため、この方法はデバッグビルドとリリースビルドの両方を同じデバイスに組み込みたい場合に便利です。
Google Play で APK を使用して配信している旧式アプリ(2021 年 8 月より前に作成)があり、同じアプリの掲載情報を使用して、それぞれ異なるデバイス設定(API レベルなど)をターゲットとする複数の APK を配布する場合は、各ビルド バリアントに同じアプリケーション ID を使用し、各 APK に異なるversionCode を与える必要があります。詳しくは、複数 APK サポートをご覧ください。AAB を使用した公開は、デフォルトで 1 つのバージョン コードとアプリケーション ID を使用する単一のアーティファクトを使用するため、影響を受けません。
ヒント: マニフェスト ファイルでアプリケーション ID を参照する必要がある場合は、任意のマニフェスト属性で ${applicationId} プレースホルダを使用できます。Gradle はビルド時にこのタグを実際のアプリケーション ID に置き換えます。詳細については、マニフェストにビルド変数を追加するをご覧ください。
複数のプロダクト フレーバーとフレーバー ディメンションの組み合わせ
複数のプロダクト フレーバーの設定を組み合わせることが必要となる場合があります。たとえば、API レベルに応じて「full」と「demo」のプロダクト フレーバーで異なる設定を作成する必要がある場合などです。これを行うには、Android Gradle プラグインを使用して、複数のプロダクト フレーバーをフレーバー ディメンションとしてグループ化します。
アプリをビルドする際、Gradle は定義された各フレーバー ディメンションに含まれるプロダクト フレーバー設定を組み合わせ、さらにビルドタイプ設定を使用して最終的なビルド バリアントを作成します。Gradle では、同じフレーバー ディメンションに属するプロダクト フレーバーが組み合わされることはありません。
下記のコードサンプルでは、
flavorDimensions プロパティを使用して「mode」フレーバー ディメンションを作成し、「full」プロダクト フレーバーと「demo」プロダクト フレーバーをグループ化しています。さらに、「api」フレーバー ディメンションを作成し、API レベルに基づいてプロダクト フレーバー設定をグループ化しています。
Kotlin
android {
  ...
  buildTypes {
    getByName("debug") {...}
    getByName("release") {...}
  }

  // Specifies the flavor dimensions you want to use. The order in which you
  // list the dimensions determines their priority, from highest to lowest,
  // when Gradle merges variant sources and configurations. You must assign
  // each product flavor you configure to one of the flavor dimensions.
  flavorDimensions += listOf("api", "mode")

  productFlavors {
    create("demo") {
      // Assigns this product flavor to the "mode" flavor dimension.
      dimension = "mode"
      ...
    }

    create("full") {
      dimension = "mode"
      ...
    }

    // Configurations in the "api" product flavors override those in "mode"
    // flavors and the defaultConfig block. Gradle determines the priority
    // between flavor dimensions based on the order in which they appear next
    // to the flavorDimensions property, with the first dimension having a higher
    // priority than the second, and so on.
    create("minApi24") {
      dimension = "api"
      minSdk = 24
      // To ensure the target device receives the version of the app with
      // the highest compatible API level, assign version codes in increasing
      // value with API level.
      versionCode = 30000 + (android.defaultConfig.versionCode ?: 0)
      versionNameSuffix = "-minApi24"
      ...
    }

    create("minApi23") {
      dimension = "api"
      minSdk = 23
      versionCode = 20000  + (android.defaultConfig.versionCode ?: 0)
      versionNameSuffix = "-minApi23"
      ...
    }

    create("minApi21") {
      dimension = "api"
      minSdk = 21
      versionCode = 10000  + (android.defaultConfig.versionCode ?: 0)
      versionNameSuffix = "-minApi21"
      ...
    }
  }
}
...
Groovy
android {
  ...
  buildTypes {
    debug {...}
    release {...}
  }

  // Specifies the flavor dimensions you want to use. The order in which you
  // list the dimensions determines their priority, from highest to lowest,
  // when Gradle merges variant sources and configurations. You must assign
  // each product flavor you configure to one of the flavor dimensions.
  flavorDimensions "api", "mode"

  productFlavors {
    demo {
      // Assigns this product flavor to the "mode" flavor dimension.
      dimension "mode"
      ...
    }

    full {
      dimension "mode"
      ...
    }

    // Configurations in the "api" product flavors override those in "mode"
    // flavors and the defaultConfig block. Gradle determines the priority
    // between flavor dimensions based on the order in which they appear next
    // to the flavorDimensions property, with the first dimension having a higher
    // priority than the second, and so on.
    minApi24 {
      dimension "api"
      minSdkVersion 24
      // To ensure the target device receives the version of the app with
      // the highest compatible API level, assign version codes in increasing
      // value with API level.

      versionCode 30000 + android.defaultConfig.versionCode
      versionNameSuffix "-minApi24"
      ...
    }

    minApi23 {
      dimension "api"
      minSdkVersion 23
      versionCode 20000  + android.defaultConfig.versionCode
      versionNameSuffix "-minApi23"
      ...
    }

    minApi21 {
      dimension "api"
      minSdkVersion 21
      versionCode 10000  + android.defaultConfig.versionCode
      versionNameSuffix "-minApi21"
      ...
    }
  }
}
...
Gradle で作成されるビルド バリアントの数は、各フレーバー ディメンション内のフレーバーの数と、設定したビルドタイプをすべて乗算した数となります。Gradle で各ビルド バリアントまたは対応するアーティファクトに名前を付けるときは、最初に優先度の高いフレーバー ディメンションに属するプロダクト フレーバー、次に優先度の低いディメンションのプロダクト フレーバー、最後にビルドタイプの順で並べた名前が付けられます。
上記の例のようにビルド構成を使用すると、Gradle は次の命名スキームに従って合計 12 個のビルド バリアントを作成します。
- ビルド バリアント:
[minApi24, minApi23, minApi21][Demo, Full][Debug, Release] - 対応する APK:
app-[minApi24, minApi23, minApi21]-[demo, full]-[debug, release].apk - 次に例を示します。
- ビルド バリアント:
minApi24DemoDebug - 対応する APK:
app-minApi24-demo-debug.apk
個別のプロダクト フレーバーおよびビルド バリアント用のソースセット ディレクトリの作成に加え、プロダクト フレーバーの各組み合わせに対してもソースセット ディレクトリを作成することが可能です。たとえば、Java ソースを作成して src/demoMinApi24/java/ ディレクトリに追加できます。この場合、Gradle ではこれらの 2 つのプロダクト フレーバーを組み合わせたバリアントのビルド時のみ、これらのソースを使用します。
プロダクト フレーバーの組み合わせに対して作成したソースセットは、個別の各プロダクト フレーバーに属するソースセットより優先されます。ソースセットの詳細および Gradle でリソースを統合する仕組みについては、ソースセットの作成をご覧ください。
バリアントのフィルタリング
Gradle は、設定されたプロダクト フレーバーとビルドタイプのすべての可能な組み合わせでビルド バリアントを作成します。ただし、その中には不要なビルド バリアントや、対象とするプロジェクトにおいては意味を持たないビルド バリアントも存在する場合があります。特定のビルド バリアント設定を削除するには、モジュール レベルの build.gradle.kts ファイル内にバリアント フィルタを作成します。
例として前のセクションのビルド構成を使用し、アプリのデモバージョンでは API レベル 23 以上のみをサポートすると仮定します。variantFilter ブロックを使用して、「minApi21」と「demo」のプロダクト フレーバーを組み合わせたすべてのビルド バリアント設定を除外できます。
Kotlin
android {
  ...
  buildTypes {...}

  flavorDimensions += listOf("api", "mode")
  productFlavors {
    create("demo") {...}
    create("full") {...}
    create("minApi24") {...}
    create("minApi23") {...}
    create("minApi21") {...}
  }
}

androidComponents {
    beforeVariants { variantBuilder ->
        // To check for a certain build type, use variantBuilder.buildType == "<buildType>"
        if (variantBuilder.productFlavors.containsAll(listOf("api" to "minApi21", "mode" to "demo"))) {
            // Gradle ignores any variants that satisfy the conditions above.
            variantBuilder.enable = false
        }
    }
}
...
Groovy
android {
  ...
  buildTypes {...}

  flavorDimensions "api", "mode"
  productFlavors {
    demo {...}
    full {...}
    minApi24 {...}
    minApi23 {...}
    minApi21 {...}
  }

  variantFilter { variant ->
      def names = variant.flavors*.name
      // To check for a certain build type, use variant.buildType.name == "<buildType>"
      if (names.contains("minApi21") && names.contains("demo")) {
          // Gradle ignores any variants that satisfy the conditions above.
          setIgnore(true)
      }
  }
}
...
ビルド構成にバリアント フィルタを追加して、通知バーの [今すぐ同期] をクリックすると、指定した条件を満たすビルド バリアントは Gradle によって無視されます。メニューバーの [Build] > [Select Build Variant] をクリックするか、ツール ウィンドウ バーの [Build Variants]  をクリックしても、ビルド バリアントがメニューに表示されなくなりました。
ソースセットの作成
Android Studio はデフォルトで、全ビルド バリアントで共有するすべての要素の main/ ソースセットとディレクトリを作成しますが、新しいソースセットを作成して、特定のビルドタイプ、プロダクト フレーバー、プロダクト フレーバーの組み合わせ(フレーバー ディメンションを使用している場合)、ビルド バリアントごとに Gradle でコンパイルおよびパッケージ化するファイルを厳密に管理することもできます。
たとえば、main/ ソースセットで基本的な機能を定義してプロダクト フレーバーのソースセットでクライアントごとにアプリのブランディングを変えることや、debug ビルドタイプを使用するビルド バリアント専用の特別なパーミッションやログ機能を含めることが可能です。
Gradle では、main/ ソースセットの場合と同じように特定の方法でソースセット ファイルとディレクトリを管理する必要があります。たとえば、「debug」ビルドタイプ固有の Kotlin クラスファイルまたは Java クラスファイルは src/debug/kotlin/ ディレクトリまたは src/debug/java/ ディレクトリに配置しなければなりません。
Android Gradle プラグインでは、各ビルドタイプ、プロダクト フレーバー、ビルド バリアントに応じたファイル構成を表示する便利な Gradle タスクが提供されています。たとえば、以下のタスク出力サンプルは、Gradle で「debug」ビルドタイプの特定のファイルがあると予想される場所を示しています。
------------------------------------------------------------
Project :app
------------------------------------------------------------

...

debug
----
Compile configuration: debugCompile
build.gradle name: android.sourceSets.debug
Java sources: [app/src/debug/java]
Kotlin sources: [app/src/debug/kotlin, app/src/debug/java]
Manifest file: app/src/debug/AndroidManifest.xml
Android resources: [app/src/debug/res]
Assets: [app/src/debug/assets]
AIDL sources: [app/src/debug/aidl]
RenderScript sources: [app/src/debug/rs]
JNI sources: [app/src/debug/jni]
JNI libraries: [app/src/debug/jniLibs]
Java-style resources: [app/src/debug/resources]
この出力を表示する手順は次のとおりです。
- ツール ウィンドウ バーの [Gradle] をクリックします。
[MyApplication] > [Tasks] > [android] に移動し、[sourceSets] をダブルクリックします。
[Tasks] フォルダを表示するには、同期中に Gradle がタスクリストを作成するようにする必要があります。方法は次のとおりです。
- [File] > [Settings] > [Experimental](macOS では [Android Studio] > [Settings] > [Experimental])をクリックします。
- [Gradle sync 時に Gradle タスクリストをビルドしない] の選択を解除します。
- Gradle がタスクを実行すると、[Run] ウィンドウが開いて出力が表示されます。
注: タスク出力には、アプリのテストを実行するために必要な test/ や androidTest/ といったテスト ソースセットなどのファイルのソースセットを管理する方法も示されています。
新しいビルド バリアントを作成する際に、Android Studio ではソースセット ディレクトリは作成されませんが、便利なオプションがいくつか提供されます。たとえば、「debug」ビルドタイプ用の java/ ディレクトリを作成するには次の手順で操作します。
- [Project] ペインを開き、ペインの上部にあるメニューから [Project] ビューを選択します。
MyProject/app/src/に移動します。srcディレクトリを右クリックし、[New] > [Directory] を選択します。- [Gradle Source Sets] のメニューから [full/java] を選択します。
- Enter キーを押します。
Android Studio はデバッグビルドのソースセット ディレクトリを作成し、そのディレクトリ内に java/ ディレクトリを作成します。または、特定のビルド バリアント用の新しいファイルをプロジェクトに追加する際に、Android Studio がディレクトリを作成するようにすることもできます。
たとえば、「debug」ビルドタイプの values.xml ファイルは次の手順で作成します。
- [Project] ペインで
srcディレクトリを右クリックし、[New] > [XML] > [Values XML File] を選択します。 - XML ファイルの名前を入力するか、デフォルトの名前のままにします。
- [Target Source Set] の横にあるメニューから [debug] を選択します。
- [Finish] をクリックします。
「debug」ビルドタイプがターゲット ソースセットとして指定されているため、Android Studio は XML ファイルを作成するときに必要となるディレクトリを自動的に作成します。この結果、図 1 のようなディレクトリ構造ができあがります。
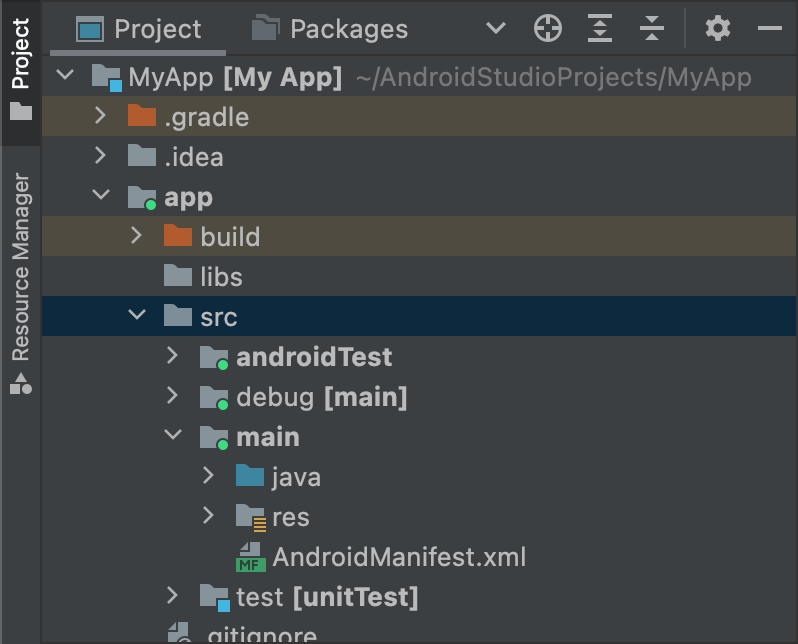
図 1. 「debug」ビルドタイプの新しいソースセット ディレクトリ。
アクティブなソースセットのアイコンには、アクティブであることを示す緑色のインジケーターが表示されます。debug ソースセットには [main] という接尾辞が付いています。これは、main ソースセットにマージされることを示しています。
同じ手順で、src/demo/ などプロダクト フレーバーのソースセット ディレクトリや、src/demoDebug/ などビルド バリアントのソースセット ディレクトリを作成できます。また、src/androidTestDemoDebug/ など特定のビルド バリアントを対象とするテスト ソースセットも作成できます。詳細については、テスト ソースセットをご覧ください。
デフォルト ソースセットの設定を変更する
ソースセットの作成セクションでは Gradle で想定するデフォルトのソースセット ファイル構成について説明しましたが、ソースファイルがこの構成になってない場合は、
sourceSets ブロックを使用すると、Gradle がソースセットの各コンポーネントのファイルを収集する際に参照する場所を変更できます。
sourceSets ブロックは android ブロック内にある必要があります。ソースファイルの場所を変更する必要はなく、モジュール レベルの build.gradle.kts ファイルからの相対パスを指定するだけです。Gradle はここで各ソースセット コンポーネントのファイルを見つけることができます。設定可能なコンポーネントや、それらを複数のファイルおよびディレクトリにマッピングできるかどうかについては、Android Gradle プラグイン API リファレンスをご覧ください。
次のコードサンプルでは、app/other/ ディレクトリのソースを main ソースセットの特定のコンポーネントにマッピングして、androidTest ソースセットのルート ディレクトリを変更しています。
Kotlin
android {
  ...
  // Encapsulates configurations for the main source set.
  sourceSets.getByName("main") {
    // Changes the directory for Java sources. The default directory is
    // 'src/main/java'.
    java.setSrcDirs(listOf("other/java"))

    // If you list multiple directories, Gradle uses all of them to collect
    // sources. Because Gradle gives these directories equal priority, if
    // you define the same resource in more than one directory, you receive an
    // error when merging resources. The default directory is 'src/main/res'.
    res.setSrcDirs(listOf("other/res1", "other/res2"))

    // Note: Avoid specifying a directory that is a parent to one
    // or more other directories you specify. For example, avoid the following:
    // res.srcDirs = ['other/res1', 'other/res1/layouts', 'other/res1/strings']
    // Specify either only the root 'other/res1' directory or only the
    // nested 'other/res1/layouts' and 'other/res1/strings' directories.

    // For each source set, you can specify only one Android manifest.
    // By default, Android Studio creates a manifest for your main source
    // set in the src/main/ directory.
    manifest.srcFile("other/AndroidManifest.xml")
    ...
  }

  // Create additional blocks to configure other source sets.
  sourceSets.getByName("androidTest") {
      // If all the files for a source set are located under a single root
      // directory, you can specify that directory using the setRoot property.
      // When gathering sources for the source set, Gradle looks only in locations
      // relative to the root directory you specify. For example, after applying the
      // configuration below for the androidTest source set, Gradle looks for Java
      // sources only in the src/tests/java/ directory.
      setRoot("src/tests")
      ...
  }
}
...
Groovy
android {
  ...
  sourceSets {
    // Encapsulates configurations for the main source set.
    main {
      // Changes the directory for Java sources. The default directory is
      // 'src/main/java'.
      java.srcDirs = ['other/java']

      // If you list multiple directories, Gradle uses all of them to collect
      // sources. Because Gradle gives these directories equal priority, if
      // you define the same resource in more than one directory, you receive an
      // error when merging resources. The default directory is 'src/main/res'.
      res.srcDirs = ['other/res1', 'other/res2']

      // Note: Avoid specifying a directory that is a parent to one
      // or more other directories you specify. For example, avoid the following:
      // res.srcDirs = ['other/res1', 'other/res1/layouts', 'other/res1/strings']
      // Specify either only the root 'other/res1' directory or only the
      // nested 'other/res1/layouts' and 'other/res1/strings' directories.

      // For each source set, you can specify only one Android manifest.
      // By default, Android Studio creates a manifest for your main source
      // set in the src/main/ directory.
      manifest.srcFile 'other/AndroidManifest.xml'
      ...
    }

    // Create additional blocks to configure other source sets.
    androidTest {

      // If all the files for a source set are located under a single root
      // directory, you can specify that directory using the setRoot property.
      // When gathering sources for the source set, Gradle looks only in locations
      // relative to the root directory you specify. For example, after applying the
      // configuration below for the androidTest source set, Gradle looks for Java
      // sources only in the src/tests/java/ directory.
      setRoot 'src/tests'
      ...
    }
  }
}
...
ソース ディレクトリは 1 つのソースセットにのみ属することができます。たとえば、test と androidTest の両方のソースセットで同じテストソースを共有することはできません。これは、Android Studio がソースセットごとに個別の IntelliJ モジュールを作成し、ソースセット間で重複するコンテンツ ルートをサポートできないためです。
ソースセットでビルドする
ソースセット ディレクトリには、特定の設定でのみパッケージ化するコードやリソースを入れておくことができます。たとえば、「demo」プロダクト フレーバーと「debug」ビルドタイプを組み合わせた「demoDebug」ビルド バリアントをビルドしている場合、Gradle はこれらのディレクトリを参照して次の優先順位を付与します。
-
src/demoDebug/(ビルド バリアントのソースセット) -
src/debug/(ビルドタイプのソースセット) -
src/demo/(プロダクト フレーバーのソースセット) -
src/main/(メインのソースセット)
プロダクト フレーバーの組み合わせに対して作成されたソースセットには、すべてのフレーバー ディメンションが含まれている必要があります。たとえば、ビルド バリアントのソースセットは、ビルドタイプとすべてのフレーバー ディメンションの組み合わせである必要があります。複数のフレーバー ディメンションをカバーするフォルダを含むコードとリソースの統合は対象外です。
複数のプロダクト フレーバーを組み合わせる場合、プロダクト フレーバーの優先順位は各プロダクト フレーバーが属するフレーバー ディメンションによって決まります。
android.flavorDimensions プロパティでフレーバー ディメンションを一覧表示すると、最初に表示されるフレーバー ディメンションに属するプロダクト フレーバーが 2 番目のフレーバー ディメンションに属するプロダクト フレーバーより優先順が高く、以降同様に続きます。また、プロダクト フレーバーの組み合わせに対して作成されたソースセットは、個別のプロダクト フレーバーに属するソースセットよりも優先されます。
Gradle がコードとリソースを組み合わせる際、より優先度の高いソースセットを判別するために優先順位が用いられます。demoDebug/ ソースセット ディレクトリにはそのビルド バリアント固有のファイルが含まれる可能性が高いため、debug/ で定義されているファイルが demoDebug/ に含まれている場合、Gradle は demoDebug/ ソースセットのファイルを使用します。Gradle では同様に、ビルドタイプとプロダクト フレーバーのソースセットのファイルに対して main/ にある同じファイルよりも高い優先度を付与します。Gradle では、以下のビルドルールを適用するときに、この優先順位が考慮されます。
kotlin/またはjava/ディレクトリのすべてのソースコードはコンパイルされて、単一の出力が生成されます。注: 特定のビルド バリアントについては、同じ Kotlin クラスまたは Java クラスを定義している 2 つ以上のソースセット ディレクトリがある場合、Gradle はビルドエラーをスローします。たとえば、デバッグアプリをビルドする際に
src/debug/Utility.ktとsrc/main/Utility.ktの両方を定義することはできません。Gradle はビルドプロセスの際にこれらの両方のディレクトリを参照し、「duplicate class」エラーをスローするためです。異なるビルドタイプ用に別のバージョンのUtility.ktが必要な場合は、各ビルドタイプで独自のバージョンのファイルを定義し、そのファイルをmain/ソースセットに含めないようにします。- 複数のマニフェストは単一のマニフェストにマージされ、前の例のリストと同じ優先順位が付与されます。つまり、ビルドタイプのマニフェスト設定により、プロダクト フレーバーなどのマニフェスト設定がオーバーライドされます。詳しくは、マニフェストのマージをご覧ください。
values/ディレクトリのファイルはマージされます。strings.xmlファイルが 2 つある場合など、2 つのファイルが同じ名前を共有している場合は、前の例のリストと同じ優先順位が付与されます。つまり、ビルドタイプのソースセットのファイルで定義されている値により、プロダクト フレーバーなどの同じファイルで定義されている値がオーバーライドされます。res/とasset/ディレクトリのリソースは一緒にパッケージ化されます。2 つ以上のソースセットで同じ名前が定義されている複数のリソースがある場合、前の例のリストと同じ優先順が付与されます。- Gradle はアプリをビルドするときに、ライブラリ モジュールの依存関係に含まれているリソースとマニフェストに最も低い優先順位を付与します。
依存関係の宣言
特定のビルド バリアントまたはテスト ソースセットの依存関係を設定するには、次の例に示すように、ビルド バリアントまたはテスト ソースセットの名前を Implementation キーワードの前に付けます。
Kotlin
dependencies {
    // Adds the local "mylibrary" module as a dependency to the "free" flavor.
    "freeImplementation"(project(":mylibrary"))

    // Adds a remote binary dependency only for local tests.
    testImplementation("junit:junit:4.12")

    // Adds a remote binary dependency only for the instrumented test APK.
    androidTestImplementation("com.android.support.test.espresso:espresso-core:3.6.1")
}
Groovy
dependencies {
    // Adds the local "mylibrary" module as a dependency to the "free" flavor.
    freeImplementation project(":mylibrary")

    // Adds a remote binary dependency only for local tests.
    testImplementation 'junit:junit:4.12'

    // Adds a remote binary dependency only for the instrumented test APK.
    androidTestImplementation 'com.android.support.test.espresso:espresso-core:3.6.1'
}
依存関係の設定について詳しくは、ビルド依存関係の追加をご覧ください。
バリアント認識型の依存関係管理を使用する
Android Gradle プラグイン 3.0.0 以降に含まれている新しい依存関係メカニズムでは、ライブラリの使用時に自動でバリアントのマッチングを行います。つまり、アプリの debug バリアントによって自動的にライブラリの debug バリアントが使用されます。これはフレーバーの使用時にも当てはまるため、アプリの freeDebug バリアントによってライブラリの freeDebug バリアントが使用されることになります。
バリアントのマッチングが正しく行われるためには、直接的なマッチングが不可能な場合のために、次のセクションで説明するように代替のマッチング手段を提供する必要があります。
たとえば、アプリで「staging」というビルドタイプを構成しているにもかかわらず、そのライブラリ依存関係の 1 つに「staging」タイプが含まれていない場合、プラグインでアプリの「staging」バージョンをビルドしようとしたときに、どのバージョンのライブラリを使用すべきかを判断できません。そのため、次のようなエラー メッセージが表示されます。
Error:Failed to resolve: Could not resolve project :mylibrary.
Required by:
    project :app
バリアントのマッチングに関連するビルドエラーの解決
アプリと依存関係との直接的なバリアント マッチングが不可能な状況において、Gradle での処理方法を制御するには、プラグインに含まれる DSL 要素が便利です。
以下に、バリアント識別依存関係マッチングに関連する問題と、DSL プロパティを使用してそれらの問題を解決する方法を示します。ライブラリ依存関係に含まれていないビルドタイプがアプリに含まれている。
たとえば、アプリには「staging」ビルドタイプが含まれているが、依存関係に含まれているビルドタイプは「debug」と「release」のみの場合などです。
なお、アプリに含まれていないビルドタイプがライブラリ依存関係に含まれている場合は、特に問題ありません。ライブラリ依存関係側にあるビルドタイプをプラグインで要求することはあり得ないためです。
次のように
matchingFallbacksを使用して、特定のビルドタイプの代わりにマッチングするタイプを指定します。Kotlin
// In the app's build.gradle.kts file.
android {
    buildTypes {
        getByName("debug") {}
        getByName("release") {}
        create("staging") {
            // Specifies a sorted list of fallback build types that the
            // plugin can try to use when a dependency does not include a
            // "staging" build type. You may specify as many fallbacks as you
            // like, and the plugin selects the first build type that's
            // available in the dependency.
            matchingFallbacks += listOf("debug", "qa", "release")
        }
    }
}
Groovy
// In the app's build.gradle file.
android {
    buildTypes {
        debug {}
        release {}
        staging {
            // Specifies a sorted list of fallback build types that the
            // plugin can try to use when a dependency does not include a
            // "staging" build type. You may specify as many fallbacks as you
            // like, and the plugin selects the first build type that's
            // available in the dependency.
            matchingFallbacks = ['debug', 'qa', 'release']
        }
    }
}
アプリとそのライブラリ依存関係の両方に存在する特定のフレーバー ディメンションにおいて、ライブラリに含まれていないフレーバーがアプリに含まれている。
たとえば、アプリとそのライブラリ依存関係の両方に「tier」フレーバー ディメンションが存在するが、アプリの「tier」フレーバー ディメンションには「free」と「paid」というフレーバーが含まれているのに対し、依存関係の同じフレーバー ディメンションには「demo」と「paid」というフレーバーしか含まれていない場合などです。
なお、アプリとそのライブラリ依存関係の両方に存在する特定のフレーバー ディメンションにおいて、アプリに含まれていないプロダクト フレーバーがライブラリ依存関係に含まれている場合は、特に問題ありません。ライブラリ依存関係側にあるフレーバーをプラグインで要求することはあり得ないためです。
次のように
matchingFallbacksを使用して、アプリの「free」プロダクト フレーバーの代わりにマッチングするフレーバーを指定します。Kotlin
// In the app's build.gradle.kts file.
android {
    defaultConfig{
    // Don't configure matchingFallbacks in the defaultConfig block.
    // Instead, specify fallbacks for a given product flavor in the
    // productFlavors block, as shown below.
  }
    flavorDimensions += "tier"
    productFlavors {
        create("paid") {
            dimension = "tier"
            // Because the dependency already includes a "paid" flavor in its
            // "tier" dimension, you don't need to provide a list of fallbacks
            // for the "paid" flavor.
        }
        create("free") {
            dimension = "tier"
            // Specifies a sorted list of fallback flavors that the plugin
            // can try to use when a dependency's matching dimension does
            // not include a "free" flavor. Specify as many
            // fallbacks as you like; the plugin selects the first flavor
            // that's available in the dependency's "tier" dimension.
            matchingFallbacks += listOf("demo", "trial")
        }
    }
}
Groovy
// In the app's build.gradle file.
android {
    defaultConfig{
    // Don't configure matchingFallbacks in the defaultConfig block.
    // Instead, specify fallbacks for a given product flavor in the
    // productFlavors block, as shown below.
  }
    flavorDimensions 'tier'
    productFlavors {
        paid {
            dimension 'tier'
            // Because the dependency already includes a "paid" flavor in its
            // "tier" dimension, you don't need to provide a list of fallbacks
            // for the "paid" flavor.
        }
        free {
            dimension 'tier'
            // Specifies a sorted list of fallback flavors that the plugin
            // can try to use when a dependency's matching dimension does
            // not include a "free" flavor. Specify as many
            // fallbacks as you like; the plugin selects the first flavor
            // that's available in the dependency's "tier" dimension.
            matchingFallbacks = ['demo', 'trial']
        }
    }
}
アプリに含まれていないフレーバー ディメンションがライブラリ依存関係に含まれている。
たとえば、ライブラリ依存関係には「minApi」ディメンション用のフレーバーが含まれているが、アプリには「tier」ディメンション用のフレーバーしか含まれていない場合などです。アプリの「freeDebug」バージョンをビルドする場合、プラグインでは「minApi23Debug」と「minApi18Debug」のどちらのバージョンの依存関係を使用すべきかを判断できません。
なお、ライブラリ依存関係に含まれていないフレーバー ディメンションがアプリに含まれている場合は、特に問題ありません。プラグインでは、ライブラリ依存関係に存在するディメンションのみのフレーバーをマッチングするためです。たとえば、依存関係に ABI のディメンションが含まれていない場合、アプリの「freeX86Debug」バージョンは依存関係の「freeDebug」バージョンを使用します。
次のサンプルに示すように、
defaultConfigブロックでmissingDimensionStrategyを使用して、見つからなかった各ディメンションの中からプラグインで選択すべきデフォルトのフレーバーを指定します。また、productFlavorsブロック内で選択肢をオーバーライドして、存在しないディメンションに対してフレーバーごとに異なるマッチング方針を指定することもできます。Kotlin
// In the app's build.gradle.kts file.
android {
    defaultConfig{
    // Specifies a sorted list of flavors that the plugin can try to use from
    // a given dimension. This tells the plugin to select the "minApi18" flavor
    // when encountering a dependency that includes a "minApi" dimension.
    // You can include additional flavor names to provide a
    // sorted list of fallbacks for the dimension.
    missingDimensionStrategy("minApi", "minApi18", "minApi23")
    // Specify a missingDimensionStrategy property for each
    // dimension that exists in a local dependency but not in your app.
    missingDimensionStrategy("abi", "x86", "arm64")
    }
    flavorDimensions += "tier"
    productFlavors {
        create("free") {
            dimension = "tier"
            // You can override the default selection at the product flavor
            // level by configuring another missingDimensionStrategy property
            // for the "minApi" dimension.
            missingDimensionStrategy("minApi", "minApi23", "minApi18")
        }
        create("paid") {}
    }
}
Groovy
// In the app's build.gradle file.
android {
    defaultConfig{
    // Specifies a sorted list of flavors that the plugin can try to use from
    // a given dimension. This tells the plugin to select the "minApi18" flavor
    // when encountering a dependency that includes a "minApi" dimension.
    // You can include additional flavor names to provide a
    // sorted list of fallbacks for the dimension.
    missingDimensionStrategy 'minApi', 'minApi18', 'minApi23'
    // Specify a missingDimensionStrategy property for each
    // dimension that exists in a local dependency but not in your app.
    missingDimensionStrategy 'abi', 'x86', 'arm64'
    }
    flavorDimensions 'tier'
    productFlavors {
        free {
            dimension 'tier'
            // You can override the default selection at the product flavor
            // level by configuring another missingDimensionStrategy property
            // for the 'minApi' dimension.
            missingDimensionStrategy 'minApi', 'minApi23', 'minApi18'
        }
        paid {}
    }
}
詳細については、Android Gradle プラグイン DSL リファレンスの matchingFallbacks と missingDimensionStrategy をご覧ください。
署名設定の設定
Gradle では、ビルドの署名設定を明示的に定義しない限りリリースビルドの APK や AAB に署名されません。署名鍵をまだ取得していない場合は、Android Studio を使用してアップロード鍵とキーストアを生成します。
Gradle ビルド設定を使用して release ビルドタイプの署名設定を手動で設定するには、次の手順を行います。
- キーストアを作成します。キーストアは一連の秘密鍵を含むバイナリ ファイルです。キーストアは安全な場所に保管する必要があります。
- 秘密鍵を作成します。秘密鍵は、配信するアプリへの署名に使用されます。アプリに含まれることはなく、未承認の第三者に開示することもありません。
-
署名設定をモジュール レベルの
build.gradle.ktsファイルに追加します。Kotlin
...
android {
    ...
    defaultConfig {...}
    signingConfigs {
        create("release") {
            storeFile = file("myreleasekey.keystore")
            storePassword = "password"
            keyAlias = "MyReleaseKey"
            keyPassword = "password"
        }
    }
    buildTypes {
        getByName("release") {
            ...
            signingConfig = signingConfigs.getByName("release")
        }
    }
}
Groovy
...
android {
    ...
    defaultConfig {...}
    signingConfigs {
        release {
            storeFile file("myreleasekey.keystore")
            storePassword "password"
            keyAlias "MyReleaseKey"
            keyPassword "password"
        }
    }
    buildTypes {
        release {
            ...
            signingConfig signingConfigs.release
        }
    }
}
注: リリースキーとキーストアのパスワードをビルドファイルに含めることは、セキュリティ上の理由からおすすめできません。代わりに、パスワードを環境変数から取得するか、ビルドプロセスによってパスワードが要求されるようにビルドファイルを設定します。
パスワードを環境変数から取得する方法:
Kotlin
storePassword = System.getenv("KSTOREPWD")
keyPassword = System.getenv("KEYPWD")
Groovy
storePassword System.getenv("KSTOREPWD")
keyPassword System.getenv("KEYPWD")
また、ローカル プロパティ ファイルからキーストアを読み込むこともできます。セキュリティ上の理由から、このファイルをソース管理に追加しないでください。代わりに、各デベロッパーのローカルで設定します。詳しくは、 ビルドファイルから署名情報を削除するをご覧ください。
このプロセスが完了すれば、アプリを配布したり、Google Play で公開したりできます。
警告: キーストアと秘密鍵は安全な場所に保管し、セキュア バックアップを取るようにしてください。Play アプリ署名を使用していて、アップロード鍵を紛失した場合は、Play Console からリセットをリクエストできます。 Play アプリ署名を使用せずにアプリを公開する場合(2021 年 8 月より前に作成したアプリの場合)、アプリ署名鍵を紛失すると、それ以降アプリを更新できなくなります。アプリのすべてのバージョンに同じ署名鍵で署名する必要があるためです。
Wear OS アプリの署名
Wear OS アプリを公開する際は、スマートウォッチの APK と、オプションのスマートフォンの APK の両方を同じ鍵で署名する必要があります。Wear OS アプリのパッケージ化と署名について詳しくは、Wear アプリのパッケージ化と配布をご覧ください。