با مجموعهها، منظم بمانید
ذخیره و طبقهبندی محتوا براساس اولویتهای شما.
برنامههای Wear OS باید مستقل از تلفن کار کنند. با این حال، اگر برنامه Wear OS شما به یک برنامه تلفن همراه وابسته است، اطلاعات زیر را در مورد اتصال ساعت شبیهسازی شده یا ساعت فیزیکی به تلفن مشاهده کنید.
دستگاه ها را با شبیه ساز ساعت جفت کنید
میتوانید دستگاهها را به صورت دستی یا با استفاده از دستیار جفتسازی شبیهساز Wear OS با دستگاه مجازی Android (AVD) یا شبیهساز ساعت خود جفت کنید.
از دستیار جفت شدن شبیه ساز Wear OS استفاده کنید
توجه: تلفن شما باید اندروید 11 (سطح API 30) یا بالاتر را اجرا کند و فروشگاه Google Play را برای استفاده از دستیار جفتسازی شبیهساز Wear OS نصب کرده باشد. همچنین، مطمئن شوید که شبیهسازهای Wear شما API سطح 28 یا بالاتر را اجرا میکنند تا از آخرین ویژگیهای دستیار استفاده کنند. برای ارتقاء تصاویر سیستم برای دستگاه های شبیه سازی شده خود، از مدیر SDK استفاده کنید.
دستیار جفتسازی شبیهساز Wear OS مدیریت و اتصال شبیهسازهای Wear را آسانتر میکند. میتوانید چندین دستگاه Wear را با یک تلفن مجازی یا فیزیکی جفت کنید. Android Studio همچنین دستگاههای جفتشده قبلی را هنگام راهاندازی به خاطر میآورد و دوباره جفت میکند.
در Device Manager ، روی نماد منوی سرریز در کنار دستگاهی که میخواهید جفت کنید کلیک کنید و Pair Wearable را انتخاب کنید.
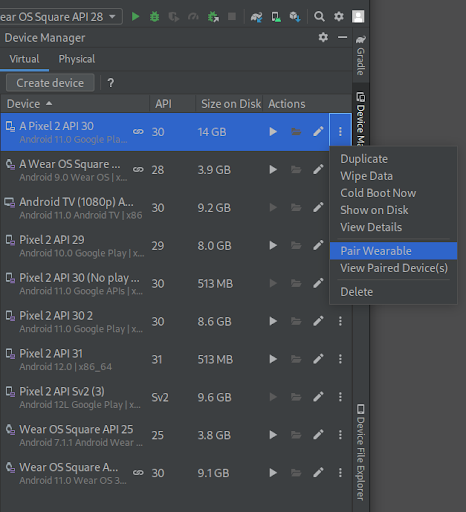
شکل 1. منوی سرریز دستگاهی که می تواند با یک شبیه ساز Wear جفت شود.
با این کار دستیار جفت سازی شبیه ساز Wear OS راه اندازی می شود. اگر در ورودی تلفن، Pair Wearable را انتخاب کرده باشید، فهرستی از دستگاههای Wear موجود را میبینید. اگر با یک دستگاه Wear شروع کرده اید، لیستی از تلفن های موجود را می بینید. دستگاهی را که می خواهید جفت کنید انتخاب کنید و روی Next کلیک کنید.
راه اندازی و آماده سازی دستگاه ها ممکن است چند دقیقه طول بکشد تا Android Studio. اگر برنامه همراه Wear OS روی گوشی شما نصب نشده است، دستورالعملها را دنبال کنید تا به فروشگاه Play وارد شوید، آن را نصب کنید و راهاندازی کنید.
برای جفت کردن دستگاههایتان در برنامه Wear OS در تلفنتان، روی منوی سرریز کلیک کنید و جفتسازی با شبیهساز را انتخاب کنید.
پس از اینکه دستگاه های شما با موفقیت جفت شدند، Device Manager نمادهای کوچکی را در کنار دستگاه های جفت شده نشان می دهد. همچنین می توانید روی منوی کشویی سرریز کلیک کنید و View Details را انتخاب کنید تا لیستی از دستگاه های جفت شده را ببینید.
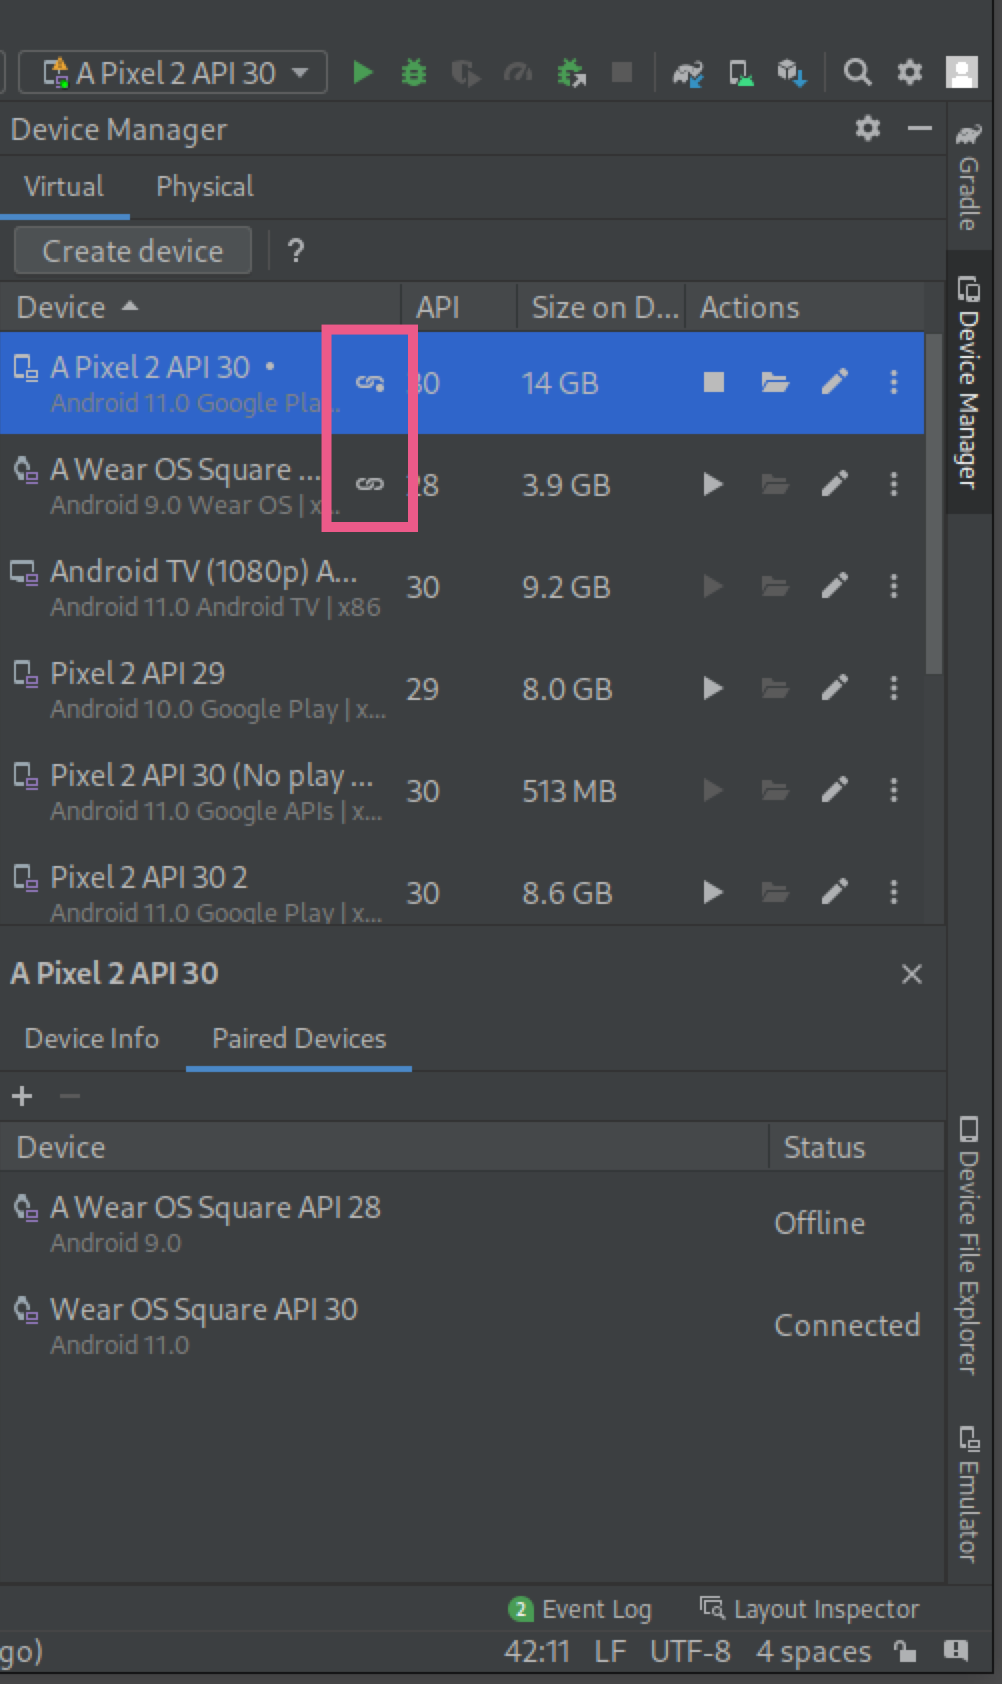
شکل 2. پنجره ابزار Paired Devices دستگاه های جفت شده با دستگاه انتخاب شده را نشان می دهد.
تلفن را با ساعت AVD جفت کنید
اگر میخواهید یک حساب Google در ساعت AVD برای توسعه داشته باشید، میتوانید یک تلفن را با ساعت AVD جفت کنید و یک حساب Google را با انجام کارهای زیر همگامسازی کنید:
در تلفن، Developer Options و USB Debugging را فعال کنید.
گوشی را از طریق USB به کامپیوتر خود وصل کنید.
هر بار که تلفن وصل می شود با استفاده از این دستور، درگاه ارتباطی AVD را به تلفن متصل منتقل کنید: adb -d forward tcp:5601 tcp:5601
در برنامه همراه Wear OS روی تلفن، فرآیند جفتسازی استاندارد را شروع کنید. به عنوان مثال، در صفحه خوش آمدید، روی دکمه Set It Up ضربه بزنید. یا اگر یک ساعت موجود از قبل جفت شده است، روی Add a New Watch در منوی سمت چپ بالا ضربه بزنید.
در برنامه همراه Wear OS در تلفن، روی منوی سرریز ضربه بزنید و سپس روی جفت کردن با شبیه ساز ضربه بزنید.
روی نماد تنظیمات ضربه بزنید.
در قسمت تنظیمات دستگاه ، روی شبیه ساز ضربه بزنید.
روی Accounts ضربه بزنید و یک حساب Google را انتخاب کنید. برای همگام سازی حساب با شبیه ساز مراحل موجود در ویزارد را دنبال کنید. در صورت لزوم، رمز عبور دستگاه قفل صفحه و گذرواژه حساب Google را تایپ کنید تا همگام سازی حساب شروع شود.
تلفن را به چندین دستگاه Wear وصل کنید
برای اتصال یک دستگاه Wear دوم به یک تلفن مجازی یا فیزیکی، همان مراحلی را که برای جفتسازی اولیه انجام میدهید دنبال کنید: تلفن یا دستگاه Wear را که میخواهید جفت کنید در Device Manager پیدا کنید، روی نماد منوی سرریز کلیک کنید و روی Pair Wearable کلیک کنید.
یک تلفن راه اندازی کنید
این بخش حاوی اطلاعاتی درباره راهاندازی تلفن همراه با برنامه Wear OS است.
از نسخه اندروید برنامه همراه استفاده کنید
در تلفن Android، به فهرست برنامه Wear OS by Google Smartwatch بروید. برای دانلود و نصب برنامه روی Update ضربه بزنید. پس از نصب، تأیید کنید که بهروزرسانی خودکار برای برنامه انتخاب شده است. بخش «نحوه بهروزرسانی خودکار برنامههای Android» را در بهروزرسانی برنامههای دانلود شده ببینید. برای شروع برنامه روی Open ضربه بزنید.
یک تلفن Android را به ساعت جفت کنید
پس از نصب برنامه همراه روی تلفن، جفتهای ساعت منسوخ را در صورت لزوم لغو جفت کنید. سپس گوشی را با ساعتی که به تازگی تصویر گرفته شده است جفت کنید. برای این کار مراحل زیر را انجام دهید:
در تلفن، نام دستگاه ساعت خود را از لیست دستگاه ها انتخاب کنید. کد جفت شدن روی تلفن و ساعت نمایش داده می شود. بررسی کنید که کدها مطابقت دارند.
برای ادامه فرآیند جفت شدن، روی Pair ضربه بزنید. هنگامی که ساعت به تلفن وصل می شود، یک پیام تأیید نمایش داده می شود. در تلفن، صفحهای نمایش داده میشود که حسابهای موجود در گوشی را فهرست میکند.
یک حساب Google برای افزودن و همگام سازی به ساعت خود انتخاب کنید.
قفل صفحه را تأیید کنید و رمز عبور را وارد کنید تا شروع به کپی کردن حساب از تلفن به ساعت شود.
دستورالعمل های موجود در ویزارد را دنبال کنید تا فرآیند جفت شدن به پایان برسد.
برنامه همراه برای آیفون
یک برنامه همراه iOS برای تلفن های دارای iOS 8.2 یا بالاتر در دسترس است. برای نصب آن موارد زیر را انجام دهید:
در iPhone خود، از App Store دیدن کنید و برنامه همراه Wear OS by Google را دانلود و نصب کنید.
برای شروع فرآیند جفتسازی، دستورالعملهای روی ساعت و تلفن را دنبال کنید. برای اطلاعات بیشتر، صفحه مربوط به رفع مشکلات راهاندازی ساعت خود را ببینید.
استفاده مجدد از کد یک برنامه تلفن همراه در ماژول Wear OS
برای ایجاد یک ماژول Wear OS، پروژه Android Studio موجود خود را باز کنید و کارهای زیر را انجام دهید:
روی File > New > New Module کلیک کنید.
در پنجره New Module ، Wear OS Module را انتخاب کرده و روی Next کلیک کنید.
در قسمت پیکربندی ماژول جدید ، موارد زیر را وارد کنید:
نام برنامه/کتابخانه : عنوان نماد راهانداز برنامه شما برای ماژول جدید
نام ماژول : نام پوشه کد منبع و فایل های منبع شما
Package Name : فضای نام کد موجود در ماژول شما. رشته به عنوان ویژگی package در فایل مانیفست اندروید ماژول اضافه می شود.
حداقل SDK : پایین ترین نسخه پلتفرمی که ماژول برنامه پشتیبانی می کند. به عنوان مثال، API 26: Android 8.0 را انتخاب کنید. این مقدار ویژگی minSdkVersion را در فایل build.gradle تنظیم می کند که می توانید بعداً آن را ویرایش کنید.
روی Next کلیک کنید. چندین گزینه الگوی کد را مشاهده می کنید. Blank Wear OS Activity را انتخاب کنید و سپس روی Next کلیک کنید.
در پنجره پیکربندی فعالیت ، مقادیر پیشفرض نام فعالیت ، نام طرحبندی و زبان مبدأ را وارد کرده یا بپذیرید. روی Finish کلیک کنید.
Android Studio فایلها را برای ماژول جدید ایجاد و همگامسازی میکند. Android Studio همچنین وابستگی های مورد نیاز Wear OS را به فایل ساخت ماژول جدید اضافه می کند. ماژول جدید در پنجره Project در سمت چپ صفحه ظاهر می شود. اگر پوشه ماژول جدید را نمیبینید، مطمئن شوید که پنجره نمای Android را نشان میدهد.
موارد زیر را در فایل build.gradle برای ماژول Wear OS جدید قرار دهید:
در قسمت android مقادیر compileSdkVersion را 33 و targetSdkVersion را 30 قرار دهید.
وابستگی های مورد نیاز خود را اضافه کنید. برای اطلاعات بیشتر، به اعلام وابستگی ها مراجعه کنید.
محتوا و نمونه کدها در این صفحه مشمول پروانههای توصیفشده در پروانه محتوا هستند. جاوا و OpenJDK علامتهای تجاری یا علامتهای تجاری ثبتشده Oracle و/یا وابستههای آن هستند.
تاریخ آخرین بهروزرسانی 2025-07-29 بهوقت ساعت هماهنگ جهانی.
[[["درک آسان","easyToUnderstand","thumb-up"],["مشکلم را برطرف کرد","solvedMyProblem","thumb-up"],["غیره","otherUp","thumb-up"]],[["اطلاعاتی که نیاز دارم وجود ندارد","missingTheInformationINeed","thumb-down"],["بیشازحد پیچیده/ مراحل بسیار زیاد","tooComplicatedTooManySteps","thumb-down"],["قدیمی","outOfDate","thumb-down"],["مشکل ترجمه","translationIssue","thumb-down"],["مشکل کد / نمونهها","samplesCodeIssue","thumb-down"],["غیره","otherDown","thumb-down"]],["تاریخ آخرین بهروزرسانی 2025-07-29 بهوقت ساعت هماهنگ جهانی."],[],[],null,["# Connect a watch to a phone\n\nWear OS apps should work independently of a phone. However, if your Wear OS app\ndepends on a mobile app, see the following information about connecting either\nan emulated watch or a physical watch to a phone.\n\nPair devices with a watch emulator\n----------------------------------\n\nYou can pair devices to your watch Android Virtual Device (AVD), or emulator, manually or by\nusing the Wear OS emulator pairing assistant.\n\n### Use the Wear OS emulator pairing assistant\n\n\n**Note:** Your phone must run Android 11 (API level 30) or\nhigher and have the Google Play Store installed to use the Wear OS\nemulator pairing assistant. Also, make sure your Wear emulators run API\nlevel 28 or higher to use the latest assistant features. To upgrade system\nimages for your emulated devices, use the\n[SDK Manager](/studio/intro/update#sdk-manager).\n\n\nThe Wear OS emulator pairing assistant makes it easier to manage and\nconnect Wear emulators. You can pair multiple Wear devices with a single\nvirtual or physical phone. Android Studio also remembers and re-pairs\npreviously paired devices when they're launched.\n\n\nTo pair two devices, follow these steps:\n\n1. If you haven't already, [create a Wear emulator](/training/wearables/get-started/creating#emulator).\n2. In the **Device Manager** , click the overflow menu icon\n next to a device you want to pair and select **Pair Wearable**.\n\n\n **Figure 1.** Overflow menu of a device that can be paired with a Wear emulator.\n\n \u003cbr /\u003e\n\n3. This launches the Wear OS emulator pairing assistant. If you selected **Pair Wearable** on the entry for a phone, you see a list of available Wear devices. If you started with a Wear device, you see a list of available phones. Select the device you want to pair and click **Next**.\n4. It might take a few minutes for Android Studio to launch and prepare the devices. If your phone doesn't have the Wear OS companion app installed, follow the prompts to log in to the Play Store, install it, and set it up.\n5. To pair your devices in the Wear OS app on your phone, click the overflow menu and select **Pair with emulator**.\n\n\nAfter your devices are successfully paired, the **Device Manager** shows small\nicons next to the paired devices. You can also click the overflow drop-down menu\nand select **View Details** to see a list of paired devices.\n**Figure 2.** The **Paired Devices** tool window shows devices paired with the selected device.\n\n### Pair a phone with the watch AVD\n\n\nIf you want a Google Account on the watch AVD for development,\nyou can pair a phone with the watch AVD and sync a Google Account by doing\nthe following:\n\n1. Follow the steps to [set up a phone](#setting-up-a-phone).\n2. On the phone, enable **Developer Options** and **USB\n Debugging**.\n3. Connect the phone to your computer through USB.\n4. Forward the AVD's communication port to the connected phone each time the phone is connected using this command: \n `adb -d forward tcp:5601 tcp:5601`\n5. In the Wear OS companion app on the phone, begin the standard pairing process. For example, on the Welcome screen, tap the **Set It Up** button. Alternatively, if an existing watch already is paired, tap **Add a New Watch** in the upper-left menu.\n6. In the Wear OS companion app on the phone, tap the overflow menu, and then tap **Pair with Emulator**.\n7. Tap the **Settings** icon.\n8. Under **Device Settings** , tap **Emulator**.\n9. Tap **Accounts** and select a Google Account. Follow the steps in the wizard to sync the account with the emulator. If necessary, type the screen-lock device password and Google Account password to start the account sync.\n\n### Connect a phone to multiple Wear devices\n\n\nTo connect a second Wear device to a virtual or physical phone, follow the same\nsteps you would for an initial pairing: locate the phone or Wear device you want\nto pair in the **Device Manager** , click the overflow menu icon, and\nclick **Pair Wearable**.\n\n\u003cbr /\u003e\n\nSet up a phone\n--------------\n\n\u003cbr /\u003e\n\n\nThis section contains information about setting up a mobile phone\nwith a Wear OS companion app.\n\n### Use the Android version of the companion app\n\n\nOn an Android phone, go to the [Wear OS by Google Smartwatch](https://play.google.com/store/apps/details?id=com.google.android.wearable.app) app listing. Tap **Update** to download and\ninstall the app. After installation, confirm that\n**Auto-update** is selected for the app. See\nthe \"How to update individual Android apps automatically\" section of [Update downloaded\napps](https://support.google.com/googleplay/answer/113412). Tap **Open** to start the app.\n\n#### Pair an Android phone to a watch\n\n\nAfter you install the companion app on a phone, unpair any obsolete watch pairings, if\nnecessary. Then pair the phone to a newly imaged watch. To do this, complete the following steps:\n\n1. On the phone, select your watch device name from the list of devices. A pairing code displays on the phone and on the watch. Check that the codes match.\n2. Tap **Pair** to continue the pairing process. When the watch connects to the phone, a confirmation message displays. On the phone, a screen displays that lists the accounts on the phone.\n3. Choose a Google account to add and sync to your watch.\n4. Confirm the screen lock and enter the password to start copying the account from the phone to the watch.\n5. Follow the instructions in the wizard to finish the pairing process.\n\n#### Companion app for iPhones\n\n\nAn iOS companion app is available for phones running iOS 8.2 or higher.\nTo install it, do the following:\n\n1. On your iPhone, visit the App Store and download and install the [Wear OS by Google](https://itunes.apple.com/us/app/android-wear/id986496028) companion app.\n2. Follow the instructions on the watch and on the phone to begin the pairing process. For additional information, see the page about [fixing setup issues with your watch](https://support.google.com/androidwear/answer/6057772?co=GENIE.Platform%3DiOS&oco=0).\n\nReuse code for a mobile app in a Wear OS module\n-----------------------------------------------\n\n\nYou can [add a module](/studio/projects/add-app-module) for a Wear OS device\nto your existing project in Android Studio to let you reuse code from your\nmobile app.\n\n### Create a Wear OS module in your existing project\n\n\nTo create a Wear OS module, open your existing Android Studio project and do the following:\n\n1. Click **File** \\\u003e **New** \\\u003e **New Module**.\n2. In the **New Module** window, select **Wear OS Module** and click **Next**.\n3. Under **Configure the new module** , enter the following:\n - **Application/Library Name**: the title of your app launcher icon for the new module\n - **Module Name**: the name of the folder for your source code and resource files\n - **Package Name** : the namespace for the code in your module. The string is added as the [`package`](/guide/topics/manifest/manifest-element#package) attribute in the module's [Android manifest file](/guide/topics/manifest/manifest-intro).\n - **Minimum SDK** : the lowest version of the platform that the app module supports. For example, select **API 26: Android 8.0** . This value sets the `minSdkVersion` attribute in the `build.gradle` file, which you can edit later.\n4. Click **Next** . You see multiple code template options. Select **Blank Wear OS Activity** and then click **Next**.\n5. In the **Configure Activity** window, enter or accept the default values for the **Activity Name** , **Layout Name** , and **Source Language** . Click **Finish**.\n\nAndroid Studio creates and syncs the files for the new module.\nAndroid Studio also adds any required dependencies for Wear OS\nto the new module's build file. The new module appears in\nthe **Project** window on the left side of the screen.\nIf you don't see the new module's folder, make sure the window is displaying the\n[Android view](/studio/projects#ProjectFiles).\n\nInclude the following in the `build.gradle` file for the new Wear OS module:\n\n- In the `android` section, set the values for `compileSdkVersion` to 33 and `targetSdkVersion` to 30.\n- Add the dependencies you need. For more information, see [Declaring dependencies](/jetpack/androidx/releases/wear#declaring_dependencies).\n- [Sync](/studio/build#sync-files) your Android Studio project. To run the code in the new module, see [Launch the\n emulator and run your Wear OS app](/training/wearables/get-started/creating#run-emulator)."]]