
API Level: 18
Android 4.3 (JELLY_BEAN_MR2)
is an update to the Jelly Bean release that offers new features for users and app
developers. This document provides an introduction to the most notable
new APIs.
As an app developer, you should download the Android 4.3 system image and SDK platform from the SDK Manager as soon as possible. If you don't have a device running Android 4.3 on which to test your app, use the Android 4.3 system image to test your app on the Android emulator. Then build your apps against the Android 4.3 platform to begin using the latest APIs.
Update your target API level
To better optimize your app for devices running Android 4.3,
you should set your targetSdkVersion to
"18", install it on an Android 4.3 system image,
test it, then publish an update with this change.
You can use APIs in Android 4.3 while also supporting older versions by adding
conditions to your code that check for the system API level before executing
APIs not supported by your minSdkVersion.
To learn more about maintaining backward compatibility, read Supporting Different
Platform Versions.
Various APIs are also available in the Android Support Library that allow you to implement new features on older versions of the platform.
For more information about how API levels work, read What is API Level?
Important Behavior Changes
If you have previously published an app for Android, be aware that your app might be affected by changes in Android 4.3.
If your app uses implicit intents...
Your app might misbehave in a restricted profile environment.
Users in a restricted profile environment might not
have all the standard Android apps available. For example, a restricted profile might have the
web browser and camera app disabled. So your app should not make assumptions about which apps are
available, because if you call startActivity() without
verifying whether an app is available to handle the Intent,
your app might crash in a restricted profile.
When using an implicit intent, you should always verify that an app is available to handle the intent by calling resolveActivity() or queryIntentActivities(). For example:
Kotlin
val intent = Intent(Intent.ACTION_SEND)
...
if (intent.resolveActivity(packageManager) != null) {
    startActivity(intent)
} else {
    Toast.makeText(context, R.string.app_not_available, Toast.LENGTH_LONG).show()
}
Java
Intent intent = new Intent(Intent.ACTION_SEND);
...
if (intent.resolveActivity(getPackageManager()) != null) {
    startActivity(intent);
} else {
    Toast.makeText(context, R.string.app_not_available, Toast.LENGTH_LONG).show();
}
If your app depends on accounts...
Your app might misbehave in a restricted profile environment.
Users within a restricted profile environment do not have access to user accounts by default.
If your app depends on an Account, then your app might crash or behave
unexpectedly when used in a restricted profile.
If you'd like to prevent restricted profiles from using your app entirely because your
app depends on account information that's sensitive, specify the android:requiredAccountType attribute in your manifest's <application>
element.
If you’d like to allow restricted profiles to continue using your app even though they can’t create their own accounts, then you can either disable your app features that require an account or allow restricted profiles to access the accounts created by the primary user. For more information, see the section below about Supporting accounts in a restricted profile.
If your app uses VideoView...
Your video might appear smaller on Android 4.3.
On previous versions of Android, the VideoView widget incorrectly
calculated the "wrap_content" value for layout_height and layout_width to be the same as "match_parent". So while using "wrap_content" for the height or width may have previously provided your desired video layout,
doing so may result in a much smaller video on Android 4.3 and higher. To fix the issue, replace
"wrap_content" with "match_parent" and verify your video appears as expected on
Android 4.3 as well as on older versions.
Restricted Profiles
On Android tablets, users can now create restricted profiles based on the primary user. When users create a restricted profile, they can enable restrictions such as which apps are available to the profile. A new set of APIs in Android 4.3 also allow you to build fine-grain restriction settings for the apps you develop. For example, by using the new APIs, you can allow users to control what type of content is available within your app when running in a restricted profile environment.
The UI for users to control the restrictions you've built is managed by the system's
Settings application. To make your app's restriction settings appear to the user,
you must declare the restrictions your app provides by creating a BroadcastReceiver that receives the ACTION_GET_RESTRICTION_ENTRIES intent. The system invokes this intent to query
all apps for available restrictions, then builds the UI to allow the primary user to
manage restrictions for each restricted profile.
In the onReceive() method of
your BroadcastReceiver, you must create a RestrictionEntry for each restriction your app provides. Each RestrictionEntry defines a restriction title, description, and one of the
following data types:
TYPE_BOOLEANfor a restriction that is either true or false.TYPE_CHOICEfor a restriction that has multiple choices that are mutually exclusive (radio button choices).TYPE_MULTI_SELECTfor a restriction that has multiple choices that are not mutually exclusive (checkbox choices).
You then put all the RestrictionEntry objects into an ArrayList and put it into the broadcast receiver's result as the value for the
EXTRA_RESTRICTIONS_LIST extra.
The system creates the UI for your app's restrictions in the Settings app and saves each
restriction with the unique key you provided for each RestrictionEntry
object. When the user opens your app, you can query for any current restrictions by
calling getApplicationRestrictions().
This returns a Bundle containing the key-value pairs for each restriction
you defined with the RestrictionEntry objects.
If you want to provide more specific restrictions that can't be handled by boolean, single
choice, and multi-choice values, then you can create an activity where the user can specify the
restrictions and allow users to open that activity from the restriction settings. In your
broadcast receiver, include the EXTRA_RESTRICTIONS_INTENT extra
in the result Bundle. This extra must specify an Intent
indicating the Activity class to launch (use the
putParcelable() method to pass EXTRA_RESTRICTIONS_INTENT with the intent).
When the primary user enters your activity to set custom restrictions, your
activity must then return a result containing the restriction values in an extra using either
the EXTRA_RESTRICTIONS_LIST or EXTRA_RESTRICTIONS_BUNDLE key, depending on whether you specify
RestrictionEntry objects or key-value pairs, respectively.
Supporting accounts in a restricted profile
Any accounts added to the primary user are available to a restricted profile, but the
accounts are not accessible from the AccountManager APIs by default.
If you attempt to add an account with AccountManager while in a restricted
profile, you will get a failure result. Due to these restrictions, you have the following
three options:
To get access to an account from a restricted profile, you must add the android:restrictedAccountType attribute to the <application> tag:
<application ...
    android:restrictedAccountType="com.example.account.type" >
Caution: Enabling this attribute provides your app access to the primary user's accounts from restricted profiles. So you should allow this only if the information displayed by your app does not reveal personally identifiable information (PII) that’s considered sensitive. The system settings will inform the primary user that your app grants restricted profiles to their accounts, so it should be clear to the user that account access is important for your app's functionality. If possible, you should also provide adequate restriction controls for the primary user that define how much account access is allowed in your app.
If you want to use accounts, but don’t actually require them for your app’s primary
functionality, you can check for account availability and disable features when not available.
You should first check if there is an existing account available. If not, then query whether
it’s possible to create a new account by calling getUserRestrictions() and check the DISALLOW_MODIFY_ACCOUNTS extra in the result. If it is true,
then you should disable whatever functionality of your app requires access to accounts.
For example:
Kotlin
val um = context.getSystemService(Context.USER_SERVICE) as UserManager
val restrictions: Bundle = um.userRestrictions
if (restrictions.getBoolean(UserManager.DISALLOW_MODIFY_ACCOUNTS, false)) {
    // cannot add accounts, disable some functionality
}
Java
UserManager um = (UserManager) context.getSystemService(Context.USER_SERVICE);
Bundle restrictions = um.getUserRestrictions();
if (restrictions.getBoolean(UserManager.DISALLOW_MODIFY_ACCOUNTS, false)) {
    // cannot add accounts, disable some functionality
}
Note: In this scenario, you should not declare any new attributes in your manifest file.
If it’s instead important that your app not be available to restricted profiles because
your app depends on sensitive personal information in an account (and because restricted profiles
currently cannot add new accounts), add
the android:requiredAccountType attribute to the <application> tag:
<application ...
    android:requiredAccountType="com.example.account.type" >
For example, the Gmail app uses this attribute to disable itself for restricted profiles, because the owner's personal email should not be available to restricted profiles.
Wireless and Connectivity
Bluetooth Low Energy (Smart Ready)
Android now supports Bluetooth Low Energy (LE) with new APIs in android.bluetooth.
With the new APIs, you can build Android apps that communicate with Bluetooth Low Energy
peripherals such as heart rate monitors and pedometers.
Because Bluetooth LE is a hardware feature that is not available on all
Android-powered devices, you must declare in your manifest file a <uses-feature>
element for "android.hardware.bluetooth_le":
<uses-feature android:name="android.hardware.bluetooth_le" android:required="true" />
If you're already familiar with Android's Classic Bluetooth APIs, notice that using the
Bluetooth LE APIs has some differences. Most importantly is that there's now a BluetoothManager class that you should use for some high level operations
such as acquiring a BluetoothAdapter, getting a list of connected
devices, and checking the state of a device. For example, here's how you should now get the
BluetoothAdapter:
Kotlin
val bluetoothManager = getSystemService(Context.BLUETOOTH_SERVICE) as BluetoothManager
bluetoothAdapter = bluetoothManager.adapter
Java
final BluetoothManager bluetoothManager =
        (BluetoothManager) getSystemService(Context.BLUETOOTH_SERVICE);
bluetoothAdapter = bluetoothManager.getAdapter();
To discover Bluetooth LE peripherals, call startLeScan() on the BluetoothAdapter, passing it an implementation
of the BluetoothAdapter.LeScanCallback interface. When the Bluetooth
adapter detects a Bluetooth LE peripheral, your BluetoothAdapter.LeScanCallback implementation receives a call to the
onLeScan() method. This
method provides you with a BluetoothDevice object representing the
detected device, the RSSI value for the device, and a byte array containing the device's
advertisement record.
If you want to scan for only specific types of peripherals, you can instead call startLeScan() and include an array of UUID objects that specify the GATT services your app supports.
Note: You can only scan for Bluetooth LE devices or scan for Classic Bluetooth devices using previous APIs. You cannot scan for both LE and Classic Bluetooth devices at once.
To then connect to a Bluetooth LE peripheral, call connectGatt() on the corresponding
BluetoothDevice object, passing it an implementation of
BluetoothGattCallback. Your implementation of BluetoothGattCallback receives callbacks regarding the connectivity
state with the device and other events. It's during the onConnectionStateChange()
callback that you can begin communicating with the device if the method passes STATE_CONNECTED as the new state.
Accessing Bluetooth features on a device also requires that your app request certain Bluetooth user permissions. For more information, see the Bluetooth Low Energy API guide.
Wi-Fi scan-only mode
When attempting to identify the user's location, Android may use Wi-Fi to help determine the location by scanning nearby access points. However, users often keep Wi-Fi turned off to conserve battery, resulting in location data that's less accurate. Android now includes a scan-only mode that allows the device Wi-Fi to scan access points to help obtain the location without connecting to an access point, thus greatly reducing battery usage.
If you want to acquire the user's location but Wi-Fi is currently off, you can request the
user to enable Wi-Fi scan-only mode by calling startActivity() with the action ACTION_REQUEST_SCAN_ALWAYS_AVAILABLE.
Wi-Fi configuration
New WifiEnterpriseConfig APIs allow enterprise-oriented services to
automate Wi-Fi configuration for managed devices.
Quick response for incoming calls
Since Android 4.0, a feature called "Quick response" allows users to respond to incoming
calls with an immediate text message without needing to pick up the call or unlock the device.
Until now, these quick messages were always handled by the default Messaging app. Now any app
can declare its capability to handle these messages by creating a Service
with an intent filter for ACTION_RESPOND_VIA_MESSAGE.
When the user responds to an incoming call with a quick response, the Phone app sends
the ACTION_RESPOND_VIA_MESSAGE intent with a URI
describing the recipient (the caller) and the EXTRA_TEXT extra
with the message the user wants to send. When your service receives the intent, it should deliver
the message and immediately stop itself (your app should not show an activity).
In order to receive this intent, you must declare the SEND_RESPOND_VIA_MESSAGE permission.
Multimedia
MediaExtractor and MediaCodec enhancements
Android now makes it easier for you to write your own Dynamic Adaptive
Streaming over HTTP (DASH) players in accordance with the ISO/IEC 23009-1 standard,
using existing APIs in MediaCodec and MediaExtractor. The framework underlying these APIs has been updated to support
parsing of fragmented MP4 files, but your app is still responsible for parsing the MPD metadata
and passing the individual streams to MediaExtractor.
If you want to use DASH with encrypted content, notice that the getSampleCryptoInfo() method returns the MediaCodec.CryptoInfo metadata describing the structure of each encrypted media
sample. Also, the getPsshInfo() method has been added to
MediaExtractor so you can access the PSSH metadata for your DASH media.
This method returns a map of UUID objects to bytes, with the
UUID specifying the crypto scheme, and the bytes being the data specific
to that scheme.
Media DRM
The new MediaDrm class provides a modular solution for digital rights
management (DRM) with your media content by separating DRM concerns from media playback. For
instance, this API separation allows you to play back Widevine-encrypted content without having
to use the Widevine media format. This DRM solution also supports DASH Common Encryption so you
can use a variety of DRM schemes with your streaming content.
You can use MediaDrm to obtain opaque key-request messages and process
key-response messages from the server for license acquisition and provisioning. Your app is
responsible for handling the network communication with the servers; the MediaDrm class provides only the ability to generate and process the messages.
The MediaDrm APIs are intended to be used in conjunction with the
MediaCodec APIs that were introduced in Android 4.1 (API level 16),
including MediaCodec for encoding and decoding your content, MediaCrypto for handling encrypted content, and MediaExtractor
for extracting and demuxing your content.
You must first construct MediaExtractor and
MediaCodec objects. You can then access the DRM-scheme-identifying
UUID, typically from metadata in the content, and use it to construct an
instance of a MediaDrm object with its constructor.
Video encoding from a Surface
Android 4.1 (API level 16) added the MediaCodec class for low-level
encoding and decoding of media content. When encoding video, Android 4.1 required that you provide
the media with a ByteBuffer array, but Android 4.3 now allows you to use a Surface as the input to an encoder. For instance, this allows you to encode input
from an existing video file or using frames generated from OpenGL ES.
To use a Surface as the input to your encoder, first call configure() for your MediaCodec.
Then call createInputSurface() to receive the Surface upon which you can stream your media.
For example, you can use the given Surface as the window for an OpenGL
context by passing it to eglCreateWindowSurface(). Then while rendering the surface, call eglSwapBuffers() to pass the frame to the MediaCodec.
To begin encoding, call start() on the MediaCodec. When done, call signalEndOfInputStream()
to terminate encoding, and call release() on the
Surface.
Media muxing
The new MediaMuxer class enables multiplexing between one audio stream
and one video stream. These APIs serve as a counterpart to the MediaExtractor
class added in Android 4.2 for de-multiplexing (demuxing) media.
Supported output formats are defined in MediaMuxer.OutputFormat. Currently,
MP4 is the only supported output format and MediaMuxer currently supports
only one audio stream and/or one video stream at a time.
MediaMuxer is mostly designed to work with MediaCodec
so you can perform video processing through MediaCodec then save the
output to an MP4 file through MediaMuxer. You can also use MediaMuxer in combination with MediaExtractor to perform
media editing without the need to encode or decode.
Playback progress and scrubbing for RemoteControlClient
In Android 4.0 (API level 14), the RemoteControlClient was added to
enable media playback controls from remote control clients such as the controls available on the
lock screen. Android 4.3 now provides the ability for such controllers to display the playback
position and controls for scrubbing the playback. If you've enabled remote control for your
media app with the RemoteControlClient APIs, then you can allow playback
scrubbing by implementing two new interfaces.
First, you must enable the FLAG_KEY_MEDIA_POSITION_UPDATE flag by passing it to
setTransportControlsFlags().
Then implement the following two new interfaces:
RemoteControlClient.OnGetPlaybackPositionListener- This includes the callback
onGetPlaybackPosition(), which requests the current position of your media when the remote control needs to update the progress in its UI. RemoteControlClient.OnPlaybackPositionUpdateListener- This includes the callback
onPlaybackPositionUpdate(), which tells your app the new time code for your media when the user scrubs the playback with the remote control UI.Once you update your playback with the new position, call
setPlaybackState()to indicate the new playback state, position, and speed.
With these interfaces defined, you can set them for your RemoteControlClient by calling setOnGetPlaybackPositionListener() and
setPlaybackPositionUpdateListener(), respectively.
Graphics
Support for OpenGL ES 3.0
Android 4.3 adds Java interfaces and native support for OpenGL ES 3.0. Key new functionality provided in OpenGL ES 3.0 includes:
- Acceleration of advanced visual effects
- High quality ETC2/EAC texture compression as a standard feature
- A new version of the GLSL ES shading language with integer and 32-bit floating point support
- Advanced texture rendering
- Broader standardization of texture size and render-buffer formats
The Java interface for OpenGL ES 3.0 on Android is provided with GLES30.
When using OpenGL ES 3.0, be sure that you declare it in your manifest file with the
<uses-feature>
tag and the android:glEsVersion attribute. For example:
<manifest>
    <uses-feature android:glEsVersion="0x00030000" />
    ...
</manifest>
And remember to specify the OpenGL ES context by calling setEGLContextClientVersion(),
passing 3 as the version.
For more information about using OpenGL ES, including how to check the device's supported OpenGL ES version at runtime, see the OpenGL ES API guide.
Mipmapping for drawables
Using a mipmap as the source for your bitmap or drawable is a simple way to provide a quality image and various image scales, which can be particularly useful if you expect your image to be scaled during an animation.
Android 4.2 (API level 17) added support for mipmaps in the Bitmap
class—Android swaps the mip images in your Bitmap when you've
supplied a mipmap source and have enabled setHasMipMap(). Now in Android 4.3, you can enable mipmaps for a BitmapDrawable object as well, by providing a mipmap asset and
setting the android:mipMap attribute in a bitmap resource file or by calling hasMipMap().
User Interface
View overlays
The new ViewOverlay class provides a transparent layer on top of
a View on which you can add visual content and which does not affect
the layout hierarchy. You can get a ViewOverlay for any View by calling getOverlay(). The overlay
always has the same size and position as its host view (the view from which it was created),
allowing you to add content that appears in front of the host view, but which cannot extend
the bounds of that host view.
Using a ViewOverlay is particularly useful when you want to create
animations such as sliding a view outside of its container or moving items around the screen
without affecting the view hierarchy. However, because the usable area of an overlay is
restricted to the same area as its host view, if you want to animate a view moving outside
its position in the layout, you must use an overlay from a parent view that has the desired
layout bounds.
When you create an overlay for a widget view such as a Button, you
can add Drawable objects to the overlay by calling
add(Drawable). If you call getOverlay() for a layout view, such as RelativeLayout,
the object returned is a ViewGroupOverlay. The
ViewGroupOverlay class is a subclass
of ViewOverlay that also allows you to add View
objects by calling add(View).
Note: All drawables and views that you add to an overlay are visual only. They cannot receive focus or input events.
For example, the following code animates a view sliding to the right by placing the view in the parent view's overlay, then performing a translation animation on that view:
Kotlin
val view: View? = findViewById(R.id.view_to_remove)
val container: ViewGroup? = view?.parent as ViewGroup

container?.apply {
    overlay.add(view)
    ObjectAnimator.ofFloat(view, "translationX", right.toFloat())
            .start()
}
Java
View view = findViewById(R.id.view_to_remove);
ViewGroup container = (ViewGroup) view.getParent();
container.getOverlay().add(view);
ObjectAnimator anim = ObjectAnimator.ofFloat(view, "translationX", container.getRight());
anim.start();
Optical bounds layout
For views that contain nine-patch background images, you can now specify that they should be aligned with neighboring views based on the "optical" bounds of the background image rather than the "clip" bounds of the view.
For example, figures 1 and 2 each show the same layout, but the version in figure 1 is using clip bounds (the default behavior), while figure 2 is using optical bounds. Because the nine-patch images used for the button and the photo frame include padding around the edges, they don’t appear to align with each other or the text when using clip bounds.
Note: The screenshot in figures 1 and 2 have the "Show layout bounds" developer setting enabled. For each view, red lines indicate the optical bounds, blue lines indicate the clip bounds, and pink indicates margins.
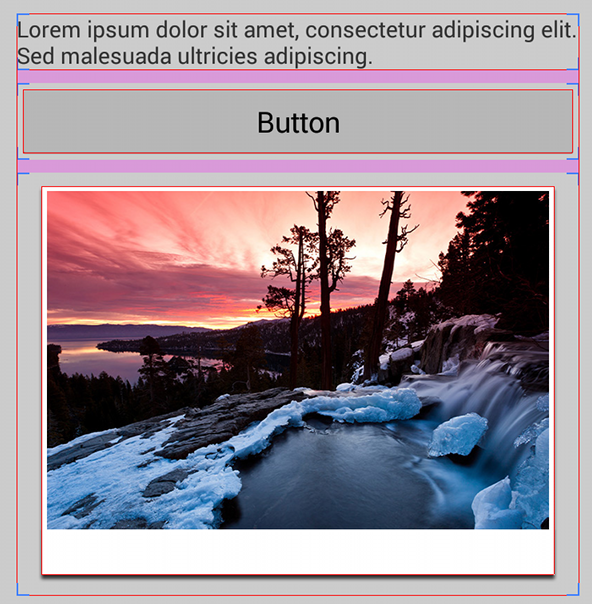
Figure 1. Layout using clip bounds (default).
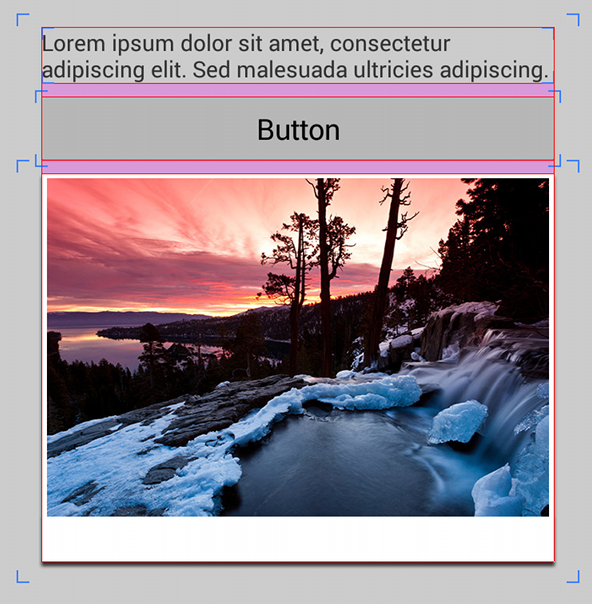
Figure 2. Layout using optical bounds.
To align the views based on their optical bounds, set the android:layoutMode attribute to "opticalBounds" in one of the parent layouts. For example:
<LinearLayout android:layoutMode="opticalBounds" ... >

Figure 3. Zoomed view of the Holo button nine-patch with optical bounds.
For this to work, the nine-patch images applied to the background of your views must specify the optical bounds using red lines along the bottom and right-side of the nine-patch file (as shown in figure 3). The red lines indicate the region that should be subtracted from the clip bounds, leaving the optical bounds of the image.
When you enable optical bounds for a ViewGroup in your layout, all
descendant views inherit the optical bounds layout mode unless you override it for a group by
setting android:layoutMode to "clipBounds". All layout elements also honor the
optical bounds of their child views, adapting their own bounds based on the optical bounds of
the views within them. However, layout elements (subclasses of ViewGroup)
currently do not support optical bounds for nine-patch images applied to their own background.
If you create a custom view by subclassing View, ViewGroup, or any subclasses thereof, your view will inherit these optical bound behaviors.
Note: All widgets supported by the Holo theme have been updated
with optical bounds, including Button, Spinner,
EditText, and others. So you can immediately benefit by setting the
android:layoutMode attribute to "opticalBounds" if your app applies a Holo theme
(Theme.Holo, Theme.Holo.Light, etc.).
To specify optical bounds for your own nine-patch images with the Draw 9-patch tool, hold Control when clicking on the border pixels.
Animation for Rect values
You can now animate between two Rect values with the new RectEvaluator. This new class is an implementation of TypeEvaluator that you can pass to ValueAnimator.setEvaluator().
Window attach and focus listener
Previously, if you wanted to listen for when your view attached/detached to the window or
when its focus changed, you needed to override the View class to
implement onAttachedToWindow() and onDetachedFromWindow(), or onWindowFocusChanged(), respectively.
Now, to receive attach and detach events you can instead implement ViewTreeObserver.OnWindowAttachListener and set it on a view with
addOnWindowAttachListener().
And to receive focus events, you can implement ViewTreeObserver.OnWindowFocusChangeListener and set it on a view with
addOnWindowFocusChangeListener().
TV overscan support
To be sure your app fills the entire screen on every television, you can now enable overscan
for you app layout. Overscan mode is determined by the FLAG_LAYOUT_IN_OVERSCAN flag, which you can enable with platform themes such as
Theme_DeviceDefault_NoActionBar_Overscan or by enabling the
windowOverscan style in a custom theme.
Screen orientation
The <activity>
tag's screenOrientation
attribute now supports additional values to honor the user's preference for auto-rotation:
"userLandscape"- Behaves the same as
"sensorLandscape", except if the user disables auto-rotate then it locks in the normal landscape orientation and will not flip. "userPortrait"- Behaves the same as
"sensorPortrait", except if the user disables auto-rotate then it locks in the normal portrait orientation and will not flip. "fullUser"- Behaves the same as
"fullSensor"and allows rotation in all four directions, except if the user disables auto-rotate then it locks in the user's preferred orientation.
Additionally, you can now also declare "locked" to lock your app's orientation into
the screen's current orientation.
Rotation animations
The new rotationAnimation field in
WindowManager allows you to select between one of three animations you
want to use when the system switches screen orientations. The three animations are:
Note: These animations are available only if you've set your activity to use "fullscreen" mode, which you can enable with themes such as Theme.Holo.NoActionBar.Fullscreen.
For example, here's how you can enable the "crossfade" animation:
Kotlin
override fun onCreate(savedInstanceState: Bundle?) {
    super.onCreate(savedInstanceState)

    val params: WindowManager.LayoutParams = window.attributes
    params.rotationAnimation = WindowManager.LayoutParams.ROTATION_ANIMATION_CROSSFADE
    window.attributes = params
    ...
}
Java
protected void onCreate(Bundle savedInstanceState) {
    super.onCreate(savedInstanceState);

    WindowManager.LayoutParams params = getWindow().getAttributes();
    params.rotationAnimation = WindowManager.LayoutParams.ROTATION_ANIMATION_CROSSFADE;
    getWindow().setAttributes(params);
    ...
}
User Input
New sensor types
The new TYPE_GAME_ROTATION_VECTOR sensor allows you to detect the device's rotations without worrying about magnetic interferences. Unlike the TYPE_ROTATION_VECTOR sensor, the TYPE_GAME_ROTATION_VECTOR is not based on magnetic north.
The new TYPE_GYROSCOPE_UNCALIBRATED and TYPE_MAGNETIC_FIELD_UNCALIBRATED sensors provide raw sensor data without
consideration for bias estimations. That is, the existing TYPE_GYROSCOPE and TYPE_MAGNETIC_FIELD
sensors provide sensor data that takes into account estimated bias from gyro-drift and hard iron
in the device, respectively. Whereas the new "uncalibrated" versions of these sensors instead provide
the raw sensor data and offer the estimated bias values separately. These sensors allow you to
provide your own custom calibration for the sensor data by enhancing the estimated bias with
external data.
Notification Listener
Android 4.3 adds a new service class, NotificationListenerService, that allows your app to receive information about new notifications as they are posted by the system.
If your app currently uses the accessibility service APIs to access system notifications, you should update your app to use these APIs instead.
Contacts Provider
Query for "contactables"
The new Contacts Provider query, Contactables.CONTENT_URI, provides an efficient way to get one Cursor that contains all email addresses and phone numbers belonging to all contacts matching the specified query.
Query for contacts deltas
New APIs have been added to Contacts Provider that allow you to efficiently query recent changes to the contacts data. Previously, your app could be notified when something in the contacts data changed, but you would not know exactly what changed and would need to retrieve all contacts then iterate through them to discover the change.
To track changes to inserts and updates, you can now include the CONTACT_LAST_UPDATED_TIMESTAMP parameter with your selection to query only the contacts that have changed since the last time you queried the provider.
To track which contacts have been deleted, the new table ContactsContract.DeletedContacts provides a log of contacts that have been deleted (but each contact deleted is held in this table for a limited time). Similar to CONTACT_LAST_UPDATED_TIMESTAMP, you can use the new selection parameter, CONTACT_DELETED_TIMESTAMP to check which contacts have been deleted since the last time you queried the provider. The table also contains the constant DAYS_KEPT_MILLISECONDS containing the number of days (in milliseconds) that the log will be kept.
Additionally, the Contacts Provider now broadcasts the CONTACTS_DATABASE_CREATED action when the user
clears the contacts storage through the system settings menu, effectively recreating the
Contacts Provider database. It’s intended to signal apps that they need to drop all the contact
information they’ve stored and reload it with a new query.
For sample code using these APIs to check for changes to the contacts, look in the ApiDemos sample available in the SDK Samples download.
Localization
Improved support for bi-directional text
Previous versions of Android support right-to-left (RTL) languages and layout,
but sometimes don't properly handle mixed-direction text. So Android 4.3 adds the BidiFormatter APIs that help you properly format text with opposite-direction
content without garbling any parts of it.
For example, when you want to create a sentence with a string variable, such as "Did you mean
15 Bay Street, Laurel, CA?", you normally pass a localized string resource and the variable to
String.format():
Kotlin
val suggestion = String.format(resources.getString(R.string.did_you_mean), address)
Java
Resources res = getResources();
String suggestion = String.format(res.getString(R.string.did_you_mean), address);
However, if the locale is Hebrew, then the formatted string comes out like this:
האם התכוונת ל 15 Bay Street, Laurel, CA?
That's wrong because the "15" should be left of "Bay Street." The solution is to use BidiFormatter and its unicodeWrap() method. For example, the code above becomes:
Kotlin
val bidiFormatter = BidiFormatter.getInstance()
val suggestion = String.format(
        resources.getString(R.string.did_you_mean),
        bidiFormatter.unicodeWrap(address)
)
Java
Resources res = getResources();
BidiFormatter bidiFormatter = BidiFormatter.getInstance();
String suggestion = String.format(res.getString(R.string.did_you_mean),
        bidiFormatter.unicodeWrap(address));
By default, unicodeWrap() uses the
first-strong directionality estimation heuristic, which can get things wrong if the first
signal for text direction does not represent the appropriate direction for the content as a whole.
If necessary, you can specify a different heuristic by passing one of the TextDirectionHeuristic constants from TextDirectionHeuristics
to unicodeWrap().
Note: These new APIs are also available for previous versions
of Android through the Android Support
Library, with the BidiFormatter class and related APIs.
Accessibility Services
Handle key events
An AccessibilityService can now receive a callback for
key input events with the onKeyEvent() callback method. This allows your accessibility service to handle input for
key-based input devices such as a keyboard and translate those events to special actions that
previously may have been possible only with touch input or the device's directional pad.
Select text and copy/paste
The AccessibilityNodeInfo now provides APIs that allow
an AccessibilityService to select, cut, copy, and paste
text in a node.
To specify the selection of text to cut or copy, your accessibility service can use the new
action, ACTION_SET_SELECTION, passing
with it the selection start and end position with ACTION_ARGUMENT_SELECTION_START_INT and ACTION_ARGUMENT_SELECTION_END_INT.
Alternatively you can select text by manipulating the cursor position using the existing
action, ACTION_NEXT_AT_MOVEMENT_GRANULARITY
(previously only for moving the cursor position), and adding the argument ACTION_ARGUMENT_EXTEND_SELECTION_BOOLEAN.
You can then cut or copy with ACTION_CUT,
ACTION_COPY, then later paste with
ACTION_PASTE.
Note: These new APIs are also available for previous versions
of Android through the Android Support
Library, with the AccessibilityNodeInfoCompat
class.
Declare accessibility features
Beginning with Android 4.3, an accessibility service must declare accessibility capabilities
in its metadata file in order to use certain accessibility features. If the capability is not
requested in the metadata file, then the feature will be a no-op. To declare your service's
accessibility capabilities, you must use XML attributes that correspond to the various
"capability" constants in the AccessibilityServiceInfo
class.
For example, if a service does not request the flagRequestFilterKeyEvents capability,
then it will not receive key events.
Testing and Debugging
Automated UI testing
The new UiAutomation class provides APIs that allow you to simulate user
actions for test automation. By using the platform's AccessibilityService APIs, the UiAutomation
APIs allow you to inspect the screen content and inject arbitrary keyboard and touch events.
To get an instance of UiAutomation, call Instrumentation.getUiAutomation(). In order
for this to work, you must supply the -w option with the instrument command
when running your InstrumentationTestCase from adb shell.
With the UiAutomation instance, you can execute arbitrary events to test
your app by calling executeAndWaitForEvent(), passing it a Runnable to perform, a timeout
period for the operation, and an implementation of the UiAutomation.AccessibilityEventFilter interface. It's within your UiAutomation.AccessibilityEventFilter implementation that you'll receive a call
that allows you to filter the events that you're interested in and determine the success or
failure of a given test case.
To observe all the events during a test, create an implementation of UiAutomation.OnAccessibilityEventListener and pass it to setOnAccessibilityEventListener().
Your listener interface then receives a call to onAccessibilityEvent()
each time an event occurs, receiving an AccessibilityEvent object
that describes the event.
There is a variety of other operations that the UiAutomation APIs expose
at a very low level to encourage the development of UI test tools such as uiautomator. For instance,
UiAutomation can also:
- Inject input events
- Change the orientation of the screen
- Take screenshots
And most importantly for UI test tools, the UiAutomation APIs work
across application boundaries, unlike those in Instrumentation.
Systrace events for apps
Android 4.3 adds the Trace class with two static methods,
beginSection() and endSection(),
which allow you to define blocks of code to include with the systrace report. By creating
sections of traceable code in your app, the systrace logs provide you a much more detailed
analysis of where slowdown occurs within your app.
For information about using the Systrace tool, read Analyzing Display and Performance with Systrace.
Security
Android key store for app-private keys
Android now offers a custom Java Security Provider in the KeyStore
facility, called Android Key Store, which allows you to generate and save private keys that
may be seen and used by only your app. To load the Android Key Store, pass
"AndroidKeyStore" to KeyStore.getInstance().
To manage your app's private credentials in the Android Key Store, generate a new key with
KeyPairGenerator with KeyPairGeneratorSpec. First
get an instance of KeyPairGenerator by calling getInstance(). Then call
initialize(), passing it an instance of
KeyPairGeneratorSpec, which you can get using
KeyPairGeneratorSpec.Builder.
Finally, get your KeyPair by calling generateKeyPair().
Hardware credential storage
Android also now supports hardware-backed storage for your KeyChain
credentials, providing more security by making the keys unavailable for extraction. That is, once
keys are in a hardware-backed key store (Secure Element, TPM, or TrustZone), they can be used for
cryptographic operations but the private key material cannot be exported. Even the OS kernel
cannot access this key material. While not all Android-powered devices support storage on
hardware, you can check at runtime if hardware-backed storage is available by calling
KeyChain.IsBoundKeyAlgorithm().
Manifest Declarations
Declarable required features
The following values are now supported in the <uses-feature>
element so you can ensure that your app is installed only on devices that provide the features
your app needs.
FEATURE_APP_WIDGETS- Declares that your app provides an app widget and should be installed only on devices that
include a Home screen or similar location where users can embed app widgets.
Example:
<uses-feature android:name="android.software.app_widgets" android:required="true" />
FEATURE_HOME_SCREEN- Declares that your app behaves as a Home screen replacement and should be installed only on
devices that support third-party Home screen apps.
Example:
<uses-feature android:name="android.software.home_screen" android:required="true" />
FEATURE_INPUT_METHODS- Declares that your app provides a custom input method (a keyboard built with
InputMethodService) and should be installed only on devices that support third-party input methods. Example:<uses-feature android:name="android.software.input_methods" android:required="true" />
FEATURE_BLUETOOTH_LE- Declares that your app uses Bluetooth Low Energy APIs and should be installed only on devices
that are capable of communicating with other devices via Bluetooth Low Energy.
Example:
<uses-feature android:name="android.software.bluetooth_le" android:required="true" />
User permissions
The following values are now supported in the <uses-permission>
to declare the
permissions your app requires in order to access certain APIs.
BIND_NOTIFICATION_LISTENER_SERVICE- Required to use the new
NotificationListenerServiceAPIs. SEND_RESPOND_VIA_MESSAGE- Required to receive the
ACTION_RESPOND_VIA_MESSAGEintent.
For a detailed view of all API changes in Android 4.3, see the API Differences Report.