
聯絡人供應程式是功能強大且彈性的 Android 元件,可管理裝置中與使用者相關的中央資料存放區。聯絡人供應程式是裝置聯絡人應用程式中顯示的資料來源,您也可以在自己的應用程式中存取這類資料,並在裝置和線上服務之間轉移資料。供應商可處理各種資料來源,並盡可能管理每個人的資料,因此組織結構相當複雜。因此,供應商的 API 包含一組廣泛的合約類別和介面,可同時簡化資料擷取和修改作業。
本指南說明下列事項:
- 基本供應商結構。
- 如何從供應商擷取資料。
- 如何修改供應商中的資料。
- 如何編寫同步轉換介面,將資料從伺服器同步處理至聯絡人供應程式。
本指南假設您已瞭解 Android 內容供應器的基本概念。如要進一步瞭解 Android 內容供應器,請參閱「 內容供應器基本概念」指南。
聯絡人供應程式機構
聯絡人供應程式是 Android 內容供應程式元件,這項服務會維護三種有關個人的資料,每種資料都對應到供應商提供的資料表,如圖 1 所示:
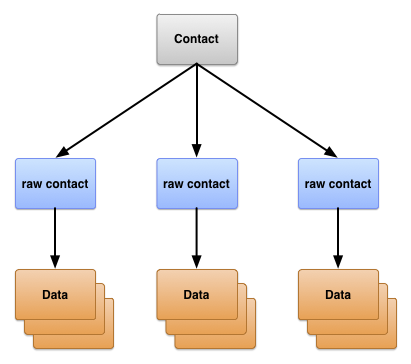
圖 1. 聯絡人供應程式資料表結構。
這三個資料表通常以合約類別的名稱表示。這些類別會定義資料表使用的內容 URI、資料欄名稱和資料欄值的常數:
-
ContactsContract.Contacts表格 - 根據原始聯絡人資料列的匯總結果,代表不同人員的資料列。
-
ContactsContract.RawContacts表格 - 包含個人資料摘要的資料列,會依使用者帳戶和類型而有所不同。
-
ContactsContract.Data表格 - 包含原始聯絡人詳細資料的列,例如電子郵件地址或電話號碼。
ContactsContract 中以合約類別表示的其他表格,是聯絡人供應程式用來管理作業或支援裝置聯絡人或電話應用程式中特定功能的輔助表格。
原始聯絡人
原始聯絡人代表來自單一帳戶類型和帳戶名稱的個人資料。由於聯絡人供應程式允許將多個線上服務做為個人資料來源,因此聯絡人供應程式允許同一人有多個原始聯絡人。多個原始聯絡人也能讓使用者合併來自多個帳戶的個人資料,但這些帳戶必須屬於同一帳戶類型。
原始聯絡人的大部分資料不會儲存在 ContactsContract.RawContacts 資料表中。而是儲存在 ContactsContract.Data 資料表的一或多個資料列中。每個資料列都有一個資料欄 Data.RAW_CONTACT_ID,其中包含父項 ContactsContract.RawContacts 列的 RawContacts._ID 值。
重要的原始聯絡人資料欄
表 1 列出 ContactsContract.RawContacts 資料表中的重要資料欄。請詳閱表格後方的附註:
表 1. 重要的原始聯絡人資料欄。
| 資料欄名稱 | 使用 | 附註 |
|---|---|---|
ACCOUNT_NAME
|
這個原始聯絡人所屬帳戶類型的帳戶名稱。
舉例來說,Google 帳戶的帳戶名稱是裝置擁有者的其中一個 Gmail 地址。詳情請參閱下一個項目 ACCOUNT_TYPE。 |
這個名稱的格式會因帳戶類型而異。不一定是電子郵件地址。 |
ACCOUNT_TYPE
|
這個原始聯絡人的來源帳戶類型。舉例來說,Google 帳戶的帳戶類型為 com.google。請務必使用您擁有或控管的網域,以網域 ID 驗證帳戶類型。確保帳戶類型是唯一的。 |
提供聯絡人資料的帳戶類型通常會與同步轉換介面相關聯,並與聯絡人供應程式同步處理。 |
DELETED
|
原始聯絡人的「已刪除」標記。 | 這個旗標可讓聯絡人供應程式在內部維護資料列,直到同步轉換介面能夠從伺服器刪除資料列,然後最終從存放區刪除資料列為止。 |
附註
以下是 ContactsContract.RawContacts 表格的重要注意事項:
-
原始聯絡人的名稱不會儲存在「
ContactsContract.RawContacts」的資料列中。而是儲存在ContactsContract.Data表格的ContactsContract.CommonDataKinds.StructuredName列中。原始聯絡人在ContactsContract.Data資料表中只有一列這類資料。 -
注意:如要在原始聯絡人資料列中使用自己的帳戶資料,必須先向
AccountManager註冊。如要這麼做,請提示使用者將帳戶類型和帳戶名稱新增至帳戶清單。如果您未執行這項操作,聯絡人供應程式會自動刪除您的原始聯絡人資料列。舉例來說,如果想讓應用程式維護網域為
com.example.dataservice的網路服務聯絡人資料,且服務的使用者帳戶為becky.sharp@dataservice.example.com,使用者必須先新增帳戶「類型」(com.example.dataservice) 和帳戶「名稱」(becky.smart@dataservice.example.com),應用程式才能新增原始聯絡人資料列。您可以在文件中向使用者說明這項規定,也可以提示使用者新增類型和名稱,或兩者皆新增。下一節將詳細說明帳戶類型和帳戶名稱。
原始聯絡人資料來源
如要瞭解原始聯絡人的運作方式,請考慮使用者「Emily Dickinson」,她在裝置上定義了下列三個使用者帳戶:
emily.dickinson@gmail.comemilyd@gmail.com- Twitter 帳戶「belle_of_amherst」
這位使用者已在「帳戶」設定中,為這三個帳戶啟用「同步處理聯絡人」功能。
假設 Emily Dickinson 開啟瀏覽器視窗,以 emily.dickinson@gmail.com 登入 Gmail,然後開啟聯絡人並新增「Thomas Higginson」。稍後,她以 emilyd@gmail.com 登入 Gmail,並傳送電子郵件給「Thomas Higginson」,系統會自動將對方新增為聯絡人。她也在 Twitter 上追蹤「colonel_tom」(Thomas Higginson 的 Twitter ID)。
聯絡人供應程式會因此建立三個原始聯絡人:
-
與
emily.dickinson@gmail.com相關的「Thomas Higginson」原始聯絡人。 使用者帳戶類型為 Google。 -
與「Thomas Higginson」相關的第二個原始聯絡人,與
emilyd@gmail.com相關聯。 使用者帳戶類型也是 Google。即使名稱與先前的名稱相同,系統仍會建立第二個原始聯絡人,因為該人員是透過不同的使用者帳戶新增。 - 與「belle_of_amherst」相關的「Thomas Higginson」第三個原始聯絡人。使用者帳戶類型為 Twitter。
資料
如先前所述,原始聯絡人的資料會儲存在與原始聯絡人 _ID 值連結的 ContactsContract.Data 列中。這樣一來,單一原始聯絡人就能擁有多個相同類型的資料執行個體,例如電子郵件地址或電話號碼。舉例來說,如果「Thomas Higginson」emilyd@gmail.com (與 Google 帳戶 emilyd@gmail.com 相關聯的 Thomas Higginson 原始聯絡人資料列) 的住家電子郵件地址為 thigg@gmail.com,公司電子郵件地址為 thomas.higginson@gmail.com,則聯絡人供應程式會儲存這兩個電子郵件地址資料列,並將兩者連結至原始聯絡人。
請注意,這個單一資料表會儲存不同類型的資料。顯示名稱、電話號碼、電子郵件地址、郵寄地址、相片和網站詳細資料列都位於 ContactsContract.Data 表格中。為方便管理,ContactsContract.Data 資料表的部分資料欄會使用描述性名稱,其他則使用一般名稱。描述性名稱資料欄的內容具有相同意義,與資料列中的資料類型無關;一般名稱資料欄的內容則會因資料類型而異。
描述性資料欄名稱
以下列舉幾個說明性資料欄名稱範例:
-
RAW_CONTACT_ID -
這項資料的原始聯絡人
_ID欄值。 -
MIMETYPE -
這個資料列中儲存的資料類型,以自訂 MIME 類型表示。聯絡人供應程式會使用
ContactsContract.CommonDataKinds子類別中定義的 MIME 類型。這些 MIME 類型為開放原始碼,可供任何與聯絡人供應程式搭配使用的應用程式或同步轉換介面使用。 -
IS_PRIMARY -
如果原始聯絡人可多次出現這類資料列,
IS_PRIMARY欄會標記包含該類型主要資料的資料列。舉例來說,如果使用者長按聯絡人的電話號碼並選取「設為預設」,則包含該號碼的ContactsContract.Data列會將IS_PRIMARY欄設為非零值。
一般資料欄名稱
一般來說,有 15 個通用資料欄 (名稱為 DATA1 到 DATA15),另外還有 4 個通用資料欄 (名稱為 SYNC1 到 SYNC4),這些資料欄只能由同步配接器使用。無論資料列包含的資料類型為何,通用資料欄名稱常數一律適用。
「DATA1」欄已建立索引。聯絡人供應程式一律會使用這個資料欄,儲存供應程式預期最常成為查詢目標的資料。舉例來說,在電子郵件列中,這個欄位會包含實際的電子郵件地址。
按照慣例,DATA15 欄會保留用於儲存二進位大型物件 (BLOB) 資料,例如相片縮圖。
類型專屬的資料欄名稱
為方便處理特定類型資料列的資料欄,聯絡人供應程式 也提供類型專屬的資料欄名稱常數,這些常數定義於 ContactsContract.CommonDataKinds 的子類別中。常數只是為相同資料欄名稱提供不同的常數名稱,有助於您存取特定型別資料列中的資料。
舉例來說,ContactsContract.CommonDataKinds.Email 類別會為 MIME 類型為 Email.CONTENT_ITEM_TYPE 的 ContactsContract.Data 資料列定義類型專屬的資料欄名稱常數。這個類別包含電子郵件地址資料欄的常數 ADDRESS。ADDRESS 的實際值為「data1」,與資料欄的通用名稱相同。
注意:請勿使用含有供應商預先定義 MIME 類型的資料列,將自訂資料新增至 ContactsContract.Data 表格。否則可能會遺失資料或導致供應商故障。舉例來說,您不應新增含有 MIME 類型 Email.CONTENT_ITEM_TYPE 的資料列,因為該資料列的 DATA1 欄包含使用者名稱,而非電子郵件地址。如果為資料列使用自訂 MIME 類型,您就能自行定義類型專屬的資料欄名稱,並隨意使用這些資料欄。
圖 2 顯示描述性資料欄和資料欄在資料列中的顯示方式,以及類型專屬的資料欄名稱如何「覆蓋」一般資料欄名稱ContactsContract.Data
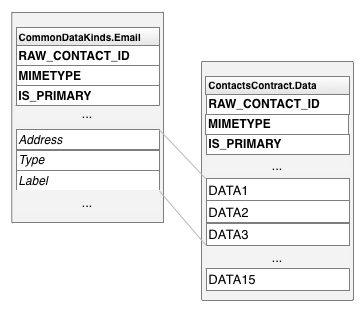
圖 2. 特定類型的資料欄名稱和一般資料欄名稱。
類型專屬的資料欄名稱類別
表 2 列出最常用的類型專屬資料欄名稱類別:
表 2. 類型專屬的資料欄名稱類別
| 對應類別 | 資料類型 | 附註 |
|---|---|---|
ContactsContract.CommonDataKinds.StructuredName |
與這個資料列相關聯的原始聯絡人名稱資料。 | 原始聯絡人只有其中一個資料列。 |
ContactsContract.CommonDataKinds.Photo |
與這個資料列相關聯的原始聯絡人的主要相片。 | 原始聯絡人只有其中一個資料列。 |
ContactsContract.CommonDataKinds.Email |
與這個資料列相關聯的原始聯絡人的電子郵件地址。 | 原始聯絡人可以有多個電子郵件地址。 |
ContactsContract.CommonDataKinds.StructuredPostal |
與這個資料列相關聯的原始聯絡人的郵寄地址。 | 原始聯絡人可以有多個郵寄地址。 |
ContactsContract.CommonDataKinds.GroupMembership |
這個 ID 會將原始聯絡人連結至聯絡人供應程式中的其中一個群組。 | 群組是帳戶類型和帳戶名稱的選用功能。如需詳細說明,請參閱「聯絡人群組」一節。 |
聯絡人
聯絡人供應程式會合併所有帳戶類型和帳戶名稱的原始聯絡人列,形成聯絡人。方便顯示及修改使用者為某人收集的所有資料。聯絡人供應程式會管理新聯絡人列的建立作業,並將原始聯絡人與現有聯絡人列彙整。應用程式和同步介面卡都不得新增聯絡人,且聯絡人列中的部分欄位為唯讀。
注意:如果您嘗試將聯絡人新增至聯絡人供應程式,但聯絡人含有 insert(),系統會擲回 UnsupportedOperationException 例外狀況。如果您嘗試更新列為「唯讀」的資料欄,系統會忽略更新。
如果新增的原始聯絡人與現有聯絡人不符,聯絡人供應程式就會建立新聯絡人。如果現有原始聯絡人的資料發生變化,導致不再與先前附加的聯絡人相符,提供者也會執行這項操作。如果應用程式或同步轉換介面建立的新原始聯絡人不符合現有聯絡人,系統會將新原始聯絡人彙整到現有聯絡人。
聯絡人供應程式會使用聯絡人資料列的 _ID 資料欄,將聯絡人資料列連結至原始聯絡人資料列。Contacts原始聯絡人資料表的 CONTACT_ID 資料欄 ContactsContract.RawContacts 包含與每個原始聯絡人資料列相關聯的聯絡人資料列 _ID 值。
ContactsContract.Contacts 表格也有 LOOKUP_KEY 欄,這是聯絡人列的「永久」連結。由於聯絡人供應程式會自動維護聯絡人,因此可能會因應匯總或同步作業,變更聯絡人列的 _ID 值。即使發生這種情況,內容 URI CONTENT_LOOKUP_URI 與聯絡人的 LOOKUP_KEY 結合後,仍會指向聯絡人資料列,因此您可以使用 LOOKUP_KEY 維護「我的最愛」聯絡人等項目的連結。這個資料欄有自己的格式,與 _ID 資料欄的格式無關。
圖 3 顯示這三個主要資料表之間的關聯。
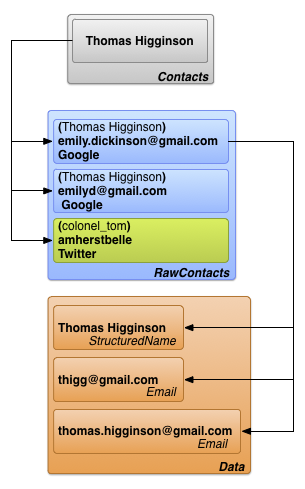
圖 3. 聯絡人、原始聯絡人和詳細資料表關係。
注意: 如果您將應用程式發布到 Google Play 商店,或應用程式在搭載 Android 10 (API 級別 29) 以上版本的裝置上執行,請注意,部分聯絡人資料欄位和方法已過時。
在上述條件下,系統會定期清除寫入這些資料欄位的值:
-
ContactsContract.ContactOptionsColumns.LAST_TIME_CONTACTED -
ContactsContract.ContactOptionsColumns.TIMES_CONTACTED -
ContactsContract.DataUsageStatColumns.LAST_TIME_USED -
ContactsContract.DataUsageStatColumns.TIMES_USED
用於設定上述資料欄位的 API 也已過時:
此外,下列欄位也不再傳回常用聯絡人。請注意,只有當聯絡人屬於特定資料類型時,部分欄位才會影響聯絡人排名。
-
ContactsContract.Contacts.CONTENT_FREQUENT_URI -
ContactsContract.Contacts.CONTENT_STREQUENT_URI -
ContactsContract.Contacts.CONTENT_STREQUENT_FILTER_URI -
CONTENT_FILTER_URI(僅影響電子郵件、電話、可撥打電話和可聯絡資料類型) -
ENTERPRISE_CONTENT_FILTER_URI(僅影響電子郵件、電話和可撥打電話的資料類型)
如果應用程式會存取或更新這些欄位或 API,請改用其他方法。舉例來說,您可以使用私有內容供應器,或儲存在應用程式或後端系統中的其他資料,滿足特定用途。
如要確認這項變更不會影響應用程式功能,您可以手動清除這些資料欄位。如要這麼做,請在搭載 Android 4.1 (API 級別 16) 以上版本的裝置上執行下列 ADB 指令:
adb shell content delete \
--uri content://com.android.contacts/contacts/delete_usage
同步轉換介面提供的資料
使用者可直接在裝置上輸入聯絡人資料,但資料也會透過同步介面卡從網路服務流入聯絡人供應器,自動在裝置和服務之間轉移資料。同步介面卡會在系統控管下於背景執行,並呼叫 ContentResolver 方法來管理資料。
在 Android 中,同步轉換介面使用的網路服務是由帳戶類型識別。每個同步轉換介面都適用於一種帳戶類型,但可以支援該類型的多個帳戶名稱。「原始聯絡人資料來源」一節簡要說明瞭帳戶類型和帳戶名稱。以下定義提供更多詳細資料,並說明帳戶類型和名稱與同步介面卡和服務的關係。
- 帳戶類型
-
識別使用者儲存資料的服務。在大多數情況下,使用者必須向服務進行驗證。舉例來說,Google 聯絡人就是帳戶類型,識別代碼為
google.com。這個值對應於AccountManager使用的帳戶類型。 - 帳戶名稱
- 用於識別特定帳戶或帳戶類型的登入資訊。Google 聯絡人帳戶與 Google 帳戶相同,帳戶名稱就是電子郵件地址。其他服務可能會使用單字使用者名稱或數字 ID。
帳戶類型可以重複。使用者可以設定多個 Google 聯絡人帳戶,並將資料下載至聯絡人供應程式;如果使用者有一組個人聯絡人 (適用於個人帳戶名稱),另一組適用於工作,就可能發生這種情況。帳戶名稱通常不得重複。兩者共同識別聯絡人供應程式與外部服務之間的特定資料流程。
如要將服務的資料轉移至聯絡人供應程式,您必須自行編寫同步轉換介面。詳情請參閱「聯絡人供應程式同步轉接程式」一節。
圖 4 顯示聯絡人供應程式如何融入使用者資料流程。在標示為「同步介面卡」的方塊中,每個介面卡都會標示帳戶類型。
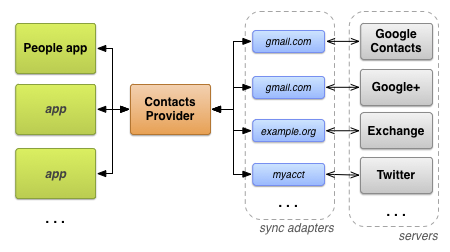
圖 4. 聯絡人供應程式的資料流程。
所需權限
如要存取聯絡人供應程式,應用程式必須要求下列權限:
- 一或多個資料表的讀取權
-
READ_CONTACTS,在AndroidManifest.xml中以<uses-permission>元素指定為<uses-permission android:name="android.permission.READ_CONTACTS">。 - 一或多個資料表的寫入權限
-
WRITE_CONTACTS,在AndroidManifest.xml中以<uses-permission>元素指定為<uses-permission android:name="android.permission.WRITE_CONTACTS">。
這些權限不適用於使用者設定檔資料。使用者設定檔及其必要權限將在下一節中討論,請參閱「使用者設定檔」。
請注意,使用者的聯絡人資料屬於個人私密資料,使用者很重視隱私權,因此不希望應用程式收集自己或聯絡人的資料。如果使用者不瞭解您為何需要存取聯絡人資料的權限,可能會給予應用程式低評分,或直接拒絕安裝。
使用者設定檔
ContactsContract.Contacts 資料表包含單一資料列,內含裝置使用者的設定檔資料。這項資料描述的是裝置,user而非使用者的聯絡人。設定檔聯絡人列會連結至使用設定檔的每個系統的原始聯絡人列。每個設定檔原始聯絡人資料列可以有多個資料列。如要存取使用者設定檔,請使用 ContactsContract.Profile 類別中的常數。
您必須具備特殊權限,才能存取使用者設定檔。除了讀取和寫入所需的 READ_CONTACTS 和 WRITE_CONTACTS 權限外,如要存取使用者個人資料,還需要 android.Manifest.permission#READ_PROFILE 和 android.Manifest.permission#WRITE_PROFILE 權限,才能分別進行讀取和寫入存取。
請注意,使用者設定檔應視為機密資訊。您可透過 android.Manifest.permission#READ_PROFILE 權限存取裝置使用者的個人識別資料。請務必在應用程式說明中,向使用者說明您需要使用者個人資料存取權的原因。
如要擷取包含使用者設定檔的聯絡人列,請呼叫 ContentResolver.query()。將內容 URI 設為 CONTENT_URI,且不提供任何選取條件。您也可以使用這個內容 URI 做為基本 URI,擷取設定檔的原始聯絡人或資料。舉例來說,這個程式碼片段會擷取設定檔的資料:
Kotlin
// Sets the columns to retrieve for the user profile
projection = arrayOf(
        ContactsContract.Profile._ID,
        ContactsContract.Profile.DISPLAY_NAME_PRIMARY,
        ContactsContract.Profile.LOOKUP_KEY,
        ContactsContract.Profile.PHOTO_THUMBNAIL_URI
)

// Retrieves the profile from the Contacts Provider
profileCursor = contentResolver.query(
        ContactsContract.Profile.CONTENT_URI,
        projection,
        null,
        null,
        null
)
Java
// Sets the columns to retrieve for the user profile
projection = new String[]
    {
        Profile._ID,
        Profile.DISPLAY_NAME_PRIMARY,
        Profile.LOOKUP_KEY,
        Profile.PHOTO_THUMBNAIL_URI
    };

// Retrieves the profile from the Contacts Provider
profileCursor =
        getContentResolver().query(
                Profile.CONTENT_URI,
                projection ,
                null,
                null,
                null);
注意:如果擷取多個聯絡人資料列,且想判斷其中一個是否為使用者個人資料,請測試該資料列的 IS_USER_PROFILE 欄。如果聯絡人是使用者設定檔,這個欄會設為「1」。
聯絡人供應程式中繼資料
聯絡人供應程式會管理資料,追蹤存放區中的聯絡人資料狀態。存放區的中繼資料會儲存在多個位置,包括原始聯絡人、資料和聯絡人資料表列、ContactsContract.Settings 資料表和 ContactsContract.SyncState 資料表。下表顯示各項中繼資料的影響:
表 3. 聯絡人供應程式中的中繼資料
| 資料表 | 欄 | 值 | 意義 |
|---|---|---|---|
ContactsContract.RawContacts |
DIRTY |
「0」- 自上次同步處理後未變更。 |
標示裝置上已變更且必須同步回伺服器的原始聯絡人。Android 應用程式更新資料列時,聯絡人供應程式會自動設定這個值。
修改原始聯絡人或資料表的同步介面卡,一律應將字串 |
| 「1」- 自上次同步以來已變更,需要同步回伺服器。 | |||
ContactsContract.RawContacts |
VERSION |
這個資料列的版本號碼。 | 每當資料列或相關資料變更時,聯絡人供應程式就會自動遞增這個值。 |
ContactsContract.Data |
DATA_VERSION |
這個資料列的版本號碼。 | 每當資料列變更時,聯絡人供應程式就會自動遞增這個值。 |
ContactsContract.RawContacts |
SOURCE_ID |
這個字串值可向建立原始聯絡人的帳戶,專屬識別該聯絡人。 |
當同步轉換介面建立新的原始聯絡人時,這個資料欄應設為原始聯絡人的伺服器專屬 ID。Android 應用程式建立新的原始聯絡人時,應將這個資料欄留空。這會向同步轉接器發出信號,表示應在伺服器上建立新的原始聯絡人,並取得 SOURCE_ID 的值。具體來說,每個帳戶類型的來源 ID 必須不重複,且在同步作業期間應保持穩定:
|
ContactsContract.Groups |
GROUP_VISIBLE |
「0」- 這個群組中的聯絡人不得顯示在 Android 應用程式 UI 中。 | 這個資料欄是為了與允許使用者在特定群組中隱藏聯絡人的伺服器相容。 |
| 「1」- 允許在應用程式 UI 中顯示這個群組中的聯絡人。 | |||
ContactsContract.Settings |
UNGROUPED_VISIBLE |
「0」- 對於這個帳戶和帳戶類型,不屬於群組的聯絡人會對 Android 應用程式 UI 隱藏。 |
根據預設,如果聯絡人的任何原始聯絡人都不屬於群組,系統就不會顯示該聯絡人 (原始聯絡人的群組成員資格會以ContactsContract.CommonDataKinds.GroupMembershipContactsContract.Data表格中的一或多個資料列表示)。在帳戶類型和帳戶的 ContactsContract.Settings 資料表列中設定這個旗標,即可強制顯示沒有群組的聯絡人。這項旗標的用途之一,是顯示來自未使用群組的伺服器的聯絡人。 |
| 「1」- 對於這個帳戶和帳戶類型,應用程式 UI 會顯示不屬於群組的聯絡人。 | |||
ContactsContract.SyncState |
(全部) | 這個資料表用於儲存同步轉換介面的中繼資料。 | 您可以使用這個資料表,在裝置上永久儲存同步狀態和其他同步相關資料。 |
聯絡人供應程式存取權
本節說明如何存取聯絡人供應程式中的資料,重點如下:
- 實體查詢。
- 批次修改。
- 使用意圖擷取及修改資料。
- 資料完整性。
「聯絡人供應程式同步轉換介面」一節也會詳細說明如何透過同步轉換介面進行修改。
查詢實體
由於聯絡人供應程式資料表是以階層式結構排列,因此通常會擷取資料列,以及與該資料列連結的所有「子項」資料列。舉例來說,如要顯示某人的所有資訊,您可能需要擷取單一 ContactsContract.RawContacts 列的所有 ContactsContract.Contacts 列,或是單一 ContactsContract.CommonDataKinds.Email 列的所有 ContactsContract.RawContacts 列。為此,聯絡人供應器提供實體建構,作用類似資料表之間的資料庫聯結。
實體就像是由父項資料表及其子項資料表所選資料欄組成的資料表。
查詢實體時,您會根據實體提供的資料欄提供投影和搜尋條件。結果是 Cursor,其中包含擷取的每個子資料表列。舉例來說,如果您查詢聯絡人名稱的 ContactsContract.Contacts.Entity,以及該名稱所有原始聯絡人的所有 ContactsContract.CommonDataKinds.Email 列,系統會傳回一個 Cursor,其中包含每個 ContactsContract.CommonDataKinds.Email 列的一列。
實體可簡化查詢。使用實體時,您可以一次擷取聯絡人或原始聯絡人的所有聯絡人資料,不必先查詢父項資料表來取得 ID,然後再使用該 ID 查詢子項資料表。此外,聯絡人供應程式會在單一交易中處理實體的查詢,確保擷取的資料在內部保持一致。
注意:實體通常不會包含父項和子項資料表的所有欄。如果您嘗試使用不在實體資料欄名稱常數清單中的資料欄名稱,系統會傳回 Exception。
下列程式碼片段顯示如何擷取聯絡人的所有原始聯絡人資料列。這個程式碼片段是較大型應用程式的一部分,該應用程式有兩個活動:「main」和「detail」。主要活動會顯示聯絡人列清單;使用者選取其中一列時,活動會將 ID 傳送至詳細資料活動。詳細資料活動會使用 ContactsContract.Contacts.Entity,顯示與所選聯絡人相關聯的所有原始聯絡人資料列。
這個程式碼片段取自「詳細資料」活動:
Kotlin
...
    /*
     * Appends the entity path to the URI. In the case of the Contacts Provider, the
     * expected URI is content://com.google.contacts/#/entity (# is the ID value).
     */
    contactUri = Uri.withAppendedPath(
            contactUri,
            ContactsContract.Contacts.Entity.CONTENT_DIRECTORY
    )

    // Initializes the loader identified by LOADER_ID.
    loaderManager.initLoader(
            LOADER_ID,  // The identifier of the loader to initialize
            null,       // Arguments for the loader (in this case, none)
            this        // The context of the activity
    )

    // Creates a new cursor adapter to attach to the list view
    cursorAdapter = SimpleCursorAdapter(
            this,                       // the context of the activity
            R.layout.detail_list_item,  // the view item containing the detail widgets
            mCursor,                    // the backing cursor
            fromColumns,               // the columns in the cursor that provide the data
            toViews,                   // the views in the view item that display the data
            0)                          // flags

    // Sets the ListView's backing adapter.
    rawContactList.adapter = cursorAdapter
...
override fun onCreateLoader(id: Int, args: Bundle?): Loader<Cursor> {
    /*
     * Sets the columns to retrieve.
     * RAW_CONTACT_ID is included to identify the raw contact associated with the data row.
     * DATA1 contains the first column in the data row (usually the most important one).
     * MIMETYPE indicates the type of data in the data row.
     */
    val projection: Array<String> = arrayOf(
            ContactsContract.Contacts.Entity.RAW_CONTACT_ID,
            ContactsContract.Contacts.Entity.DATA1,
            ContactsContract.Contacts.Entity.MIMETYPE
    )

    /*
     * Sorts the retrieved cursor by raw contact id, to keep all data rows for a single raw
     * contact collated together.
     */
    val sortOrder = "${ContactsContract.Contacts.Entity.RAW_CONTACT_ID} ASC"

    /*
     * Returns a new CursorLoader. The arguments are similar to
     * ContentResolver.query(), except for the Context argument, which supplies the location of
     * the ContentResolver to use.
     */
    return CursorLoader(
            applicationContext, // The activity's context
            contactUri,        // The entity content URI for a single contact
            projection,         // The columns to retrieve
            null,               // Retrieve all the raw contacts and their data rows.
            null,               //
            sortOrder           // Sort by the raw contact ID.
    )
}
Java
...
    /*
     * Appends the entity path to the URI. In the case of the Contacts Provider, the
     * expected URI is content://com.google.contacts/#/entity (# is the ID value).
     */
    contactUri = Uri.withAppendedPath(
            contactUri,
            ContactsContract.Contacts.Entity.CONTENT_DIRECTORY);

    // Initializes the loader identified by LOADER_ID.
    getLoaderManager().initLoader(
            LOADER_ID,  // The identifier of the loader to initialize
            null,       // Arguments for the loader (in this case, none)
            this);      // The context of the activity

    // Creates a new cursor adapter to attach to the list view
    cursorAdapter = new SimpleCursorAdapter(
            this,                        // the context of the activity
            R.layout.detail_list_item,   // the view item containing the detail widgets
            mCursor,                     // the backing cursor
            fromColumns,                // the columns in the cursor that provide the data
            toViews,                    // the views in the view item that display the data
            0);                          // flags

    // Sets the ListView's backing adapter.
    rawContactList.setAdapter(cursorAdapter);
...
@Override
public Loader<Cursor> onCreateLoader(int id, Bundle args) {

    /*
     * Sets the columns to retrieve.
     * RAW_CONTACT_ID is included to identify the raw contact associated with the data row.
     * DATA1 contains the first column in the data row (usually the most important one).
     * MIMETYPE indicates the type of data in the data row.
     */
    String[] projection =
        {
            ContactsContract.Contacts.Entity.RAW_CONTACT_ID,
            ContactsContract.Contacts.Entity.DATA1,
            ContactsContract.Contacts.Entity.MIMETYPE
        };

    /*
     * Sorts the retrieved cursor by raw contact id, to keep all data rows for a single raw
     * contact collated together.
     */
    String sortOrder =
            ContactsContract.Contacts.Entity.RAW_CONTACT_ID +
            " ASC";

    /*
     * Returns a new CursorLoader. The arguments are similar to
     * ContentResolver.query(), except for the Context argument, which supplies the location of
     * the ContentResolver to use.
     */
    return new CursorLoader(
            getApplicationContext(),  // The activity's context
            contactUri,              // The entity content URI for a single contact
            projection,               // The columns to retrieve
            null,                     // Retrieve all the raw contacts and their data rows.
            null,                     //
            sortOrder);               // Sort by the raw contact ID.
}
載入完成後,LoaderManager 會叫用回呼 onLoadFinished()。這個方法其中一個傳入的引數是 Cursor,其中包含查詢結果。在自己的應用程式中,您可以從這個 Cursor 取得資料,以便顯示或進一步處理。
批次修改
請盡可能在「批次模式」下,透過建立 ArrayList 的 ContentProviderOperation 物件並呼叫 applyBatch(),在聯絡人供應程式中插入、更新及刪除資料。因為聯絡人供應程式會在單一交易中執行所有作業,因此您的修改內容絕不會讓聯絡人存放區處於不一致的狀態。applyBatch()批次修改功能也可同時插入原始聯絡人和詳細資料。
注意:如要修改單一原始聯絡人,建議您將意圖傳送至裝置的聯絡人應用程式,而不是在應用程式中處理修改作業。如需更多詳細資訊,請參閱「使用意圖擷取及修改」一節。
收益點數
如果批次修改作業包含大量作業,可能會阻礙其他程序,導致整體使用者體驗不佳。如要盡可能將所有修改作業整理到少數幾個獨立清單中,同時避免這些作業封鎖系統,您應為一或多個作業設定產生點。降伏點是 ContentProviderOperation 物件,其 isYieldAllowed() 值設為 true。當聯絡人供應器遇到產生點時,會暫停工作,讓其他程序執行,並關閉目前的交易。供應器重新啟動時,會繼續執行 ArrayList 中的下一個作業,並啟動新的交易。
每次呼叫 applyBatch() 時,產生點數會導致多筆交易。因此,您應為一組相關資料列的最後一項作業設定產生點。舉例來說,您應該為一組作業中的最後一項作業設定產生點,這組作業會新增原始聯絡人資料列及其相關聯的資料列,或是為與單一聯絡人相關的一組資料列設定產生點。
產生點也是原子作業的單位。兩個產生點之間的所有存取作業都會以單一單元的形式成功或失敗。如果未設定任何產生點,最小的不可分割作業就是整個作業批次。如果您使用產生點,可防止作業降低系統效能,同時確保部分作業是不可分割的。
修改後向參照
以一組 ContentProviderOperation 物件插入新的原始聯絡人資料列及其相關聯的資料列時,您必須插入原始聯絡人的 _ID 值做為 RAW_CONTACT_ID 值,將資料列連結至原始聯絡人資料列。不過,建立資料列的 ContentProviderOperation 時,這個值無法使用,因為您尚未套用原始聯絡人列的 ContentProviderOperation。如要解決這個問題,ContentProviderOperation.Builder 類別提供 withValueBackReference() 方法。這個方法可讓您插入或修改資料欄,並使用先前作業的結果。
withValueBackReference()
方法有兩個引數:
-
key - 鍵/值組合的鍵。這個引數的值應為您要修改的資料表中的資料欄名稱。
-
previousResult -
陣列中值的索引 (從 0 開始),來自
applyBatch()的ContentProviderResult物件。套用批次作業時,每個作業的結果都會儲存在中繼結果陣列中。previousResult值是其中一個結果的索引,會與key值一併擷取及儲存。這樣一來,您就能插入新的原始聯絡人記錄並取回其_ID值,然後在新增ContactsContract.Data資料列時「反向參照」該值。首次呼叫
applyBatch()時,系統會建立整個結果陣列,大小等於您提供的ContentProviderOperation物件的ArrayList大小。不過,結果陣列中的所有元素都會設為null,如果您嘗試對尚未套用的作業進行結果的反向參照,withValueBackReference()會擲回Exception。
下列程式碼片段顯示如何以批次方式插入新的原始聯絡人和資料。這些程式碼包含建立降伏點的程式碼,以及使用反向參照的程式碼。
第一個程式碼片段會從 UI 擷取聯絡人資料。此時,使用者已選取要新增原始聯絡人的帳戶。
Kotlin
// Creates a contact entry from the current UI values, using the currently-selected account.
private fun createContactEntry() {
    /*
     * Gets values from the UI
     */
    val name = contactNameEditText.text.toString()
    val phone = contactPhoneEditText.text.toString()
    val email = contactEmailEditText.text.toString()

    val phoneType: String = contactPhoneTypes[mContactPhoneTypeSpinner.selectedItemPosition]

    val emailType: String = contactEmailTypes[mContactEmailTypeSpinner.selectedItemPosition]
Java
// Creates a contact entry from the current UI values, using the currently-selected account.
protected void createContactEntry() {
    /*
     * Gets values from the UI
     */
    String name = contactNameEditText.getText().toString();
    String phone = contactPhoneEditText.getText().toString();
    String email = contactEmailEditText.getText().toString();

    int phoneType = contactPhoneTypes.get(
            contactPhoneTypeSpinner.getSelectedItemPosition());

    int emailType = contactEmailTypes.get(
            contactEmailTypeSpinner.getSelectedItemPosition());
下一個程式碼片段會建立作業,將原始聯絡人資料列插入 ContactsContract.RawContacts 資料表:
Kotlin
    /*
     * Prepares the batch operation for inserting a new raw contact and its data. Even if
     * the Contacts Provider does not have any data for this person, you can't add a Contact,
     * only a raw contact. The Contacts Provider will then add a Contact automatically.
     */

    // Creates a new array of ContentProviderOperation objects.
    val ops = arrayListOf<ContentProviderOperation>()

    /*
     * Creates a new raw contact with its account type (server type) and account name
     * (user's account). Remember that the display name is not stored in this row, but in a
     * StructuredName data row. No other data is required.
     */
    var op: ContentProviderOperation.Builder =
            ContentProviderOperation.newInsert(ContactsContract.RawContacts.CONTENT_URI)
                    .withValue(ContactsContract.RawContacts.ACCOUNT_TYPE, selectedAccount.name)
                    .withValue(ContactsContract.RawContacts.ACCOUNT_NAME, selectedAccount.type)

    // Builds the operation and adds it to the array of operations
    ops.add(op.build())
Java
    /*
     * Prepares the batch operation for inserting a new raw contact and its data. Even if
     * the Contacts Provider does not have any data for this person, you can't add a Contact,
     * only a raw contact. The Contacts Provider will then add a Contact automatically.
     */

     // Creates a new array of ContentProviderOperation objects.
    ArrayList<ContentProviderOperation> ops =
            new ArrayList<ContentProviderOperation>();

    /*
     * Creates a new raw contact with its account type (server type) and account name
     * (user's account). Remember that the display name is not stored in this row, but in a
     * StructuredName data row. No other data is required.
     */
    ContentProviderOperation.Builder op =
            ContentProviderOperation.newInsert(ContactsContract.RawContacts.CONTENT_URI)
            .withValue(ContactsContract.RawContacts.ACCOUNT_TYPE, selectedAccount.getType())
            .withValue(ContactsContract.RawContacts.ACCOUNT_NAME, selectedAccount.getName());

    // Builds the operation and adds it to the array of operations
    ops.add(op.build());
接著,程式碼會為顯示名稱、電話和電子郵件列建立資料列。
每個作業建構工具物件都會使用 withValueBackReference() 取得 RAW_CONTACT_ID。參考點會回溯至第一個作業的 ContentProviderResult 物件,該物件會新增原始聯絡人資料列,並傳回新的 _ID 值。因此,每個資料列都會自動連結至所屬的新 ContactsContract.RawContacts 列。RAW_CONTACT_ID
新增電子郵件列的 ContentProviderOperation.Builder 物件會標示 withYieldAllowed(),設定產生點:
Kotlin
    // Creates the display name for the new raw contact, as a StructuredName data row.
    op = ContentProviderOperation.newInsert(ContactsContract.Data.CONTENT_URI)
            /*
             * withValueBackReference sets the value of the first argument to the value of
             * the ContentProviderResult indexed by the second argument. In this particular
             * call, the raw contact ID column of the StructuredName data row is set to the
             * value of the result returned by the first operation, which is the one that
             * actually adds the raw contact row.
             */
            .withValueBackReference(ContactsContract.Data.RAW_CONTACT_ID, 0)

            // Sets the data row's MIME type to StructuredName
            .withValue(ContactsContract.Data.MIMETYPE,
                    ContactsContract.CommonDataKinds.StructuredName.CONTENT_ITEM_TYPE)

            // Sets the data row's display name to the name in the UI.
            .withValue(ContactsContract.CommonDataKinds.StructuredName.DISPLAY_NAME, name)

    // Builds the operation and adds it to the array of operations
    ops.add(op.build())

    // Inserts the specified phone number and type as a Phone data row
    op = ContentProviderOperation.newInsert(ContactsContract.Data.CONTENT_URI)
            /*
             * Sets the value of the raw contact id column to the new raw contact ID returned
             * by the first operation in the batch.
             */
            .withValueBackReference(ContactsContract.Data.RAW_CONTACT_ID, 0)

            // Sets the data row's MIME type to Phone
            .withValue(ContactsContract.Data.MIMETYPE,
                    ContactsContract.CommonDataKinds.Phone.CONTENT_ITEM_TYPE)

            // Sets the phone number and type
            .withValue(ContactsContract.CommonDataKinds.Phone.NUMBER, phone)
            .withValue(ContactsContract.CommonDataKinds.Phone.TYPE, phoneType)

    // Builds the operation and adds it to the array of operations
    ops.add(op.build())

    // Inserts the specified email and type as a Phone data row
    op = ContentProviderOperation.newInsert(ContactsContract.Data.CONTENT_URI)
            /*
             * Sets the value of the raw contact id column to the new raw contact ID returned
             * by the first operation in the batch.
             */
            .withValueBackReference(ContactsContract.Data.RAW_CONTACT_ID, 0)

            // Sets the data row's MIME type to Email
            .withValue(ContactsContract.Data.MIMETYPE,
                    ContactsContract.CommonDataKinds.Email.CONTENT_ITEM_TYPE)

            // Sets the email address and type
            .withValue(ContactsContract.CommonDataKinds.Email.ADDRESS, email)
            .withValue(ContactsContract.CommonDataKinds.Email.TYPE, emailType)

    /*
     * Demonstrates a yield point. At the end of this insert, the batch operation's thread
     * will yield priority to other threads. Use after every set of operations that affect a
     * single contact, to avoid degrading performance.
     */
    op.withYieldAllowed(true)

    // Builds the operation and adds it to the array of operations
    ops.add(op.build())
Java
    // Creates the display name for the new raw contact, as a StructuredName data row.
    op =
            ContentProviderOperation.newInsert(ContactsContract.Data.CONTENT_URI)
            /*
             * withValueBackReference sets the value of the first argument to the value of
             * the ContentProviderResult indexed by the second argument. In this particular
             * call, the raw contact ID column of the StructuredName data row is set to the
             * value of the result returned by the first operation, which is the one that
             * actually adds the raw contact row.
             */
            .withValueBackReference(ContactsContract.Data.RAW_CONTACT_ID, 0)

            // Sets the data row's MIME type to StructuredName
            .withValue(ContactsContract.Data.MIMETYPE,
                    ContactsContract.CommonDataKinds.StructuredName.CONTENT_ITEM_TYPE)

            // Sets the data row's display name to the name in the UI.
            .withValue(ContactsContract.CommonDataKinds.StructuredName.DISPLAY_NAME, name);

    // Builds the operation and adds it to the array of operations
    ops.add(op.build());

    // Inserts the specified phone number and type as a Phone data row
    op =
            ContentProviderOperation.newInsert(ContactsContract.Data.CONTENT_URI)
            /*
             * Sets the value of the raw contact id column to the new raw contact ID returned
             * by the first operation in the batch.
             */
            .withValueBackReference(ContactsContract.Data.RAW_CONTACT_ID, 0)

            // Sets the data row's MIME type to Phone
            .withValue(ContactsContract.Data.MIMETYPE,
                    ContactsContract.CommonDataKinds.Phone.CONTENT_ITEM_TYPE)

            // Sets the phone number and type
            .withValue(ContactsContract.CommonDataKinds.Phone.NUMBER, phone)
            .withValue(ContactsContract.CommonDataKinds.Phone.TYPE, phoneType);

    // Builds the operation and adds it to the array of operations
    ops.add(op.build());

    // Inserts the specified email and type as a Phone data row
    op =
            ContentProviderOperation.newInsert(ContactsContract.Data.CONTENT_URI)
            /*
             * Sets the value of the raw contact id column to the new raw contact ID returned
             * by the first operation in the batch.
             */
            .withValueBackReference(ContactsContract.Data.RAW_CONTACT_ID, 0)

            // Sets the data row's MIME type to Email
            .withValue(ContactsContract.Data.MIMETYPE,
                    ContactsContract.CommonDataKinds.Email.CONTENT_ITEM_TYPE)

            // Sets the email address and type
            .withValue(ContactsContract.CommonDataKinds.Email.ADDRESS, email)
            .withValue(ContactsContract.CommonDataKinds.Email.TYPE, emailType);

    /*
     * Demonstrates a yield point. At the end of this insert, the batch operation's thread
     * will yield priority to other threads. Use after every set of operations that affect a
     * single contact, to avoid degrading performance.
     */
    op.withYieldAllowed(true);

    // Builds the operation and adds it to the array of operations
    ops.add(op.build());
最後一個程式碼片段會顯示對 applyBatch() 的呼叫,插入新的原始聯絡人和資料列。
Kotlin
    // Ask the Contacts Provider to create a new contact
    Log.d(TAG, "Selected account: ${mSelectedAccount.name} (${mSelectedAccount.type})")
    Log.d(TAG, "Creating contact: $name")

    /*
     * Applies the array of ContentProviderOperation objects in batch. The results are
     * discarded.
     */
    try {
        contentResolver.applyBatch(ContactsContract.AUTHORITY, ops)
    } catch (e: Exception) {
        // Display a warning
        val txt: String = getString(R.string.contactCreationFailure)
        Toast.makeText(applicationContext, txt, Toast.LENGTH_SHORT).show()

        // Log exception
        Log.e(TAG, "Exception encountered while inserting contact: $e")
    }
}
Java
    // Ask the Contacts Provider to create a new contact
    Log.d(TAG,"Selected account: " + selectedAccount.getName() + " (" +
            selectedAccount.getType() + ")");
    Log.d(TAG,"Creating contact: " + name);

    /*
     * Applies the array of ContentProviderOperation objects in batch. The results are
     * discarded.
     */
    try {

            getContentResolver().applyBatch(ContactsContract.AUTHORITY, ops);
    } catch (Exception e) {

            // Display a warning
            Context ctx = getApplicationContext();

            CharSequence txt = getString(R.string.contactCreationFailure);
            int duration = Toast.LENGTH_SHORT;
            Toast toast = Toast.makeText(ctx, txt, duration);
            toast.show();

            // Log exception
            Log.e(TAG, "Exception encountered while inserting contact: " + e);
    }
}
批次作業也允許您實作樂觀並行控制,也就是套用修改交易的方法,不必鎖定基礎存放區。如要使用這個方法,請套用交易,然後檢查可能同時進行的其他修改。如果發現不一致的修改,請復原交易並重試。
樂觀並行控制適用於行動裝置,因為一次只有一位使用者,而且很少會同時存取資料存放區。由於系統不會使用鎖定,因此不會浪費時間設定鎖定,也不會等待其他交易解除鎖定。
如要在更新單一資料列時使用樂觀並行控制,請按照下列步驟操作:ContactsContract.RawContacts
-
擷取原始聯絡人的
VERSION資料欄,以及您擷取的其他資料。 -
使用
newAssertQuery(Uri)方法建立適合強制執行限制的ContentProviderOperation.Builder物件。如要取得內容 URI,請使用RawContacts.CONTENT_URI,並在其中附加原始聯絡人的_ID。 -
針對
ContentProviderOperation.Builder物件,請呼叫withValue(),將VERSION欄與您剛擷取的版本號碼進行比較。 -
針對相同的
ContentProviderOperation.Builder,請呼叫withExpectedCount(),確保這項判斷只測試一個資料列。 -
呼叫
build()建立ContentProviderOperation物件,然後將這個物件新增為傳遞至applyBatch()的ArrayList中的第一個物件。 - 套用批次交易。
如果您讀取原始聯絡人資料列後,在嘗試修改資料列前,該資料列已由其他作業更新,則「assert」ContentProviderOperation會失敗,且整批作業都會復原。然後選擇重試批次作業或採取其他動作。
下列程式碼片段示範如何使用 CursorLoader 查詢單一原始聯絡人後,建立「assert」ContentProviderOperation:
Kotlin
/*
 * The application uses CursorLoader to query the raw contacts table. The system calls this method
 * when the load is finished.
 */
override fun onLoadFinished(loader: Loader<Cursor>, cursor: Cursor) {
    // Gets the raw contact's _ID and VERSION values
    rawContactID = cursor.getLong(cursor.getColumnIndex(BaseColumns._ID))
    mVersion = cursor.getInt(cursor.getColumnIndex(SyncColumns.VERSION))
}

...

// Sets up a Uri for the assert operation
val rawContactUri: Uri = ContentUris.withAppendedId(
        ContactsContract.RawContacts.CONTENT_URI,
        rawContactID
)

// Creates a builder for the assert operation
val assertOp: ContentProviderOperation.Builder =
        ContentProviderOperation.newAssertQuery(rawContactUri).apply {
            // Adds the assertions to the assert operation: checks the version
            withValue(SyncColumns.VERSION, mVersion)

            // and count of rows tested
            withExpectedCount(1)
        }

// Creates an ArrayList to hold the ContentProviderOperation objects
val ops = arrayListOf<ContentProviderOperation>()

ops.add(assertOp.build())

// You would add the rest of your batch operations to "ops" here

...

// Applies the batch. If the assert fails, an Exception is thrown
try {
    val results: Array<ContentProviderResult> = contentResolver.applyBatch(AUTHORITY, ops)
} catch (e: OperationApplicationException) {
    // Actions you want to take if the assert operation fails go here
}
Java
/*
 * The application uses CursorLoader to query the raw contacts table. The system calls this method
 * when the load is finished.
 */
public void onLoadFinished(Loader<Cursor> loader, Cursor cursor) {

    // Gets the raw contact's _ID and VERSION values
    rawContactID = cursor.getLong(cursor.getColumnIndex(BaseColumns._ID));
    mVersion = cursor.getInt(cursor.getColumnIndex(SyncColumns.VERSION));
}

...

// Sets up a Uri for the assert operation
Uri rawContactUri = ContentUris.withAppendedId(RawContacts.CONTENT_URI, rawContactID);

// Creates a builder for the assert operation
ContentProviderOperation.Builder assertOp = ContentProviderOperation.newAssertQuery(rawContactUri);

// Adds the assertions to the assert operation: checks the version and count of rows tested
assertOp.withValue(SyncColumns.VERSION, mVersion);
assertOp.withExpectedCount(1);

// Creates an ArrayList to hold the ContentProviderOperation objects
ArrayList ops = new ArrayList<ContentProviderOperation>;

ops.add(assertOp.build());

// You would add the rest of your batch operations to "ops" here

...

// Applies the batch. If the assert fails, an Exception is thrown
try
    {
        ContentProviderResult[] results =
                getContentResolver().applyBatch(AUTHORITY, ops);

    } catch (OperationApplicationException e) {

        // Actions you want to take if the assert operation fails go here
    }
使用意圖擷取及修改資料
將意圖傳送至裝置的聯絡人應用程式,即可間接存取聯絡人供應器。這項意圖會啟動裝置的聯絡人應用程式 UI,使用者可在其中執行聯絡人相關工作。具備這類存取權的使用者可以:
- 從清單中挑選聯絡人,然後傳回應用程式以進行後續作業。
- 編輯現有聯絡人的資料。
- 為任一帳戶插入新的原始聯絡人。
- 刪除聯絡人或聯絡人資料。
如果使用者要插入或更新資料,您可以先收集資料,然後將資料做為意圖的一部分傳送。
透過裝置的聯絡人應用程式使用 Intent 存取聯絡人供應程式時,您不必自行編寫 UI 或存取供應程式的程式碼。您也不必要求讀取或寫入供應商的權限。裝置的聯絡人應用程式可將聯絡人的讀取權限委派給您,由於您是透過其他應用程式修改提供者,因此不必具備寫入權限。
如要瞭解將意圖傳送至供應商的一般程序,請參閱「
內容供應器基本概念」指南的「透過意圖存取資料」一節。表 4 彙整了可用工作使用的動作、MIME 類型和資料值,而您可搭配 putExtra() 使用的額外值則列於 ContactsContract.Intents.Insert 的參考文件:
表 4. 聯絡人供應程式意圖。
| 工作 | 動作 | 資料 | MIME 類型 | 附註 |
|---|---|---|---|---|
| 從清單中選擇聯絡人 | ACTION_PICK |
下列其中一項:
|
未使用 |
視您提供的內容 URI 類型而定,顯示原始聯絡人清單或原始聯絡人資料清單。
呼叫 |
| 插入新的原始聯絡人 | Insert.ACTION |
不適用 |
RawContacts.CONTENT_TYPE:一組原始聯絡人的 MIME 類型。
|
顯示裝置聯絡人應用程式的「新增聯絡人」畫面。系統會顯示您新增至意圖的額外值。如果使用 startActivityForResult() 傳送,系統會將新加入的原始聯絡人內容 URI 傳回活動的 onActivityResult() 回呼方法,並放在 Intent 引數的「data」欄位中。如要取得值,請呼叫 getData()。
|
| 編輯聯絡人 | ACTION_EDIT |
對聯絡人表示 CONTENT_LOOKUP_URI。編輯者活動可讓使用者編輯與這個聯絡人相關聯的任何資料。
|
Contacts.CONTENT_ITEM_TYPE,單一聯絡人。 |
在聯絡人應用程式中顯示「編輯聯絡人」畫面。系統會顯示您新增至意圖的額外值。使用者按一下「完成」儲存編輯內容時,活動會返回前景。 |
| 顯示可新增資料的挑選器。 | ACTION_INSERT_OR_EDIT |
無 |
CONTENT_ITEM_TYPE
|
這項意圖一律會顯示聯絡人應用程式的選擇畫面。使用者可以選擇編輯聯絡人,或新增聯絡人。系統會根據使用者的選擇顯示編輯或新增畫面,並顯示您在 Intent 中傳遞的額外資料。如果應用程式會顯示電子郵件地址或電話號碼等聯絡人資料,請使用這項意圖,讓使用者將資料新增至現有聯絡人。contact,
注意:這個 Intent 的 Extras 中不需要傳送名稱值,因為使用者一律會選擇現有名稱或新增名稱。此外,如果您傳送名稱,使用者選擇編輯,聯絡人應用程式會顯示您傳送的名稱,覆寫先前的值。如果使用者沒有注意到這點並儲存編輯內容,舊值就會遺失。 |
裝置的聯絡人應用程式不允許您使用意圖刪除原始聯絡人或任何相關資料。如要刪除原始聯絡人,請改用 ContentResolver.delete() 或 ContentProviderOperation.newDelete()。
下列程式碼片段說明如何建構及傳送意圖,插入新的原始聯絡人和資料:
Kotlin
// Gets values from the UI
val name = contactNameEditText.text.toString()
val phone = contactPhoneEditText.text.toString()
val email = contactEmailEditText.text.toString()

val company = companyName.text.toString()
val jobtitle = jobTitle.text.toString()

/*
 * Demonstrates adding data rows as an array list associated with the DATA key
 */

// Defines an array list to contain the ContentValues objects for each row
val contactData = arrayListOf<ContentValues>()

/*
 * Defines the raw contact row
 */

// Sets up the row as a ContentValues object
val rawContactRow = ContentValues().apply {
    // Adds the account type and name to the row
    put(ContactsContract.RawContacts.ACCOUNT_TYPE, selectedAccount.type)
    put(ContactsContract.RawContacts.ACCOUNT_NAME, selectedAccount.name)
}

// Adds the row to the array
contactData.add(rawContactRow)

/*
 * Sets up the phone number data row
 */

// Sets up the row as a ContentValues object
val phoneRow = ContentValues().apply {
    // Specifies the MIME type for this data row (all data rows must be marked by their type)
    put(ContactsContract.Data.MIMETYPE,ContactsContract.CommonDataKinds.Phone.CONTENT_ITEM_TYPE)

    // Adds the phone number and its type to the row
    put(ContactsContract.CommonDataKinds.Phone.NUMBER, phone)
}

// Adds the row to the array
contactData.add(phoneRow)

/*
 * Sets up the email data row
 */

// Sets up the row as a ContentValues object
val emailRow = ContentValues().apply {
    // Specifies the MIME type for this data row (all data rows must be marked by their type)
    put(ContactsContract.Data.MIMETYPE, ContactsContract.CommonDataKinds.Email.CONTENT_ITEM_TYPE)

    // Adds the email address and its type to the row
    put(ContactsContract.CommonDataKinds.Email.ADDRESS, email)
}

// Adds the row to the array
contactData.add(emailRow)

// Creates a new intent for sending to the device's contacts application
val insertIntent = Intent(ContactsContract.Intents.Insert.ACTION).apply {
    // Sets the MIME type to the one expected by the insertion activity
    type = ContactsContract.RawContacts.CONTENT_TYPE

    // Sets the new contact name
    putExtra(ContactsContract.Intents.Insert.NAME, name)

    // Sets the new company and job title
    putExtra(ContactsContract.Intents.Insert.COMPANY, company)
    putExtra(ContactsContract.Intents.Insert.JOB_TITLE, jobtitle)

    /*
    * Adds the array to the intent's extras. It must be a parcelable object in order to
    * travel between processes. The device's contacts app expects its key to be
    * Intents.Insert.DATA
    */
    putParcelableArrayListExtra(ContactsContract.Intents.Insert.DATA, contactData)
}

// Send out the intent to start the device's contacts app in its add contact activity.
startActivity(insertIntent)
Java
// Gets values from the UI
String name = contactNameEditText.getText().toString();
String phone = contactPhoneEditText.getText().toString();
String email = contactEmailEditText.getText().toString();

String company = companyName.getText().toString();
String jobtitle = jobTitle.getText().toString();

// Creates a new intent for sending to the device's contacts application
Intent insertIntent = new Intent(ContactsContract.Intents.Insert.ACTION);

// Sets the MIME type to the one expected by the insertion activity
insertIntent.setType(ContactsContract.RawContacts.CONTENT_TYPE);

// Sets the new contact name
insertIntent.putExtra(ContactsContract.Intents.Insert.NAME, name);

// Sets the new company and job title
insertIntent.putExtra(ContactsContract.Intents.Insert.COMPANY, company);
insertIntent.putExtra(ContactsContract.Intents.Insert.JOB_TITLE, jobtitle);

/*
 * Demonstrates adding data rows as an array list associated with the DATA key
 */

// Defines an array list to contain the ContentValues objects for each row
ArrayList<ContentValues> contactData = new ArrayList<ContentValues>();


/*
 * Defines the raw contact row
 */

// Sets up the row as a ContentValues object
ContentValues rawContactRow = new ContentValues();

// Adds the account type and name to the row
rawContactRow.put(ContactsContract.RawContacts.ACCOUNT_TYPE, selectedAccount.getType());
rawContactRow.put(ContactsContract.RawContacts.ACCOUNT_NAME, selectedAccount.getName());

// Adds the row to the array
contactData.add(rawContactRow);

/*
 * Sets up the phone number data row
 */

// Sets up the row as a ContentValues object
ContentValues phoneRow = new ContentValues();

// Specifies the MIME type for this data row (all data rows must be marked by their type)
phoneRow.put(
        ContactsContract.Data.MIMETYPE,
        ContactsContract.CommonDataKinds.Phone.CONTENT_ITEM_TYPE
);

// Adds the phone number and its type to the row
phoneRow.put(ContactsContract.CommonDataKinds.Phone.NUMBER, phone);

// Adds the row to the array
contactData.add(phoneRow);

/*
 * Sets up the email data row
 */

// Sets up the row as a ContentValues object
ContentValues emailRow = new ContentValues();

// Specifies the MIME type for this data row (all data rows must be marked by their type)
emailRow.put(
        ContactsContract.Data.MIMETYPE,
        ContactsContract.CommonDataKinds.Email.CONTENT_ITEM_TYPE
);

// Adds the email address and its type to the row
emailRow.put(ContactsContract.CommonDataKinds.Email.ADDRESS, email);

// Adds the row to the array
contactData.add(emailRow);

/*
 * Adds the array to the intent's extras. It must be a parcelable object in order to
 * travel between processes. The device's contacts app expects its key to be
 * Intents.Insert.DATA
 */
insertIntent.putParcelableArrayListExtra(ContactsContract.Intents.Insert.DATA, contactData);

// Send out the intent to start the device's contacts app in its add contact activity.
startActivity(insertIntent);
資料完整性
由於聯絡人存放區包含重要且私密的使用者資料,使用者期望這些資料正確無誤且為最新狀態,因此聯絡人供應程式制定了明確的資料完整性規則。修改聯絡人資料時,您有責任遵守這些規則。重要規則如下:
-
新增
ContactsContract.RawContacts列時,請務必一併新增ContactsContract.CommonDataKinds.StructuredName列。 -
如果
ContactsContract.RawContacts列沒有ContactsContract.CommonDataKinds.StructuredName列,可能會在匯總期間造成問題。ContactsContract.Data -
一律將新的
ContactsContract.Data列連結至父項ContactsContract.RawContacts列。 -
如果
ContactsContract.Data資料列未連結至ContactsContract.RawContacts,就不會顯示在裝置的聯絡人應用程式中,且可能會導致同步介面卡發生問題。 - 只變更您擁有的原始聯絡人資料。
- 請注意,聯絡人供應程式通常會管理多種帳戶類型/線上服務的資料。請務必確保應用程式只會修改或刪除屬於您的資料列,且只會插入您控管的帳戶類型和名稱。
-
請一律使用
ContactsContract及其子類別中定義的常數,做為授權單位、內容 URI、URI 路徑、資料欄名稱、MIME 類型和TYPE值。 - 使用這些常數有助於避免錯誤。如果任何常數已遭淘汰,您也會收到編譯器警告。
自訂資料列
建立及使用自訂 MIME 類型,即可在 ContactsContract.Data 表格中插入、編輯、刪除及擷取自己的資料列。資料列只能使用 ContactsContract.DataColumns 中定義的資料欄,但您可以將自己的類型專屬資料欄名稱對應至預設資料欄名稱。在裝置的聯絡人應用程式中,系統會顯示資料列的資料,但無法編輯或刪除,使用者也無法新增其他資料。如要允許使用者修改自訂資料列,您必須在自己的應用程式中提供編輯器活動。
如要顯示自訂資料,請提供包含 <ContactsAccountType> 元素和一或多個 <ContactsDataKind> 子元素的 contacts.xml 檔案。詳情請參閱 <ContactsDataKind> element 一節。
如要進一步瞭解自訂 MIME 類型,請參閱「 建立內容供應者」指南。
聯絡人供應程式同步轉換介面
聯絡人供應程式專門用於處理裝置與線上服務之間的聯絡人資料同步處理作業。使用者可以藉此將現有資料下載到新裝置,以及將現有資料上傳到新帳戶。此外,無論新增和變更的來源為何,同步功能都能確保使用者取得最新資料。同步處理的另一個優點是,即使裝置未連上網路,也能存取聯絡人資料。
雖然您可以透過多種方式實作同步處理,但 Android 系統提供外掛程式同步處理架構,可自動執行下列工作:
- 正在檢查網路是否可用。
- 根據使用者偏好設定排定及執行同步作業。
- 重新啟動已停止的同步程序。
如要使用這個架構,請提供同步轉換介面外掛程式。每個同步轉換介面都是服務和內容供應器專屬的,但可以處理同一服務的多個帳戶名稱。這個架構也允許同一個服務和供應商使用多個同步配接器。
同步轉換介面類別和檔案
您要將同步轉換介面實作為 AbstractThreadedSyncAdapter 的子類別,並將其安裝為 Android 應用程式的一部分。系統會從應用程式資訊清單中的元素,以及資訊清單指向的特殊 XML 檔案,瞭解同步轉換介面。XML 檔案會定義線上服務的帳戶類型和內容供應商的授權,兩者會共同識別轉接器。使用者必須先為同步轉換介面的帳戶類型新增帳戶,並為同步轉換介面同步處理的內容供應器啟用同步功能,同步轉換介面才會啟動。此時,系統會開始管理轉接程式,並視需要呼叫轉接程式,在內容供應器和伺服器之間進行同步。
注意:使用帳戶類型做為同步轉換介面識別資訊的一部分,可讓系統偵測並將存取同一機構不同服務的同步轉換介面分組。舉例來說,Google 線上服務的同步介面卡都具有相同的帳戶類型 com.google。使用者在裝置上新增 Google 帳戶時,系統會一併列出 Google 服務的所有已安裝同步轉換介面;列出的每個同步轉換介面都會與裝置上的不同內容供應器同步。
由於大多數服務都要求使用者先驗證身分,才能存取資料,因此 Android 系統提供類似於同步轉換介面架構的驗證架構,且通常會與同步轉換介面架構搭配使用。驗證架構會使用 AbstractAccountAuthenticator 的子類別外掛程式驗證器。驗證器會透過下列步驟驗證使用者身分:
- 收集使用者的姓名、密碼或類似資訊 (使用者的憑證)。
- 將憑證傳送至服務
- 檢查服務的回覆。
如果服務接受憑證,驗證器可以儲存憑證供日後使用。由於外掛程式驗證器架構的關係,AccountManager 可以存取驗證器支援並選擇公開的任何驗證權杖,例如 OAuth2 驗證權杖。
雖然不需要驗證,但大多數聯絡人服務都會使用驗證。 不過,您不一定要使用 Android 驗證架構進行驗證。
實作同步轉換介面
如要為聯絡人供應程式實作同步轉換介面,請先建立包含下列項目的 Android 應用程式:
-
Service元件,可回應系統要求,繫結至同步轉換介面。 -
系統想執行同步作業時,會呼叫服務的
onBind()方法,取得同步轉換介面的IBinder。這樣一來,系統就能對介面卡的各種方法進行跨程序呼叫。 -
實際的同步轉換介面,實作方式為
AbstractThreadedSyncAdapter的具體子類別。 -
這個類別負責從伺服器下載資料、從裝置上傳資料,以及解決衝突。轉接程式的主要工作是在
onPerformSync()方法中完成。這個類別必須以單例模式例項化。 -
Application的子類別。 -
這個類別可做為同步轉換介面單例模式的工廠。使用
onCreate()方法例項化同步轉換介面,並提供靜態「getter」方法,將單例項傳回給同步轉換介面服務的onBind()方法。 -
選用:可回應系統使用者驗證要求的
Service元件。 -
AccountManager會啟動這項服務,開始驗證程序。服務的onCreate()方法會例項化驗證器物件。當系統要驗證應用程式同步轉換介面的使用者帳戶時,會呼叫服務的onBind()方法,取得驗證器的IBinder。這樣一來,系統就能對驗證器的各種方法進行跨程序呼叫。 -
選用:處理驗證要求的
AbstractAccountAuthenticator具體子類別。 -
這個類別提供
AccountManager叫用的方法,可向伺服器驗證使用者憑證。驗證程序的詳細資訊會因使用的伺服器技術而異。如要進一步瞭解驗證,請參閱伺服器軟體的說明文件。 - 定義系統的同步轉換介面和驗證器的 XML 檔案。
-
先前說明的同步轉換介面和驗證器服務元件,是在應用程式資訊清單的
<service>元素中定義。這些元素包含<meta-data>子項元素,可為系統提供特定資料:
社群媒體動態消息資料
android.provider.ContactsContract.StreamItems 和 android.provider.ContactsContract.StreamItemPhotos 資料表會管理社群網路的傳入資料。您可以編寫同步轉換介面,將自有網路的串流資料新增至這些資料表,也可以從這些資料表讀取串流資料,並在自有應用程式中顯示,或同時執行這兩項操作。透過這些功能,您可以將社群網路服務和應用程式整合至 Android 的社群網路體驗。
社群串流文字
串流項目一律會與原始聯絡人建立關聯。android.provider.ContactsContract.StreamItemsColumns#RAW_CONTACT_ID 會連結至原始聯絡人的 _ID 值。原始聯絡人的帳戶類型和帳戶名稱也會儲存在串流項目列中。
將串流中的資料儲存在下列資料欄:
- android.provider.ContactsContract.StreamItemsColumns#ACCOUNT_TYPE
- 必要。與這個串流項目相關聯的原始聯絡人帳戶類型。插入串流項目時,請記得設定這個值。
- android.provider.ContactsContract.StreamItemsColumns#ACCOUNT_NAME
- 必要。與這個串流項目相關聯的原始聯絡人帳戶名稱。插入串流項目時,請記得設定這個值。
- ID 欄
-
必要。插入串流項目時,必須插入下列 ID 欄:
- android.provider.ContactsContract.StreamItemsColumns#CONTACT_ID:與這個串流項目相關聯的聯絡人 android.provider.BaseColumns#_ID 值。
- android.provider.ContactsContract.StreamItemsColumns#CONTACT_LOOKUP_KEY:與這個串流項目相關聯的聯絡人 android.provider.ContactsContract.ContactsColumns#LOOKUP_KEY 值。
- android.provider.ContactsContract.StreamItemsColumns#RAW_CONTACT_ID:與這個串流項目相關聯的原始聯絡人 android.provider.BaseColumns#_ID 值。
- android.provider.ContactsContract.StreamItemsColumns#COMMENTS
- 選用。儲存摘要資訊,可在串流項目開頭顯示。
- android.provider.ContactsContract.StreamItemsColumns#TEXT
-
串流項目的文字,可能是項目來源發布的內容,也可能是產生串流項目的某項動作說明。這個資料欄可以包含
fromHtml()可轉譯的任何格式和內嵌資源圖片。供應商可能會截斷或省略長內容,但會盡量避免中斷標記。 - android.provider.ContactsContract.StreamItemsColumns#TIMESTAMP
- 文字字串,內含串流項目插入或更新的時間,格式為自 Epoch 時間算起的毫秒數。插入或更新串流項目的應用程式必須負責維護這個資料欄,聯絡人供應程式不會自動維護。
如要顯示串流項目的識別資訊,請使用 android.provider.ContactsContract.StreamItemsColumns#RES_ICON、android.provider.ContactsContract.StreamItemsColumns#RES_LABEL 和 android.provider.ContactsContract.StreamItemsColumns#RES_PACKAGE,連結至應用程式中的資源。
android.provider.ContactsContract.StreamItems 資料表也包含 android.provider.ContactsContract.StreamItemsColumns#SYNC1 到 android.provider.ContactsContract.StreamItemsColumns#SYNC4 的資料欄,僅供同步介面卡使用。
社群串流相片
android.provider.ContactsContract.StreamItemPhotos 資料表會儲存與串流項目相關聯的相片。資料表的 android.provider.ContactsContract.StreamItemPhotosColumns#STREAM_ITEM_ID 資料欄會連結至 android.provider.ContactsContract.StreamItems 資料表的 _ID 資料欄中的值。相片參照會儲存在資料表的下列資料欄中:
- android.provider.ContactsContract.StreamItemPhotos#PHOTO 欄 (BLOB)。
- 相片的二進位表示法,由供應商調整大小,以利儲存和顯示。 這個資料欄可與舊版聯絡人供應器回溯相容,舊版供應器會使用這個資料欄儲存相片。不過,在目前版本中,您不應使用這個資料欄儲存相片。請改用 android.provider.ContactsContract.StreamItemPhotosColumns#PHOTO_FILE_ID 或 android.provider.ContactsContract.StreamItemPhotosColumns#PHOTO_URI (兩者皆說明如下),將相片儲存在檔案中。這個資料欄現在包含相片的縮圖,可供讀取。
- android.provider.ContactsContract.StreamItemPhotosColumns#PHOTO_FILE_ID
-
原始聯絡人相片的數字 ID。將這個值附加至常數
DisplayPhoto.CONTENT_URI,取得指向單一相片檔案的內容 URI,然後呼叫openAssetFileDescriptor()取得相片檔案的控制代碼。 - android.provider.ContactsContract.StreamItemPhotosColumns#PHOTO_URI
-
直接指向這個資料列所代表相片的相片檔案的內容 URI。
使用這個 URI 呼叫
openAssetFileDescriptor(),即可取得相片檔案的控制代碼。
使用社群串流資料表
這些資料表的運作方式與聯絡人供應程式中的其他主要資料表相同,但有以下例外狀況:
- 這些表格需要額外的存取權限。如要從中讀取資料,應用程式必須具備 android.Manifest.permission#READ_SOCIAL_STREAM 權限。如要修改這些項目,應用程式必須具備 android.Manifest.permission#WRITE_SOCIAL_STREAM 權限。
-
對於 android.provider.ContactsContract.StreamItems 資料表,每個原始聯絡人儲存的資料列數量有限。達到這個上限後,聯絡人供應程式會自動刪除 android.provider.ContactsContract.StreamItemsColumns#TIMESTAMP 最舊的資料列,騰出空間存放新的串流項目資料列。如要取得限制,請對內容 URI android.provider.ContactsContract.StreamItems#CONTENT_LIMIT_URI 發出查詢。除了內容 URI 以外,您可以將所有引數設為
null。查詢會傳回包含單列的 Cursor,其中包含單一資料欄 android.provider.ContactsContract.StreamItems#MAX_ITEMS。
類別 android.provider.ContactsContract.StreamItems.StreamItemPhotos 會定義 android.provider.ContactsContract.StreamItemPhotos 的子表格,其中包含單一串流項目的相片列。
社群動態互動
Contacts Provider 管理的社群串流資料,搭配裝置的聯絡人應用程式,可讓您以強大的方式將社群網路系統與現有聯絡人連結。可用的功能如下:
- 只要使用同步轉換介面將社群網路服務同步至聯絡人供應程式,即可擷取使用者聯絡人的最近活動,並儲存在 android.provider.ContactsContract.StreamItems 和 android.provider.ContactsContract.StreamItemPhotos 資料表中,以供日後使用。
- 除了定期同步處理,您也可以在使用者選取要查看的聯絡人時,觸發同步轉換介面來擷取其他資料。這樣一來,同步轉換介面就能為聯絡人擷取高解析度相片和最新的串流項目。
- 向裝置的聯絡人應用程式和聯絡人內容供應器註冊通知,即可在查看聯絡人時接收意圖,並在該時間點從服務更新聯絡人的狀態。相較於使用同步轉換介面進行完整同步,這種做法可能更快,且使用的頻寬較少。
- 使用者可以在裝置的聯絡人應用程式中查看聯絡人,並將聯絡人新增至社群網路服務。您可以使用「邀請聯絡人」功能啟用這項功能,方法是結合將現有聯絡人新增至網路的活動,以及提供裝置聯絡人應用程式和聯絡人供應程式應用程式詳細資料的 XML 檔案。
定期將串流項目與聯絡人供應程式同步處理,與其他同步處理作業相同。如要進一步瞭解同步處理,請參閱「聯絡人供應程式同步轉換介面」一節。註冊通知和邀請聯絡人會在接下來兩節中說明。
註冊以處理社群網路檢視畫面
如要註冊同步轉換介面,以便在使用者查看由同步轉換介面管理的聯絡人時接收通知,請按照下列步驟操作:
-
在專案的
res/xml/目錄中建立名為contacts.xml的檔案。如果已有這個檔案,可以略過這個步驟。 -
在這個檔案中,新增
<ContactsAccountType xmlns:android="http://schemas.android.com/apk/res/android">元素。如果這個元素已存在,可以略過這個步驟。 -
如要註冊服務,在使用者於裝置的聯絡人應用程式中開啟聯絡人詳細資料頁面時收到通知,請將
viewContactNotifyService="serviceclass"屬性新增至 元素,其中serviceclass是服務的完整類別名稱,該服務應從裝置的聯絡人應用程式接收意圖。對於通知程式服務,請使用擴充IntentService的類別,讓服務接收意圖。傳入的意圖資料包含使用者點選的原始聯絡人內容 URI。您可以從通知程式服務繫結至同步轉換介面,然後呼叫該介面,更新原始聯絡人的資料。
如要註冊活動,以便在使用者點選串流項目或相片 (或兩者) 時呼叫,請按照下列步驟操作:
-
在專案的
res/xml/目錄中建立名為contacts.xml的檔案。如果已有這個檔案,可以略過這個步驟。 -
在這個檔案中,新增
<ContactsAccountType xmlns:android="http://schemas.android.com/apk/res/android">元素。如果這個元素已存在,可以略過這個步驟。 -
如要註冊其中一項活動,以便處理使用者在裝置的聯絡人應用程式中點選串流項目,請將
viewStreamItemActivity="activityclass"屬性新增至 元素,其中activityclass是活動的完整類別名稱,應從裝置的聯絡人應用程式接收意圖。 -
如要註冊活動,以便處理使用者在裝置的聯絡人應用程式中點選串流相片的動作,請將
viewStreamItemPhotoActivity="activityclass"屬性新增至元素,其中activityclass是活動的完整類別名稱,應接收來自裝置聯絡人應用程式的意圖。
如需 <ContactsAccountType> 元素的詳細說明,請參閱「<ContactsAccountType> 元素」一節。
傳入的意圖包含使用者點選的項目或相片內容 URI。 如要為文字項目和相片分別建立活動,請在同一個檔案中使用這兩個屬性。
與社群網路服務互動
使用者不必離開裝置的聯絡人應用程式,即可邀請聯絡人加入社群網站。不過,你可以讓裝置的聯絡人應用程式傳送意圖,邀請聯絡人參加你的其中一項活動。如要設定這項功能,請按照下列步驟操作:
-
在專案的
res/xml/目錄中建立名為contacts.xml的檔案。如果已有這個檔案,可以略過這個步驟。 -
在這個檔案中,新增
<ContactsAccountType xmlns:android="http://schemas.android.com/apk/res/android">元素。如果這個元素已存在,可以略過這個步驟。 -
新增下列屬性:
inviteContactActivity="activityclass"-
inviteContactActionLabel="@string/invite_action_label"
activityclass值是應接收意圖的活動完整類別名稱。invite_action_label值是文字字串,會顯示在裝置聯絡人應用程式的「新增連線」選單中。
注意: ContactsSource 是 ContactsAccountType 的已淘汰標記名稱。
contacts.xml 參考資料
檔案 contacts.xml 包含 XML 元素,可控制同步轉換介面和應用程式與聯絡人應用程式及聯絡人供應程式的互動。以下各節將說明這些元素。
<ContactsAccountType> 元素
<ContactsAccountType> 元素會控管應用程式與聯絡人應用程式的互動。語法如下:
<ContactsAccountType
        xmlns:android="http://schemas.android.com/apk/res/android"
        inviteContactActivity="activity_name"
        inviteContactActionLabel="invite_command_text"
        viewContactNotifyService="view_notify_service"
        viewGroupActivity="group_view_activity"
        viewGroupActionLabel="group_action_text"
        viewStreamItemActivity="viewstream_activity_name"
        viewStreamItemPhotoActivity="viewphotostream_activity_name">
包含在:
res/xml/contacts.xml
可能包含:
<ContactsDataKind>
說明:
宣告 Android 元件和 UI 標籤,讓使用者邀請聯絡人加入社群網路、在社群網路串流更新時通知使用者等。
請注意,<ContactsAccountType> 的屬性不需要 android: 屬性前置字元。
屬性:
inviteContactActivity- 使用者從裝置的聯絡人應用程式選取「新增連線」時,您要啟動的應用程式活動完整類別名稱。
inviteContactActionLabel-
在「新增連線」選單中,為
inviteContactActivity指定的活動顯示的文字字串。 例如,你可以使用「在我的網路上追蹤」字串。這個標籤可以使用字串資源 ID。 viewContactNotifyService- 應用程式中服務的完整類別名稱,使用者查看聯絡人時,該服務應會收到通知。這項通知是由裝置的聯絡人應用程式傳送,可讓應用程式延後執行耗用大量資料的操作,直到需要時再執行。舉例來說,應用程式可以讀取並顯示聯絡人的高解析度相片和最新社群串流項目,藉此回應這項通知。詳情請參閱「社群串流互動」一節。
viewGroupActivity- 應用程式中可顯示群組資訊的活動完整類別名稱。使用者在裝置的聯絡人應用程式中點選群組標籤時,系統會顯示這項活動的 UI。
viewGroupActionLabel-
聯絡人應用程式顯示的標籤,適用於可讓使用者查看應用程式中群組的 UI 控制項。
這個屬性允許使用字串資源 ID。
viewStreamItemActivity- 使用者點選原始聯絡人的串流項目時,裝置的聯絡人應用程式會啟動您應用程式中的活動,這個活動的完整類別名稱。
viewStreamItemPhotoActivity- 應用程式中活動的完整類別名稱。當使用者點選原始聯絡人的串流項目中的相片時,裝置的聯絡人應用程式會啟動這項活動。
<ContactsDataKind> 元素
<ContactsDataKind> 元素可控制聯絡人應用程式 UI 中應用程式自訂資料列的顯示方式。語法如下:
<ContactsDataKind
        android:mimeType="MIMEtype"
        android:icon="icon_resources"
        android:summaryColumn="column_name"
        android:detailColumn="column_name">
包含在:
<ContactsAccountType>
說明:
使用這個元素,讓聯絡人應用程式顯示自訂資料列的內容,做為原始聯絡人詳細資料的一部分。<ContactsAccountType> 的每個 <ContactsDataKind> 子元素都代表同步配接器新增至 ContactsContract.Data 表格的自訂資料列類型。針對您使用的每個自訂 MIME 類型,新增一個 <ContactsDataKind> 元素。如果您有不想顯示資料的自訂資料列,則不必新增元素。
屬性:
android:mimeType-
您在
ContactsContract.Data表格中為其中一種自訂資料列類型定義的自訂 MIME 類型。舉例來說,值vnd.android.cursor.item/vnd.example.locationstatus可以是自訂 MIME 類型,用於記錄聯絡人最後已知位置的資料列。 android:icon- Android 可繪製資源,聯絡人應用程式會將這個資源顯示在資料旁。向使用者指出資料來自您的服務。
android:summaryColumn- 從資料列擷取的兩個值中,第一個值的資料欄名稱。這個值會顯示為該資料列項目的第一行。第一行是資料摘要,但這部分為選填。另請參閱 android:detailColumn。
android:detailColumn-
從資料列擷取的兩個值中,第二個值的資料欄名稱。這個值會顯示為這個資料列項目的第二行。另請參閱
android:summaryColumn。
其他聯絡人供應程式功能
除了前幾節所述的主要功能外,聯絡人供應程式還提供下列實用功能,可處理聯絡人資料:
- 聯絡人群組
- 相片功能
聯絡人群組
聯絡人供應程式可以選擇使用群組資料,為相關聯絡人集合加上標籤。如果與使用者帳戶相關聯的伺服器想保留群組,該帳戶類型的帳戶同步轉換介面應在聯絡人供應程式和伺服器之間轉移群組資料。使用者將新聯絡人新增至伺服器,然後將該聯絡人加入新群組時,同步轉換介面必須將新群組新增至 ContactsContract.Groups 表格。原始聯絡人所屬的一或多個群組會儲存在 ContactsContract.Data 表格中,並使用 ContactsContract.CommonDataKinds.GroupMembership MIME 類型。
如果您要設計同步轉換介面,將伺服器中的原始聯絡人資料新增至聯絡人供應程式,且未使用群組,則必須告知供應程式顯示您的資料。在使用者將帳戶新增至裝置時執行的程式碼中,更新聯絡人供應程式為該帳戶新增的 ContactsContract.Settings 列。在此資料列中,將 Settings.UNGROUPED_VISIBLE 欄的值設為 1。這麼做之後,即使您不使用群組,聯絡人供應程式也會一律顯示聯絡人資料。
聯絡人相片
ContactsContract.Data 表格會將相片儲存為 MIME 類型為 Photo.CONTENT_ITEM_TYPE 的資料列。資料列的 CONTACT_ID 欄會連結至所屬原始聯絡人的 _ID 欄。類別 ContactsContract.Contacts.Photo 定義了子資料表,其中包含聯絡人主要相片的相片資訊,也就是聯絡人主要原始聯絡人的主要相片。ContactsContract.Contacts同樣地,ContactsContract.RawContacts.DisplayPhoto 類別會定義 ContactsContract.RawContacts 的子資料表,其中包含原始聯絡人主要相片的相片資訊。
ContactsContract.Contacts.Photo 和 ContactsContract.RawContacts.DisplayPhoto 的參考文件包含擷取相片資訊的範例。沒有可供擷取原始聯絡人主要縮圖的便利類別,但您可以將查詢傳送至 ContactsContract.Data 資料表,選取原始聯絡人的 _ID、Photo.CONTENT_ITEM_TYPE 和 IS_PRIMARY 資料欄,找出原始聯絡人的主要相片列。
個人的社群動態資料也可能包含相片。這些相片會儲存在 android.provider.ContactsContract.StreamItemPhotos 資料表中,詳情請參閱「社群串流相片」一節。