
Your app should work well on Wear OS devices of all sizes, taking advantage of additional space where available, and still look great on smaller screens too. This guide provides recommendations for achieving this user experience.
To learn more about the design principles for adaptive layouts, read the design guidance.
Build responsive layouts using Material 3
Layouts should have percentage-based margins. Because Compose works by default in absolute values instead, userememberResponsiveColumnPadding from
the Horologist Library to calculate the padding and pass it to
the ScreenScaffold's contentPadding parameter and the TransformingLazyColumn's
contentPadding parameter.
The following code snippet uses a
TransformingLazyColumn component to create content that looks great on a variety
of Wear OS screen sizes:
val columnState = rememberTransformingLazyColumnState() val transformationSpec = rememberTransformationSpec() ScreenScaffold( scrollState = columnState ) { contentPadding -> TransformingLazyColumn( state = columnState, contentPadding = contentPadding ) { item { ListHeader( modifier = Modifier .fillMaxWidth() .transformedHeight(this, transformationSpec) .minimumVerticalContentPadding(ListHeaderDefaults.minimumTopListContentPadding), transformation = SurfaceTransformation(transformationSpec) ) { Text(text = "Header") } } // ... other items item { Button( modifier = Modifier .fillMaxWidth() .transformedHeight(this, transformationSpec) .minimumVerticalContentPadding(ButtonDefaults.minimumVerticalListContentPadding), transformation = SurfaceTransformation(transformationSpec), onClick = { /* ... */ }, icon = { Icon( imageVector = Icons.Default.Build, contentDescription = "build", ) }, ) { Text( text = "Build", maxLines = 1, overflow = TextOverflow.Ellipsis, ) } } } }
This example also demonstrates ScreenScaffold and AppScaffold.
These coordinate between the App and individual screens
(navigation routes) to ensure the correct scrolling behavior and
TimeText positioning.
For the top and bottom padding, also note the following:
- The specification of the first and last
ItemType, to determine the correct padding. - The use of
ListHeaderfor the first item in the list, becauseTextheaders shouldn't have padding.
Full specifications can be found in the Figma design kits. For more details and examples, see:
- The Horologist library - provides helpers to help build optimized and differentiated apps for Wear OS.
- The ComposeStarter sample - an example showing the principles outlined in this guide.
- The JetCaster sample - a more complex example of building an app to work with different screen sizes, using the Horologist library.
Use scrolling layouts in your app
Use a scrolling layout, as shown earlier on this page, as the default choice when implementing your screens. This lets users reach your app's components regardless of display preferences or Wear OS device screen size.
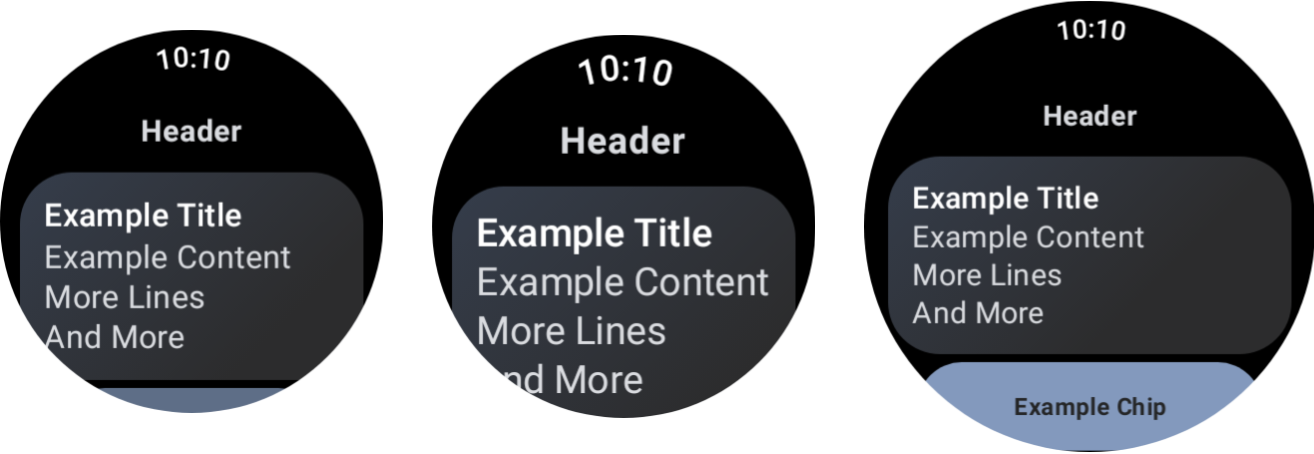
The effect of different device sizes and font-scaling.
Dialogs
Dialogs should also be scrollable, unless there is a very good reason not to.
The AlertDialog component is responsive and is scrollable by default
if the content exceeds the viewport height.
Custom screens might require non-scrolling layouts
Some screens may still be suited to non-scrolling layouts. Several examples include the main player screen in a media app and the workout screen in a fitness app.
In these cases, look at the canonical guidance provided in the Figma design kits, and implement a design that is responsive to the size of the screen, using the correct margins.
Provide differentiated experiences through breakpoints
With larger displays, you can introduce additional content and features. To implement this sort of differentiated experience, use screen size breakpoints, showing a different layout when the screen size exceeds 225 dp:
const val LARGE_DISPLAY_BREAKPOINT = 225 @Composable fun isLargeDisplay() = LocalConfiguration.current.screenWidthDp >= LARGE_DISPLAY_BREAKPOINT // ... // ... use in your Composables: if (isLargeDisplay()) { // Show additional content. } else { // Show content only for smaller displays. } // ...
The design guidance illustrates more of these opportunities.
Test combinations of screen and font sizes using previews
Compose previews help you develop for a variety of Wear OS screen sizes. Use both the devices and font-scaling preview definitions to see the following:
- How your screens look at the extremes of sizing, for example, largest font paired with smallest screen.
- How your differentiated experience behaves across breakpoints.
Ensure you implement previews using WearPreviewDevices and
WearPreviewFontScales for all the screens in your app.
@WearPreviewDevices @WearPreviewFontScales @Composable fun ComposeListPreview() { ComposeList() }
Screenshot testing
Beyond preview testing, screenshot testing lets you test against a range of existing hardware sizes. This is particularly useful where those devices might not be immediately available to you, and the issue may not present itself on other screen sizes.
Screenshot testing also helps you identify regressions at specific locations in your codebase.
Our samples use Roborazzi for screenshot testing:
- Configure your project and app
build.gradlefiles to use Roborazzi. - Create a screenshot test for each screen you have in your app. For example, the following code shows a screenshot test for a screen containing a list:
@RunWith(ParameterizedRobolectricTestRunner::class) class ComposeListScreenTest( override val device: WearDevice ) : WearScreenshotTest() { override val tolerance = 0.02f @Test fun myScreenTest() = runTest { AppScaffold { ComposeList() } } companion object { @JvmStatic @ParameterizedRobolectricTestRunner.Parameters fun devices() = WearDevice.entries } }
Some important points to note:
WearDevice.entriescontains definitions for most popular Wear OS devices so that the tests are run on a representative range of screen sizes.
Generate golden images
To generate images for your screens, run the following command in a terminal:
./gradlew recordRoborazziDebug
Verify images
To verify changes against existing images, run the following command in a terminal:
./gradlew verifyRoborazziDebug
For a full example of screenshot testing, see the ComposeStarter sample.