
如要瞭解如何簡單編輯應用程式程式碼,以便使用 Microbenchmark 程式庫,請參閱「快速入門導覽課程」一節。如要瞭解如何完成程式碼集變更較為複雜的整體設定,請參閱「完整專案設定」一節。
快速入門
本節說明如何在不必將程式碼移入模組的情況下,試用基準測試作業並執行一次性評估。為了獲得精準的效能結果,以下步驟包含停用應用程式的偵錯功能,因此建議您只在本機作業副本操作,不要將變更存入來源控制系統。
如要執行一次性基準測試,請執行下列步驟:
新增程式庫至模組的
build.gradle或build.gradle.kts檔案:Kotlin
dependencies {
    implementation("androidx.benchmark:benchmark-junit4:1.2.4")
}
Groovy
dependencies {
    implementation 'androidx.benchmark:benchmark-junit4:1.2.4'
}
請使用
implementation依附元件,而非androidTestImplementation依附元件。如果您使用androidTestImplementation,基準測試將無法執行,因為程式庫資訊清單不會合併至應用程式資訊清單。更新
debug建構類型,使其無法偵錯:Kotlin
android {
    ...
    buildTypes {
        debug {
            isDebuggable = false
        }
    }
}
Groovy
android {
    ...
    buildTypes {
        debug {
            debuggable false
        }
    }
}
將
testInstrumentationRunner變更為AndroidBenchmarkRunner:Kotlin
android {
    ...
    defaultConfig {
        testInstrumentationRunner = "androidx.benchmark.junit4.AndroidBenchmarkRunner"
    }
}
Groovy
android {
    ...
    defaultConfig {
        testInstrumentationRunner "androidx.benchmark.junit4.AndroidBenchmarkRunner"
    }
}
在
androidTest目錄的測試檔案中加入BenchmarkRule例項,以便新增基準測試。如要進一步瞭解基準測試的編寫方法,請參閱「建立 Microbenchmark 類別」。下列程式碼片段說明如何在檢測設備測試中新增基準測試:
Kotlin
@RunWith(AndroidJUnit4::class) class SampleBenchmark { @get:Rule val benchmarkRule = BenchmarkRule() @Test fun benchmarkSomeWork() { benchmarkRule.measureRepeated { doSomeWork() } } }
Java
@RunWith(AndroidJUnit4.class)
class SampleBenchmark {
    @Rule
    public BenchmarkRule benchmarkRule = new BenchmarkRule();

    @Test
    public void benchmarkSomeWork() {
            BenchmarkRuleKt.measureRepeated(
                (Function1<BenchmarkRule.Scope, Unit>) scope -> doSomeWork()
            );
       }
    }
}
如要瞭解如何編寫基準測試,請跳至「建立 Microbenchmark 類別」一節。
完整專案設定
如要設定一般基準測試,而非一次性基準測試,請將各項基準測試作業分立在個別模組中。這可確保其設定 (例如將 debuggable 設為 false) 與一般測試分開。
由於 Microbenchmark 會直接執行您的程式碼,因此請將要進行基準測試的程式碼放入個別 Gradle 模組中,然後設定該模組的依附元件,如圖 1 所示。
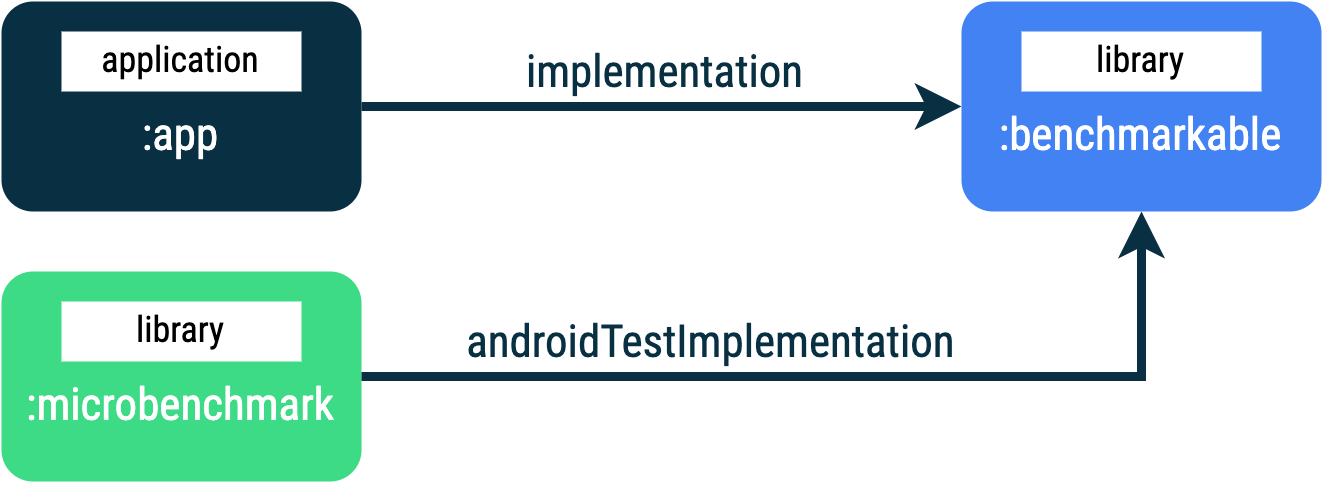
:app、:microbenchmark 和 :benchmarkable Gradle 模組,可讓 Microbenchmark 在 :benchmarkable 模組中針對程式碼進行基準測試。如要加入新的 Gradle 模組,您可以使用 Android Studio 中的模組精靈。此精靈會建立預先設定基準測試的模組,並加入基準測試目錄,同時將 debuggable 設為 false。
在 Android Studio 的「Project」面板中,於專案或模組上按一下滑鼠右鍵,然後依序點選「New」>「Module」。
在「Templates」窗格中選取「Benchmark」。
選取「Microbenchmark」做為基準測試模組類型。
輸入「microbenchmark」,做為模組名稱。
按一下「Finish」。

建立模組後,請變更其 build.gradle 或 build.gradle.kts 檔案,然後新增 androidTestImplementation 至包含程式碼的模組中,進行基準測試:
Kotlin
dependencies {
    // The module name might be different.
    androidTestImplementation(project(":benchmarkable"))
}
Groovy
dependencies {
    // The module name might be different.
    androidTestImplementation project(':benchmarkable')
}
建立 Microbenchmark 類別
基準測試是標準的檢測設備測試。如要建立基準測試,請使用程式庫提供的 BenchmarkRule 類別。如要對活動進行基準測試,請使用 ActivityScenario 或 ActivityScenarioRule。如要對 UI 程式碼進行基準測試,請使用 @UiThreadTest。
下列程式碼說明基準測試範例:
Kotlin
@RunWith(AndroidJUnit4::class) class SampleBenchmark { @get:Rule val benchmarkRule = BenchmarkRule() @Test fun benchmarkSomeWork() { benchmarkRule.measureRepeated { doSomeWork() } } }
Java
@RunWith(AndroidJUnit4.class)
class SampleBenchmark {
    @Rule
    public BenchmarkRule benchmarkRule = new BenchmarkRule();

    @Test
    public void benchmarkSomeWork() {
        final BenchmarkState state = benchmarkRule.getState();
        while (state.keepRunning()) {
            doSomeWork();
        }
    }
}
針對設定停用時間
如果有不需要評估的程式碼區段,您可以利用 runWithTimingDisabled{} 區塊停用該區段的時間。這些區段通常代表每次基準測試疊代時需要執行的部分程式碼。
Kotlin
// using random with the same seed, so that it generates the same data every run private val random = Random(0) // create the array once and just copy it in benchmarks private val unsorted = IntArray(10_000) { random.nextInt() } @Test fun benchmark_quickSort() { // ... benchmarkRule.measureRepeated { // copy the array with timing disabled to measure only the algorithm itself listToSort = runWithTimingDisabled { unsorted.copyOf() } // sort the array in place and measure how long it takes SortingAlgorithms.quickSort(listToSort) } // assert only once not to add overhead to the benchmarks assertTrue(listToSort.isSorted) }
Java
private final int[] unsorted = new int[10000];

public SampleBenchmark() {
    // Use random with the same seed, so that it generates the same data every
    // run.
    Random random = new Random(0);

    // Create the array once and copy it in benchmarks.
    Arrays.setAll(unsorted, (index) -> random.nextInt());
}

@Test
public void benchmark_quickSort() {
    final BenchmarkState state = benchmarkRule.getState();

    int[] listToSort = new int[0];

    while (state.keepRunning()) {

        // Copy the array with timing disabled to measure only the algorithm
        // itself.
        state.pauseTiming();
        listToSort = Arrays.copyOf(unsorted, 10000);
        state.resumeTiming();

        // Sort the array in place and measure how long it takes.
        SortingAlgorithms.quickSort(listToSort);
    }

    // Assert only once, not to add overhead to the benchmarks.
    assertTrue(SortingAlgorithmsKt.isSorted(listToSort));
}
請盡量減少在 measureRepeated 區塊內和 runWithTimingDisabled 內部執行的作業量。measureRepeated 區塊會多次執行,且可能影響執行基準測試所需的總時間。如果需要驗證基準測試的某些結果,您可以斷言最後一個結果,而不必在每個基準測試疊代都執行。
執行基準測試
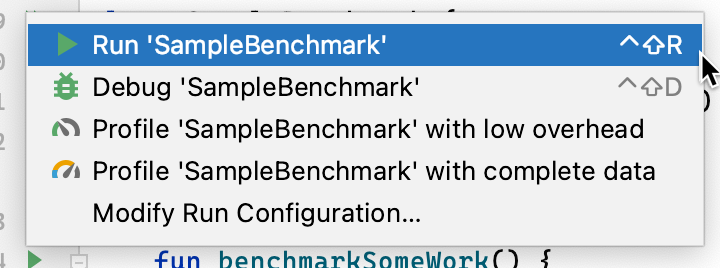
在 Android Studio 中,和執行任何 @Test 一樣,使用測試類別或方法旁的空白邊動作執行基準測試,如圖 3 所示。
您也可以從指令列執行 connectedCheck,藉此從指定的 Gradle 模組執行所有測試:
./gradlew benchmark:connectedCheck或單一測試:
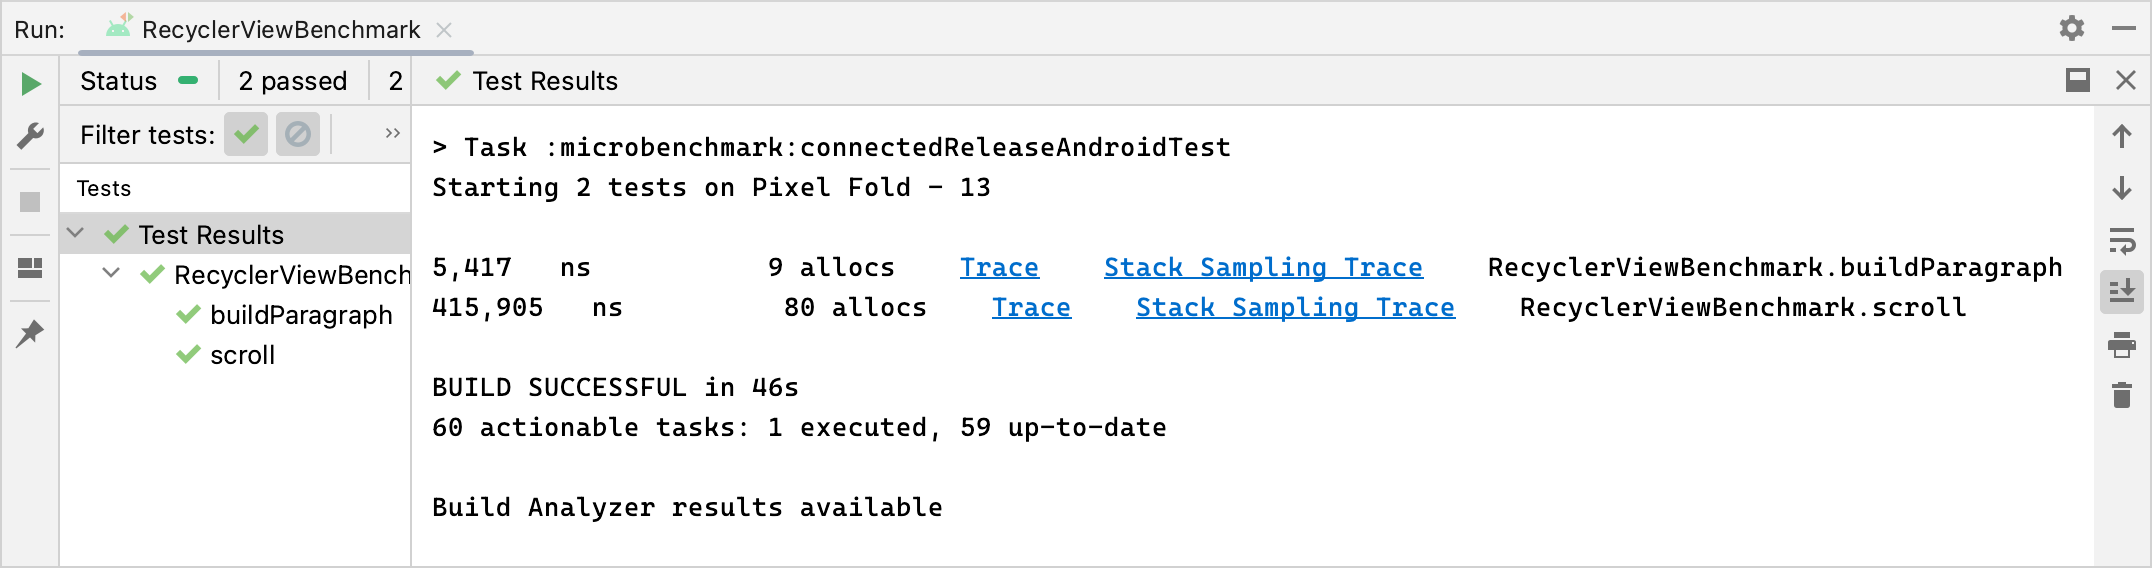
./gradlew benchmark:connectedCheck -P android.testInstrumentationRunnerArguments.class=com.example.benchmark.SampleBenchmark#benchmarkSomeWork基準測試結果
Microbenchmark 成功執行後,指標就會直接在 Android Studio 中顯示,也會以 JSON 格式提供完整的基準測試報表 (含其他指標和裝置資訊)。
JSON 報表和所有剖析追蹤記錄也會自動從裝置複製到主機。寫入主體機器的位置如下:
project_root/module/build/outputs/connected_android_test_additional_output/debugAndroidTest/connected/device_id/
根據預設,JSON 報表會寫入裝置端磁碟的測試 APK 外部共用媒體資料夾中,通常位於 /storage/emulated/0/Android/media/**app_id**/**app_id**-benchmarkData.json。
設定錯誤
程式庫會偵測下列條件,確保專案和環境的設定正確,可提供符合版本的效能。
- 可進行偵錯設定為
false。 - 使用實體裝置 (不支援模擬器)。
- 如果裝置已啟用 Root 權限,則鎖定時脈。
- 裝置的電池電量充足,至少有 25% 的電力。
如果以上任何條件檢查失敗,基準測試都會回報錯誤,避免評估出錯。
如要隱抑特定錯誤類型,避免引發警告及導致基準測試中止,請使用逗號分隔的清單將錯誤類型傳遞至檢測引數 androidx.benchmark.suppressErrors
您可以透過 Gradle 指令碼進行設定,如以下範例所示:
Kotlin
android {
    defaultConfig {
       …
      testInstrumentationRunnerArguments["androidx.benchmark.suppressErrors"] = "DEBUGGABLE,LOW-BATTERY"
    }
}
Groovy
android {
    defaultConfig {
       …
      testInstrumentationRunnerArguments["androidx.benchmark.suppressErrors"] = "DEBUGGABLE,LOW-BATTERY"
    }
}
您也可以透過指令列隱抑錯誤:
$ ./gradlew :benchmark:connectedCheck -P andoidtestInstrumentationRunnerArguments.androidx.benchmark.supperssErrors=DEBUGGABLE,LOW-BATTERY
隱抑錯誤會讓基準測試以錯誤設定的狀態執行,系統會特意將基準測試的輸出內容重新命名,將錯誤內容加在測試名稱的前面。舉例來說,如果透過上述程式碼片段中的隱抑錯誤,執行可進行偵錯的基準測試,系統會在測試名稱前面加上 DEBUGGABLE_。
為您推薦
- 注意:系統會在 JavaScript 關閉時顯示連結文字
- 編寫 Macrobenchmark
- 在不使用 Gradle 的情況下建構 Microbenchmark
- 建立基準設定檔 {:#create-profile-rules}