
本頁面將說明如何設定建構變化版本,以便透過單一專案建立不同版本的應用程式。此外,您也可以瞭解如何妥善管理依附元件和簽署設定。
每個「建構變化版本」都代表您可以建構的不同應用程式版本。例如,您可能想建構兩個應用程式版本:一個是包含有限內容的免費版應用程式,另一個則是提供更多內容的付費版應用程式。您也可以根據 API 級別或其他裝置變化版本,為應用程式建構針對各種裝置所設計的不同版本。
Gradle 透過一組特定規則,結合建構類型和變種版本中設定的各項設定、程式碼及資源後,就會產生建構變化版本。雖然您無法直接設定建構變化版本,但可以設定組成這類變化版本的建構類型和變種版本。
舉例來說,「demo」的「變種版本」可能會指定某些功能和裝置需求,例如自訂原始碼、資源和最低 API 級別;「debug」的「建構類型」則會套用不同的建構與封裝設定,例如偵錯選項及簽署金鑰。兩者結合後的建構變化版本即為應用程式的「demoDebug」版本,當中包含「demo」變種版本、「debug」建構類型和 main/ 來源集所含設定與資源的組合。
設定建構類型
您可以在模組層級 build.gradle.kts 檔案的 android 區塊中,建立及設定建構類型。建立新模組時,Android Studio 會自動建立偵錯和發布建構類型。雖然 debug 建構類型不會顯示在建構設定檔中,但 Android Studio 是以 debuggable
true 設定該類型。如此一來,您就能在安全的 Android 裝置上對應用程式進行偵錯,並使用一般偵錯 KeyStore 設定應用程式簽署程序。
如果想新增或變更某些設定,可以在設定中加入 debug 建構類型。下列範例將指定偵錯建構類型的 applicationIdSuffix,並設定「staging」建構類型,這個類型是以 debug 建構類型中的設定進行初始化:
Kotlin
android {
    defaultConfig {
        manifestPlaceholders["hostName"] = "www.example.com"
        ...
    }
    buildTypes {
        getByName("release") {
            isMinifyEnabled = true
            proguardFiles(getDefaultProguardFile("proguard-android.txt"), "proguard-rules.pro")
        }

        getByName("debug") {
            applicationIdSuffix = ".debug"
            isDebuggable = true
        }

        /**
         * The `initWith` property lets you copy configurations from other build types,
         * then configure only the settings you want to change. This one copies the debug build
         * type, and then changes the manifest placeholder and application ID.
         */
        create("staging") {
            initWith(getByName("debug"))
            manifestPlaceholders["hostName"] = "internal.example.com"
            applicationIdSuffix = ".debugStaging"
        }
    }
}
Groovy
android {
    defaultConfig {
        manifestPlaceholders = [hostName:"www.example.com"]
        ...
    }
    buildTypes {
        release {
            minifyEnabled true
            proguardFiles getDefaultProguardFile('proguard-android.txt'), 'proguard-rules.pro'
        }

        debug {
            applicationIdSuffix ".debug"
            debuggable true
        }

        /**
         * The `initWith` property lets you copy configurations from other build types,
         * then configure only the settings you want to change. This one copies the debug build
         * type, and then changes the manifest placeholder and application ID.
         */
        staging {
            initWith debug
            manifestPlaceholders = [hostName:"internal.example.com"]
            applicationIdSuffix ".debugStaging"
        }
    }
}
注意:當您變更建構設定檔時,Android Studio 會要求您將專案與新設定保持同步。如要同步處理專案,請在您進行變更後顯示的通知列中點選「Sync Now」,或者按一下工具列中的「Sync Project」圖示  。如果 Android Studio 發現您的設定有誤,畫面會顯示「Messages」視窗說明問題。
如要進一步瞭解可透過建構類型設定的所有屬性,請參閱 BuildType 參考資料。
設定變種版本
建立變種版本與建構類型的方法很類似,只需將變種版本新增到建構設定中的 productFlavors 區塊,並加入所需設定即可。變種版本支援與 defaultConfig 相同的屬性,因為 defaultConfig 實際上屬於 ProductFlavor 類別。也就是說,您可以在 defaultConfig 區塊中提供所有變種版本的基本設定,而且每個變種版本都能變更任何預設值,例如 applicationId。如要進一步瞭解應用程式 ID,請參閱「設定應用程式 ID」。
注意:您仍需使用 main/ 資訊清單檔案中的 package 屬性指定套件名稱,也必須在原始碼中將該套件名稱用於參照 R 類別,或解析任何相關活動或服務註冊。因此,您不必變更原始碼,就能使用 applicationId 為每個變種版本提供一組專屬 ID,方便封裝及發布應用程式。
所有變種版本都必須屬於已命名的版本維度,也就是一組變種版本。您必須將所有變種版本指派給版本維度,否則會收到下列建構錯誤訊息:
  Error: All flavors must now belong to a named flavor dimension.
  The flavor 'flavor_name' is not assigned to a flavor dimension.
如果某個模組只指定一個版本維度,Android Gradle 外掛程式就會自動將此模組的所有變種版本指派給該維度。
下列程式碼範例將建立名為「version」的版本維度,並新增「demo」和「full」變種版本。這些變種版本提供各自專屬的 applicationIdSuffix 和 versionNameSuffix:
Kotlin
android {
    ...
    defaultConfig {...}
    buildTypes {
        getByName("debug"){...}
        getByName("release"){...}
    }
    // Specifies one flavor dimension.
    flavorDimensions += "version"
    productFlavors {
        create("demo") {
            // Assigns this product flavor to the "version" flavor dimension.
            // If you are using only one dimension, this property is optional,
            // and the plugin automatically assigns all the module's flavors to
            // that dimension.
            dimension = "version"
            applicationIdSuffix = ".demo"
            versionNameSuffix = "-demo"
        }
        create("full") {
            dimension = "version"
            applicationIdSuffix = ".full"
            versionNameSuffix = "-full"
        }
    }
}
Groovy
android {
    ...
    defaultConfig {...}
    buildTypes {
        debug{...}
        release{...}
    }
    // Specifies one flavor dimension.
    flavorDimensions "version"
    productFlavors {
        demo {
            // Assigns this product flavor to the "version" flavor dimension.
            // If you are using only one dimension, this property is optional,
            // and the plugin automatically assigns all the module's flavors to
            // that dimension.
            dimension "version"
            applicationIdSuffix ".demo"
            versionNameSuffix "-demo"
        }
        full {
            dimension "version"
            applicationIdSuffix ".full"
            versionNameSuffix "-full"
        }
    }
}
注意:如果有在 Google Play 使用 APK 發行的舊版應用程式 (2021 年 8 月前建立),請指派相同的 applicationId 值給所有變化版本,並為每個變化版本提供不同 versionCode,這樣就能透過 Google Play 的多重 APK 支援功能發行應用程式。如要在 Google Play 以獨立應用程式發行不同變化版本的應用程式,您需要為每個變化版本指派不同的 applicationId。
建立及設定變種版本後,請按一下通知列中的「Sync Now」。同步處理完成後,Gradle 會根據您的建構類型和變種版本自動建立建構變化版本,並依照 <product-flavor><Build-Type> 為其命名。舉例來說,假設您建立了「demo」和「full」變種版本,並保留預設的「debug」和「release」建構類型,Gradle 會建立下列建構變化版本:
-
demoDebug -
demoRelease -
fullDebug -
fullRelease
如果想選取要建立及執行的建構變化版本,請依序前往「Build」>「Select Build Variant」,然後從選單中選擇建構變化版本。如要開始利用各建構變化版本專屬的功能和資源自訂每個變化版本,您必須按照本頁說明建立及管理來源集。
變更建構變化版本的應用程式 ID
當您建構應用程式的 APK 或 AAB 時,建構工具會使用應用程式 ID 標記應用程式,這個 ID 是在 build.gradle.kts 檔案中的 defaultConfig 區塊內所定義,如下列範例所示。不過,如果想建立「free」和「pro」版等不同版本的應用程式,在 Google Play 商店中以獨立商店資訊顯示各版本,就必須分別建立建構變化版本,而且每個變化版本都要使用不同的應用程式 ID。
在此情況下,請將每個建構變化版本定義為獨立的變種版本。您可以重新定義 productFlavors 區塊中各變種版本的 applicationId 屬性,也可以使用 applicationIdSuffix,在預設的應用程式 ID 後方附加片段,如下所示:
Kotlin
android {
    defaultConfig {
        applicationId = "com.example.myapp"
    }
    productFlavors {
        create("free") {
            applicationIdSuffix = ".free"
        }
        create("pro") {
            applicationIdSuffix = ".pro"
        }
    }
}
Groovy
android {
    defaultConfig {
        applicationId "com.example.myapp"
    }
    productFlavors {
        free {
            applicationIdSuffix ".free"
        }
        pro {
            applicationIdSuffix ".pro"
        }
    }
}
這樣一來,「free」變種版本的應用程式 ID 即為「com.example.myapp.free」。
您也可以根據建構類型,使用 applicationIdSuffix 附加片段,如下所示:
Kotlin
android {
    ...
    buildTypes {
        getByName("debug") {
            applicationIdSuffix = ".debug"
        }
    }
}
Groovy
android {
    ...
    buildTypes {
        debug {
            applicationIdSuffix ".debug"
        }
    }
}
由於 Gradle 會在變種版本之後套用建構類型設定,因此「free debug」建構變化版本的應用程式 ID 為「com.example.myapp.free.debug」。若希望同一部裝置同時具有 debug 和 release 建構類型,這項功能就很實用,因為兩個應用程式無法使用相同的應用程式 ID。
如果您有曾在 Google Play 使用 APK 發行的舊版應用程式 (2021 年 8 月前建立),而您想透過同一份應用程式資訊發行多個 APK,而且各 APK 分別指定不同裝置設定 (例如 API 級別),就必須為每個建構變化版本使用相同的應用程式 ID,但提供不同versionCode 給各 APK。詳情請參閱「支援多個 APK」。由於 AAB 採用單一構件,而且該構件在預設情況下使用單一版本代碼和應用程式 ID,因此透過 AAB 發布內容的程序不會受到影響。
提示:如需在資訊清單檔案中參照應用程式 ID,可以在任何資訊清單屬性中使用 ${applicationId} 預留位置。在建構期間,Gradle 會將此標記替換為實際的應用程式 ID。詳情請參閱「將建構變數插入資訊清單」。
結合多個變種版本與版本維度
在某些情況下,您可能會想結合多種變種版本的設定。舉例來說,您可能想針對以 API 級別為依據的「full」和「demo」變種版本,建立不同設定,Android Gradle 外掛程式即可用來建立多組變種版本做為版本維度。
Gradle 建構應用程式時,會將您定義的各種版本維度中的變種版本設定,結合建構類型設定,以便建立最終的建構變化版本。Gradle 不會結合同一版本維度的不同變種版本。
下列程式碼範例使用 flavorDimensions 屬性建立「mode」版本維度,將「full」和「demo」變種版本分組,另外也建立「api」版本維度,根據 API 級別將變種版本設定分組:
Kotlin
android {
  ...
  buildTypes {
    getByName("debug") {...}
    getByName("release") {...}
  }

  // Specifies the flavor dimensions you want to use. The order in which you
  // list the dimensions determines their priority, from highest to lowest,
  // when Gradle merges variant sources and configurations. You must assign
  // each product flavor you configure to one of the flavor dimensions.
  flavorDimensions += listOf("api", "mode")

  productFlavors {
    create("demo") {
      // Assigns this product flavor to the "mode" flavor dimension.
      dimension = "mode"
      ...
    }

    create("full") {
      dimension = "mode"
      ...
    }

    // Configurations in the "api" product flavors override those in "mode"
    // flavors and the defaultConfig block. Gradle determines the priority
    // between flavor dimensions based on the order in which they appear next
    // to the flavorDimensions property, with the first dimension having a higher
    // priority than the second, and so on.
    create("minApi24") {
      dimension = "api"
      minSdk = 24
      // To ensure the target device receives the version of the app with
      // the highest compatible API level, assign version codes in increasing
      // value with API level.
      versionCode = 30000 + (android.defaultConfig.versionCode ?: 0)
      versionNameSuffix = "-minApi24"
      ...
    }

    create("minApi23") {
      dimension = "api"
      minSdk = 23
      versionCode = 20000  + (android.defaultConfig.versionCode ?: 0)
      versionNameSuffix = "-minApi23"
      ...
    }

    create("minApi21") {
      dimension = "api"
      minSdk = 21
      versionCode = 10000  + (android.defaultConfig.versionCode ?: 0)
      versionNameSuffix = "-minApi21"
      ...
    }
  }
}
...
Groovy
android {
  ...
  buildTypes {
    debug {...}
    release {...}
  }

  // Specifies the flavor dimensions you want to use. The order in which you
  // list the dimensions determines their priority, from highest to lowest,
  // when Gradle merges variant sources and configurations. You must assign
  // each product flavor you configure to one of the flavor dimensions.
  flavorDimensions "api", "mode"

  productFlavors {
    demo {
      // Assigns this product flavor to the "mode" flavor dimension.
      dimension "mode"
      ...
    }

    full {
      dimension "mode"
      ...
    }

    // Configurations in the "api" product flavors override those in "mode"
    // flavors and the defaultConfig block. Gradle determines the priority
    // between flavor dimensions based on the order in which they appear next
    // to the flavorDimensions property, with the first dimension having a higher
    // priority than the second, and so on.
    minApi24 {
      dimension "api"
      minSdkVersion 24
      // To ensure the target device receives the version of the app with
      // the highest compatible API level, assign version codes in increasing
      // value with API level.

      versionCode 30000 + android.defaultConfig.versionCode
      versionNameSuffix "-minApi24"
      ...
    }

    minApi23 {
      dimension "api"
      minSdkVersion 23
      versionCode 20000  + android.defaultConfig.versionCode
      versionNameSuffix "-minApi23"
      ...
    }

    minApi21 {
      dimension "api"
      minSdkVersion 21
      versionCode 10000  + android.defaultConfig.versionCode
      versionNameSuffix "-minApi21"
      ...
    }
  }
}
...
Gradle 建立的建構變化版本數量,等於每個版本維度中變種版本的數量乘以您設定的建構類型數量。當 Gradle 為每個建構變化版本或對應的構件命名時,系統會依照版本維度的優先順序,從高到低依序顯示各維度的變種版本,然後列出建構類型。
以先前的建構設定為例,Gradle 共建立 12 個採用下列命名配置的建構變化版本:
- 建構變化版本:
[minApi24, minApi23, minApi21][Demo, Full][Debug, Release] - 對應 APK:
app-[minApi24, minApi23, minApi21]-[demo, full]-[debug, release].apk - 例如:
- 建構變化版本:
minApi24DemoDebug - 對應的 APK:
app-minApi24-demo-debug.apk
除了可以為個別變種版本和建構變化版本建立來源集目錄外,您也可以為每個變種版本「組合」建立來源集目錄。舉例來說,您可以建立 Java 來源並添加至 src/demoMinApi24/java/ 目錄,只有在建立結合這兩種變種版本的變化版本時,Gradle 才會使用這些來源。
就優先順序而言,您為變種版本組合建立的來源集高於個別變種版本的來源集。如要進一步瞭解來源集和 Gradle 合併資源的方式,請參閱「建立來源集」一節。
篩選變化版本
Gradle 會針對您設定的變種版本與建構類型的所有可能組合,建立建構變化版本。不過,某些建構變化版本可能並不符合您的需求,或者對您的專案沒有意義。如要移除特定建構變化版本設定,請在模組層級 build.gradle.kts 檔案中建立變化版本篩選器。
以上一節中的建構設定為例,假設您打算只為試用版應用程式支援 API 23 以上級別,就可以使用 variantFilter 區塊,篩除所有結合「minApi21」和「demo」變種版本的建構變化版本設定:
Kotlin
android {
  ...
  buildTypes {...}

  flavorDimensions += listOf("api", "mode")
  productFlavors {
    create("demo") {...}
    create("full") {...}
    create("minApi24") {...}
    create("minApi23") {...}
    create("minApi21") {...}
  }
}

androidComponents {
    beforeVariants { variantBuilder ->
        // To check for a certain build type, use variantBuilder.buildType == "<buildType>"
        if (variantBuilder.productFlavors.containsAll(listOf("api" to "minApi21", "mode" to "demo"))) {
            // Gradle ignores any variants that satisfy the conditions above.
            variantBuilder.enable = false
        }
    }
}
...
Groovy
android {
  ...
  buildTypes {...}

  flavorDimensions "api", "mode"
  productFlavors {
    demo {...}
    full {...}
    minApi24 {...}
    minApi23 {...}
    minApi21 {...}
  }

  variantFilter { variant ->
      def names = variant.flavors*.name
      // To check for a certain build type, use variant.buildType.name == "<buildType>"
      if (names.contains("minApi21") && names.contains("demo")) {
          // Gradle ignores any variants that satisfy the conditions above.
          setIgnore(true)
      }
  }
}
...
一旦您將變化版本篩選器加入建構設定,並點選通知列中的「Sync Now」後,Gradle 就會忽略所有符合指定條件的建構變化版本。當您在選單列中依序點選「Build」>「Select Build Variant」,或在工具視窗列中按一下「Build Variants」圖示  時,選單也不會再顯示篩除的建構變化版本。
建立來源集
根據預設,針對您想在所有建構變化版本之間共用的全部內容,Android Studio 會建立 main/ 來源集和目錄。不過,您可以建立新的來源集,確切控管 Gradle 為特定建構類型、變種版本、變種版本組合 (使用版本維度時) 和建構變化版本編譯及封裝的檔案。
舉例來說,您可以在 main/ 來源集中定義基本功能,並使用變種版本來源集變更不同用戶端的應用程式品牌資訊,或者只針對使用 debug 建構類型的建構變化版本,加入特殊權限和記錄功能。
與 main/ 來源集類似,Gradle 會預期以特定方式整理來源集檔案和目錄。舉例來說,Gradle 會預期「debug」建構類型專屬的 Kotlin 或 Java 類別檔案位於 src/debug/kotlin/ 或 src/debug/java/ 目錄中。
Android Gradle 外掛程式提供實用的 Gradle 工作,展示如何整理每個建構類型、變種版本和建構變化版本的檔案。例如,下列工作輸出內容中的範例說明 Gradle 預期在哪裡找到「debug」建構類型的某些檔案:
------------------------------------------------------------
Project :app
------------------------------------------------------------

...

debug
----
Compile configuration: debugCompile
build.gradle name: android.sourceSets.debug
Java sources: [app/src/debug/java]
Kotlin sources: [app/src/debug/kotlin, app/src/debug/java]
Manifest file: app/src/debug/AndroidManifest.xml
Android resources: [app/src/debug/res]
Assets: [app/src/debug/assets]
AIDL sources: [app/src/debug/aidl]
RenderScript sources: [app/src/debug/rs]
JNI sources: [app/src/debug/jni]
JNI libraries: [app/src/debug/jniLibs]
Java-style resources: [app/src/debug/resources]
如要查看此輸出內容,請按照下列步驟操作:
- 按一下工具視窗列中的「Gradle」。
依序前往「MyApplication」>「Tasks」>「android」,然後按兩下「sourceSets」。
如要查看「Tasks」資料夾,您必須讓 Gradle 在同步期間建立工作清單,步驟如下:
- 依序按一下「File」>「Settings」>「Experimental」 (macOS 使用者應依序點選「Android Studio」>「Settings」>「Experimental」)。
- 取消選取「Do not build Gradle task list during Gradle sync」。
- Gradle 執行工作後,系統會開啟「Run」視窗,顯示輸出內容。
注意:工作輸出內容也會展示如何為用於執行應用程式測試的檔案彙整來源集,例如 test/ 和 androidTest/ 測試來源集。
建立新的建構變化版本時,Android Studio 不會為您建立來源集目錄,但會為您提供幾個實用選項。舉例來說,如果只要建立「debug」構建類型的 java/ 目錄,請按照以下步驟操作:
- 開啟「Project」窗格,然後從窗格頂端的選單中選取「Project」檢視畫面。
- 前往
MyProject/app/src/。 - 在
src目錄上按一下滑鼠右鍵,然後依序選取「New」>「Directory」。 - 從「Gradle Source Sets」下方的選單中選取 [full/java]。
- 按下 Enter 鍵。
Android Studio 會為您的 debug 建構類型建立來源集目錄,然後在其中建立 java/ 目錄。或者,當您在專案中新增特定建構變化版本的檔案時,Android Studio 也可以為您建立目錄。
舉例來說,如要為「debug」建構類型建立值的 XML 檔案,請按照以下步驟操作:
- 在「Project」窗格中的
src目錄上按一下滑鼠右鍵,然後依序選取「New」>「XML」>「Values XML File」。 - 輸入 XML 檔案名稱,或是保留預設名稱。
- 在「Target Source Set」旁的選單中,選取「debug」。
- 按一下「Finish」。
由於「debug」建構類型是指定為目標來源集,因此 Android Studio 會在建立 XML 檔案時自動建立必要目錄。產生的目錄結構如圖 1 所示。
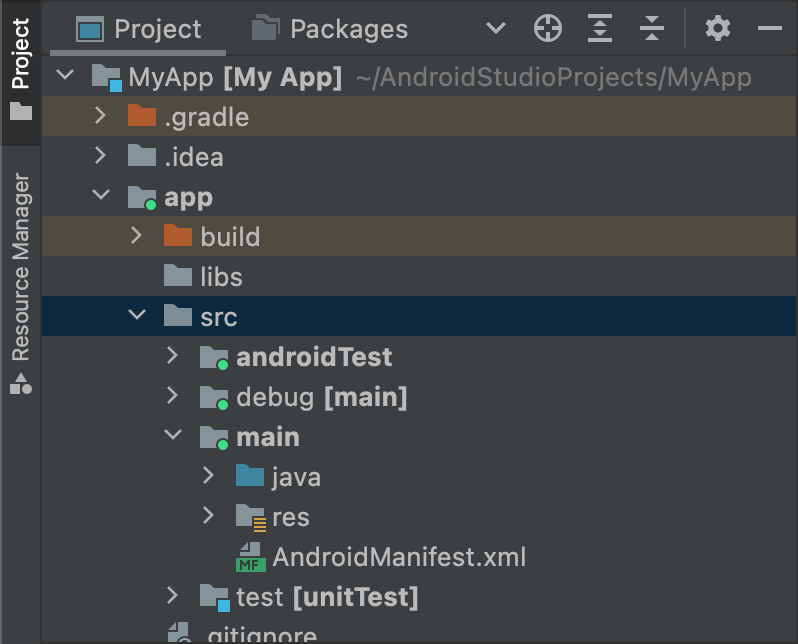
圖 1:「debug」建構類型的新來源集目錄。
來源集在圖示中顯示的綠色指標代表有效狀態。debug 來源集後方會加上 [main],表示本身將合併至 main 來源集中。
您也可以按照相同的程序,分別為變種版本及建構變化版本建立來源集目錄,比如 src/demo/ 和 src/demoDebug/。此外,您也可以建立指定特定建構變化版本的測試來源集,例如 src/androidTestDemoDebug/。詳情請參閱測試來源集。
變更預設來源集設定
如果您的來源未彙整成 Gradle 預期的預設來源集檔案結構 (如先前的「建立來源集」一節所述),您可以使用 sourceSets 區塊,變更 Gradle 收集來源集各元件檔案的位置。
sourceSets 區塊必須位於 android 區塊中。您不必重新調整來源檔案位置,只需向 Gradle 提供與模組層級 build.gradle.kts 檔案相對的路徑,Gradle 可在該路徑下找到每個來源集元件的檔案。如要瞭解可以設定的元件,以及是否可將這些元件對應至多個檔案或目錄,請參閱 Android Gradle 外掛程式 API 參考資料。
下列程式碼範例會將 app/other/ 目錄中的來源對應至 main 來源集的某些元件,並變更 androidTest 來源集的根目錄:
Kotlin
android {
  ...
  // Encapsulates configurations for the main source set.
  sourceSets.getByName("main") {
    // Changes the directory for Java sources. The default directory is
    // 'src/main/java'.
    java.setSrcDirs(listOf("other/java"))

    // If you list multiple directories, Gradle uses all of them to collect
    // sources. Because Gradle gives these directories equal priority, if
    // you define the same resource in more than one directory, you receive an
    // error when merging resources. The default directory is 'src/main/res'.
    res.setSrcDirs(listOf("other/res1", "other/res2"))

    // Note: Avoid specifying a directory that is a parent to one
    // or more other directories you specify. For example, avoid the following:
    // res.srcDirs = ['other/res1', 'other/res1/layouts', 'other/res1/strings']
    // Specify either only the root 'other/res1' directory or only the
    // nested 'other/res1/layouts' and 'other/res1/strings' directories.

    // For each source set, you can specify only one Android manifest.
    // By default, Android Studio creates a manifest for your main source
    // set in the src/main/ directory.
    manifest.srcFile("other/AndroidManifest.xml")
    ...
  }

  // Create additional blocks to configure other source sets.
  sourceSets.getByName("androidTest") {
      // If all the files for a source set are located under a single root
      // directory, you can specify that directory using the setRoot property.
      // When gathering sources for the source set, Gradle looks only in locations
      // relative to the root directory you specify. For example, after applying the
      // configuration below for the androidTest source set, Gradle looks for Java
      // sources only in the src/tests/java/ directory.
      setRoot("src/tests")
      ...
  }
}
...
Groovy
android {
  ...
  sourceSets {
    // Encapsulates configurations for the main source set.
    main {
      // Changes the directory for Java sources. The default directory is
      // 'src/main/java'.
      java.srcDirs = ['other/java']

      // If you list multiple directories, Gradle uses all of them to collect
      // sources. Because Gradle gives these directories equal priority, if
      // you define the same resource in more than one directory, you receive an
      // error when merging resources. The default directory is 'src/main/res'.
      res.srcDirs = ['other/res1', 'other/res2']

      // Note: Avoid specifying a directory that is a parent to one
      // or more other directories you specify. For example, avoid the following:
      // res.srcDirs = ['other/res1', 'other/res1/layouts', 'other/res1/strings']
      // Specify either only the root 'other/res1' directory or only the
      // nested 'other/res1/layouts' and 'other/res1/strings' directories.

      // For each source set, you can specify only one Android manifest.
      // By default, Android Studio creates a manifest for your main source
      // set in the src/main/ directory.
      manifest.srcFile 'other/AndroidManifest.xml'
      ...
    }

    // Create additional blocks to configure other source sets.
    androidTest {

      // If all the files for a source set are located under a single root
      // directory, you can specify that directory using the setRoot property.
      // When gathering sources for the source set, Gradle looks only in locations
      // relative to the root directory you specify. For example, after applying the
      // configuration below for the androidTest source set, Gradle looks for Java
      // sources only in the src/tests/java/ directory.
      setRoot 'src/tests'
      ...
    }
  }
}
...
請注意,來源目錄只能屬於一個來源集。例如,您無法與 test 及 androidTest 來源集共用相同的測試來源。這是因為 Android Studio 會為每個來源集分別建立 IntelliJ 模組,而且無法跨來源集支援重複內容根目錄。
使用來源集進行建構
您可以使用來源集目錄,在當中加入只想與某些設定一起封裝的程式碼和資源。舉例來說,如果您打算建立的「demoDebug」建構變化版本是「demo」變種版本和「debug」建構類型的交叉產品,Gradle 會檢視這些目錄,並設定以下優先順序:
-
src/demoDebug/(建構變化版本來源集) -
src/debug/(建構類型來源集) -
src/demo/(變種版本來源集) -
src/main/(主要來源集)
為變種版本組合建立的來源集必須包含所有版本維度。舉例來說,建構變化版本來源集必須是建構類型與所有版本維度的組合。若程式碼和資源涉及涵蓋多個 (但非全部) 版本維度的資料夾,系統並不支援合併這類程式碼與資源。
如果您結合多種變種版本,變種版本的優先順序取決於所屬版本維度。使用 android.flavorDimensions 屬性列出版本維度時,所列第一個版本維度的變種版本在優先順序上高於第二個版本維度的變種版本,依此類推。此外,您為變種版本組合建立的來源集在優先程度上也高於個別變種版本的來源集。
當 Gradle 結合程式碼和資源時,上述順序將決定優先順序較高的來源集。demoDebug/ 來源集目錄可能含有建構變化版本專屬的檔案,因此如果 demoDebug/ 包含 debug/ 中一併定義的檔案,Gradle 就會使用 demoDebug/ 來源集中的檔案。同樣地,針對建構類型與變種版本來源集中的檔案,Gradle 會為其指定高於 main/ 中相同檔案的優先順序。Gradle 套用下列建構規則時,會考量這個優先順序:
- 系統會一起編譯
kotlin/或java/目錄中的所有原始碼,產生單一輸出內容。注意:就特定建構變化版本而言,Gradle 若遇到兩個以上的來源集目錄定義同一個 Kotlin 或 Java 類別,就會擲回建構錯誤。舉例來說,您在建構偵錯應用程式時,無法一併定義
src/debug/Utility.kt和src/main/Utility.kt,因為 Gradle 會在建構程序中檢視這兩個目錄,並擲回「重複類別」錯誤。如果想為不同建構類型指定不同版本的Utility.kt,每個建構類型都必須定義本身的檔案版本,而且不得將該版本加入main/來源集。 - 資訊清單會合併為單一資訊清單。系統會按照先前範例中清單的順序排定優先順序。也就是說,建構類型的資訊清單設定會覆寫變種版本的資訊清單設定,以此類推。詳情請參閱有關合併資訊清單的說明。
values/目錄中的檔案會合併在一起。如果兩個檔案的名稱相同 (例如有兩個strings.xml檔案),系統會按照先前範例中清單的順序排定優先順序。也就是說,建構類型來源集中檔案定義的值會覆寫變種版本內相同檔案定義的值,以此類推。res/和asset/目錄中的資源會封裝在一起。如果在兩個以上的來源集中定義了名稱相同的資源,系統會按照先前範例中清單的順序排定優先順序。- 建構應用程式時,Gradle 會為程式庫模組依附元件隨附的資源和資訊清單,設定最低的優先順序。
宣告依附元件
如要設定特定建構變化版本或測試來源集的依附元件,請在 Implementation 關鍵字之前加上建構變化版本或測試來源集的名稱做為前綴,如以下範例所示:
Kotlin
dependencies {
    // Adds the local "mylibrary" module as a dependency to the "free" flavor.
    "freeImplementation"(project(":mylibrary"))

    // Adds a remote binary dependency only for local tests.
    testImplementation("junit:junit:4.12")

    // Adds a remote binary dependency only for the instrumented test APK.
    androidTestImplementation("com.android.support.test.espresso:espresso-core:3.6.1")
}
Groovy
dependencies {
    // Adds the local "mylibrary" module as a dependency to the "free" flavor.
    freeImplementation project(":mylibrary")

    // Adds a remote binary dependency only for local tests.
    testImplementation 'junit:junit:4.12'

    // Adds a remote binary dependency only for the instrumented test APK.
    androidTestImplementation 'com.android.support.test.espresso:espresso-core:3.6.1'
}
如要進一步瞭解如何設定依附元件,請參閱「新增建構依附元件」。
使用變化版本感知依附元件管理功能
Android Gradle 外掛程式 3.0.0 以上版本包含新的依附元件機制,可在使用程式庫時自動比對變化版本。這表示應用程式的 debug 變化版本會自動採用程式庫的 debug 變化版本,以此類推。此機制也適用於變種版本:應用程式的 freeDebug 變化版本會使用程式庫的 freeDebug 變化版本。
為了讓外掛程式能正確比對變化版本,如果發生無法直接比對的情況,您需要提供替代比對項目。
舉例來說,假設應用程式設定了名為「staging」的建構類型,但其中一個程式庫依附元件並未設定該類型。當外掛程式嘗試建構「staging」版應用程式時,將無法得知要使用的程式庫版本,這時系統會顯示類似下方的錯誤訊息:
Error:Failed to resolve: Could not resolve project :mylibrary.
Required by:
    project :app
解決關於比對變化版本的建構錯誤
應用程式與依附元件之間若無法直接比對變化版本,這個外掛程式包含的 DSL 元素可協助控管 Gradle 解決這個狀況。
以下列出有關變化版本感知依附元件比對功能的問題,以及使用 DSL 屬性解決這些問題的方法:應用程式含有程式庫依附元件不含的建構類型。
舉例來說,您的應用程式包含「staging」建構類型,但依附元件中只有「debug」和「release」建構類型。
請注意,如果程式庫依附元件含有應用程式不含的建構類型,則沒有任何問題,因為外掛程式絕對不會要求從依附元件取得該建構類型。
使用
matchingFallbacks指定特定建構類型的替代比對項目,如下所示:Kotlin
// In the app's build.gradle.kts file.
android {
    buildTypes {
        getByName("debug") {}
        getByName("release") {}
        create("staging") {
            // Specifies a sorted list of fallback build types that the
            // plugin can try to use when a dependency does not include a
            // "staging" build type. You may specify as many fallbacks as you
            // like, and the plugin selects the first build type that's
            // available in the dependency.
            matchingFallbacks += listOf("debug", "qa", "release")
        }
    }
}
Groovy
// In the app's build.gradle file.
android {
    buildTypes {
        debug {}
        release {}
        staging {
            // Specifies a sorted list of fallback build types that the
            // plugin can try to use when a dependency does not include a
            // "staging" build type. You may specify as many fallbacks as you
            // like, and the plugin selects the first build type that's
            // available in the dependency.
            matchingFallbacks = ['debug', 'qa', 'release']
        }
    }
}
對於應用程式及其程式庫依附元件中的特定版本維度,應用程式含有該程式庫不含的變種版本。
舉例來說,您的應用程式及其程式庫依附元件都包含「tier」版本維度。不過,應用程式內的「tier」維度含有「free」和「paid」變種版本,但依附元件中只有相同維度的「demo」和「paid」版本。
請注意,指定的版本維度會同時存在於應用程式及其程式庫依附元件中,如果程式庫包含應用程式不含的變種版本,則沒有任何問題,因為外掛程式絕對不會要求從依附元件取得該變種版本。
使用
matchingFallbacks指定應用程式「free」變種版本的替代比對項目,如下所示:Kotlin
// In the app's build.gradle.kts file.
android {
    defaultConfig{
    // Don't configure matchingFallbacks in the defaultConfig block.
    // Instead, specify fallbacks for a given product flavor in the
    // productFlavors block, as shown below.
  }
    flavorDimensions += "tier"
    productFlavors {
        create("paid") {
            dimension = "tier"
            // Because the dependency already includes a "paid" flavor in its
            // "tier" dimension, you don't need to provide a list of fallbacks
            // for the "paid" flavor.
        }
        create("free") {
            dimension = "tier"
            // Specifies a sorted list of fallback flavors that the plugin
            // can try to use when a dependency's matching dimension does
            // not include a "free" flavor. Specify as many
            // fallbacks as you like; the plugin selects the first flavor
            // that's available in the dependency's "tier" dimension.
            matchingFallbacks += listOf("demo", "trial")
        }
    }
}
Groovy
// In the app's build.gradle file.
android {
    defaultConfig{
    // Don't configure matchingFallbacks in the defaultConfig block.
    // Instead, specify fallbacks for a given product flavor in the
    // productFlavors block, as shown below.
  }
    flavorDimensions 'tier'
    productFlavors {
        paid {
            dimension 'tier'
            // Because the dependency already includes a "paid" flavor in its
            // "tier" dimension, you don't need to provide a list of fallbacks
            // for the "paid" flavor.
        }
        free {
            dimension 'tier'
            // Specifies a sorted list of fallback flavors that the plugin
            // can try to use when a dependency's matching dimension does
            // not include a "free" flavor. Specify as many
            // fallbacks as you like; the plugin selects the first flavor
            // that's available in the dependency's "tier" dimension.
            matchingFallbacks = ['demo', 'trial']
        }
    }
}
程式庫依附元件包含應用程式並未提供的版本維度。
舉例來說,程式庫依附元件包含「minApi」維度的變種版本,但您的應用程式僅含有「tier」維度的變種版本。在此情況下,當您建構「freeDebug」版本的應用程式時,外掛程式就無法判斷要使用「minApi23Debug」還是「minApi18Debug」版本的依附元件。
請注意,如果應用程式含有程式庫依附元件不含的版本維度,則沒有任何問題,因為外掛程式只會比對依附元件中維度的變種版本。舉例來說,如果依附元件不含 ABI 的維度,「freeX86Debug」版本的應用程式會使用「freeDebug」版本的依附元件。
在
defaultConfig區塊中,使用missingDimensionStrategy指定外掛程式從每個遺漏的維度中選取的預設變種版本,如以下範例所示。您也可以覆寫productFlavors區塊中的選項,讓每個變種版本都能針對遺漏的維度指定不同比對策略。Kotlin
// In the app's build.gradle.kts file.
android {
    defaultConfig{
    // Specifies a sorted list of flavors that the plugin can try to use from
    // a given dimension. This tells the plugin to select the "minApi18" flavor
    // when encountering a dependency that includes a "minApi" dimension.
    // You can include additional flavor names to provide a
    // sorted list of fallbacks for the dimension.
    missingDimensionStrategy("minApi", "minApi18", "minApi23")
    // Specify a missingDimensionStrategy property for each
    // dimension that exists in a local dependency but not in your app.
    missingDimensionStrategy("abi", "x86", "arm64")
    }
    flavorDimensions += "tier"
    productFlavors {
        create("free") {
            dimension = "tier"
            // You can override the default selection at the product flavor
            // level by configuring another missingDimensionStrategy property
            // for the "minApi" dimension.
            missingDimensionStrategy("minApi", "minApi23", "minApi18")
        }
        create("paid") {}
    }
}
Groovy
// In the app's build.gradle file.
android {
    defaultConfig{
    // Specifies a sorted list of flavors that the plugin can try to use from
    // a given dimension. This tells the plugin to select the "minApi18" flavor
    // when encountering a dependency that includes a "minApi" dimension.
    // You can include additional flavor names to provide a
    // sorted list of fallbacks for the dimension.
    missingDimensionStrategy 'minApi', 'minApi18', 'minApi23'
    // Specify a missingDimensionStrategy property for each
    // dimension that exists in a local dependency but not in your app.
    missingDimensionStrategy 'abi', 'x86', 'arm64'
    }
    flavorDimensions 'tier'
    productFlavors {
        free {
            dimension 'tier'
            // You can override the default selection at the product flavor
            // level by configuring another missingDimensionStrategy property
            // for the 'minApi' dimension.
            missingDimensionStrategy 'minApi', 'minApi23', 'minApi18'
        }
        paid {}
    }
}
詳情請參閱 Android Gradle 外掛程式 DSL 參考資料中的 matchingFallbacks 和 missingDimensionStrategy。
指定簽署設定
除非您已明確定義這個版本的簽署設定,否則 Gradle 不會簽署 release 建構類型的 APK 或 AAB。如果還沒有簽署金鑰,可以使用 Android Studio 產生上傳金鑰和 KeyStore。
如要透過 Gradle 建構設定,手動指定 release 建構類型的簽署設定,請按照下列步驟操作:
- 建立 KeyStore。「KeyStore」是包含一組私密金鑰的二進位檔案。您必須將 KeyStore 存放在安全的地方。
- 建立私密金鑰。「私密金鑰」可用於簽署要發布的應用程式,而且該金鑰一律不會包含在應用程式中,也不會透露給未經授權的第三方。
-
將簽署設定新增至模組層級的
build.gradle.kts檔案:Kotlin
...
android {
    ...
    defaultConfig {...}
    signingConfigs {
        create("release") {
            storeFile = file("myreleasekey.keystore")
            storePassword = "password"
            keyAlias = "MyReleaseKey"
            keyPassword = "password"
        }
    }
    buildTypes {
        getByName("release") {
            ...
            signingConfig = signingConfigs.getByName("release")
        }
    }
}
Groovy
...
android {
    ...
    defaultConfig {...}
    signingConfigs {
        release {
            storeFile file("myreleasekey.keystore")
            storePassword "password"
            keyAlias "MyReleaseKey"
            keyPassword "password"
        }
    }
    buildTypes {
        release {
            ...
            signingConfig signingConfigs.release
        }
    }
}
注意:最好不要在建構檔案中加入發布金鑰和 KeyStore 的密碼,因為這並不安全。請改為設定建構檔案,從環境變數取得這些密碼,或者讓建構程序提示您輸入這些密碼。
如要從環境變數取得這些密碼,請使用下列程式碼:
Kotlin
storePassword = System.getenv("KSTOREPWD")
keyPassword = System.getenv("KEYPWD")
Groovy
storePassword System.getenv("KSTOREPWD")
keyPassword System.getenv("KEYPWD")
此外,您也可以從本機屬性檔案載入 KeyStore。基於安全考量,請勿將這個檔案加入來源控制系統,而是在本機為每位開發人員設定該檔案。詳情請參閱「移除建構檔案中的簽署資訊」。
完成這項程序後,即可發行應用程式並發布至 Google Play。
警告:請將 KeyStore 和私密金鑰妥善保存在安全的地方,並確保已經建立安全備份。如果您使用 Play 應用程式簽署功能,當上傳金鑰遺失時,可以透過 Play 管理中心要求重設。如果您發布的應用程式未使用 Play 應用程式簽署功能 (適用於 2021 年 8 月前建立的應用程式),而且已經遺失應用程式簽署金鑰,則您無法發布任何更新,因為您必須始終使用相同的金鑰對應用程序的所有版本進行簽署。
簽署 Wear OS 應用程式
發布 Wear OS 應用程式時,您必須使用相同金鑰簽署智慧手錶 APK 和選擇性提供的手機 APK。如要進一步瞭解如何封裝及簽署 Wear OS 應用程式,請參閱「封裝及發布 Wear 應用程式」。